
COBBLESTONE SOFTWARE
Contract Insight — User Guide
Starting an IntelliSign Process
Module: Document Collaboration Gateway › IntelliSign › Starting an IntelliSign Process
Note: Each procedure in this guide begins at the Contract Insight homepage, so any section can be followed on its own. Custom fields are configurable, so the exact field list on a contract category record may vary between environments.
1. Overview
IntelliSign is Contract Insight's built-in electronic signature tool. A process is started from the record that holds the document — Actions → IntelliSign — and opens on the record's Negotiation Processes page, where + New signature process walks you through choosing the document, adding signers, placing signature fields and starting the process. Nothing is sent to signers until you click Start process. Once running, the process appears on Negotiation Processes as a Signatures Process alongside every other signature process, and is tracked through the same console (Status, Groups and participants, Files, Pause / End process / Finalize).
2. Key Elements
- Actions → IntelliSign (Document Processing group) on a record: opens Negotiation Processes filtered to that record's signature processes.
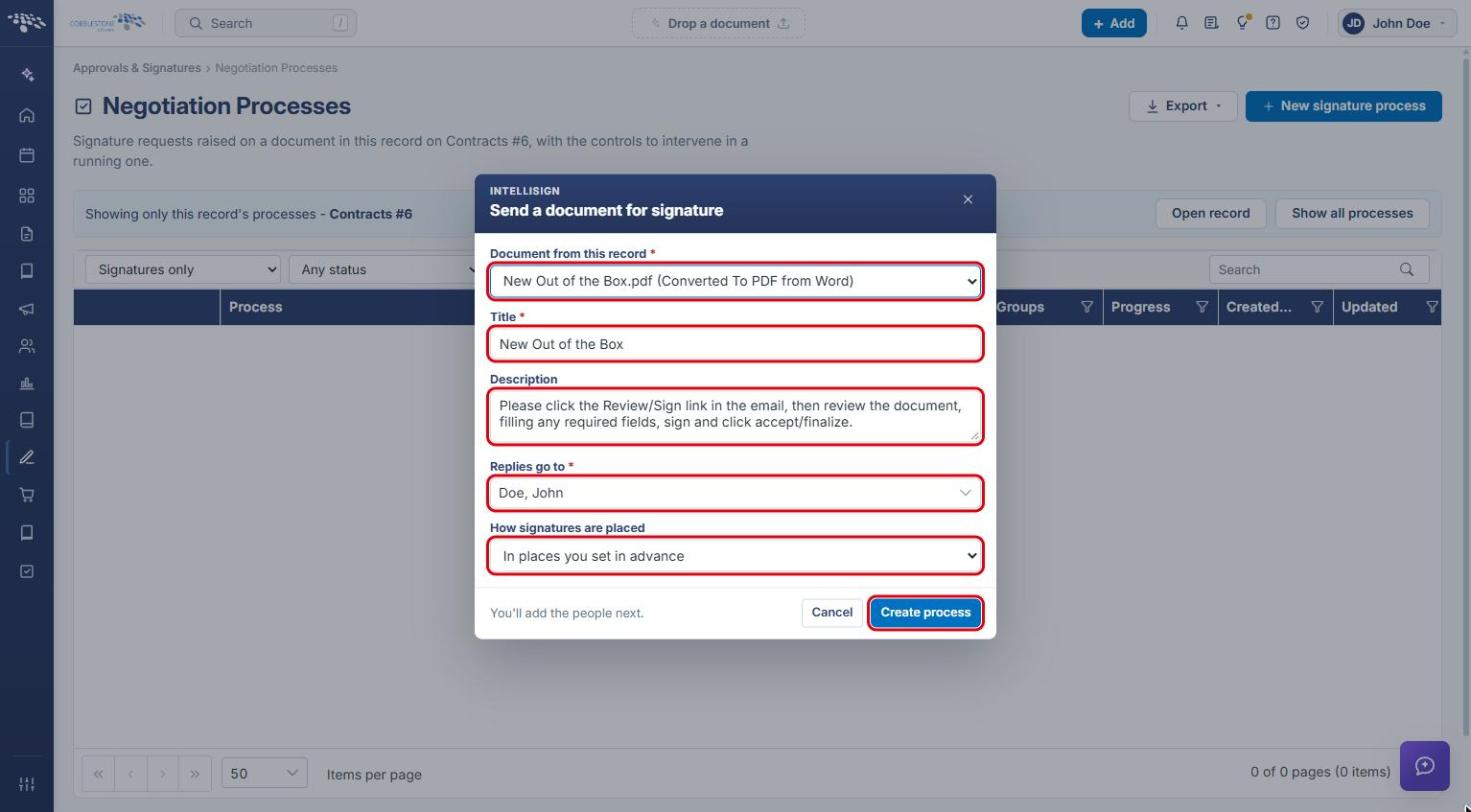
- + New signature process: opens the Send a document for signature window — Document from this record, Title, Description, Replies go to and How signatures are placed.
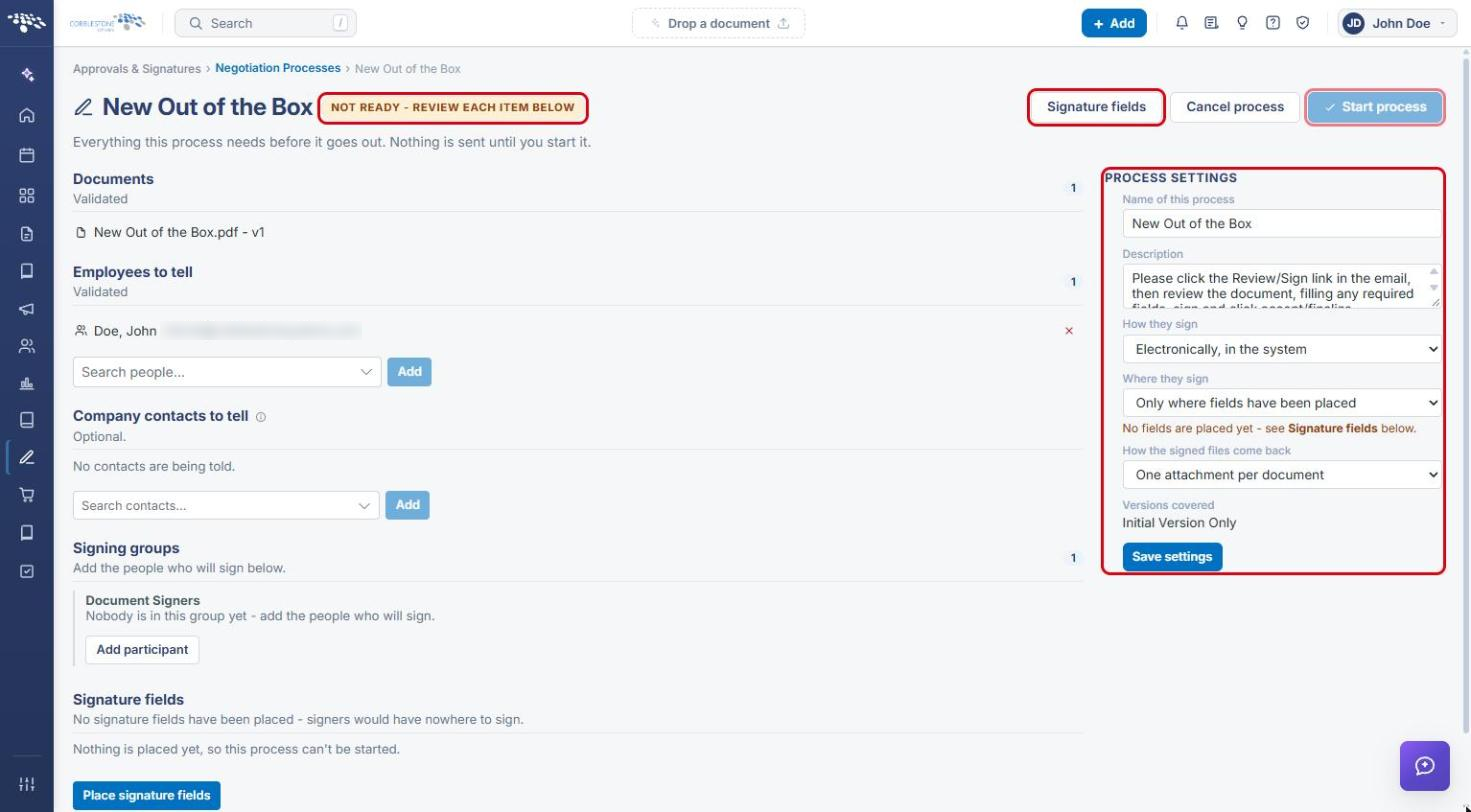
- Process setup page: shows a Not ready badge until every item is complete. Lists Documents, Employees to tell, Company contacts to tell, Signing groups and Signature fields, with Process Settings (How they sign, Where they sign, How the signed files come back) on the right.
- Signature fields editor: place Signature, Text and Date fields on the document for each signer, or use Suggest fields. Changes save automatically.
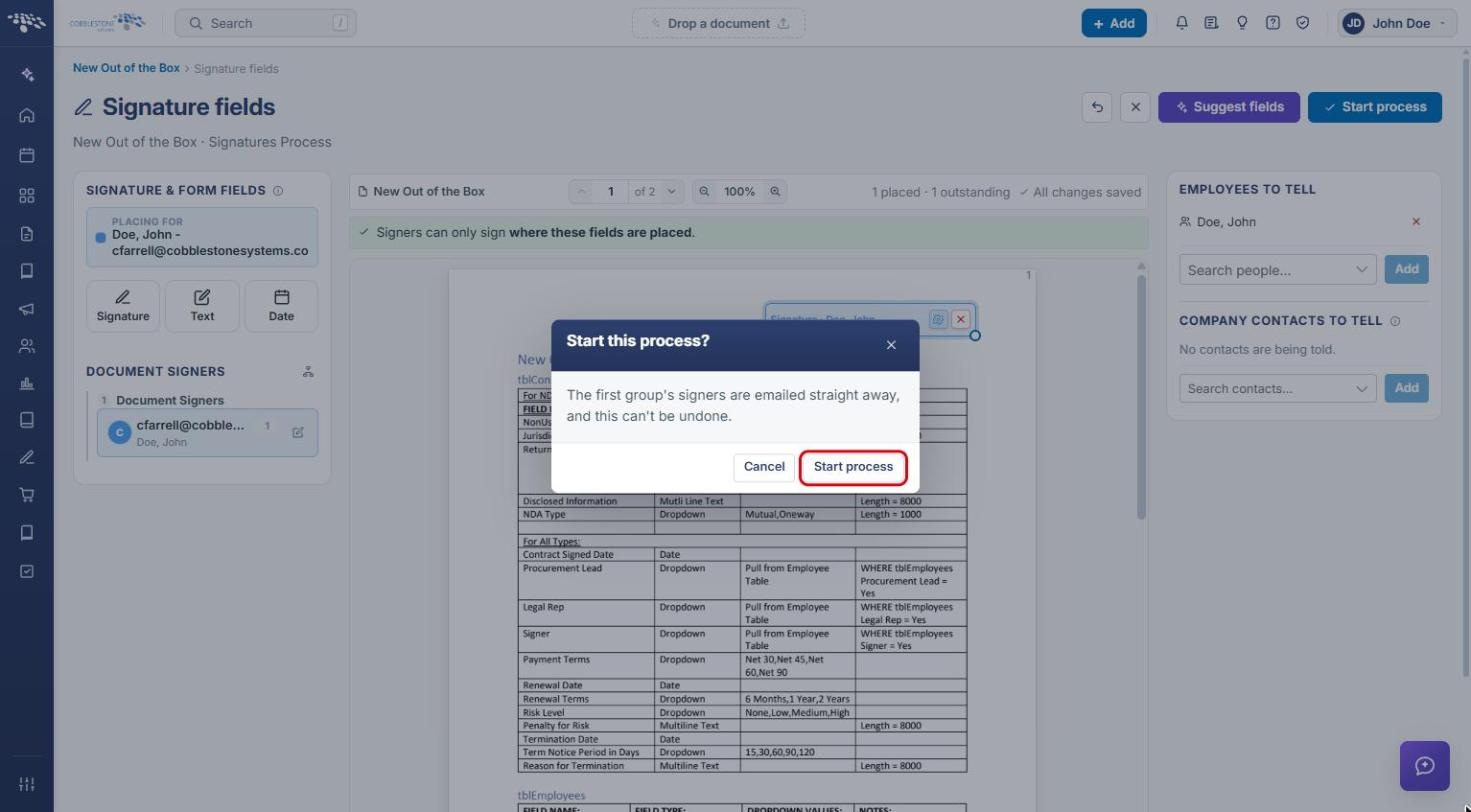
- Start process: emails the first signing group straight away. This cannot be undone.
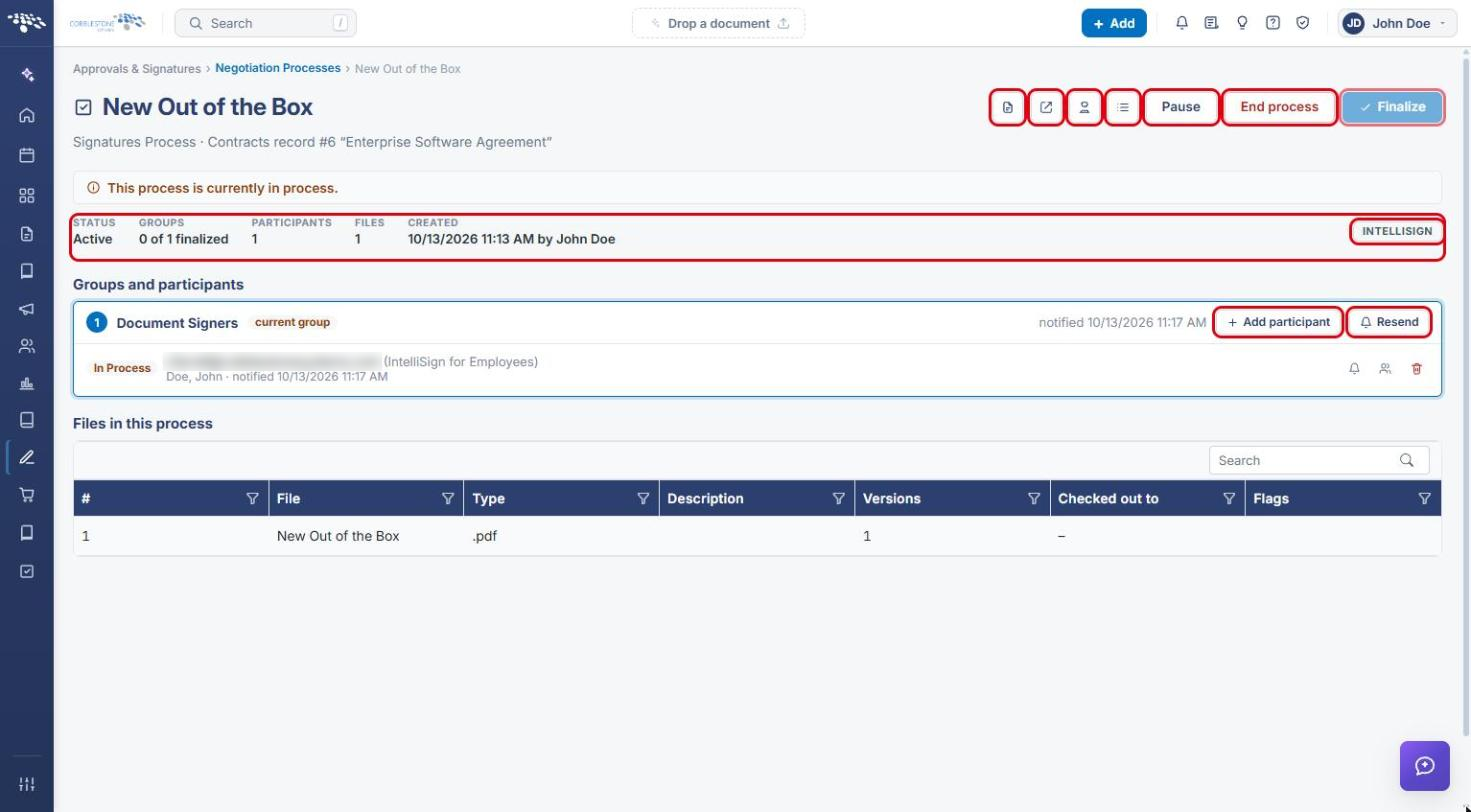
- Process console: Status, Groups, Participants, Files and Created details, plus Add participant, Resend, Pause, End process and Finalize.
3. Navigating to the Record
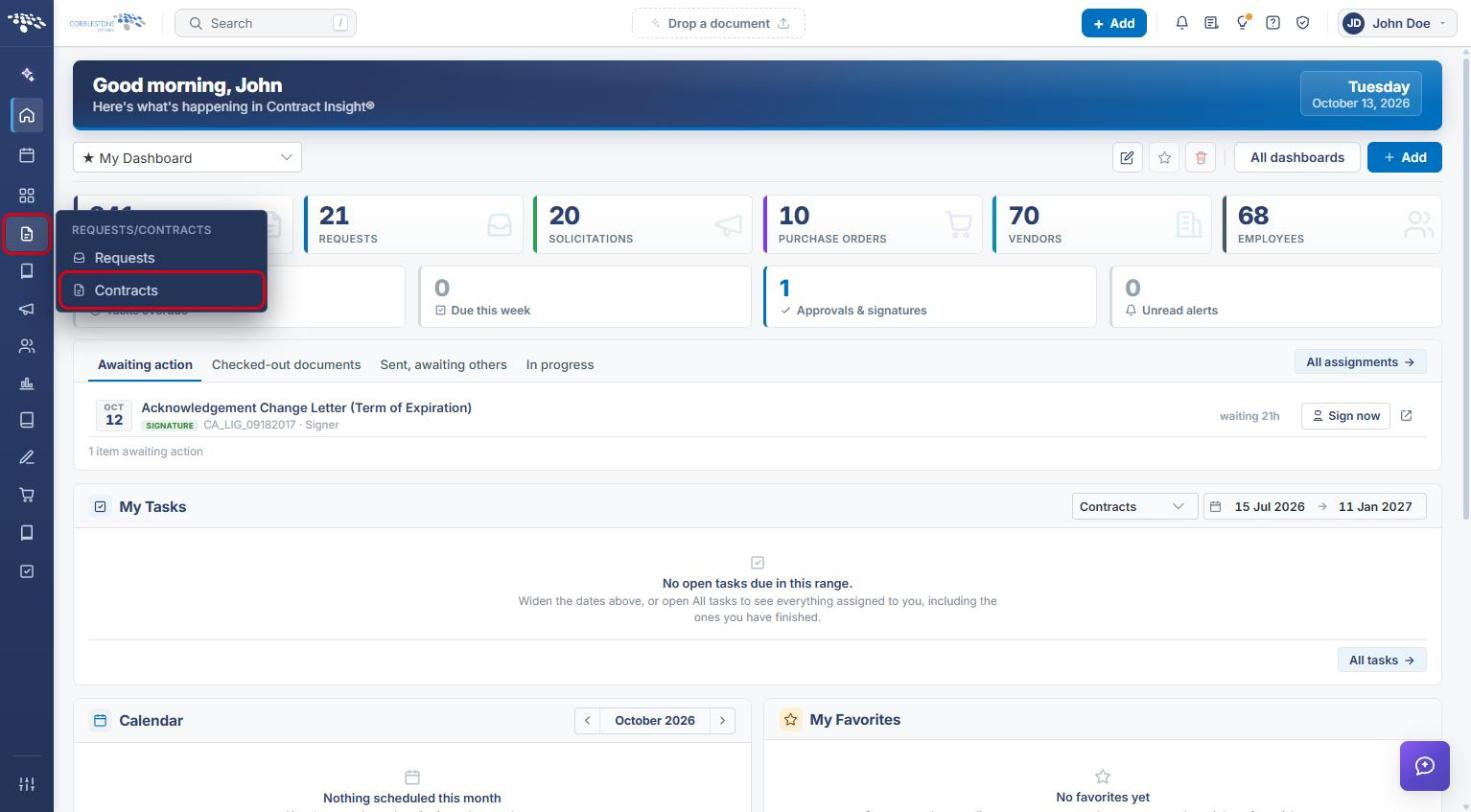
- From the Contract Insight homepage, click the Requests/Contracts icon in the left navigation menu.
- Select Contracts.
- Locate the contract that holds the document to be signed (use Search if needed) and click Manage on its row to open the record.
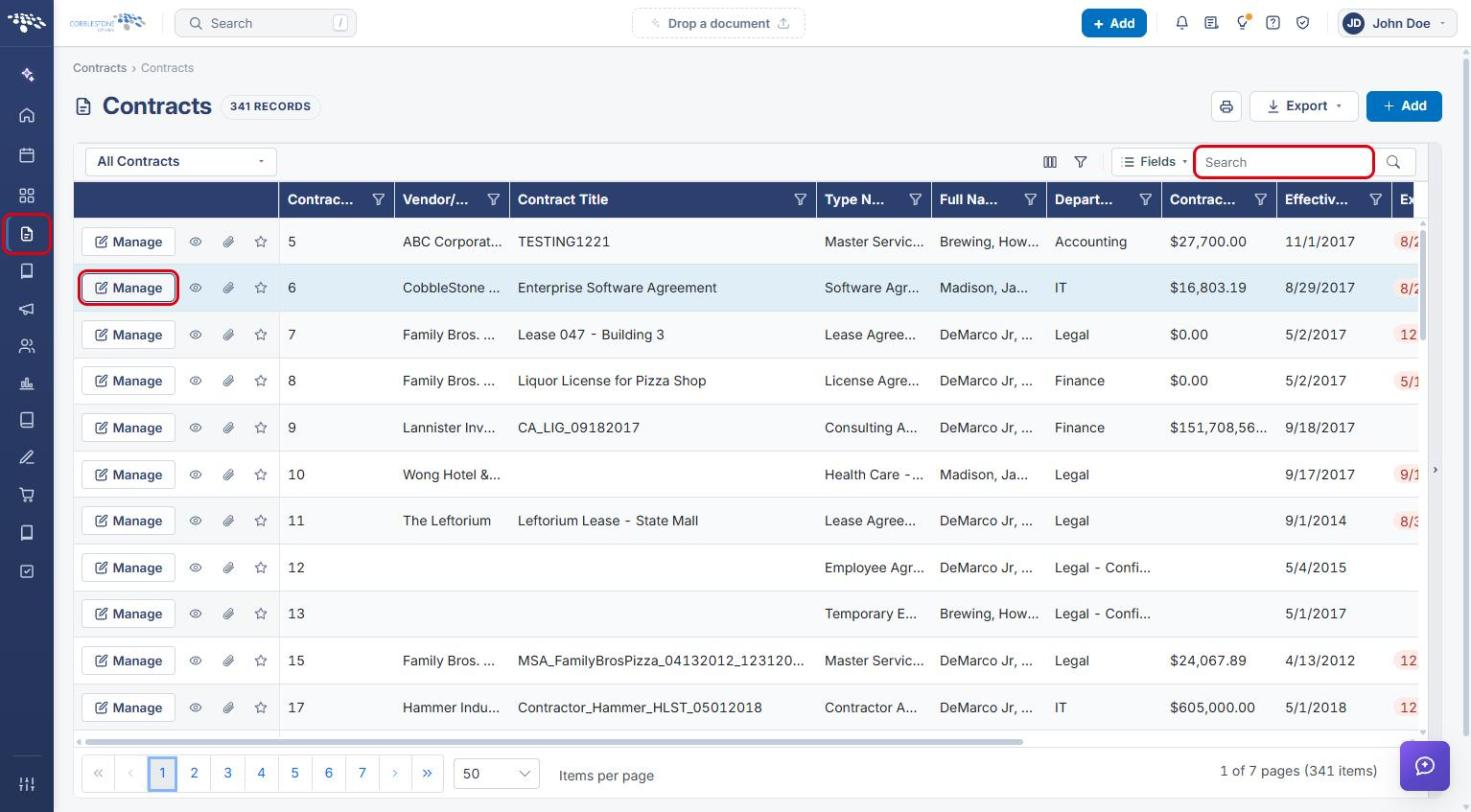
Note: IntelliSign is available from the Actions menu of other record types as well (for example Requests or Employees). The steps below are the same once the record is open.
4. Starting an IntelliSign Process
4a. Opening IntelliSign from the Record
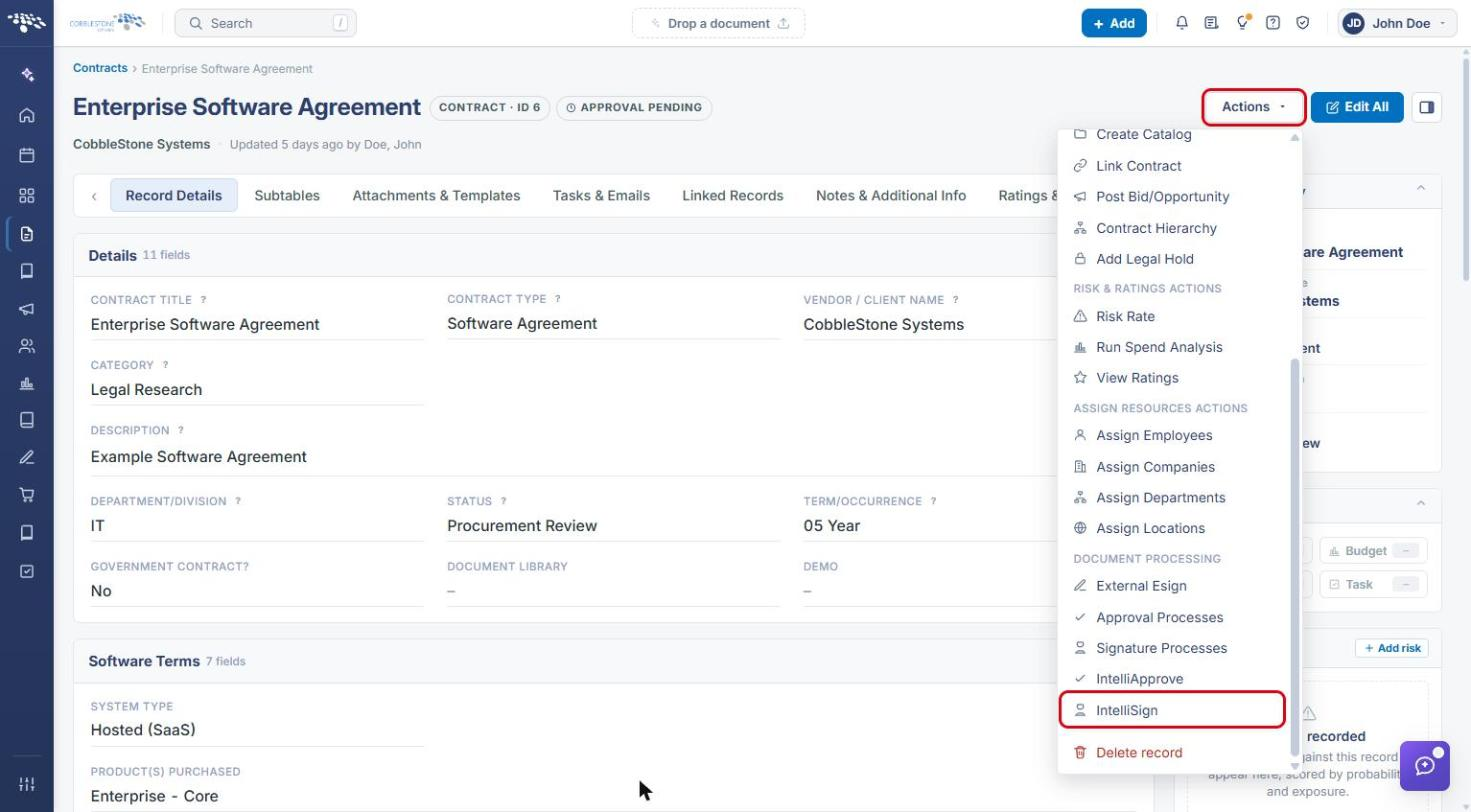
- On the record, click Actions in the top-right corner.
- Scroll to the Document Processing group and click IntelliSign.
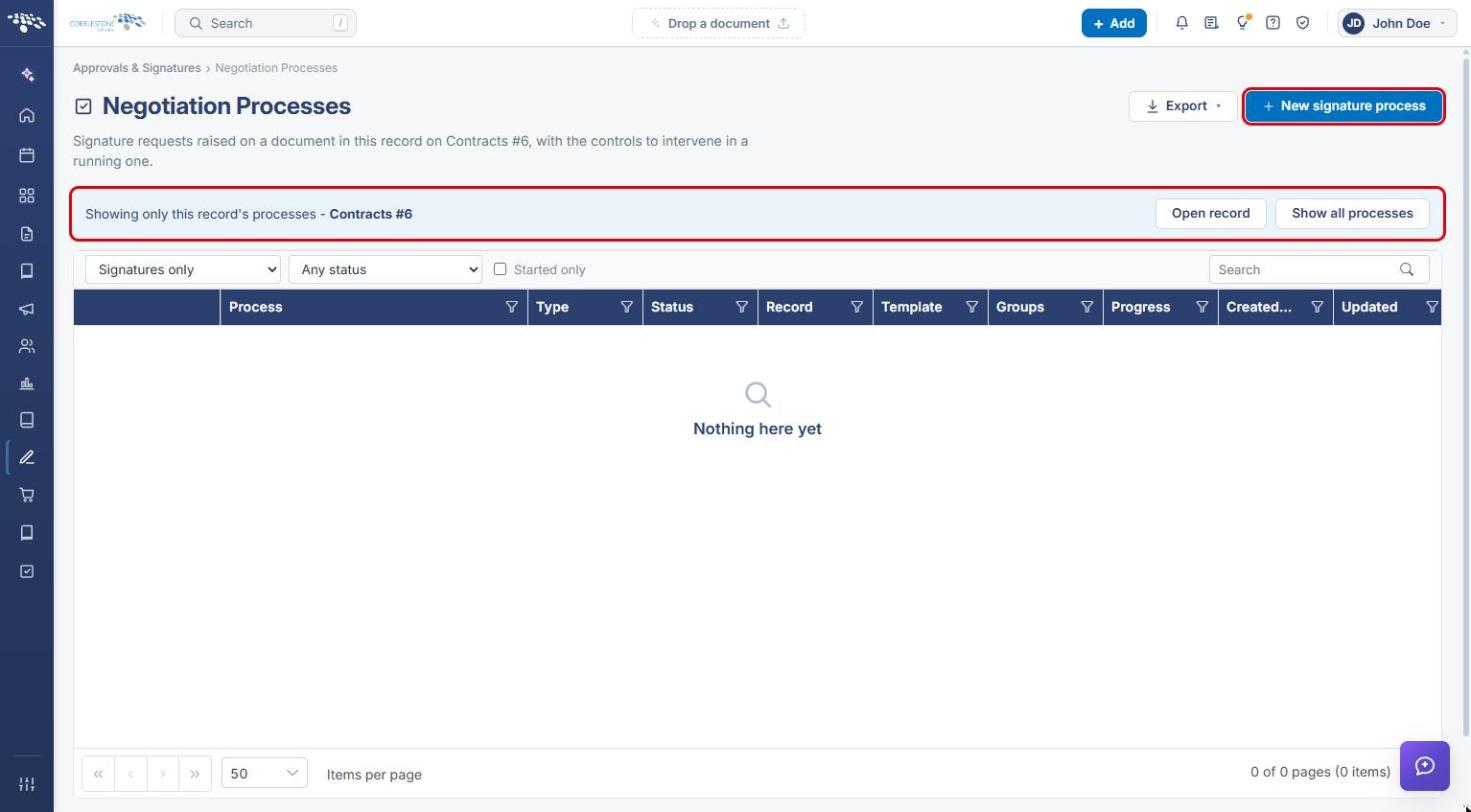
- The Negotiation Processes page opens, showing only this record's processes. Click + New signature process.
4b. Choosing the Document
- In the Send a document for signature window, select the Document from this record to be signed. The Title and Description fill in automatically and can be edited.
- Confirm who Replies go to.
- Choose How signatures are placed: In places you set in advance or Anywhere the signer chooses.
- Click Create process. You'll add the people next — nothing is sent yet.
5. Setting Up the Process
5a. Reviewing the Process Setup Page
The setup page lists everything the process needs before it goes out. A Not ready – review each item below badge is shown until every section is complete, and Start process stays disabled until then.
- Review the Documents and Employees to tell sections. Use Search people… or Search contacts… to add anyone else who should be notified.
- In Process Settings, confirm the process name and description, then set:
- How they sign: Electronically, in the system, or On paper (they download, sign and upload it back).
- Where they sign: Only where fields have been placed, or Anywhere on the document.
- How the signed files come back: One attachment per document, or All of them as a single PDF.
- Click Save settings if you changed anything.
5b. Adding Signers
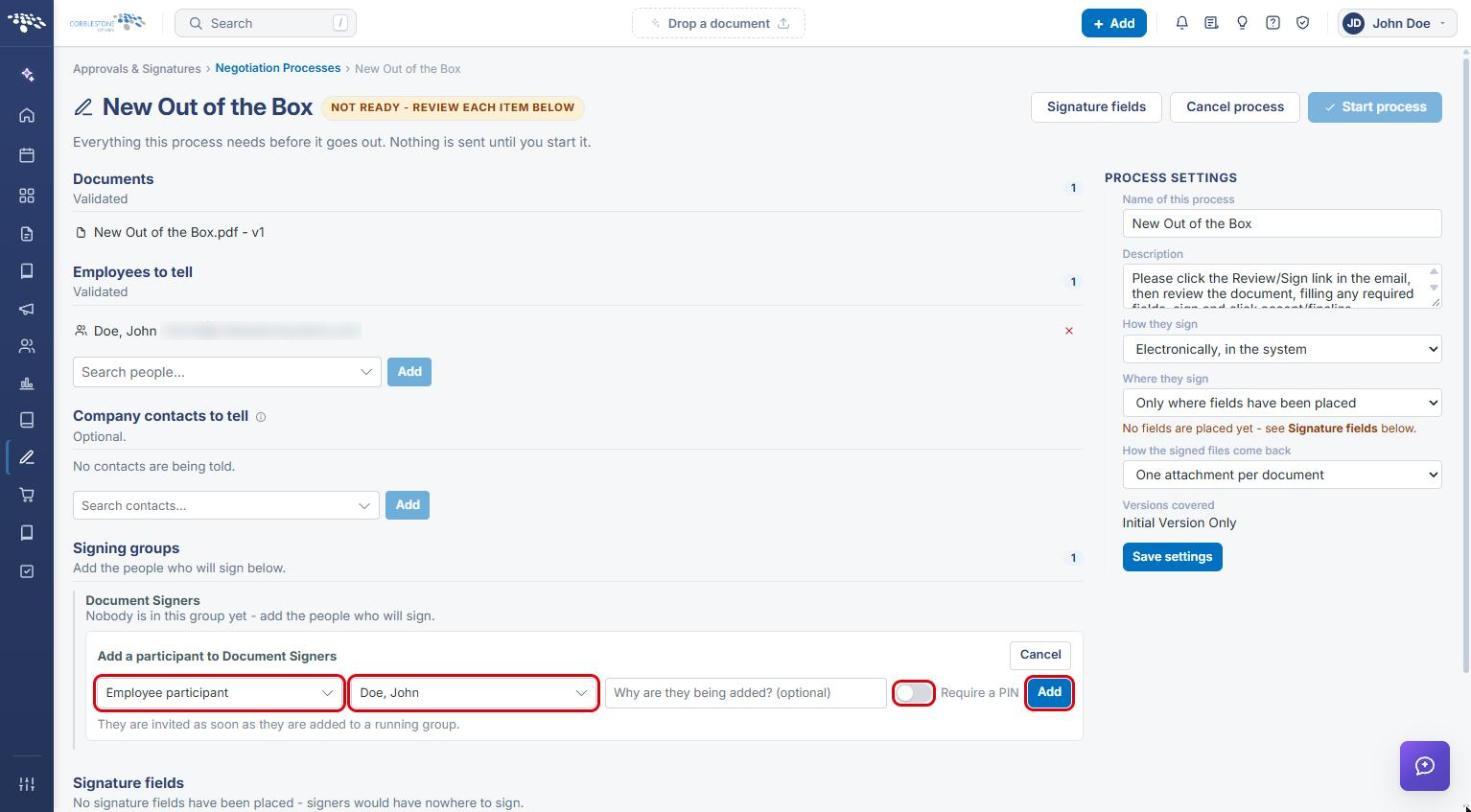
- Under Signing groups, click Add participant in the group (for example, Document Signers).
- Choose the participant type: External participant, Employee participant or Company contact participant.
- Select or enter the person (for an external participant, enter their full name and e-mail address). Optionally add a reason and turn on Require a PIN.
- Click Add. Repeat for each signer.
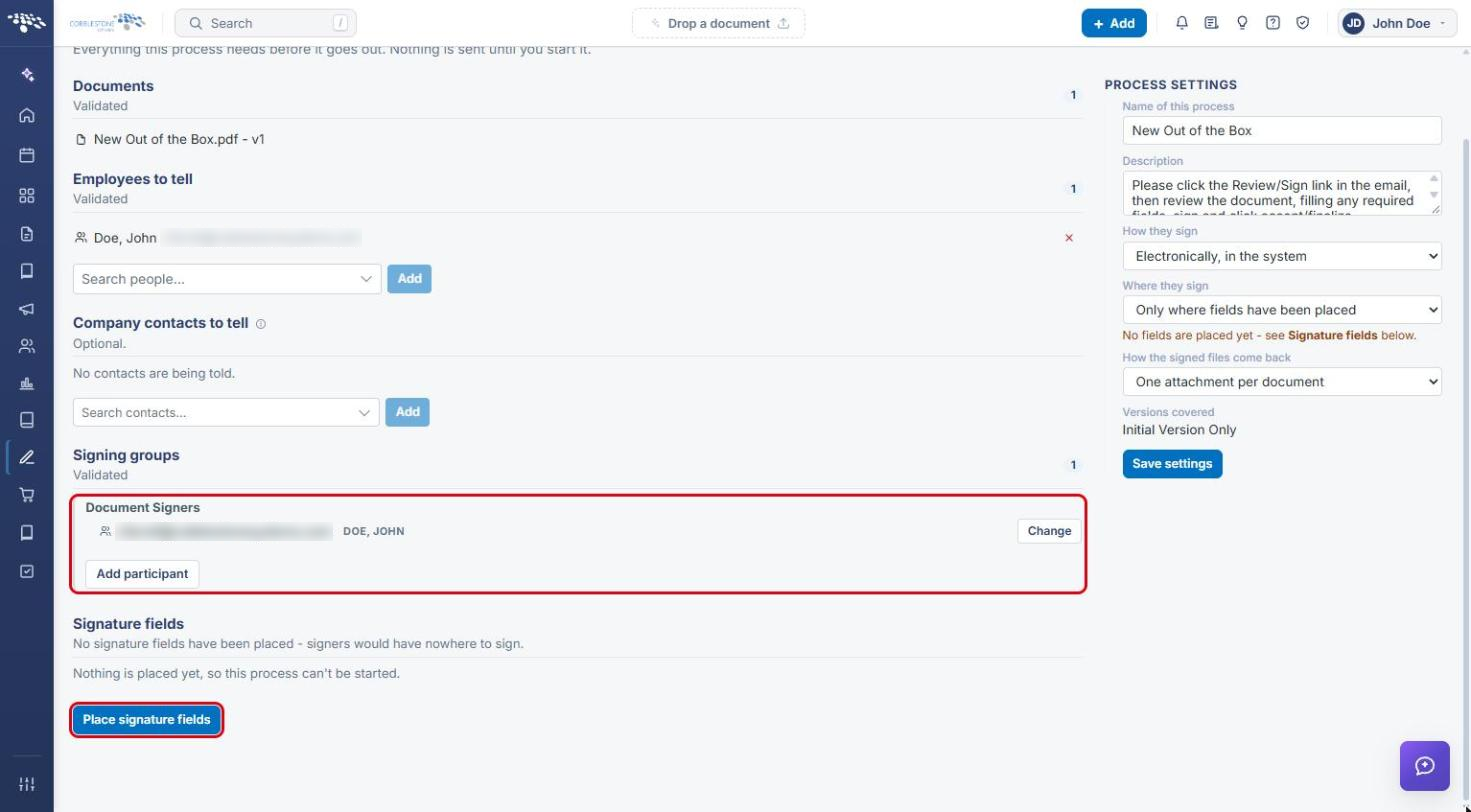
- The signer is listed under the group and the section shows Validated. If signatures are placed in advance, click Place signature fields.
5c. Placing Signature Fields
- In the Signature fields editor, confirm the signer under Placing for (select another signer under Document Signers to switch).
- Click Signature, Text or Date, then click on the document where the field should go. Use the page controls to move between pages, or click Suggest fields to have fields suggested for you.
- Check the counter (for example, 1 placed · 1 outstanding). Changes save automatically.
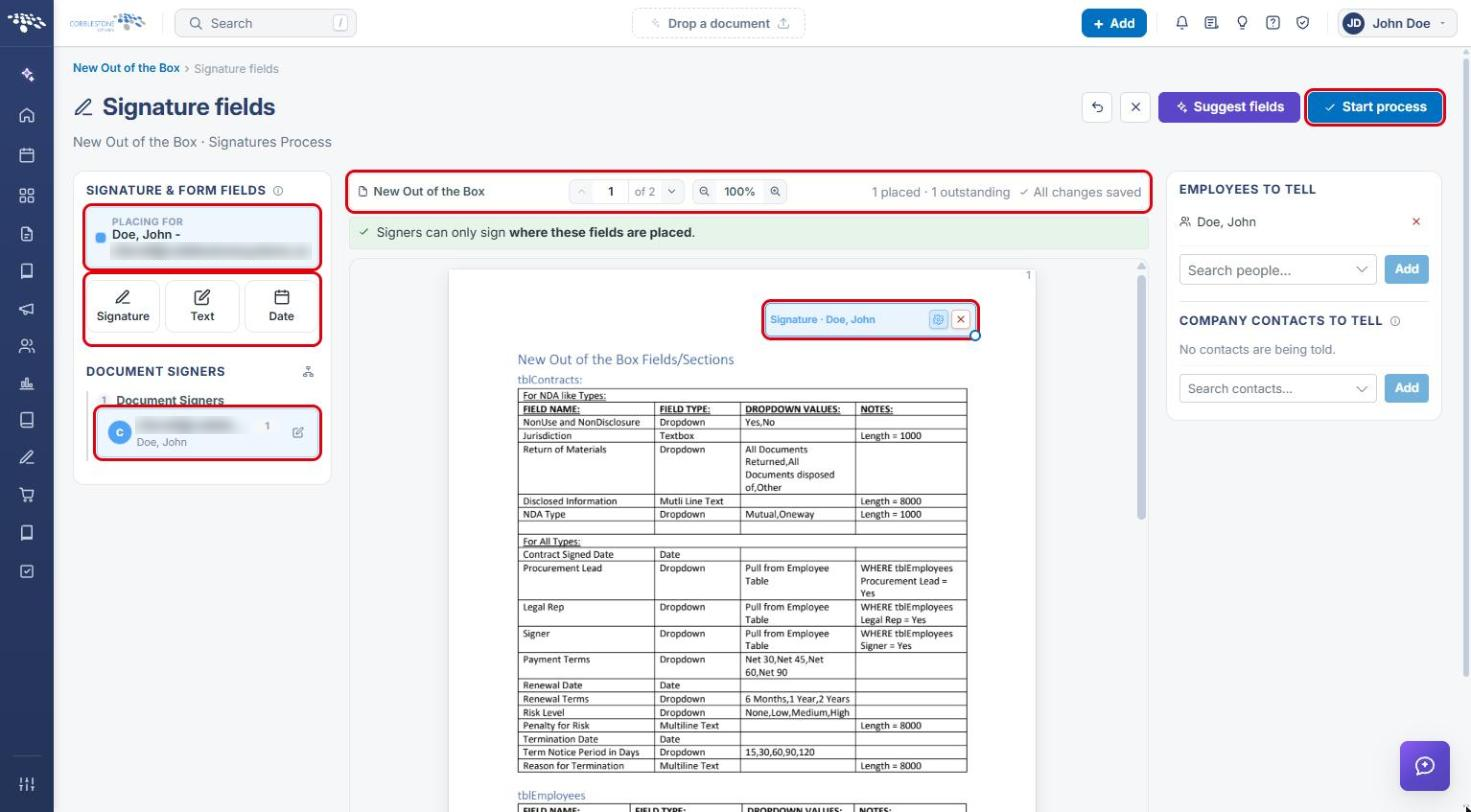
Note: When Where they sign is set to Only where fields have been placed, at least one signature field must be placed before the process can start.
6. Starting the Process
- Click Start process (available on the Signature fields editor and the process setup page once everything is ready).
- In the Start this process? window, click Start process. The first group's signers are emailed straight away, and this can't be undone.
- The process console opens. Review the status details (Status, Groups, Participants, Files, Created) and the IntelliSign tag. From here you can:
- Use Add participant or Resend on a signing group.
- Use the header icons to open the record, open the process on the signing portal, view the signature receipt, or place fields.
- Click Pause or End process to intervene, or Finalize once signing is complete.
7. Tracking IntelliSign Processes
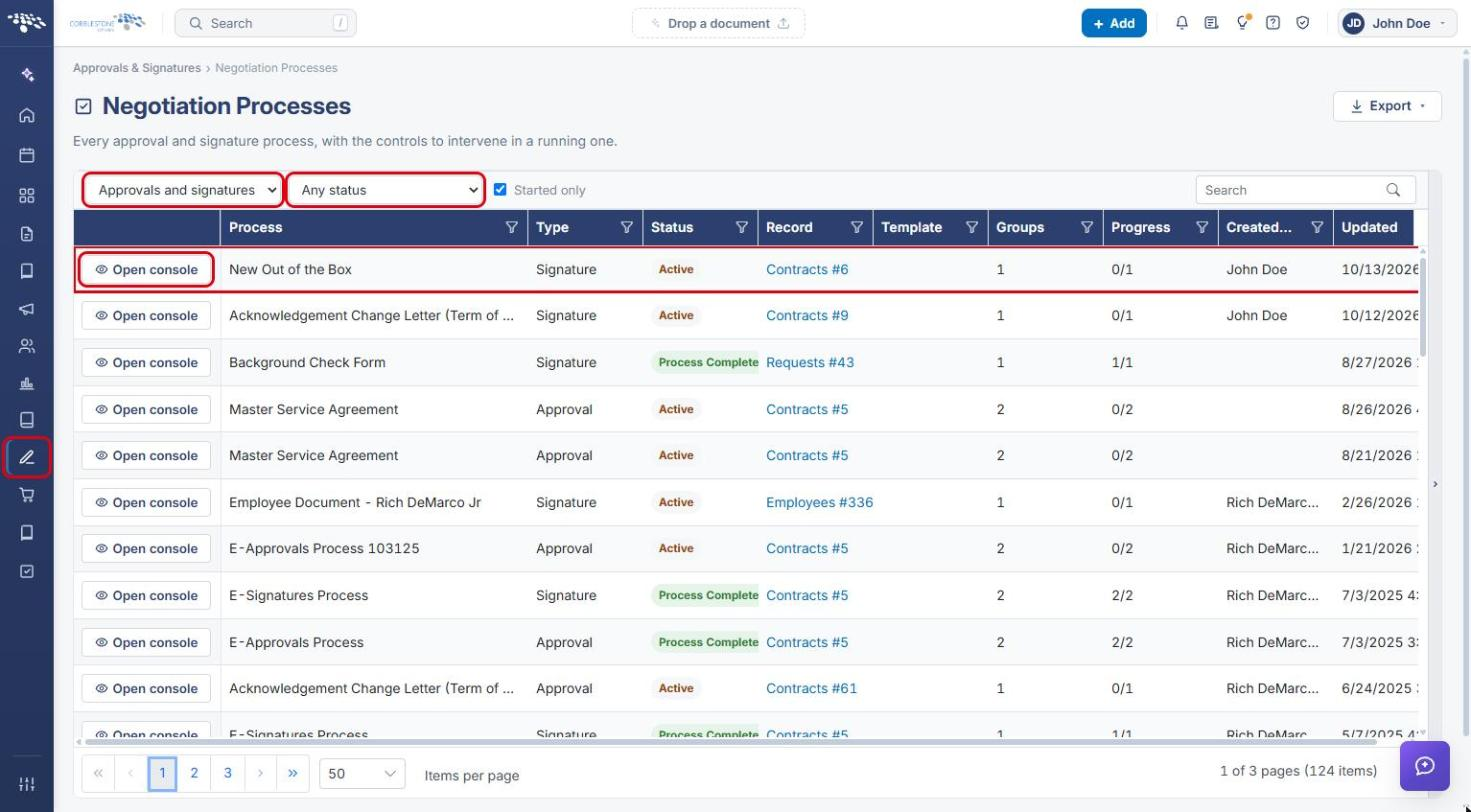
- From the Contract Insight homepage, click the Approvals & Signatures icon in the left navigation menu and select Negotiation Processes.
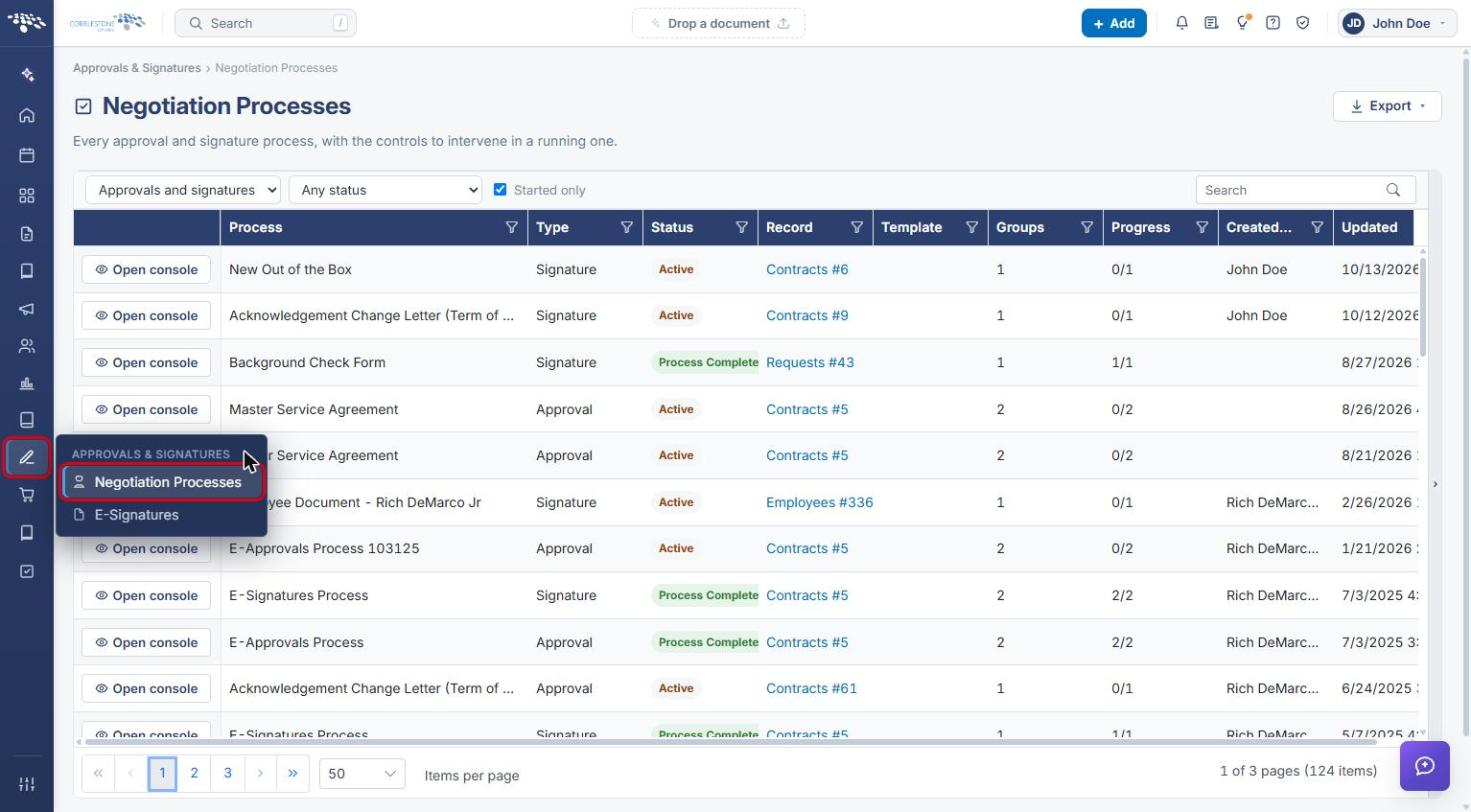
- Use the type and status filters (and Started only) to narrow the list. IntelliSign processes are listed with the type Signature.
- Click Open console on a row to view and manage that process.
8. Quick Reference Summary
| Task | How to Complete It |
|---|---|
| Open a contract record | Requests/Contracts → Contracts → Manage on the row. |
| Start IntelliSign | Record → Actions → IntelliSign → + New signature process. |
| Choose the document | Select Document from this record, confirm Title, Replies go to and How signatures are placed → Create process. |
| Set process options | Process Settings → How they sign, Where they sign, How the signed files come back → Save settings. |
| Add a signer | Signing groups → Add participant → choose type and person → Add. |
| Place signature fields | Place signature fields → choose Signature, Text or Date → click on the document. |
| Send for signature | Start process → confirm Start process. |
| Track or manage a process | Approvals & Signatures → Negotiation Processes → Open console (Pause, End process, Finalize, Resend). |
