
COBBLESTONE SOFTWARE
Contract Insight — User Guide
Setting Signature Place Holders
Module: Document Collaboration Gateway › IntelliSign › Setting Signature Place Holders
Note: Each procedure in this guide begins at the Contract Insight homepage, so any section can be followed on its own. Custom fields are configurable, so the exact field list on a contract category record may vary between environments.
1. Overview
Signature placeholders are set directly on the document from the Signature fields screen: choosing Signature, Date, or Text and clicking a spot on the rendered document drops that placeholder there, ready to be filled in when the signer submits their signature.
The screen describes itself as “Place where each participant signs before the document goes out.” Once fields are placed, signers can only sign where those fields are. The screen saves as you work, so every placement, move, and removal is saved the moment it happens.
2. Key Elements
- The Signature & Form Fields panel offers Signature, Text, and Date placeholder types.
- Placeholders are positioned directly on the rendered document pages.
- Placing for shows which signer the next field belongs to. Document Signers lists each signing group and signer, with a count of fields placed for each.
- The status line (for example, 1 placed · 1 outstanding) and All changes saved confirm progress and auto-save.
- Each placed field has a gear for Field settings, an × to remove it, and a handle to resize it.
- Suggest fields and undo sit at the top right. Page and zoom controls sit above the document.
- Employees to tell and Company contacts to tell list the people to be told about the document.
3. Navigating to a Signature Process
- From the Contract Insight homepage, click the Approvals & Signatures icon in the left navigation bar.
- Select Negotiation Processes.
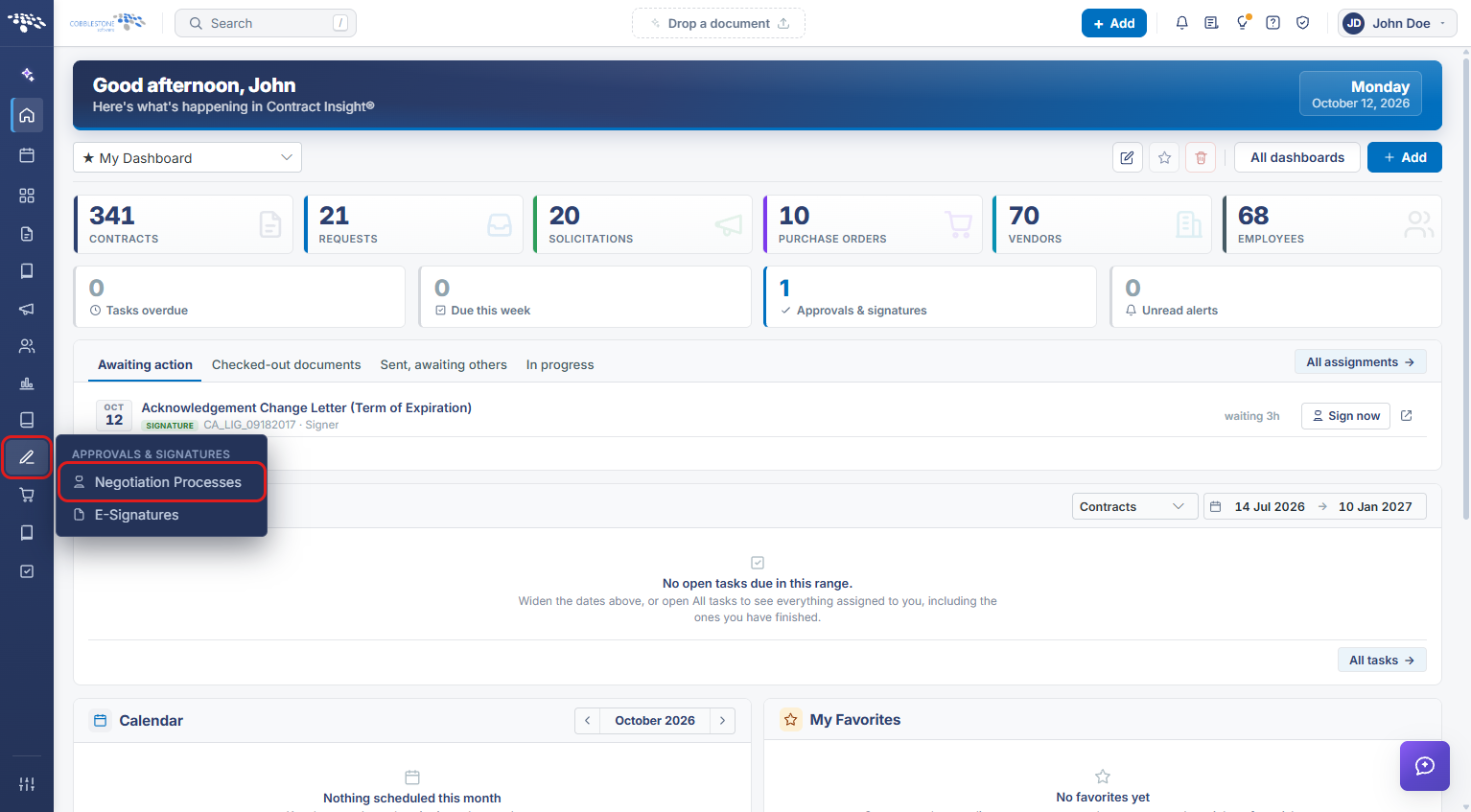
- Find the signature process with the filters or the Search box. Set the type filter to Signatures only to narrow the list.
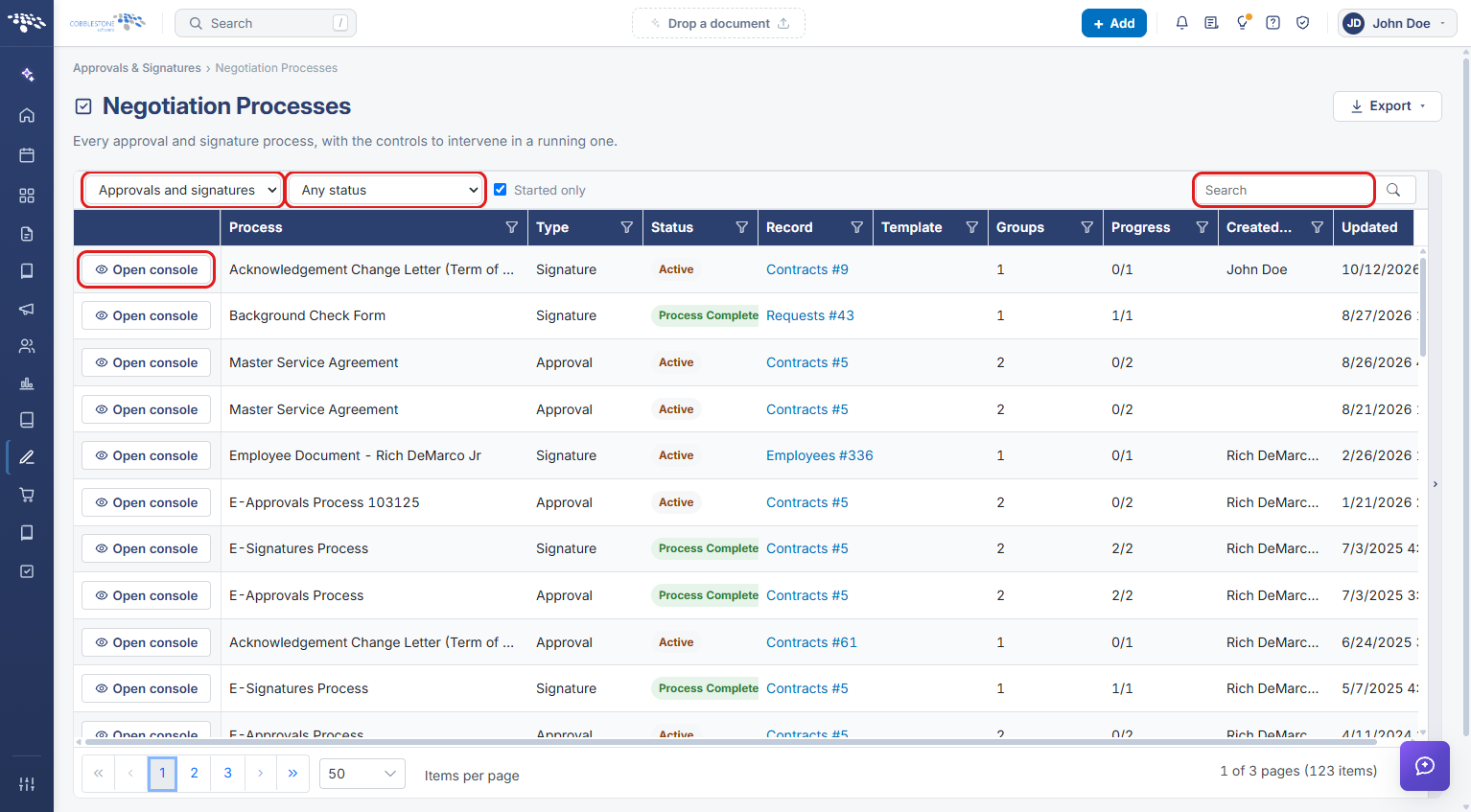
- Click Open console on the process row.
4. Opening the Signature Fields Screen
4a. From the Process Console
- Open the signature process console (see Section 3) and confirm it is a Signatures Process.
- Check Groups and participants to see who will sign. Fields are placed for these signers.
- Click the Place fields icon at the top right (“pre-define where each participant signs”).
4b. From a Merged Document
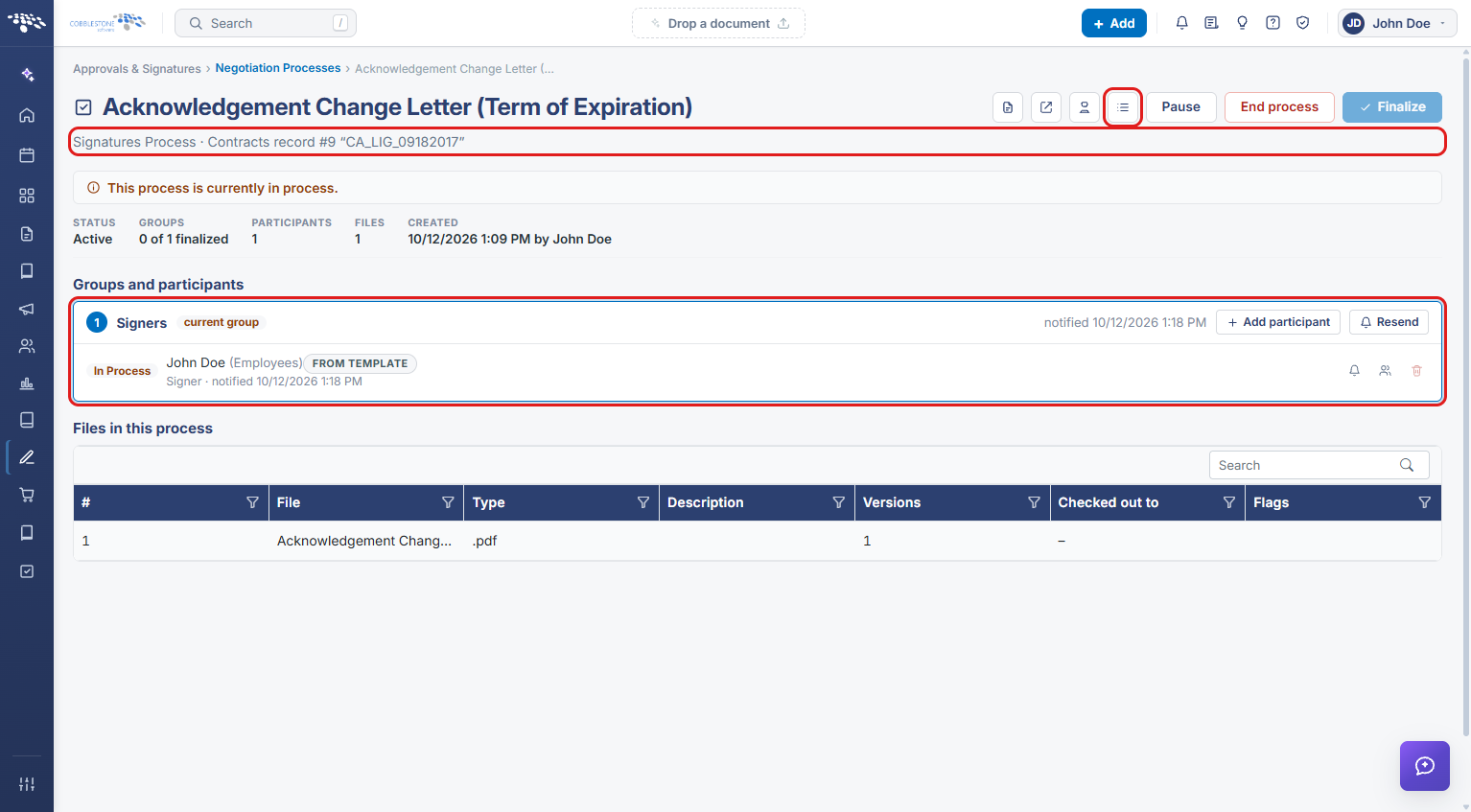
- From the homepage, click the Administration icon and open Merged Documents.
- Click Open on the document's row.
- Click Signature fields at the top right of the document page.
5. Placing Signature, Text, and Date Fields
- On the Signature fields screen, check Placing for to see which signer the next field is for. To place fields for a different signer, click their name under Document Signers.
- In the Signature & Form Fields panel, click Signature, Text, or Date.
- Click the spot on the document where the field should go. The field appears labeled with its type and signer, for example Signature · John Doe.
- Repeat for each field and signer. Use the status line (for example, 1 placed · 1 outstanding) to track what is left, and the count next to each signer to see how many fields they have.
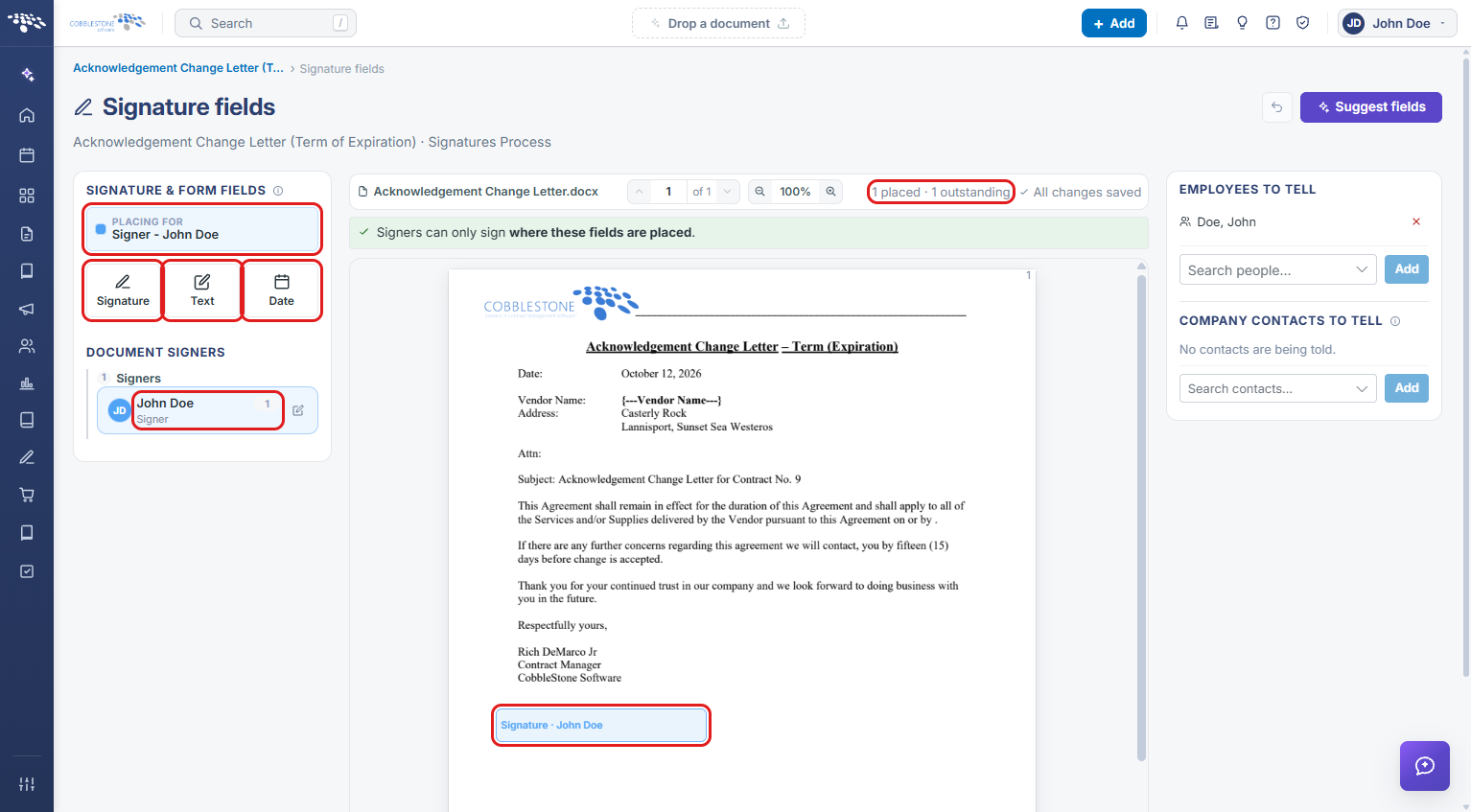
Note: Once at least one field is placed, signers can only sign where the fields are. Remove every field and signing goes back to anywhere on the document.
6. Adjusting Fields and Notifications
- To move a field, drag it. To resize it, drag the handle at its corner.
- To change a field, click the gear on the field or double-click it to open Field settings. Click the × on the field to remove it.
- Use the undo button at the top right to reverse the last change. Click Suggest fields to have fields proposed for you.
- Use the page controls and zoom controls above the document to move between pages and resize the view.
- To hand a signer's part to someone else, click the edit icon next to the signer under Document Signers.
- Under Employees to tell and Company contacts to tell, search for a person and click Add. Click the × next to a name to take them off the list.
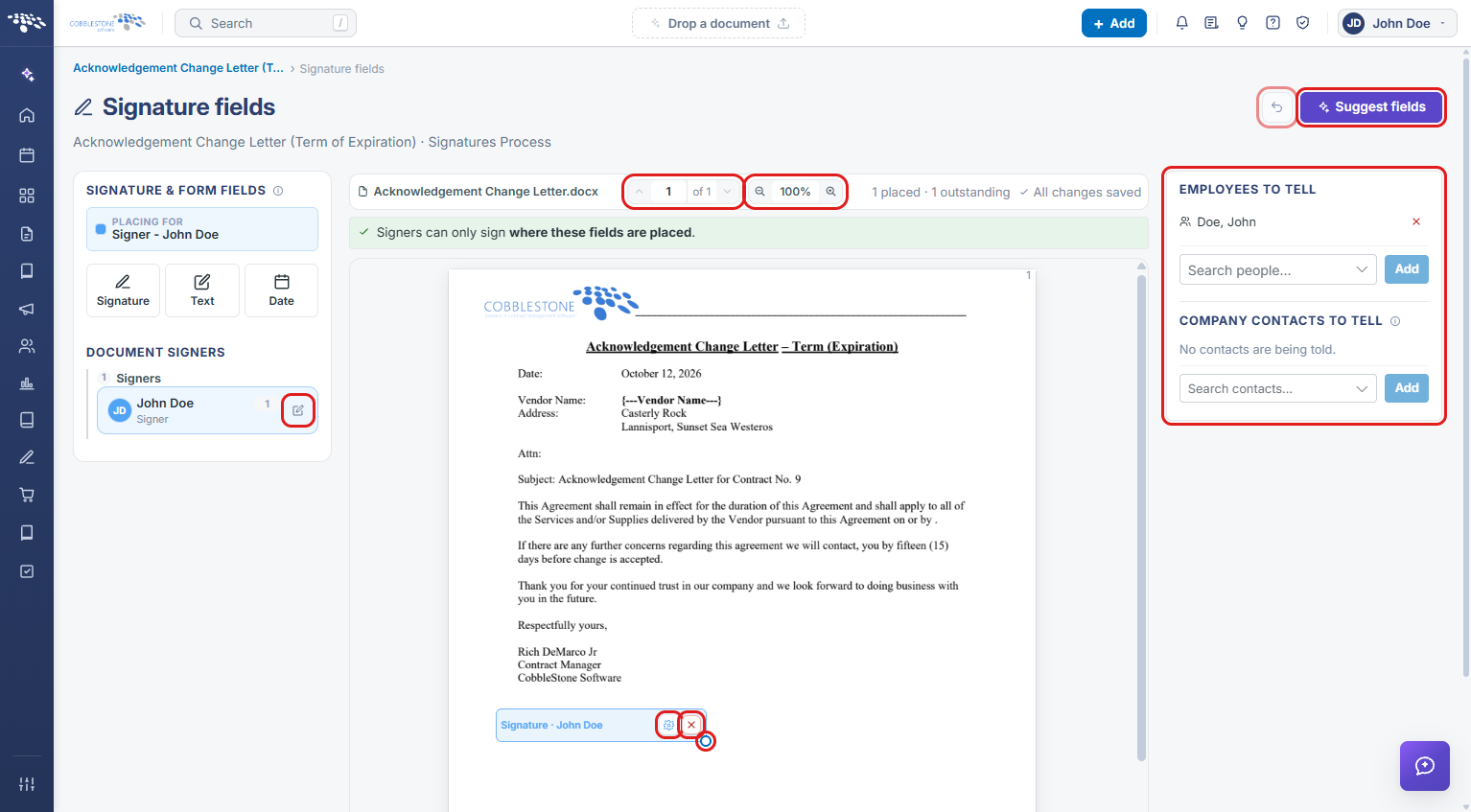
Note: There is no Save button. Changes save as you make them, and the header shows All changes saved.
7. Quick Reference Summary
| Task | How to Complete It |
|---|---|
| Open the Signature fields screen | Approvals & Signatures → Negotiation Processes → Open console → Place fields icon. Or: Merged Documents → Open → Signature fields. |
| Choose who a field is for | Click the signer under Document Signers and check Placing for. |
| Place a field | Click Signature, Text, or Date → click the spot on the document. |
| Move or resize a field | Drag the field, or drag its corner handle. |
| Edit or remove a field | Gear (or double-click) for Field settings; × to remove. |
| Tell people about the document | Employees to tell / Company contacts to tell → search → Add. |