
COBBLESTONE SOFTWARE
Contract Insight — User Guide
IntelliSign Process from Standard Packages
Module: Document Collaboration Gateway › IntelliSign › IntelliSign Process from Standard Packages
Note: Each procedure in this guide begins at the Contract Insight homepage, so any section can be followed on its own. Custom fields are configurable, so the exact field list on a contract category record may vary between environments.
1. Overview
A Standard Package is a shared signing process that many document templates can follow. Packages are managed in Administration → Approval & Signing Processes (“Routing that many document templates can share, instead of each carrying its own”). An administrator builds the signing steps and signers once; every Document Package template that follows the package copies those steps onto each document generated from it. From the generated package on a record, a user then sets up the IntelliSign signature process, reviews the signers, and creates the process.
2. Key Elements
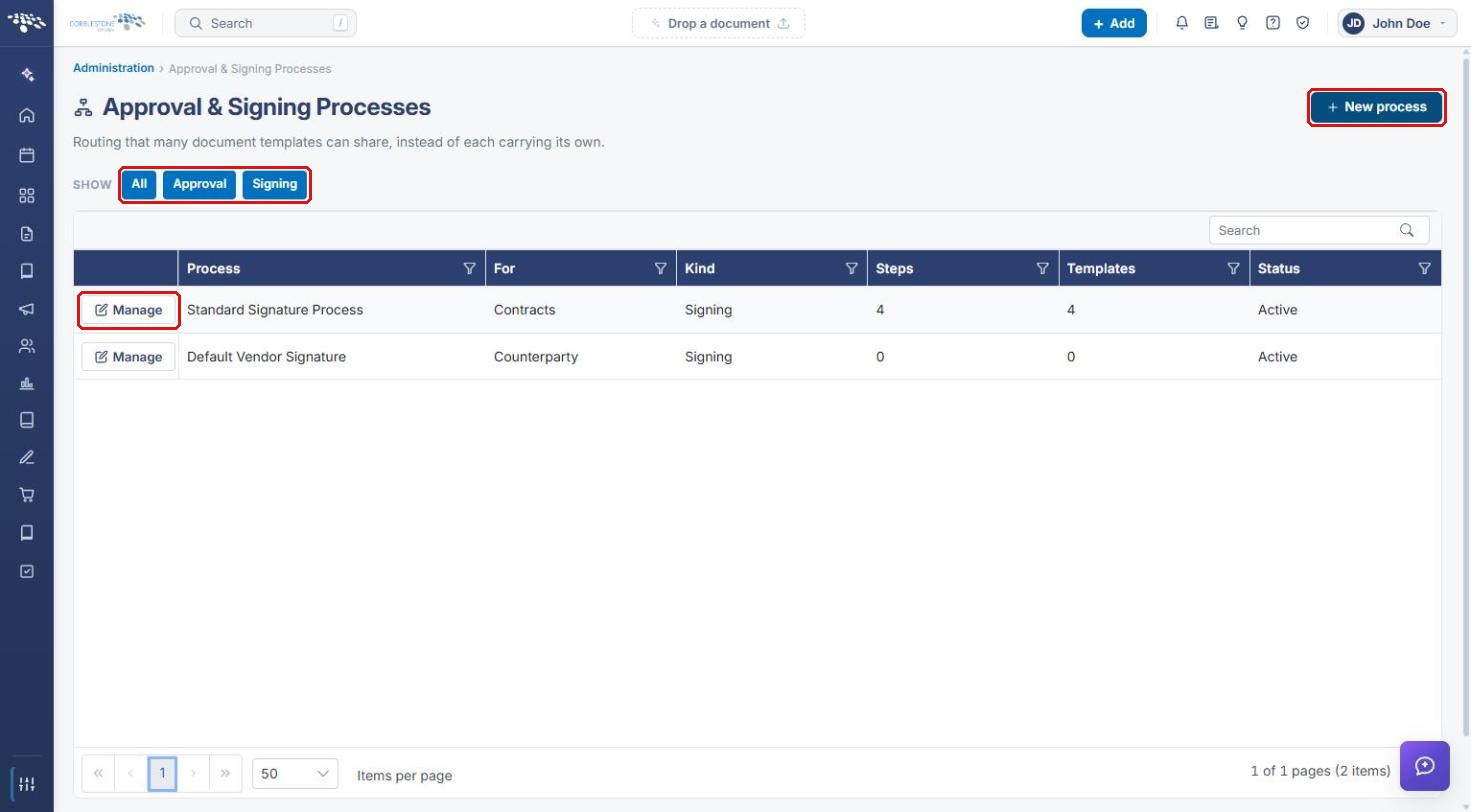
- Approval & Signing Processes list: every shared process with its record type (For), Kind (Approval or Signing), number of Steps, number of Templates that follow it, and Status. Use the All, Approval, and Signing filters to narrow the list.
- Process page (“Who signs, and in what order”): signers are invited step by step — within a step they sign in parallel, across steps sequentially. Each step offers Edit, Signer, Rules, Copy, and Delete. A banner lists every template the changes will affect.
- E-Signatures tab on a document template (step 3, Approvals & signing): turns on Use E-Signatures and selects the Signature process (the package) the template follows. The package's steps are shown read-only.
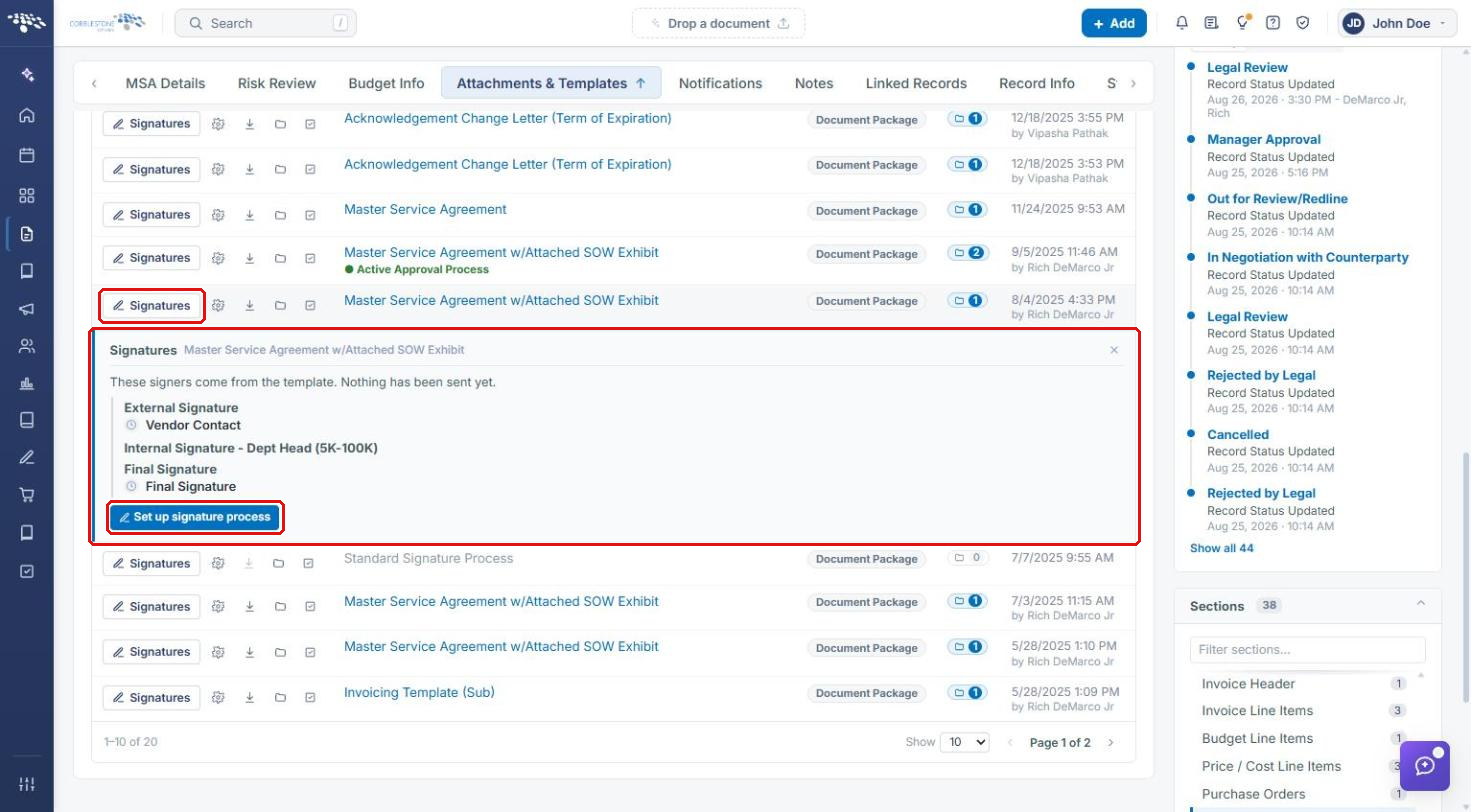
- Merged Document Templates section on a record: generates the package and lists Saved documents, each with a Signatures action that leads to Set up signature process.
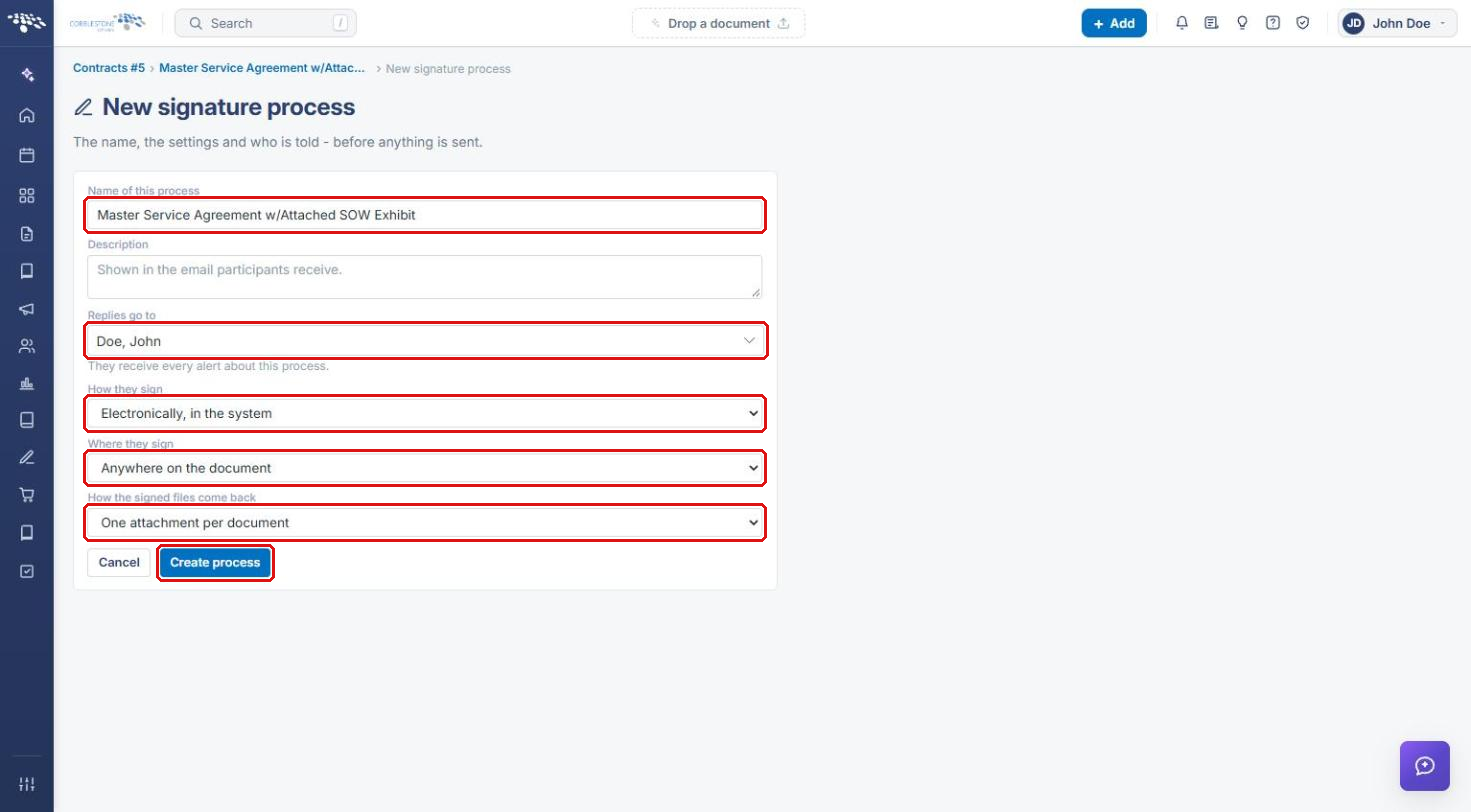
- New signature process page: the name, settings, and who is told — before anything is sent.
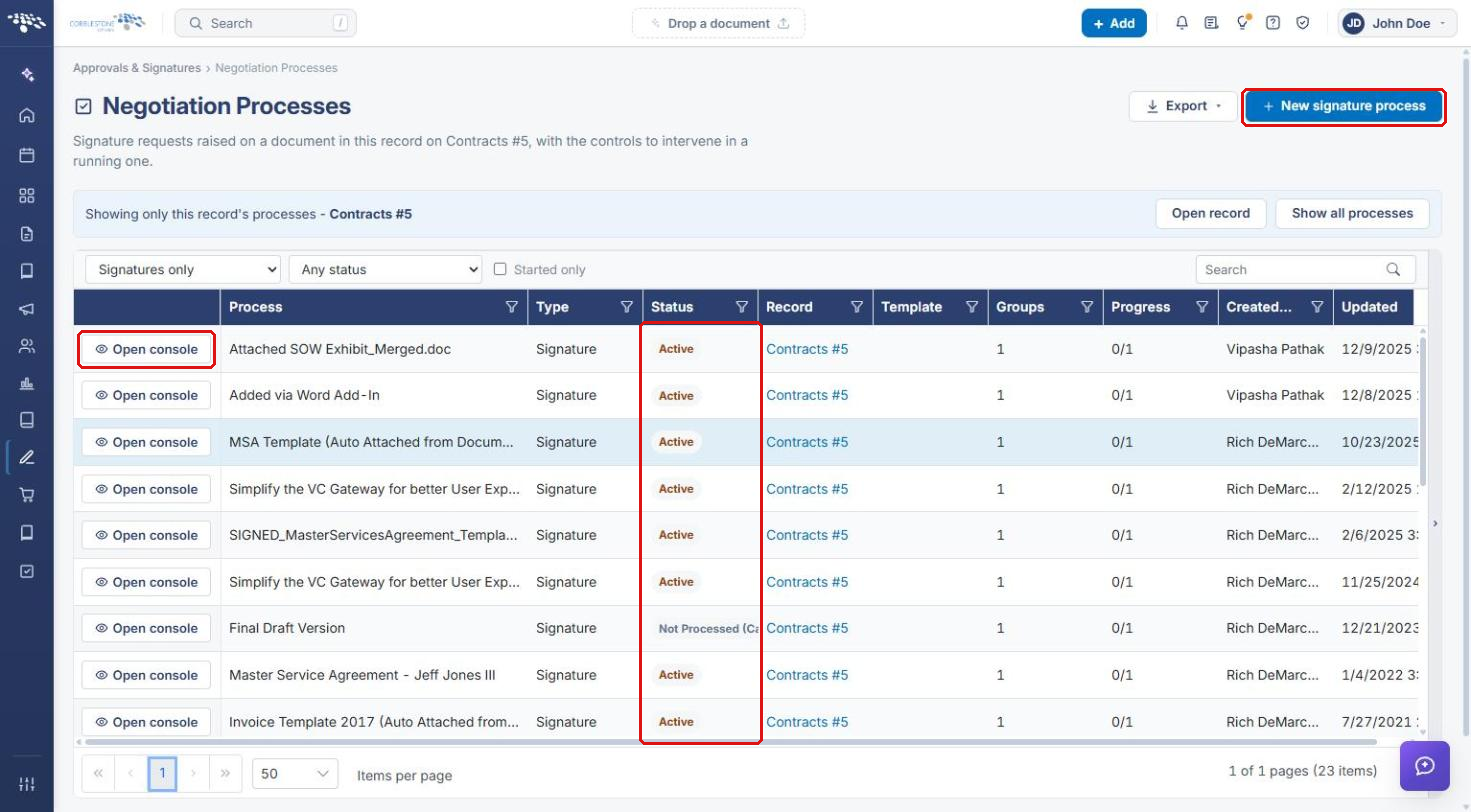
- Negotiation Processes page (record Actions → IntelliSign): monitors the record's signature processes and opens each one's console.
3. Navigating to Approval & Signing Processes
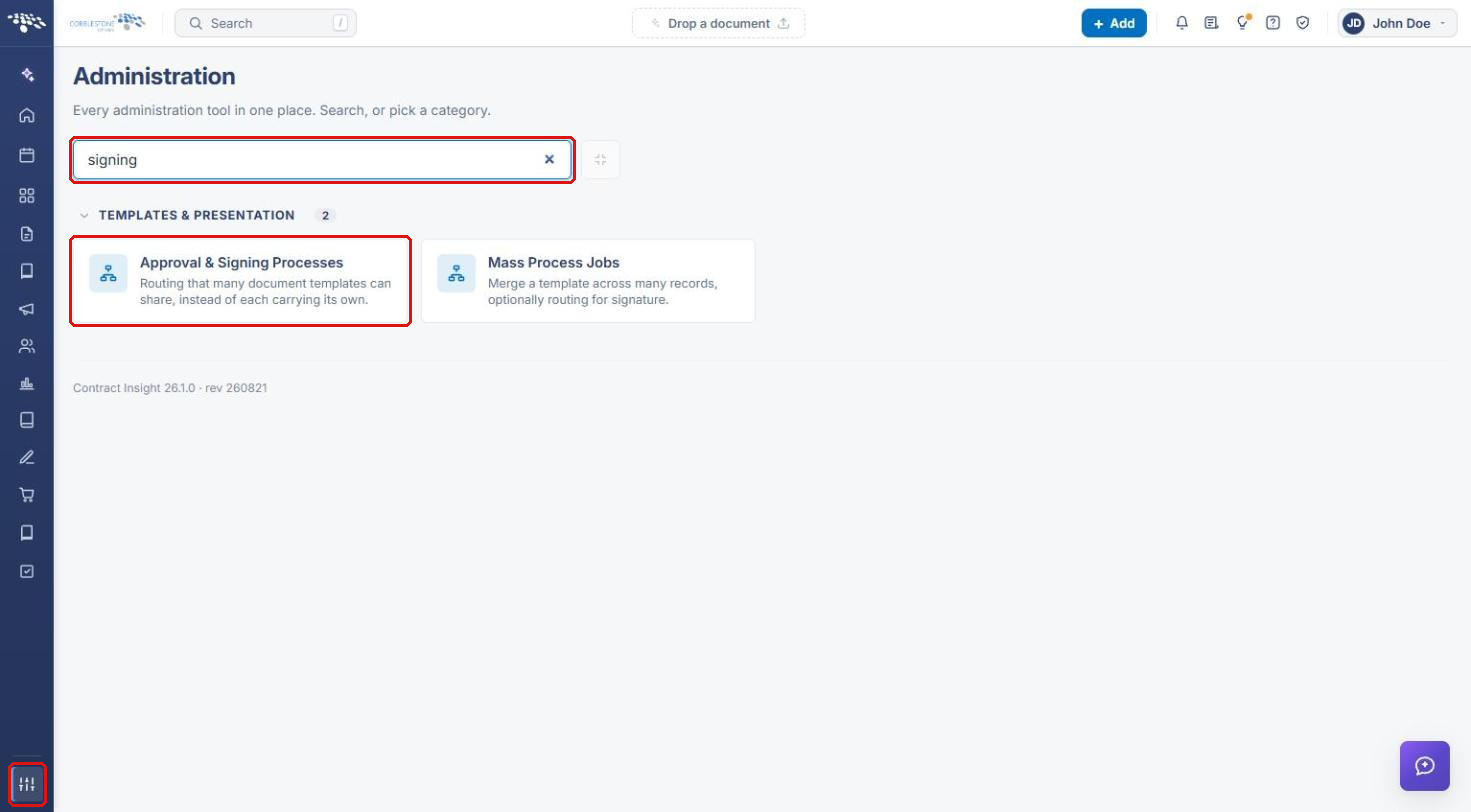
- From the Contract Insight homepage, click the Administration icon at the bottom of the left navigation bar.
- In the Search administration box, type signing (or scroll to the Templates & Presentation category).
- Click Approval & Signing Processes.
The Approval & Signing Processes page lists every shared process. Click + New process to create a package, or click Manage on a row to open an existing one.
4. Creating a Standard Signing Package
4a. Creating the Process
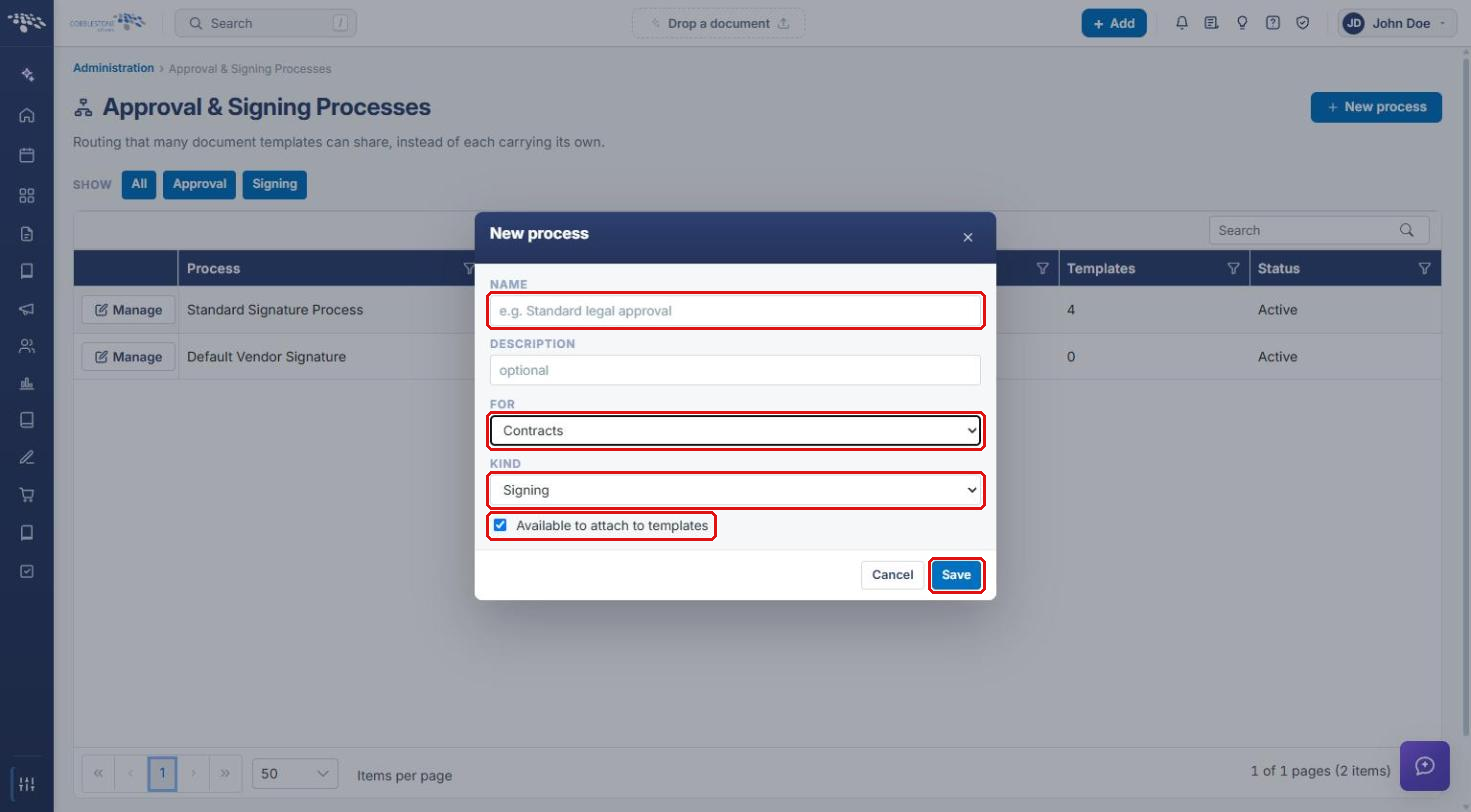
- Navigate to Administration → Approval & Signing Processes (see Section 3) and click + New process.
- Enter a Name and, optionally, a Description.
- In For, choose the record type the package applies to (for example, Contracts).
- In Kind, select Signing.
- Leave Available to attach to templates checked so document templates can select this package.
- Click Save. The new process opens so you can add its steps.
4b. Adding Signing Steps
- On the process page, click Add step. To change an existing step, click Edit on that step.
- Enter a Step name and optional Description.
- Choose the step's Sequence (its position in the signing order).
- Optionally choose Set status on complete to update the record's status when the step is finished.
- Optionally set Reminders: the number of days after the invite and the maximum number of reminders. Leave blank for none.
- Click Save step.
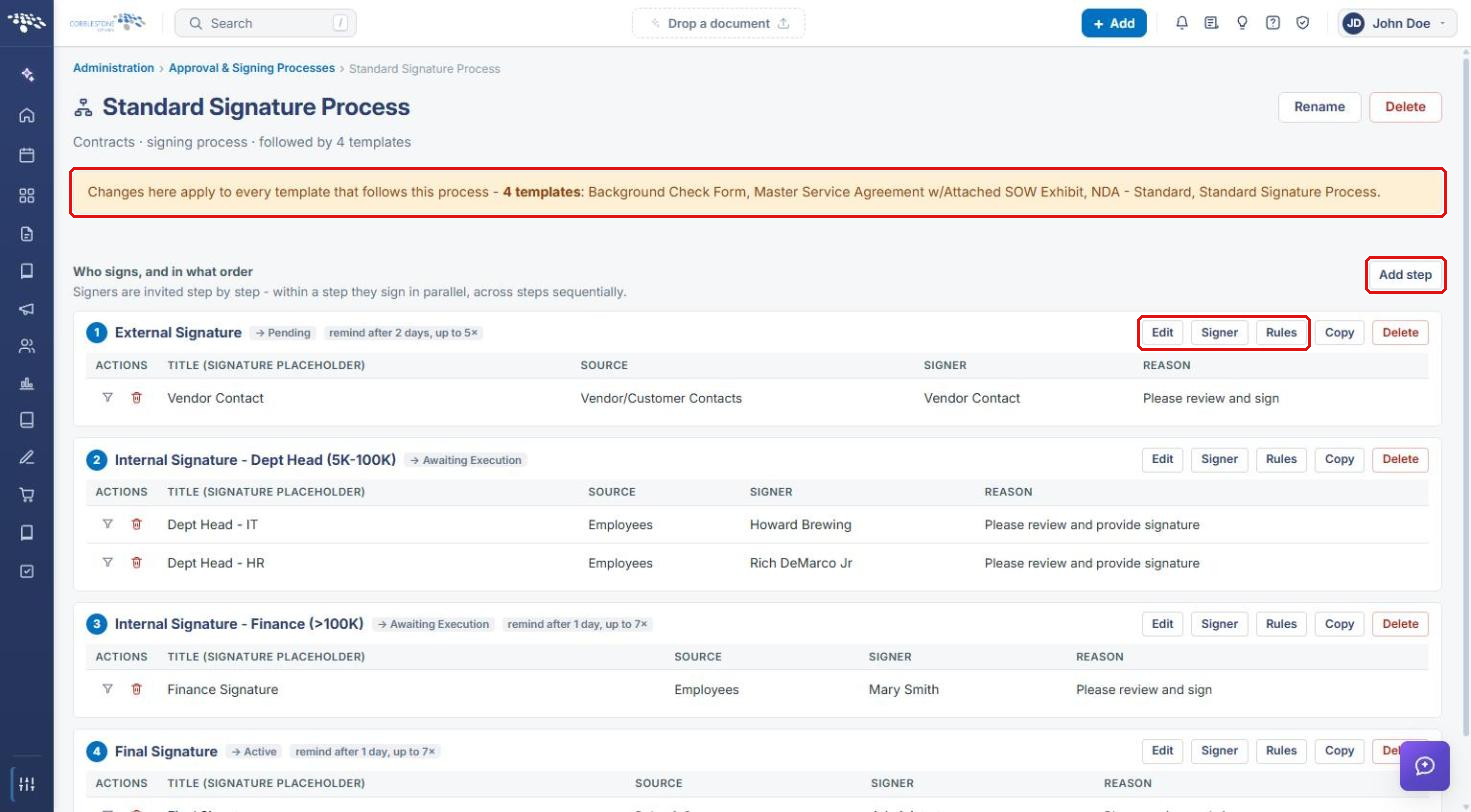
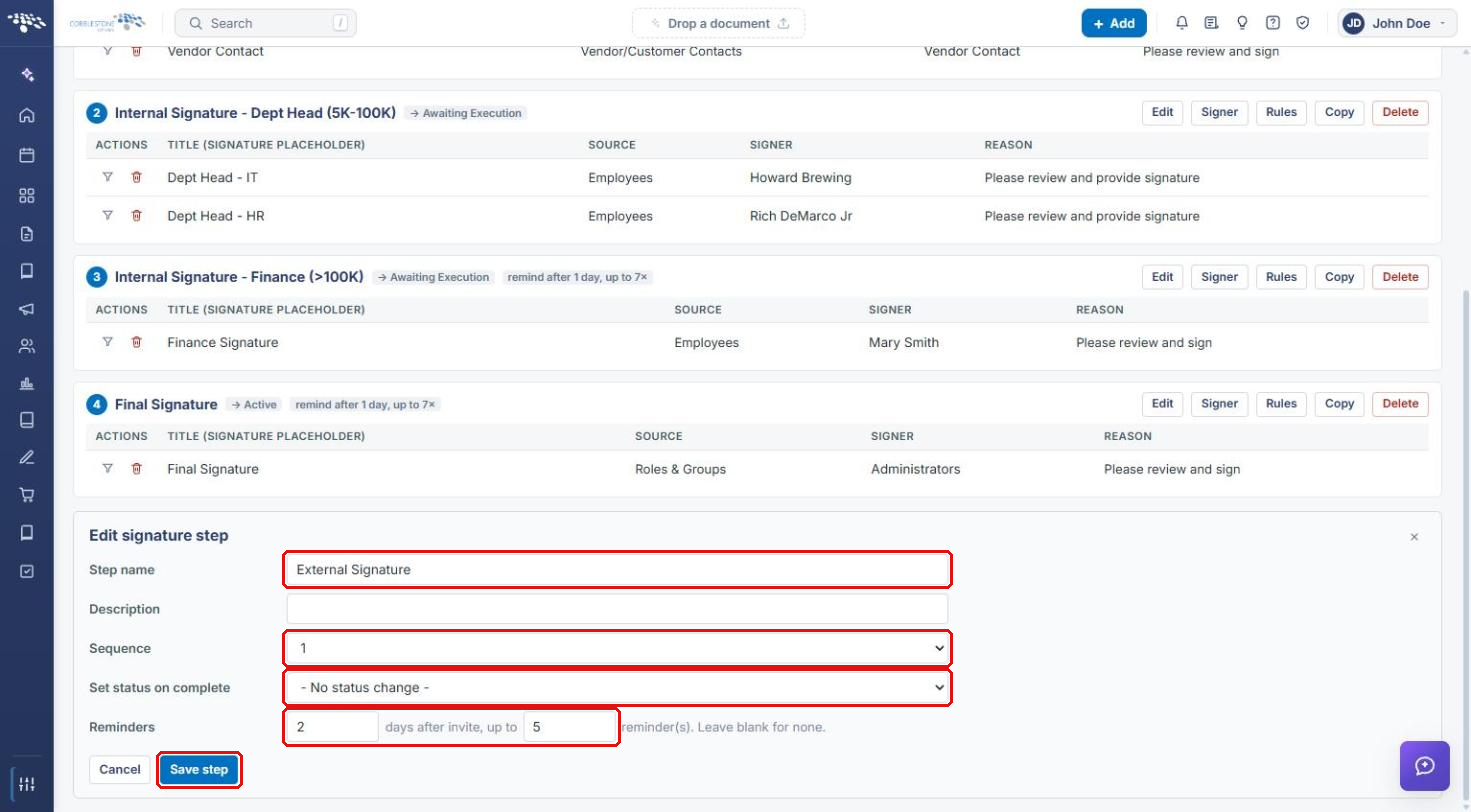
Note: Changes on this page apply to every template that follows the process. The banner at the top of the page lists the templates affected.
4c. Adding Signers to a Step
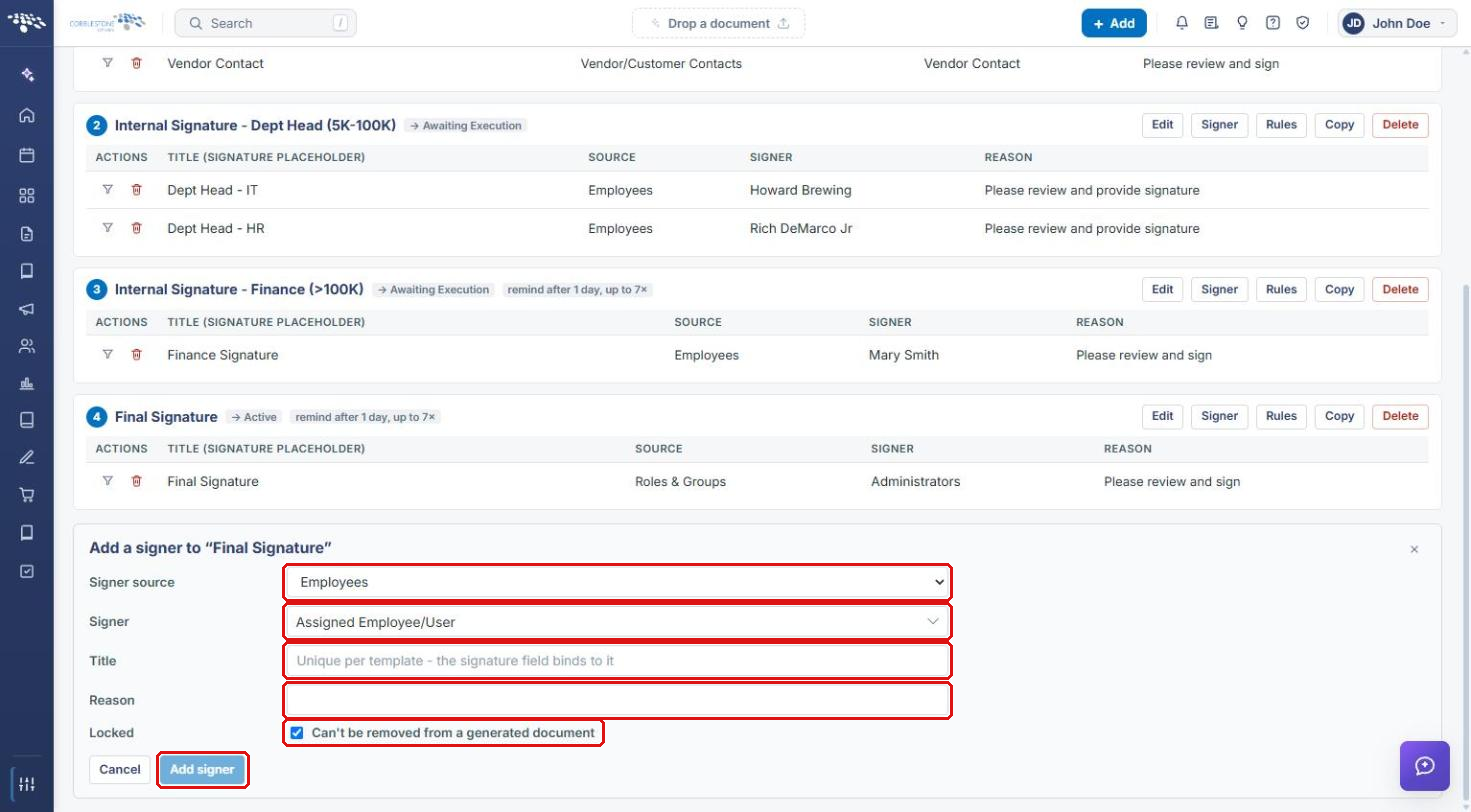
- Click Signer on the step.
- Choose the Signer source (for example, Employees, Vendor/Customer Contacts, or Roles & Groups), then choose the Signer.
- Enter a Title. The title is the signature placeholder; it must be unique per template, and the signature field in the document binds to it.
- Enter a Reason (for example, “Please review and sign”).
- Leave Locked checked if the signer can't be removed from a generated document.
- Click Add signer. Repeat for each signer in the step.
4d. Setting Step Rules (Optional)
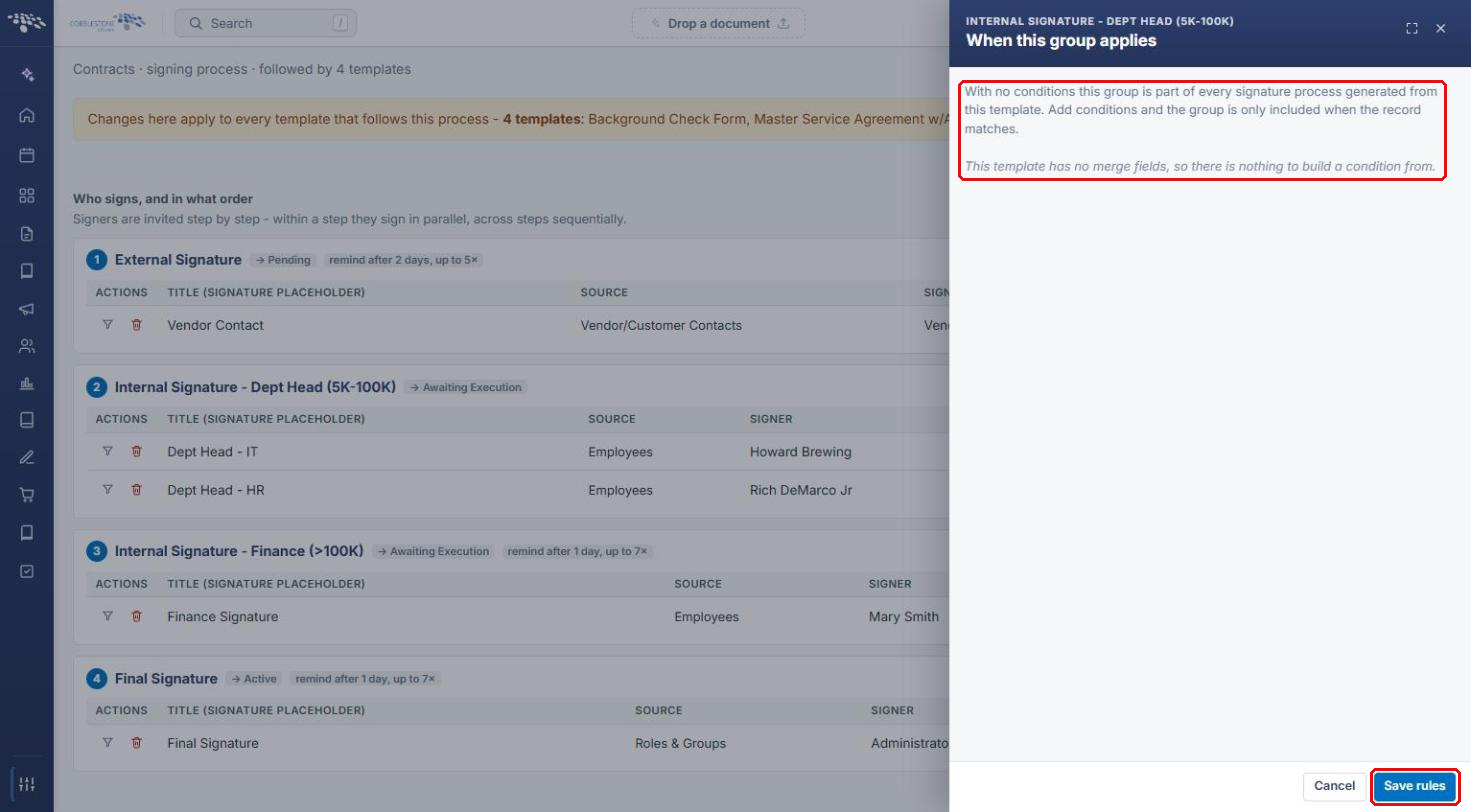
Click Rules on a step to control when it applies. With no conditions, the step is part of every signature process generated from the template. Add conditions and the step is only included when the record matches. Conditions are built from the template's merge fields. Click Save rules to apply.
5. Attaching the Package to a Document Template
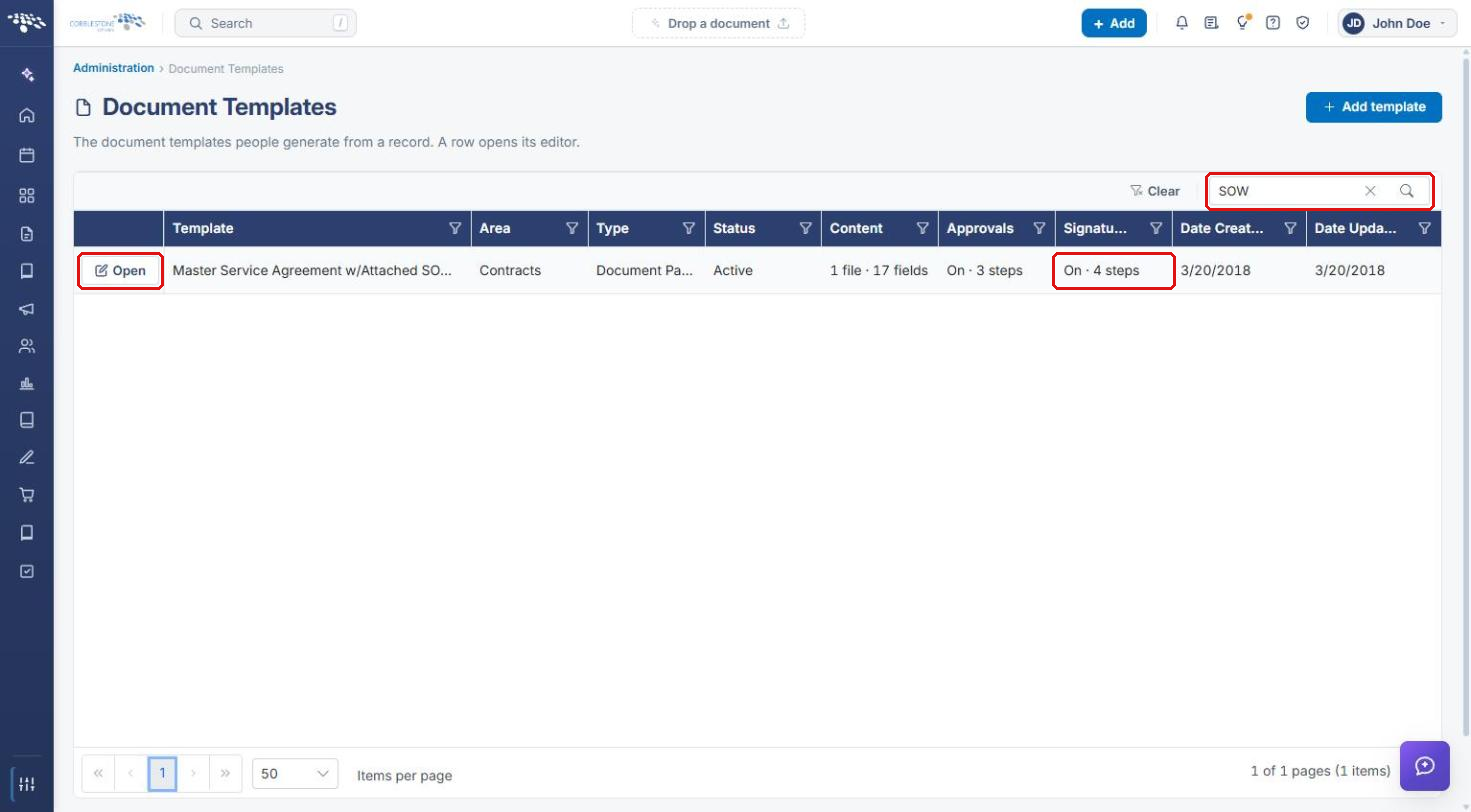
- Navigate to Administration and click Document Templates (in the Templates & Presentation category).
- Use the Search box to find the template and click Open. The Signatures column shows whether signing is on and how many steps it has.
- Click step 3 — Approvals & signing, then click the E-Signatures tab.
- Check Use E-Signatures — Enabled. Optionally check Allow direct signing.
- In Signature process, select the Standard Package (for example, Standard Signature Process).
- Click Save signature settings.
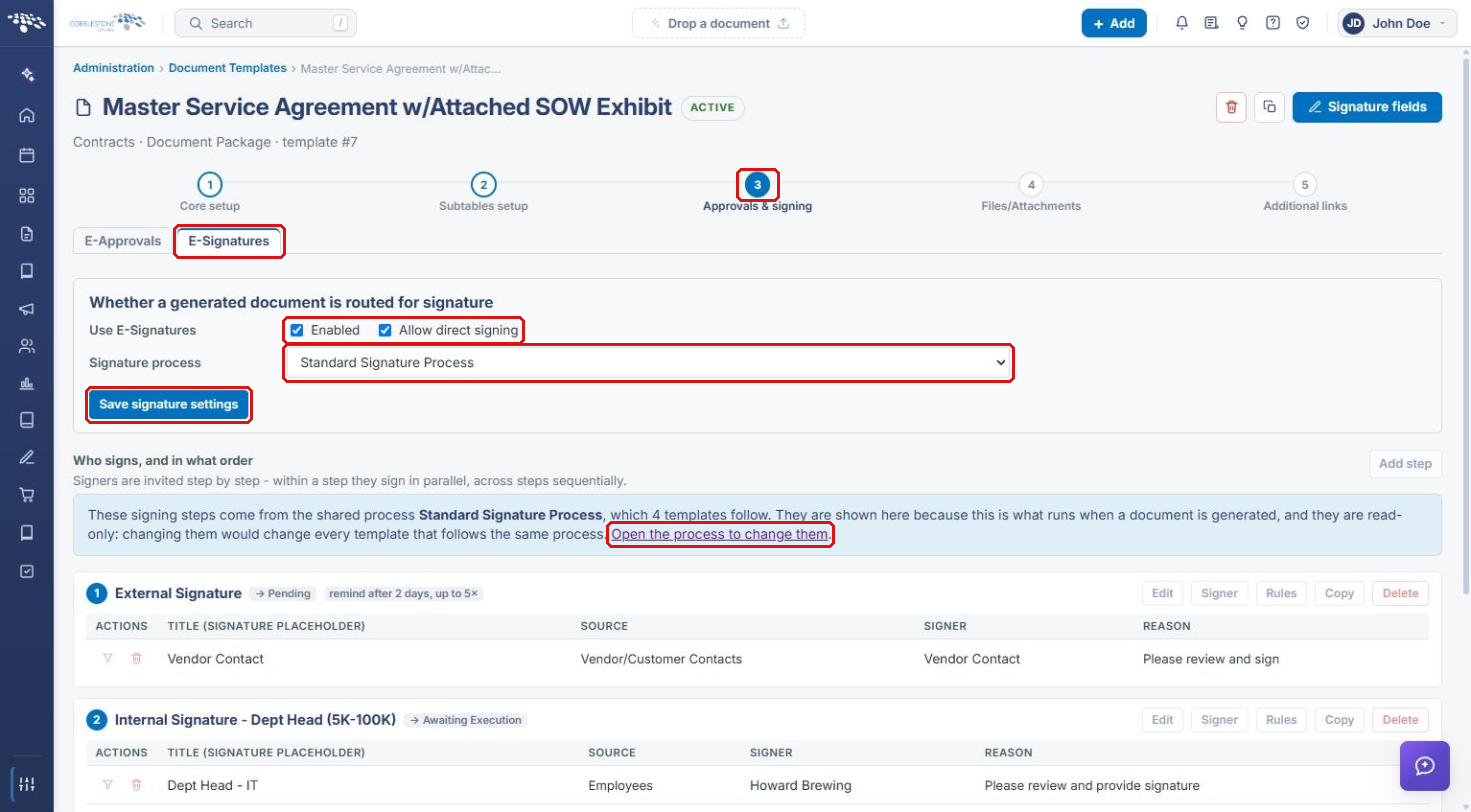
The package's signing steps are displayed below the settings. They are read-only here because changing them would change every template that follows the same process. Click Open the process to change them to edit the package itself.
Tip: Use the Signature fields button at the top of the template to place each signer's signature placeholder in the document. See Setting Signature Place Holders for details.
6. Starting the IntelliSign Process from a Record
6a. Generating the Document Package
- From the Contract Insight homepage, click Requests/Contracts → Contracts and click Manage on the contract.
- Click the Attachments & Templates tab and scroll to Merged Document Templates.
- In Template, choose a template that follows the Standard Package.
- Review any Optional clauses to include, and confirm the Saving as name (click the pencil icon to rename it).
- Click Generate & Save. The package is added to the Saved documents list with the package's signers already attached.
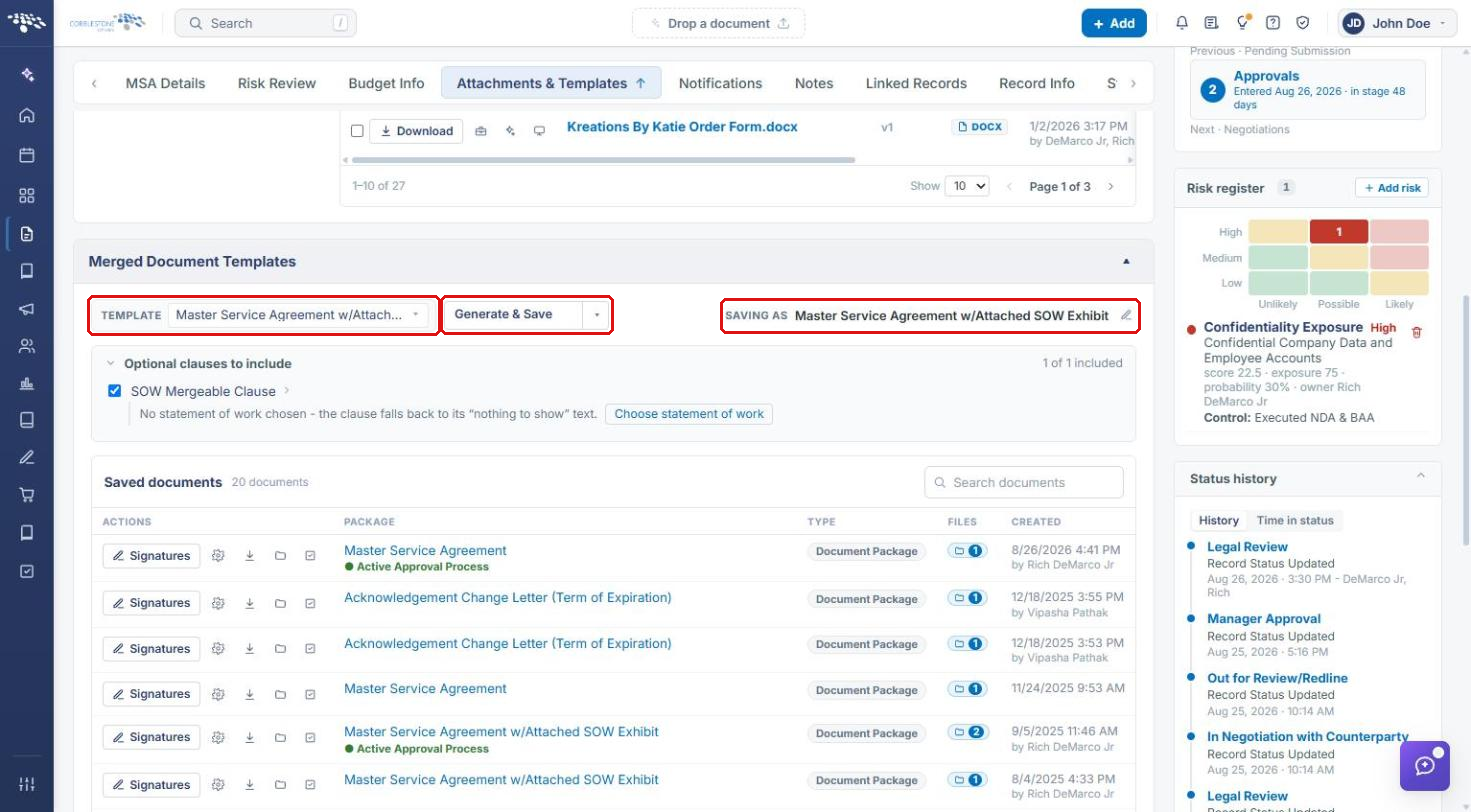
Note: The arrow beside Generate & Save offers Generate without saving, which downloads the document without saving a package to the record. Only saved packages can be routed for signature.
6b. Setting Up the Signature Process
- In Saved documents, find the package and click Signatures. The panel lists the signers that came from the template and confirms that nothing has been sent yet.
- Click Set up signature process.
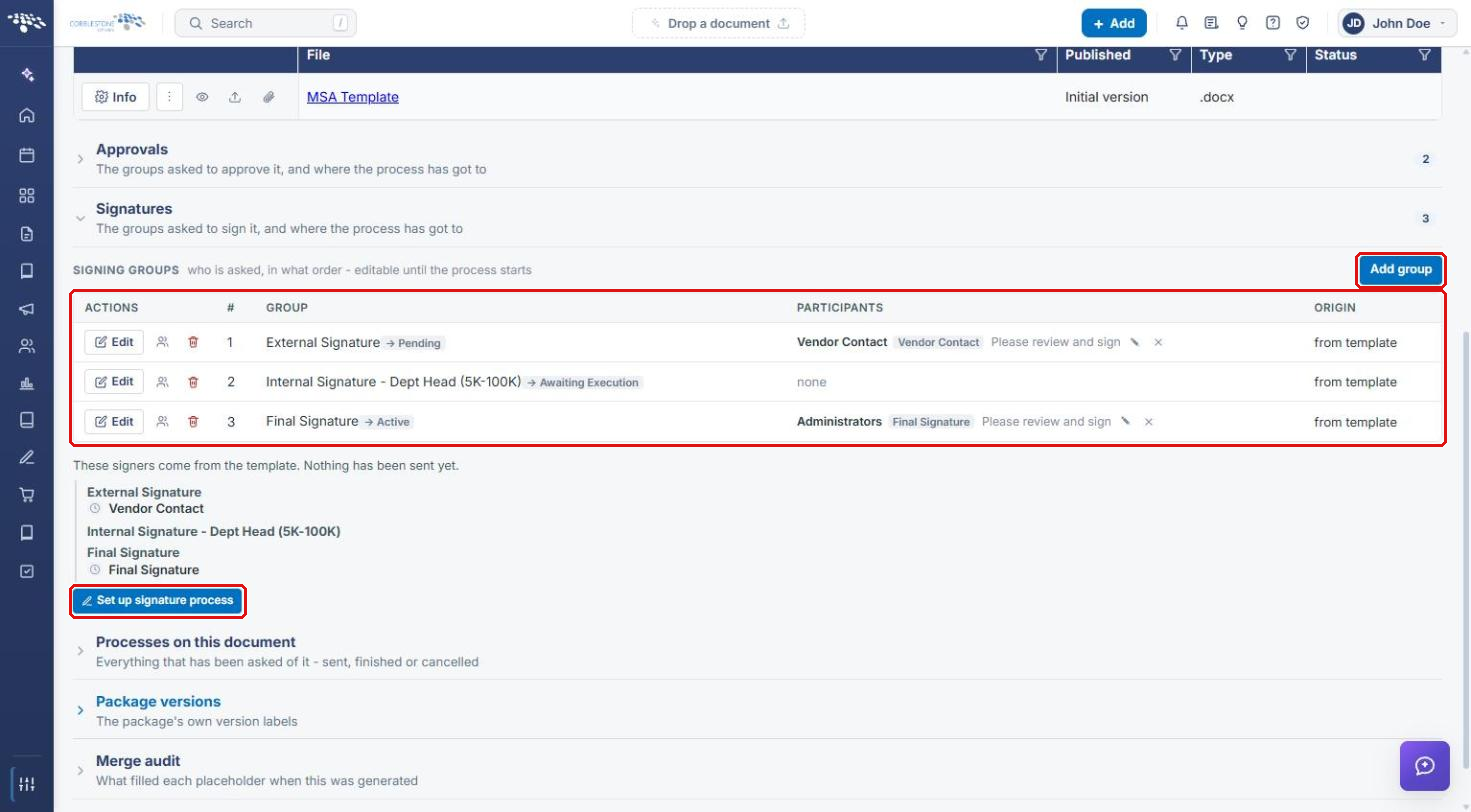
To review or adjust signers first, click the package name to open the package page and expand Signatures. The Signing groups copied from the template can be edited until the process starts — use Edit, the participants icon, or delete on a group, or click Add group. Set up signature process is also available here.
6c. Creating the Process
- Confirm the Name of this process and, optionally, enter a Description (shown in the email participants receive).
- In Replies go to, choose who receives every alert about the process.
- Choose How they sign: Electronically, in the system, or On paper (they download, sign, and upload it back).
- Choose Where they sign: Only where fields have been placed, or Anywhere on the document.
- Choose How the signed files come back: One attachment per document, or All of them as a single PDF.
- Click Create process.
7. Monitoring the Signature Process
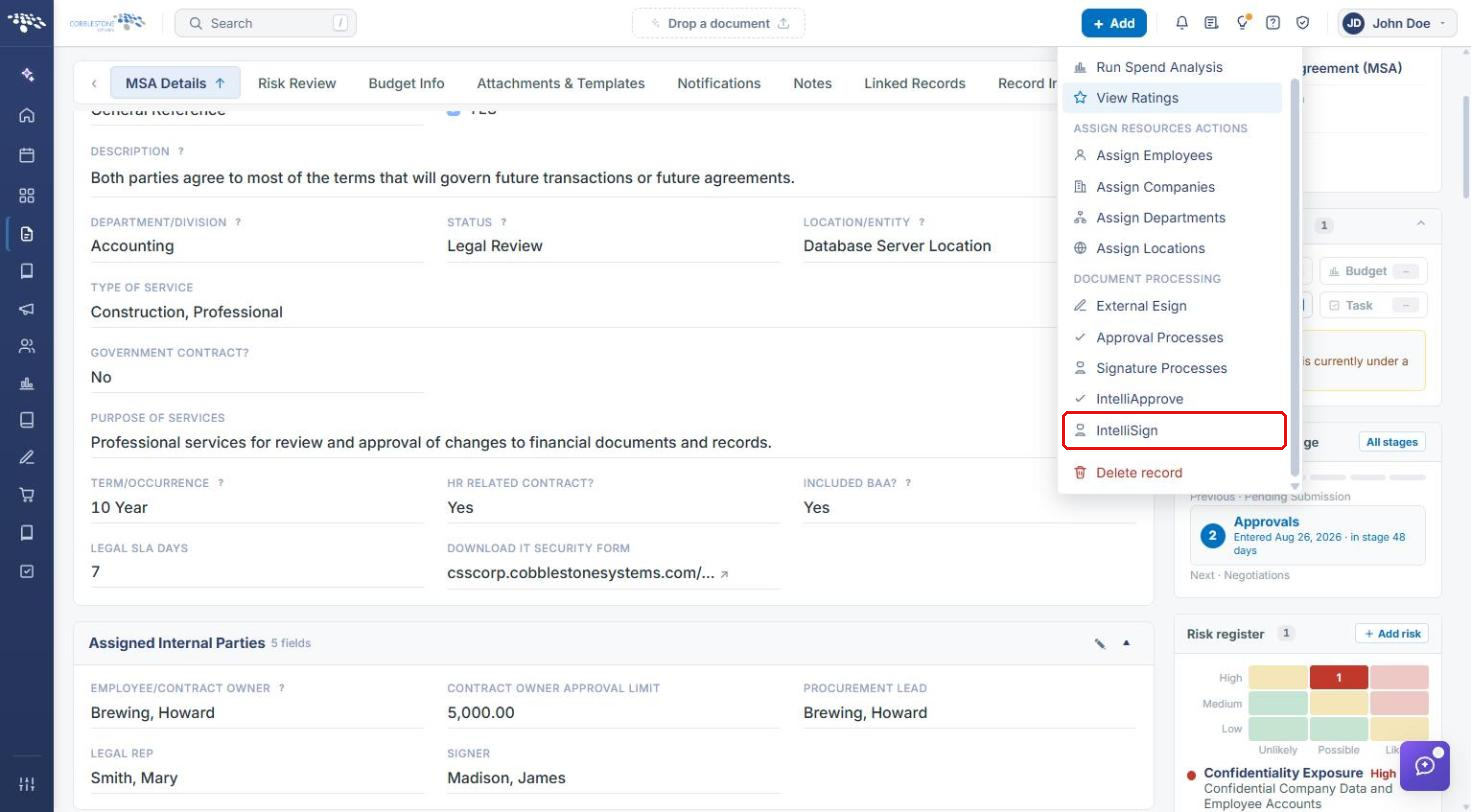
- On the record, click Actions and, under Document Processing, select IntelliSign.
- The Negotiation Processes page lists the record's signature processes with their Status, Groups, and Progress. Click Open console on a row to follow or intervene in a running process. Click Show all processes to see processes across all records, or + New signature process to send another document from this record.
8. Quick Reference Summary
| Task | How to Complete It |
|---|---|
| Open the Standard Packages list | Administration → search “signing” → Approval & Signing Processes. |
| Create a package | + New process → enter a name, choose For, set Kind to Signing → Save. |
| Add or edit signing steps | Process page → Add step or Edit → Save step. |
| Add signers to a step | Process page → Signer on the step → choose source, signer, title → Add signer. |
| Attach a package to a template | Document Templates → Open → Approvals & signing → E-Signatures → select Signature process → Save signature settings. |
| Generate the package on a record | Record → Attachments & Templates → Merged Document Templates → choose template → Generate & Save. |
| Start the IntelliSign process | Saved documents → Signatures → Set up signature process → Create process. |
| Monitor the process | Record → Actions → IntelliSign → Open console. |