COBBLESTONE SOFTWARE
Contract Insight — User Guide
SSO - Just in Time
Single Sign-On › Single Sign On Configuration › SSO - Just in Time
Note: Each procedure in this guide begins at the Contract Insight homepage, so any section can be followed on its own. Custom fields are configurable, so the exact field list on a contract category record may vary between environments.
1. Overview
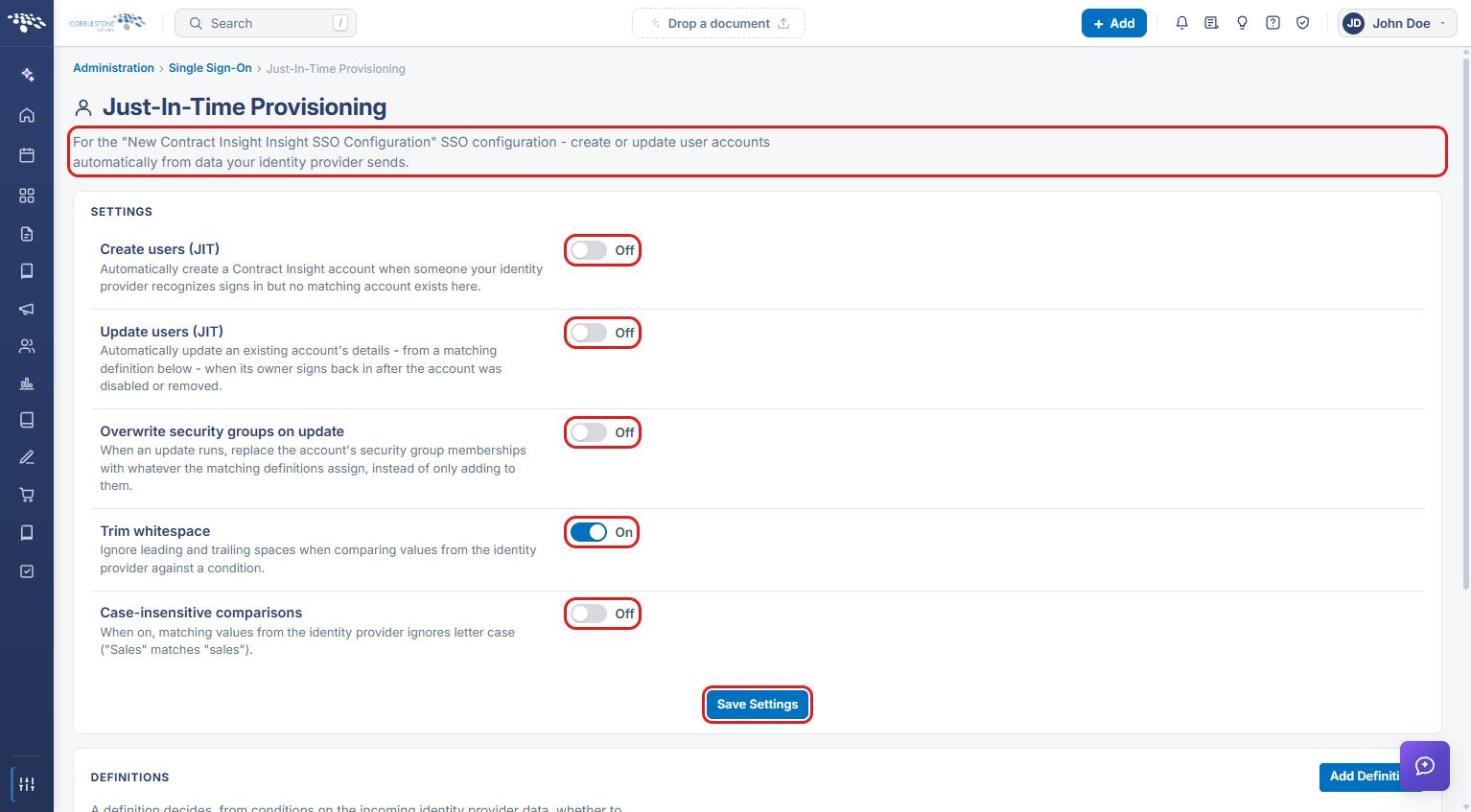
Just-in-time (JIT) provisioning is configured per SSO configuration by clicking its dedicated icon in the SSO Configurations table on Administration > Single Sign-On, which opens a Just-In-Time Provisioning screen scoped to that one configuration (for example, "For the 'Blackbox SSO' SSO configuration"). Its Settings section has five toggles: Create users (JIT) (automatically create a Contract Insight account when someone the identity provider recognizes signs in but no matching account exists — off by default in this environment); Update users (JIT) (automatically update an existing account's details from a matching definition when its owner signs back in after being disabled/removed — on); Overwrite security groups on update (replace, rather than add to, the account's group memberships on update — off); Trim whitespace (ignore leading/trailing spaces when comparing identity-provider values against a condition — on); and Case-insensitive comparisons (ignore letter case when matching, e.g. "Sales" matches "sales" — off). Below Settings, a Definitions section is where a definition decides, from conditions on the incoming identity-provider data, whether to create or update an account and how to fill it in — the most common setup uses two definitions, one broader for creating a new account and a more limited one for updating an existing one.
2. Key Elements
- Reached from the SSO Configurations table's Just-in-time provisioning icon, scoped to one named SSO configuration.
- Five toggles: Create users (JIT), Update users (JIT), Overwrite security groups on update, Trim whitespace, and Case-insensitive comparisons.
- A Definitions section below Settings maps identity-provider data conditions to account-creation/update behavior — typically one definition for creating accounts and a separate, more limited one for updating them.
3. Navigating to Single Sign-On
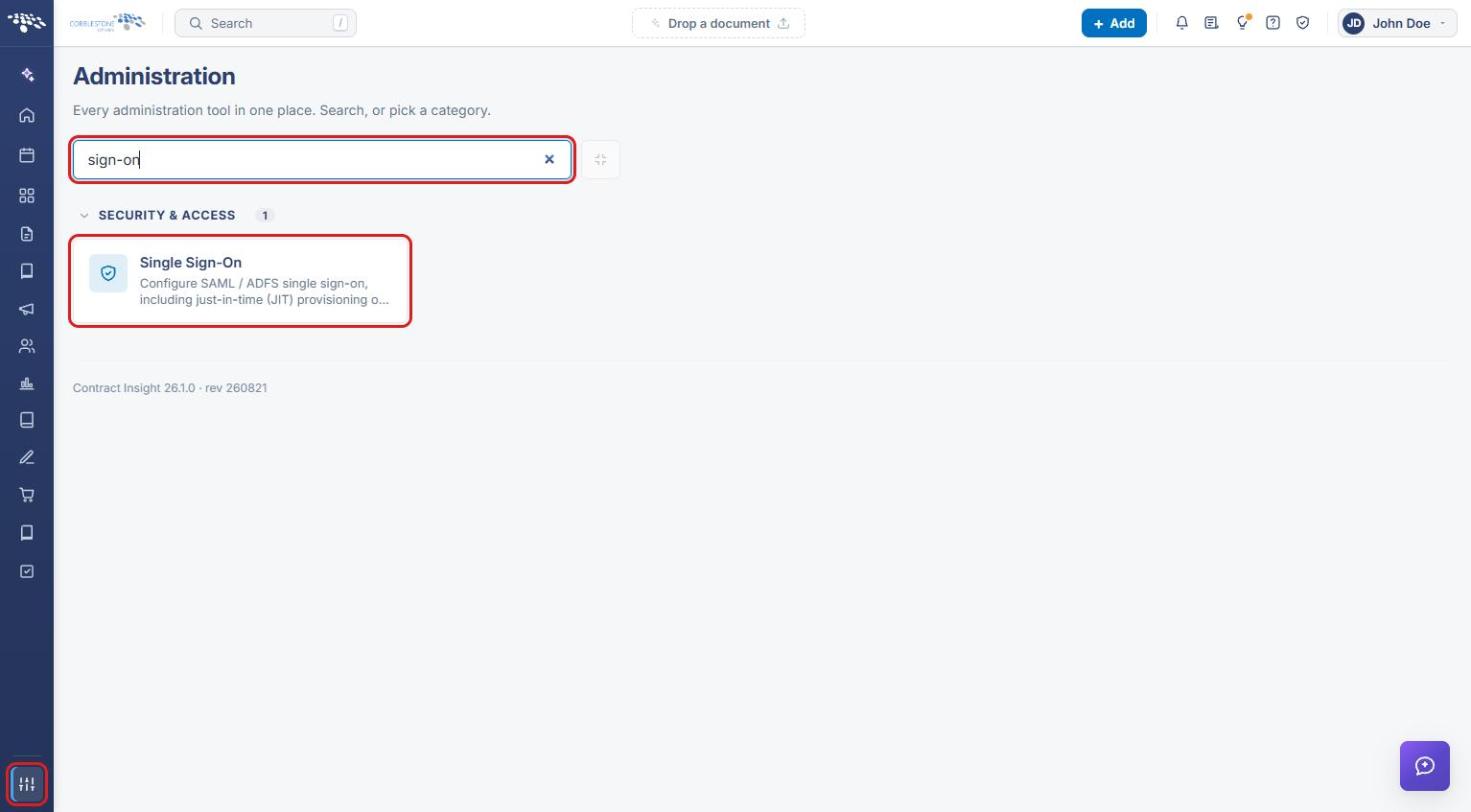
- From the Contract Insight homepage, click the Administration icon at the bottom of the left navigation bar.
- In the Search administration box, type sign-on, or scroll to the Security & Access category.
- Click Single Sign-On.
4. Opening Just-In-Time Provisioning
- On the Single Sign-On page, scroll down to SSO Configurations.
- Find the SSO configuration to provision users for. Use Add configuration first if none exists.
- Click the Just-in-time provisioning for this configuration icon (person icon) on that configuration's row.
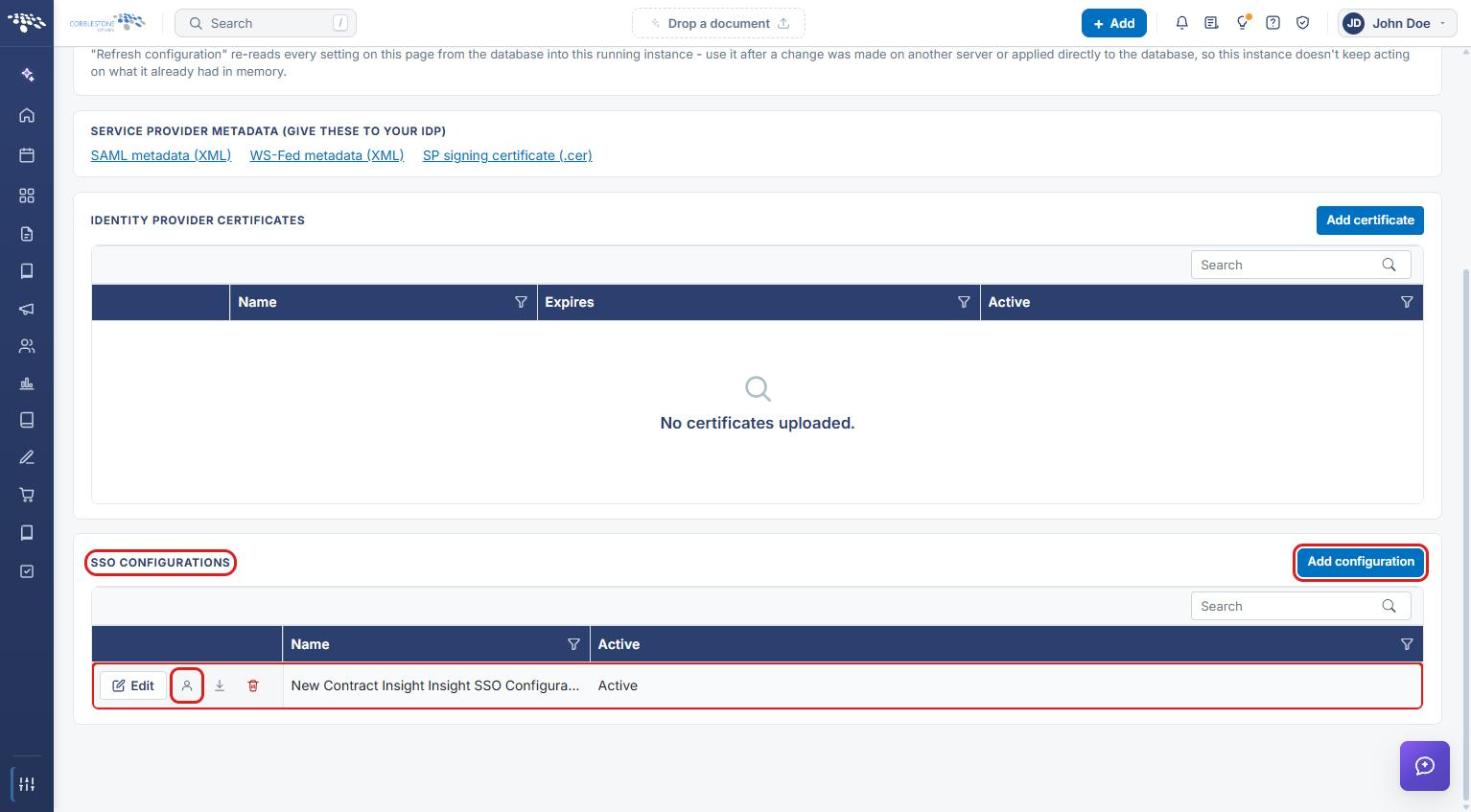
The Just-In-Time Provisioning screen opens. The subtitle names the SSO configuration it applies to.
5. Configuring JIT Settings
- In the Settingssection, turn each toggle on or off as needed:
- Create users (JIT): create a new account when a recognized user signs in without one.
- Update users (JIT): update an existing account from a matching definition when its owner signs back in.
- Overwrite security groups on update: replace group memberships on update instead of adding to them.
- Trim whitespace: ignore leading and trailing spaces when comparing values.
- Case-insensitive comparisons: ignore letter case when matching values.
- Click Save Settings.
6. Managing Definitions
6a. Viewing and Adding Definitions
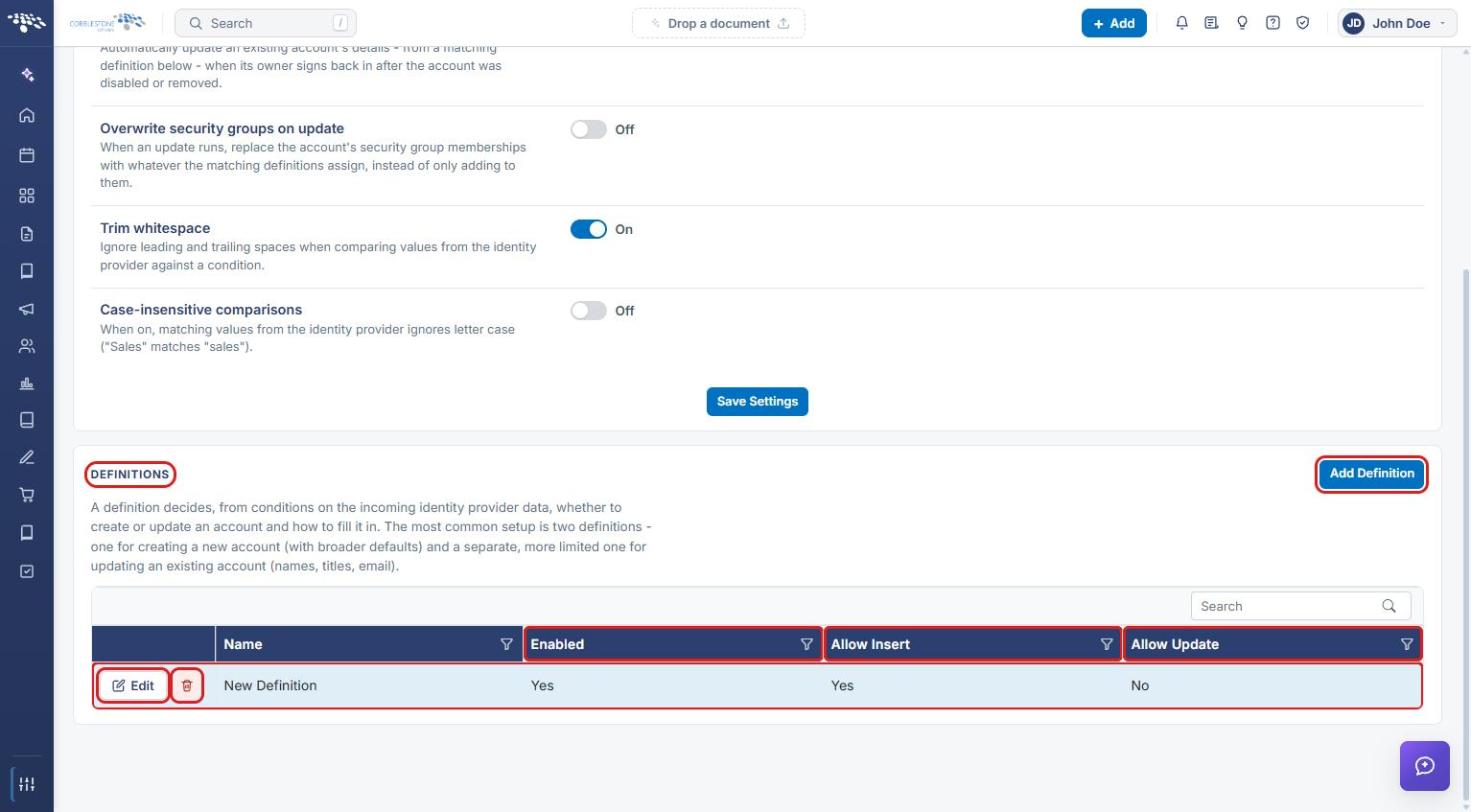
- Scroll to the Definitions section below Settings.
- Review existing definitions. The grid shows whether each is Enabled and whether it can Allow Insert (create accounts) and Allow Update (update accounts).
- Click Add Definition to create a new one, or Edit on a row to change an existing one. Use the delete icon to remove a definition.
6b. Setting a Definition's Options and Conditions
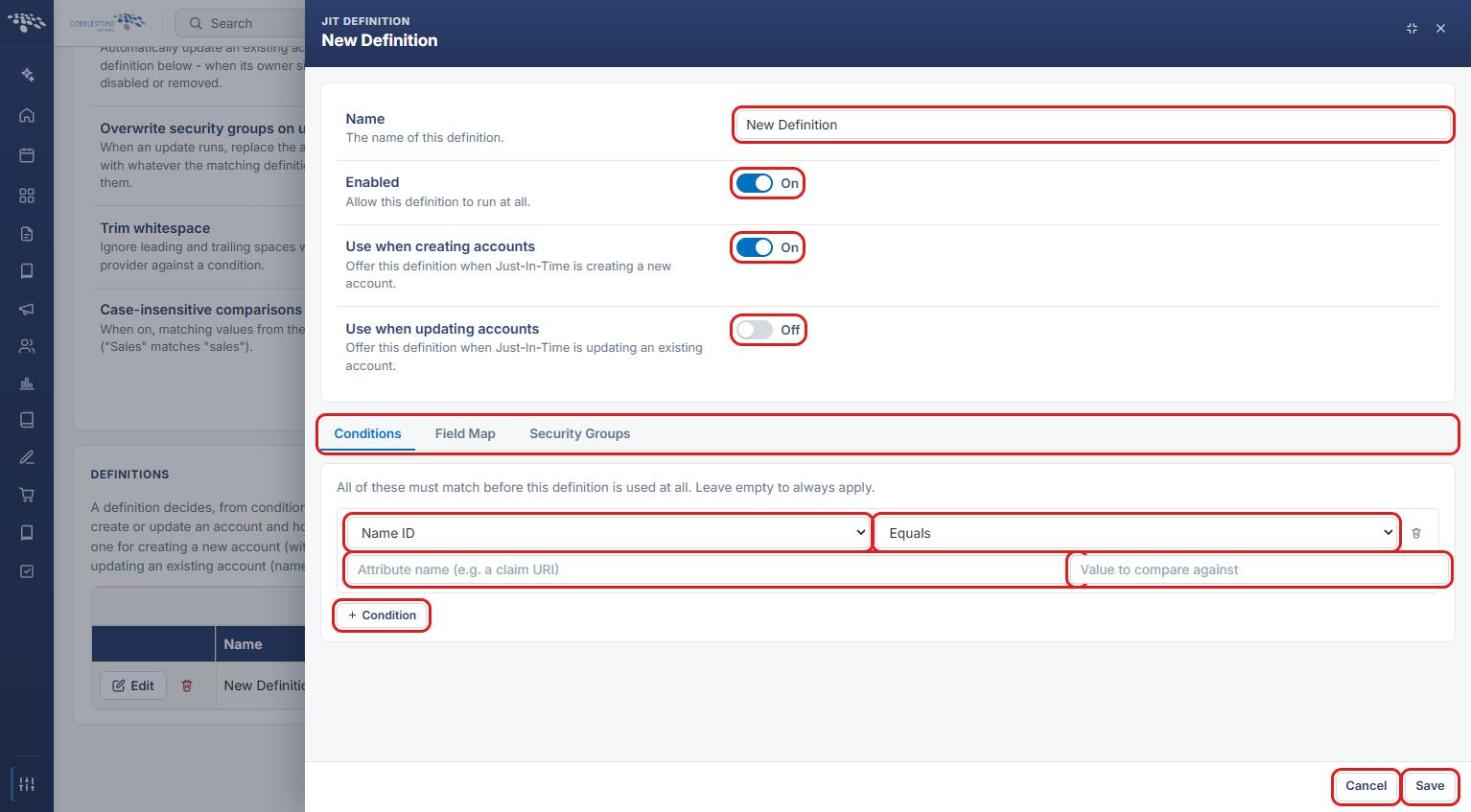
- In the JIT Definition panel, enter a Name.
- Set Enabled, Use when creating accounts, and Use when updating accounts.
- On the Conditions tab, choose the identity-provider value (for example, Name ID), an operator (for example, Equals), and enter the attribute name and the value to compare against. Click + Condition to add more. All conditions must match before the definition is used; leave them empty to always apply.
6c. Mapping Account Fields
- Click the Field Map tab.
- Click + Field Map, choose the identity-provider value in the first drop-down, and choose the account field to fill in Choose a field. Enter the attribute name if the source needs one. Use the delete icon to remove a mapping.
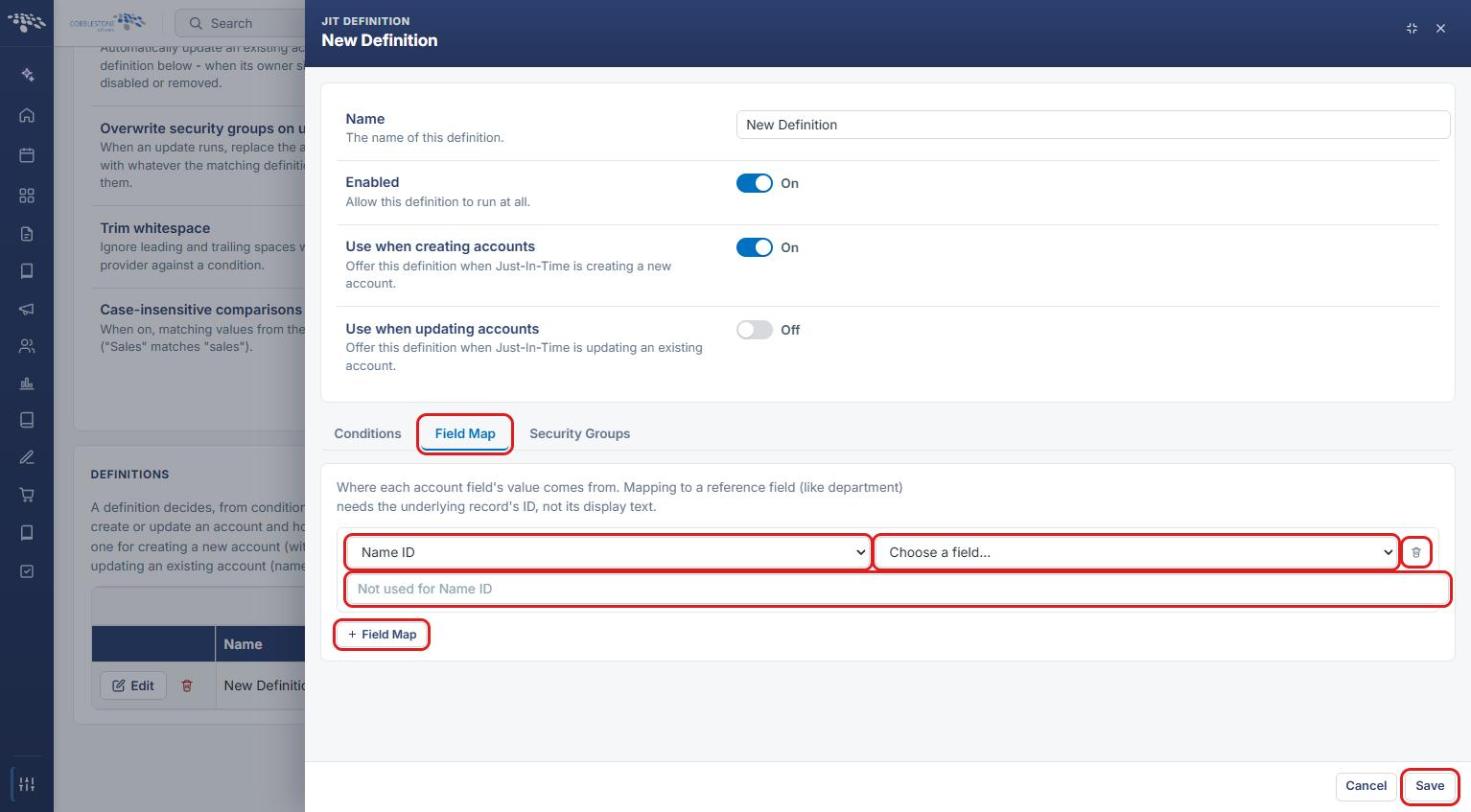
Note: Mapping to a reference field (such as a department) needs the underlying record's ID, not its display text.
6d. Assigning Security Groups
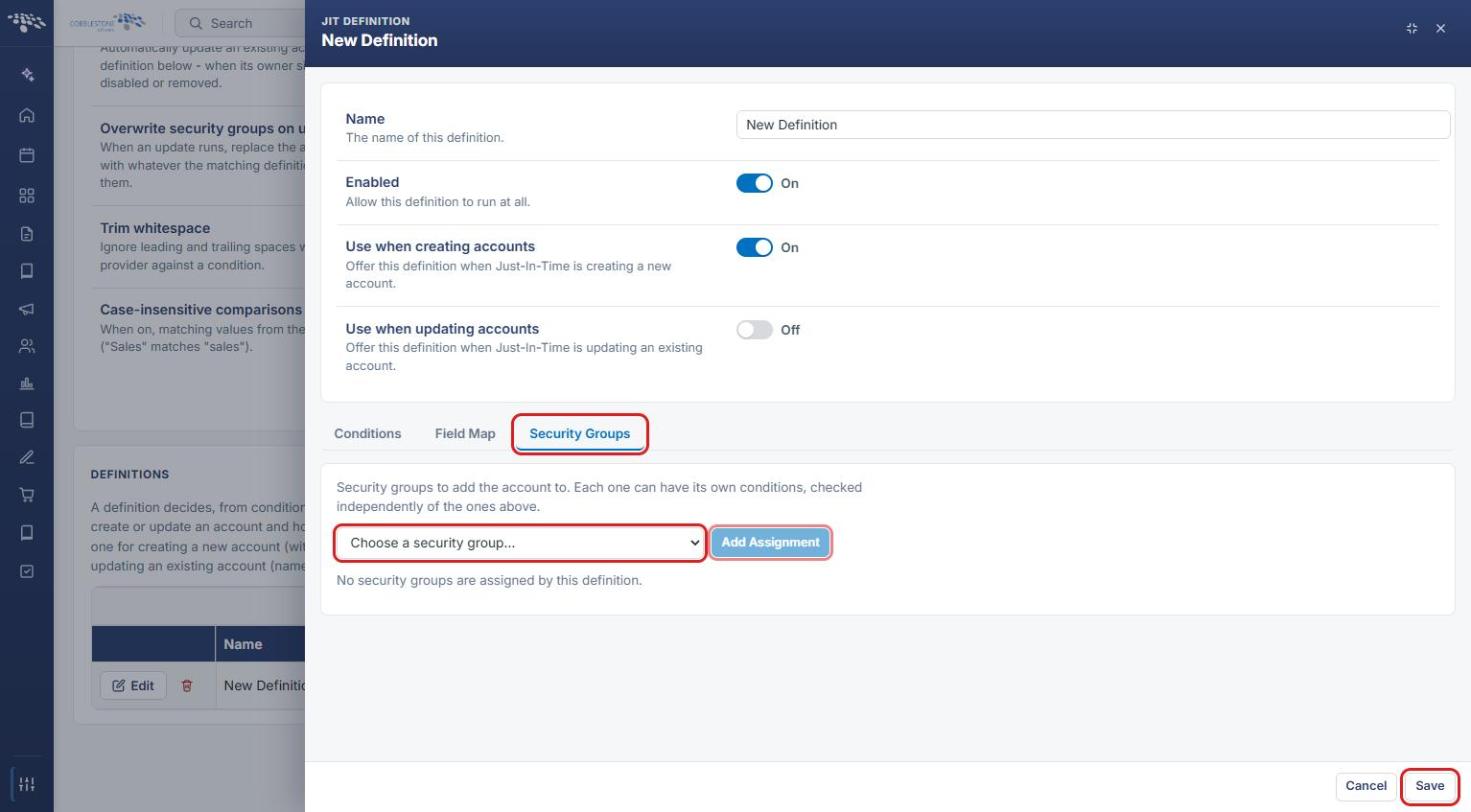
- Click the Security Groups tab.
- Select a group from Choose a security group and click Add Assignment. Each assignment can have its own conditions, checked independently of the definition's conditions.
- Click Save to save the definition, or Cancel to discard changes.
Note: The most common setup uses two definitions: a broader one for creating new accounts and a more limited one for updating existing accounts (names, titles, email).
7. Quick Reference Summary
| Task | How to Complete It |
|---|---|
| Open Single Sign-On | Administration → search sign-on → Single Sign-On. |
| Open JIT for a configuration | SSO Configurations → Just-in-time provisioning icon on the row. |
| Turn account creation or updates on/off | Settings → toggles → Save Settings. |
| Add a definition | Definitions → Add Definition → set options → Save. |
| Limit when a definition applies | Definition → Conditions tab → + Condition. |
| Fill account fields from the IdP | Definition → Field Map tab → + Field Map. |
| Assign security groups | Definition → Security Groups tab → choose a group → Add Assignment. |