COBBLESTONE SOFTWARE
Contract Insight — User Guide
Single Sign On Configuration
Single Sign-On › Single Sign On Configuration
Note: Each procedure in this guide begins at the Contract Insight homepage, so any section can be followed on its own. Custom fields are configurable, so the exact field list on a contract category record may vary between environments.
1. Overview
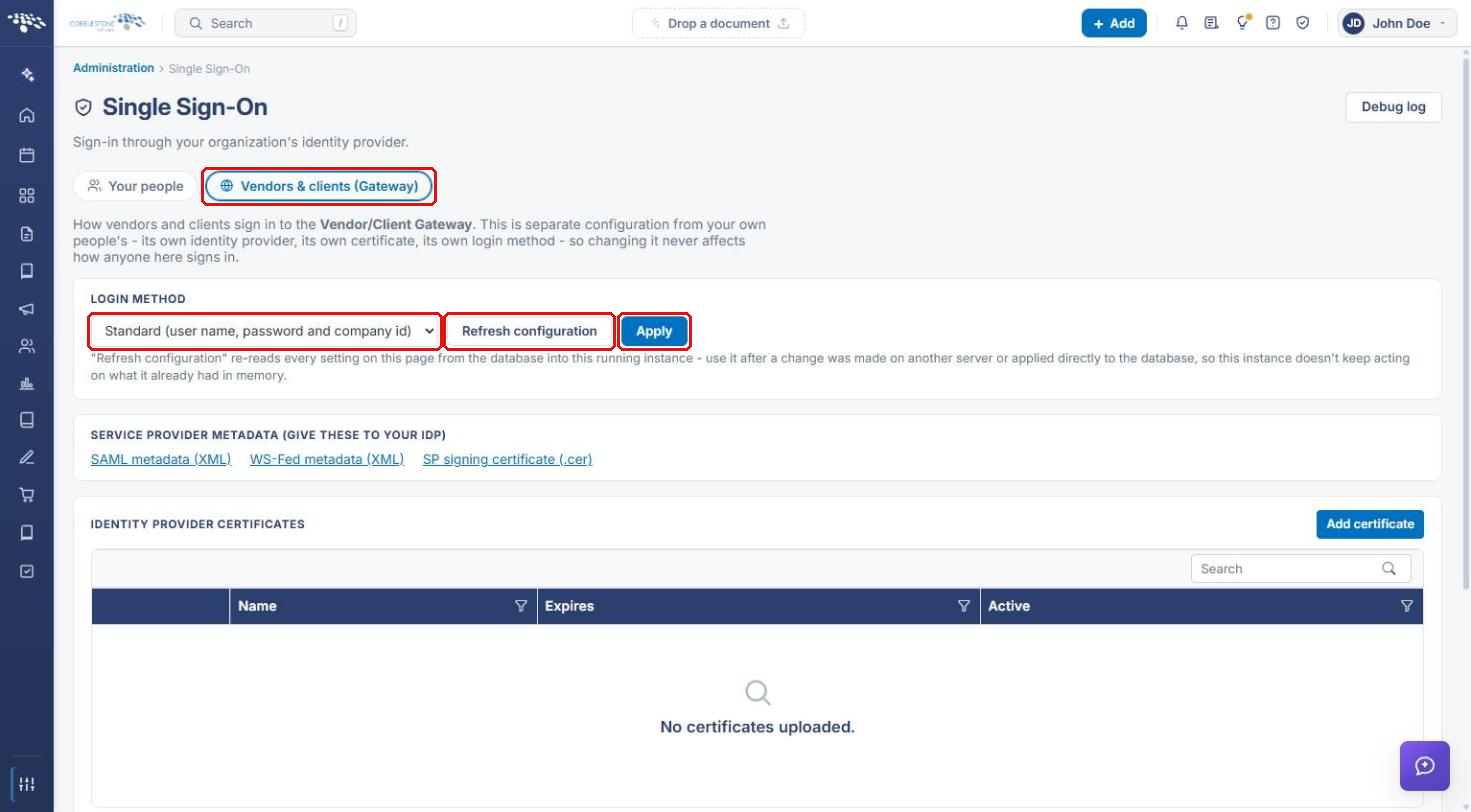
Administration → Single Sign-On is where SAML 2.0 and ADFS / WS-Federation federated sign-in is configured. The page has two independent tabs: Your people (internal employees) and Vendors & clients (Gateway) (Vendor/Client Gateway sign-in). Each tab has its own login method, identity provider certificates, and SSO configurations, so changing one never affects how the other signs in. The usual order is: give your identity provider (IdP) the Contract Insight service provider metadata, upload the IdP's signing certificate, set up an SSO configuration, and then switch the login method.
2. Key Elements
- Your people and Vendors & clients (Gateway) tabs: separate login methods, certificates, and configurations for internal users and Gateway users.
- Login Method: Standard (username / password), Integrated Windows Authentication, SAML 2.0 Single Sign-On, or ADFS / WS-Federation, with Refresh configuration and Apply. On the Gateway tab, Standard reads Standard (user name, password and company id).
- Service Provider Metadata: SAML metadata (XML), WS-Fed metadata (XML), and SP signing certificate (.cer) to give to your IdP.
- Identity Provider Certificates: the IdP's signing certificates, added with Add certificate.
- SSO Configurations: each named configuration, with Edit, Just-in-time provisioning, metadata download, and delete actions.
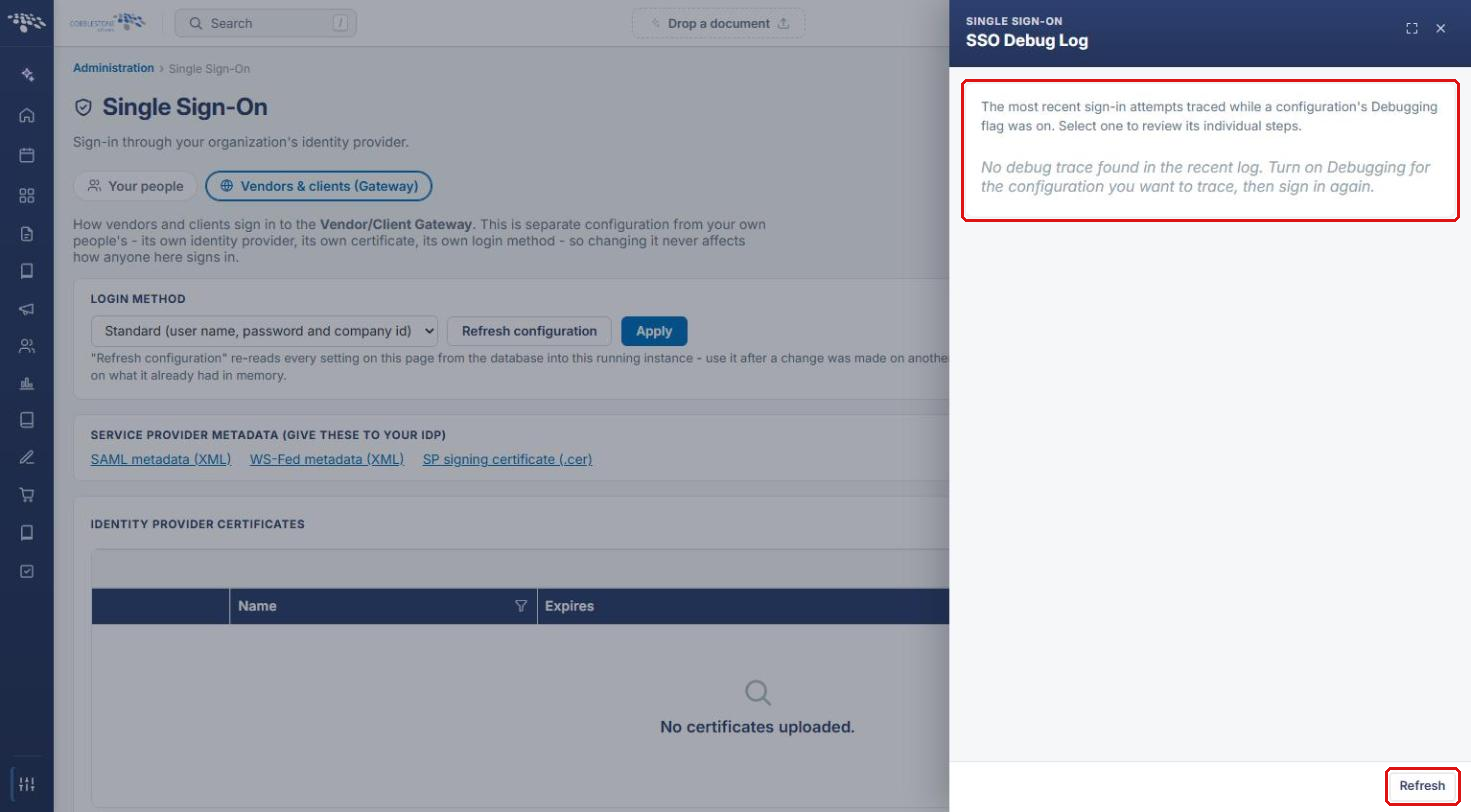
- Debug log: recent sign-in attempts traced while a configuration's Debugging setting is on.
3. Navigating to Single Sign-On
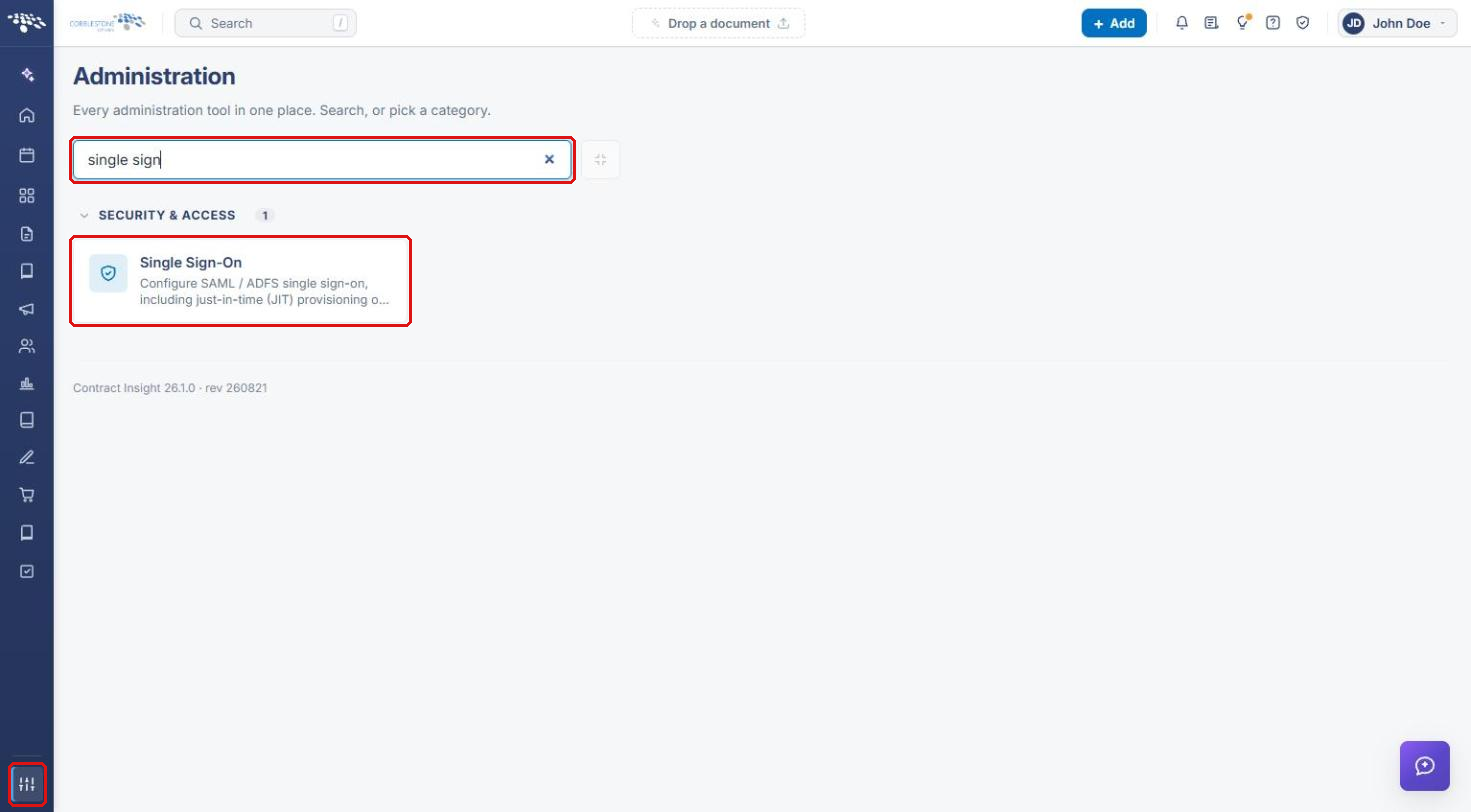
- From the Contract Insight homepage, click the Administration icon at the bottom of the left navigation bar.
- In Search administration, type single sign (or scroll to the Security & Access category).
- Click Single Sign-On.
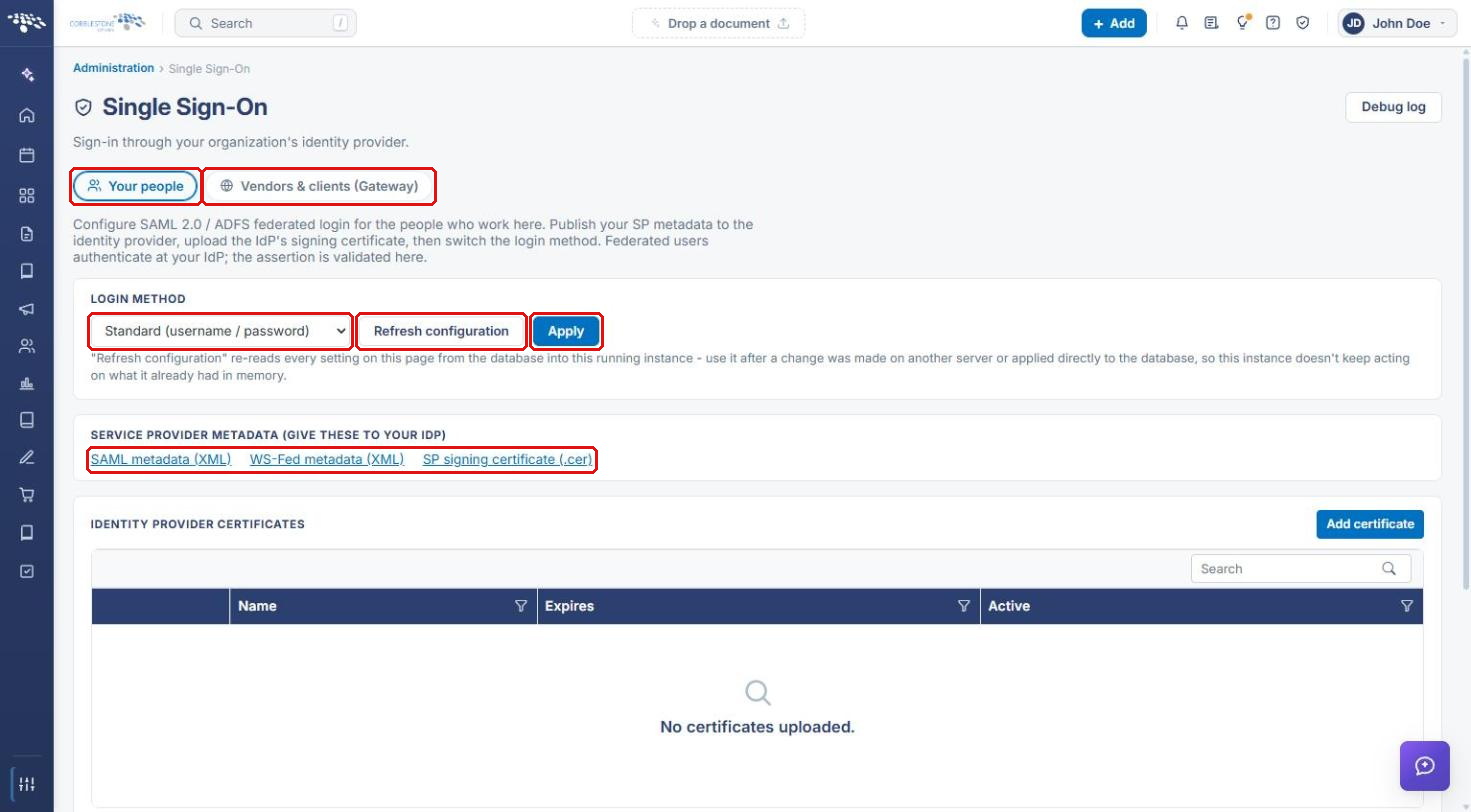
The page opens on the Your people tab. Click Vendors & clients (Gateway) to configure Gateway sign-in instead (see Section 8).
4. Exchanging Metadata and Certificates with Your Identity Provider
4a. Giving Contract Insight's Metadata to the IdP
- Under Service Provider Metadata (give these to your IdP), click SAML metadata (XML) for SAML 2.0, or WS-Fed metadata (XML) for ADFS / WS-Federation.
- If your IdP needs it separately, click SP signing certificate (.cer).
- Give these files to your identity provider administrator.
4b. Adding the IdP's Signing Certificate
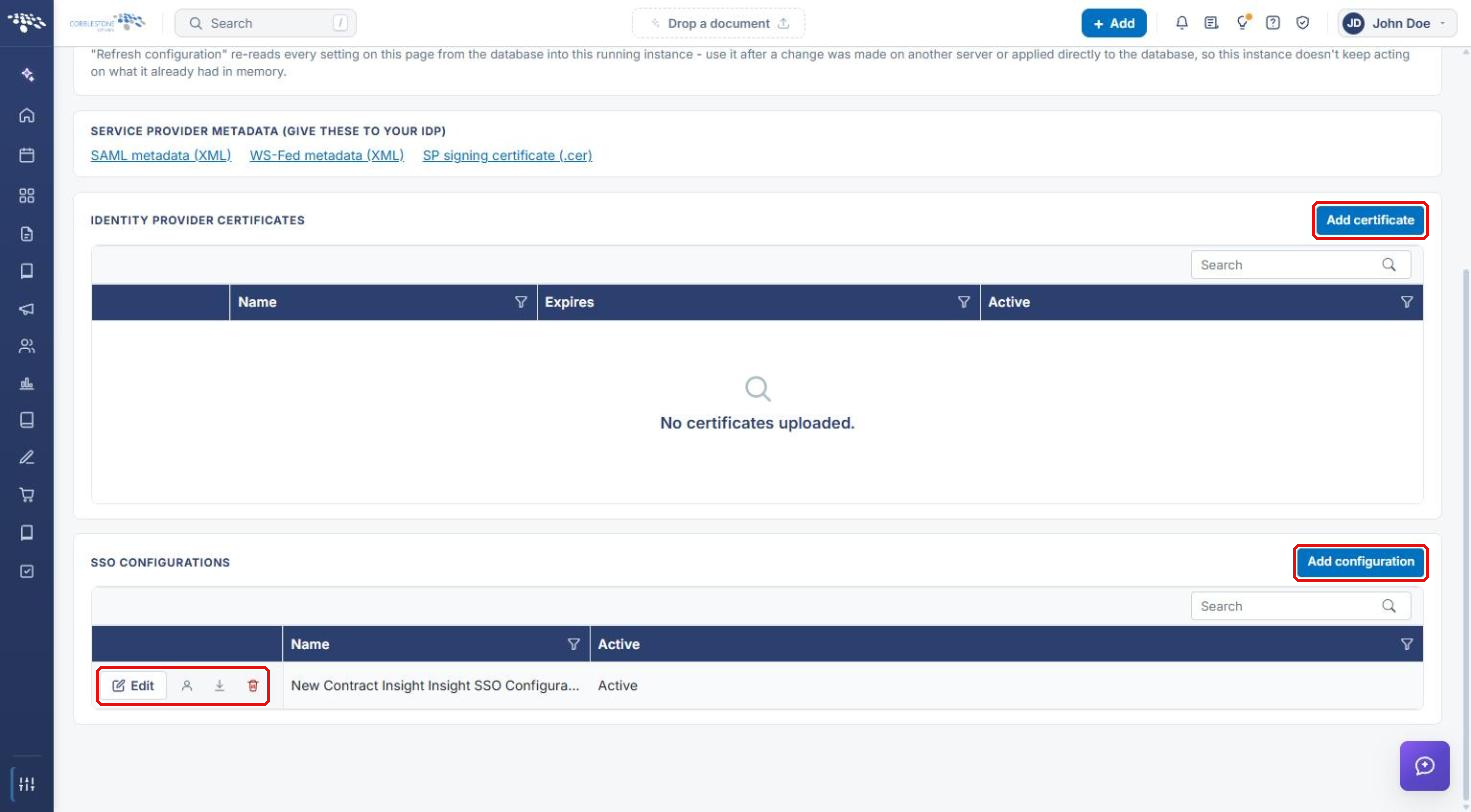
- Scroll to Identity Provider Certificates and click Add certificate.
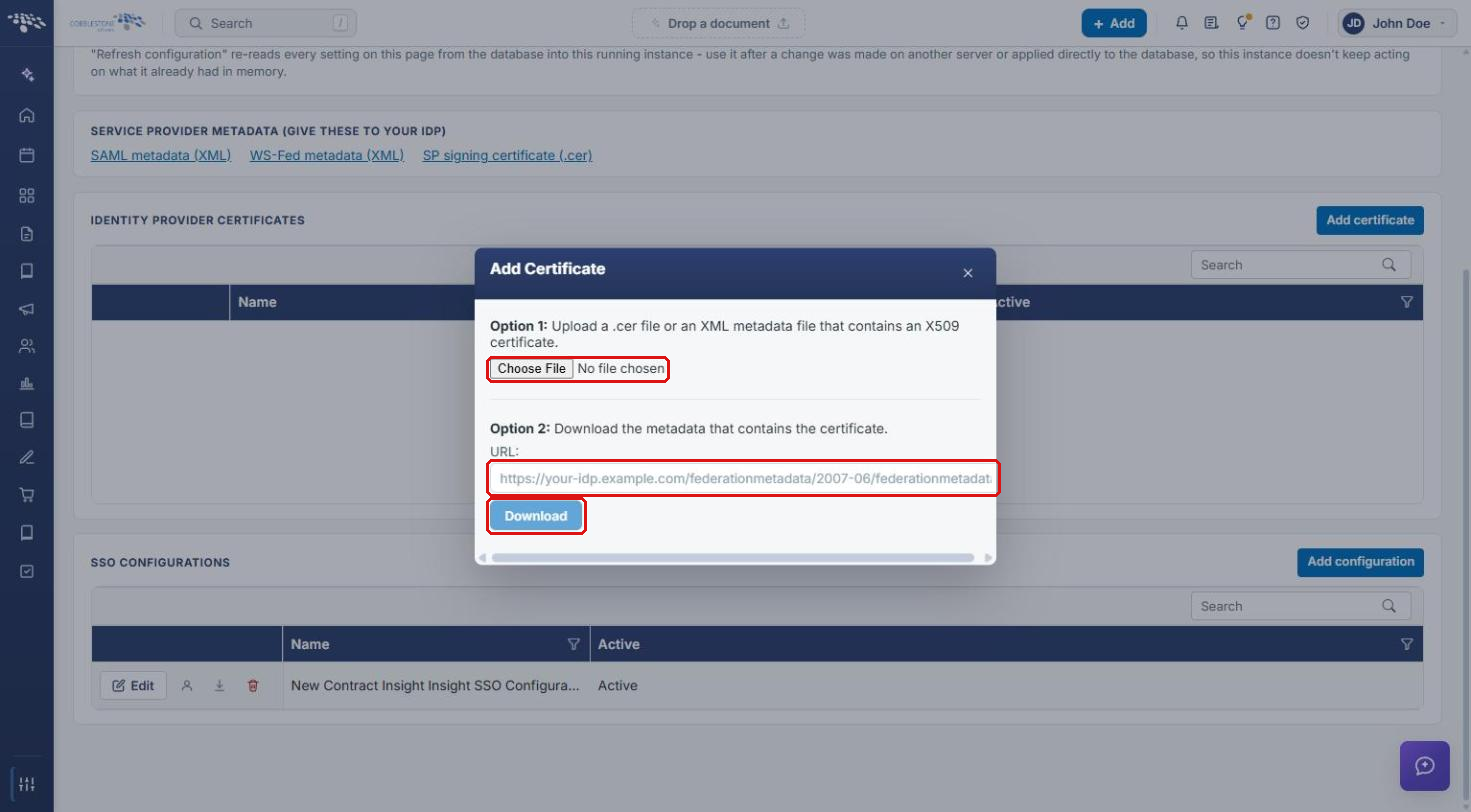
- In the Add Certificate window, either:
- Option 1: click Choose File and upload a .cer file or an XML metadata file that contains an X509 certificate, or
- Option 2: enter the IdP's metadata URL and click Download.
- The certificate is listed with its Name, Expires date, and Active status.
5. Setting Up an SSO Configuration
- Under SSO Configurations, click Add configuration, or click Edit on an existing configuration. For an existing configuration, the Edit Configuration section opens below the list.
- Enter a Name and turn Active on.
- Choose the Single Sign On Mode: Single Sign On Only, or Single Sign On and Standard Logins.
- Copy the Standard Login Address and keep it somewhere an administrator can find it. It shows the username-and-password form even when SSO is in use, and nothing in the application links to it.
- Enter the IDP Login URL (where users are redirected to authenticate), the Audience Restriction, and the Entity ID (if blank, the ACS URL is used).
- Set User Name Location: NameId, or Attribute with the attribute name exactly as it appears in the assertion (case sensitive).
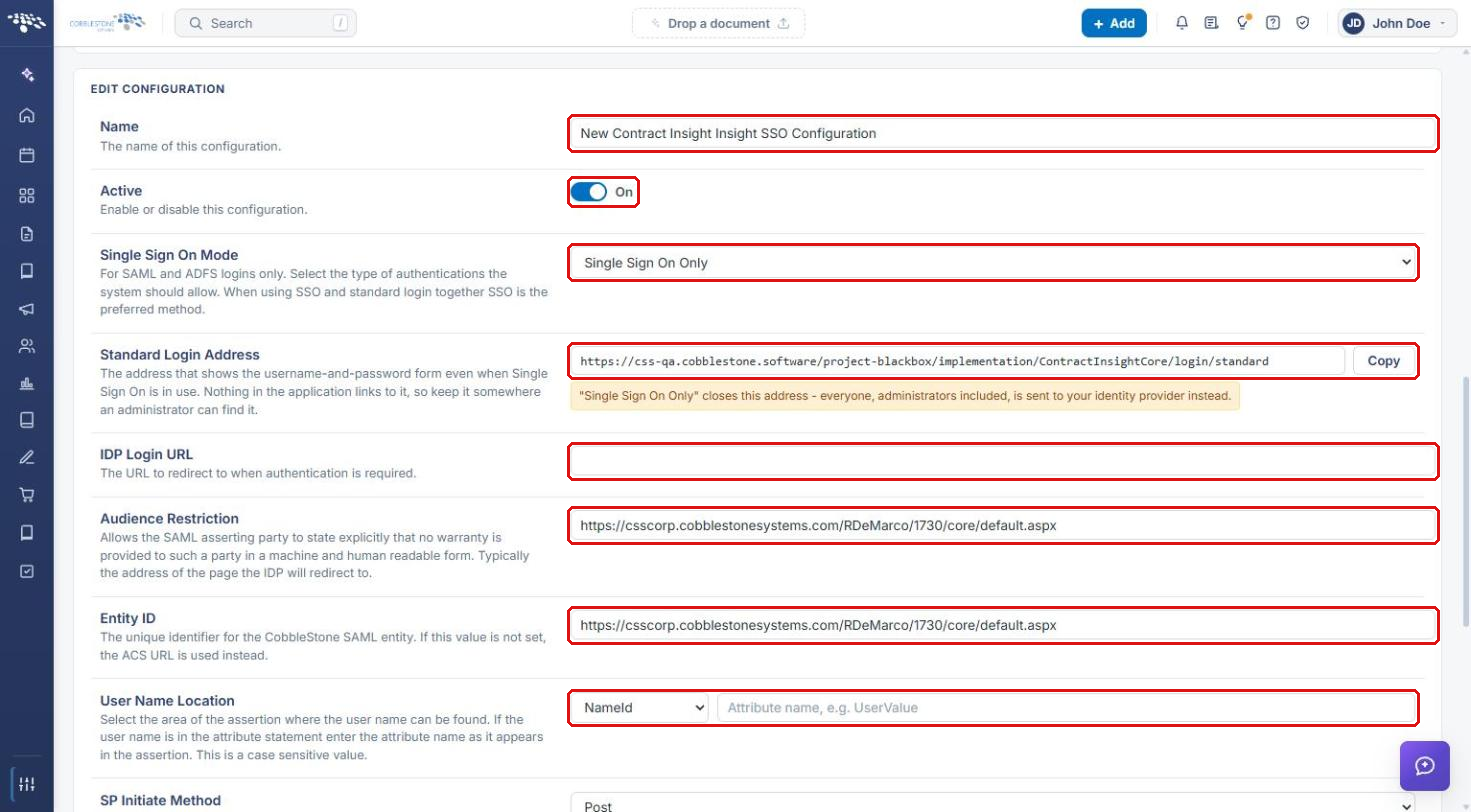
- Set the SP Initiate Method (Post or Redirect) and the Assertion Consumer Service URL the IdP should send authentications to.
- Optionally turn on Enable Single Logout and enter the Single Logout URL. Single logout may sign the user out of other systems managed by the IdP.
- Optionally turn on Debugging to trace sign-in attempts (see Section 9).
- Click Save, or Cancel to discard changes.
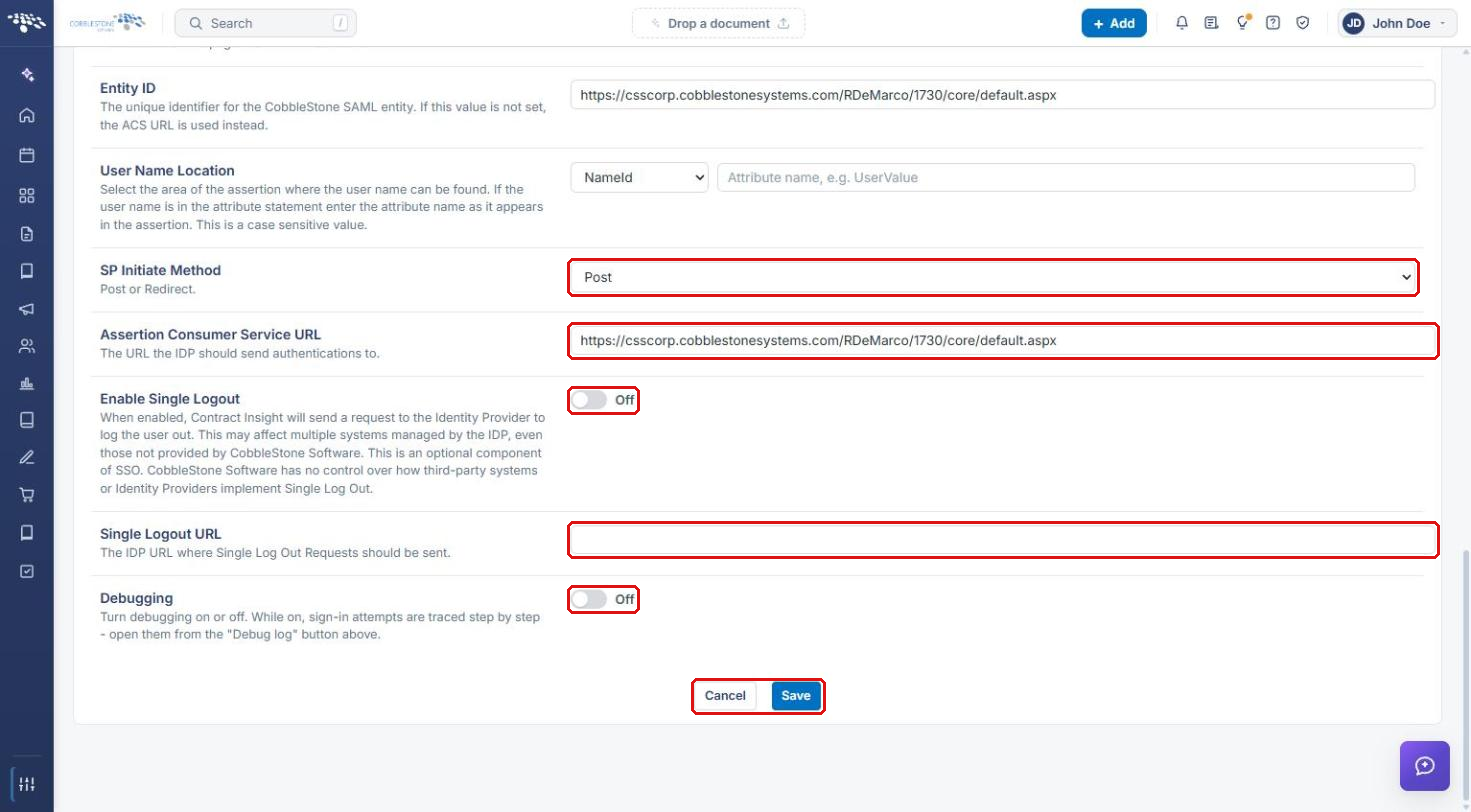
Note: Single Sign On Only closes the Standard Login Address. Everyone, administrators included, is sent to your identity provider. Use Single Sign On and Standard Logins while you are testing.
6. Switching the Login Method
- At the top of the tab, under Login Method, choose SAML 2.0 Single Sign-On or ADFS / WS-Federation (see the screenshot in Section 3).
- Click Apply.
Note: Refresh configuration re-reads every setting on the page from the database into the running instance. Use it after a change was made on another server or directly in the database.
7. Just-In-Time (JIT) Provisioning
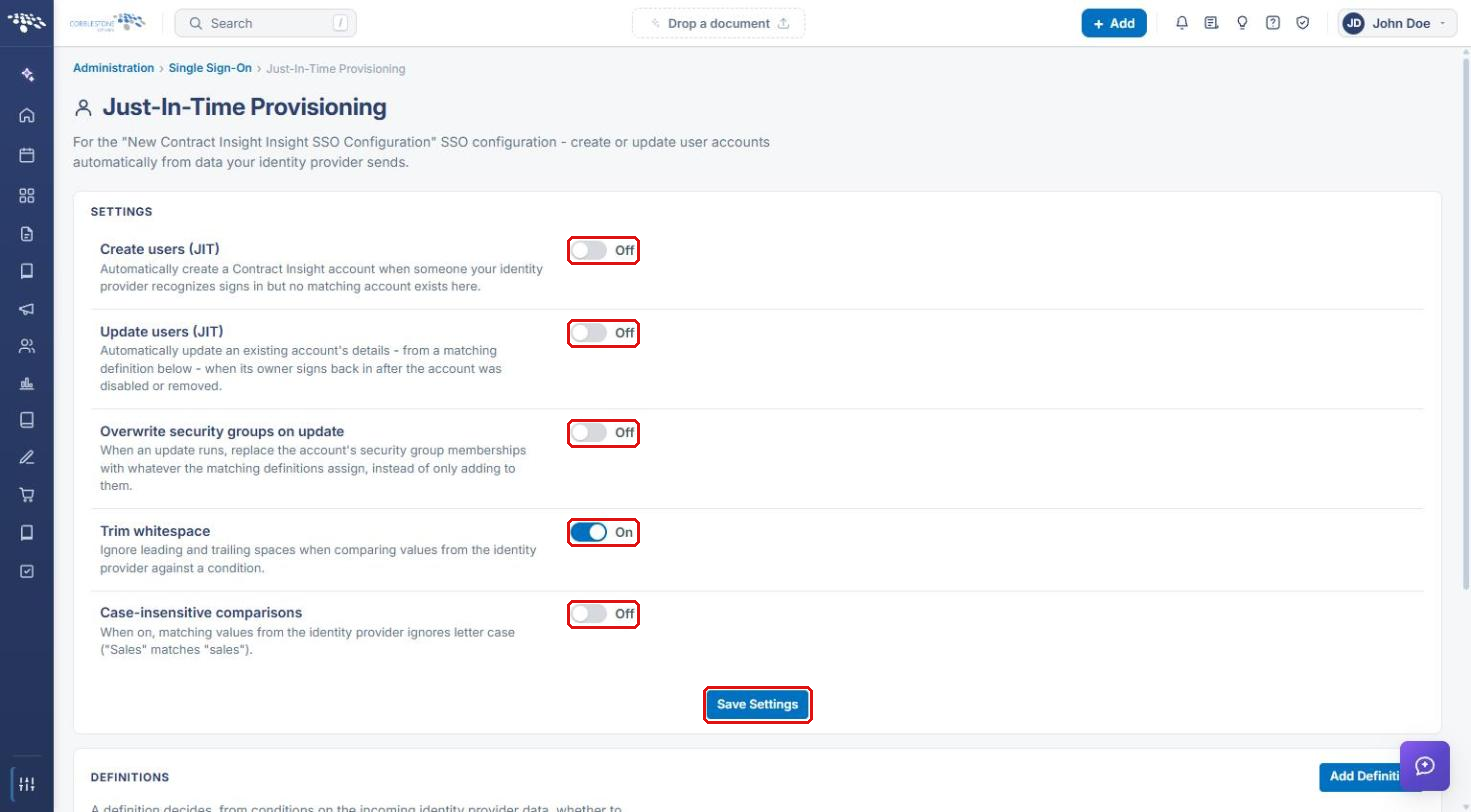
- On the configuration's row under SSO Configurations, click the Just-in-time provisioning (person) icon.
- Under Settings, turn on the options you need:
- Create users (JIT): create a Contract Insight account when someone your IdP recognizes signs in and no matching account exists.
- Update users (JIT): update an existing account's details from a matching definition when its owner signs back in.
- Overwrite security groups on update: replace the account's security groups instead of only adding to them.
- Trim whitespace and Case-insensitive comparisons: control how IdP values are compared against conditions.
- Click Save Settings.
- Under Definitions, click Add Definition, or Edit on an existing one. A definition decides, from conditions on the incoming IdP data, whether to create or update an account and how to fill it in.
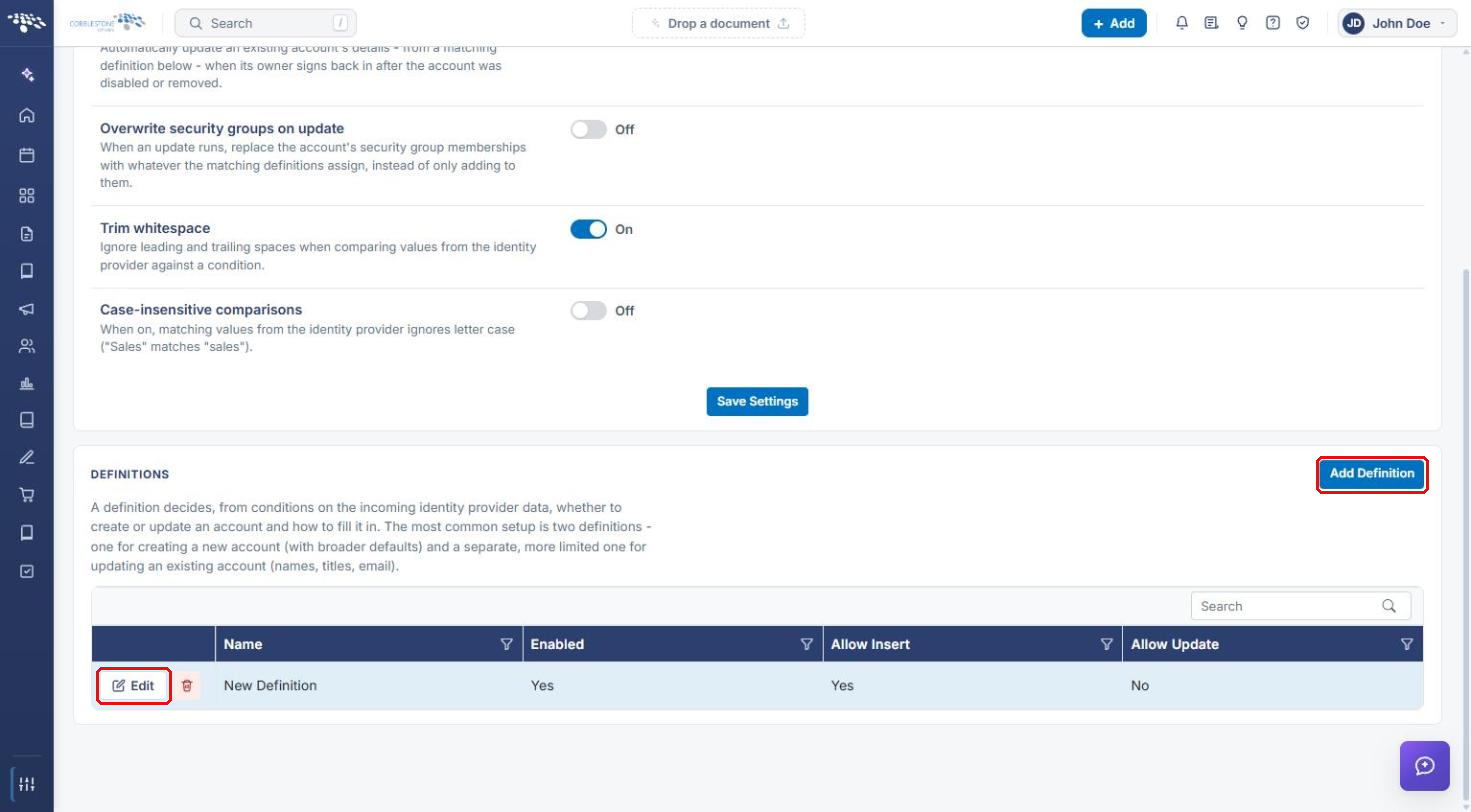
Tip: The most common setup is two definitions: one for creating new accounts (with broader defaults), and a more limited one for updating existing accounts (names, titles, email). See SSO - Just in Time for full details on definitions.
8. Configuring Gateway (Vendor/Client) Sign-In
- On the Single Sign-On page, click the Vendors & clients (Gateway) tab.
- Repeat Sections 4 through 7 on this tab: it has its own identity provider, certificate, and configurations.
- Choose the Login Method and click Apply. The standard option here is Standard (user name, password and company id).
9. Troubleshooting with the Debug Log
- Turn on Debugging in the SSO configuration (Section 5) and sign in again through the IdP.
- On the Single Sign-On page, click Debug log.
- Select a traced sign-in attempt to review its individual steps. Click Refresh to load new attempts.
Note: Turn Debugging off again when you are finished.
10. Quick Reference Summary
| Task | How to Complete It |
|---|---|
| Open Single Sign-On | Administration → search “single sign” → Single Sign-On. |
| Give your IdP the SP metadata | Service Provider Metadata → SAML metadata (XML) or WS-Fed metadata (XML). |
| Add the IdP signing certificate | Identity Provider Certificates → Add certificate → upload a file or download from a URL. |
| Create or edit a configuration | SSO Configurations → Add configuration or Edit → Save. |
| Turn on SSO | Login Method → SAML 2.0 or ADFS / WS-Federation → Apply. |
| Set up JIT provisioning | Configuration row → person icon → Settings and Definitions. |
| Configure Gateway sign-in | Vendors & clients (Gateway) tab. |
| Review sign-in traces | Turn on Debugging → Debug log. |