COBBLESTONE SOFTWARE
Contract Insight — User Guide
Search Engine Configuration
Application Configuration: Search Config and the Search Engine
Note: Each procedure in this guide begins at the Contract Insight homepage, so any section can be followed on its own. The record types, fields and filters available on these screens depend on how the environment is configured, so the exact lists will vary between systems.
1. Overview
Contract Insight offers two ways to find records. The search box in the application header runs a search across the record types the system is configured to cover and groups the matches by area, with a count for each. The search engine takes the same words and searches the full text of documents, returning what it finds by relevance rather than by area.
Search Config governs the first of these. It sets which record types a search covers, the order their results appear in, the heading shown above each group, and — through filters — which of an area’s records are allowed to appear at all. Those filters sit on top of each person’s own permissions, so they narrow what a search can return without ever widening it.
The search engine side is governed by application settings and a scheduled job. The settings decide whether the search engine replaces the standard search, whether it is suggested on the results page, how often its indexes and caches are rebuilt, and how deeply a single search looks. The job itself — Search Engine Indexing and Caching — does the indexing work on a timer and can also be run on demand.
Because these screens change how search behaves for everyone, they are maintained from the Administration area and are normally reserved for Application Administrators or users specifically granted the appropriate permission.
2. Accessing Search Config
Search Config is the central management screen for what a search covers. To open it:
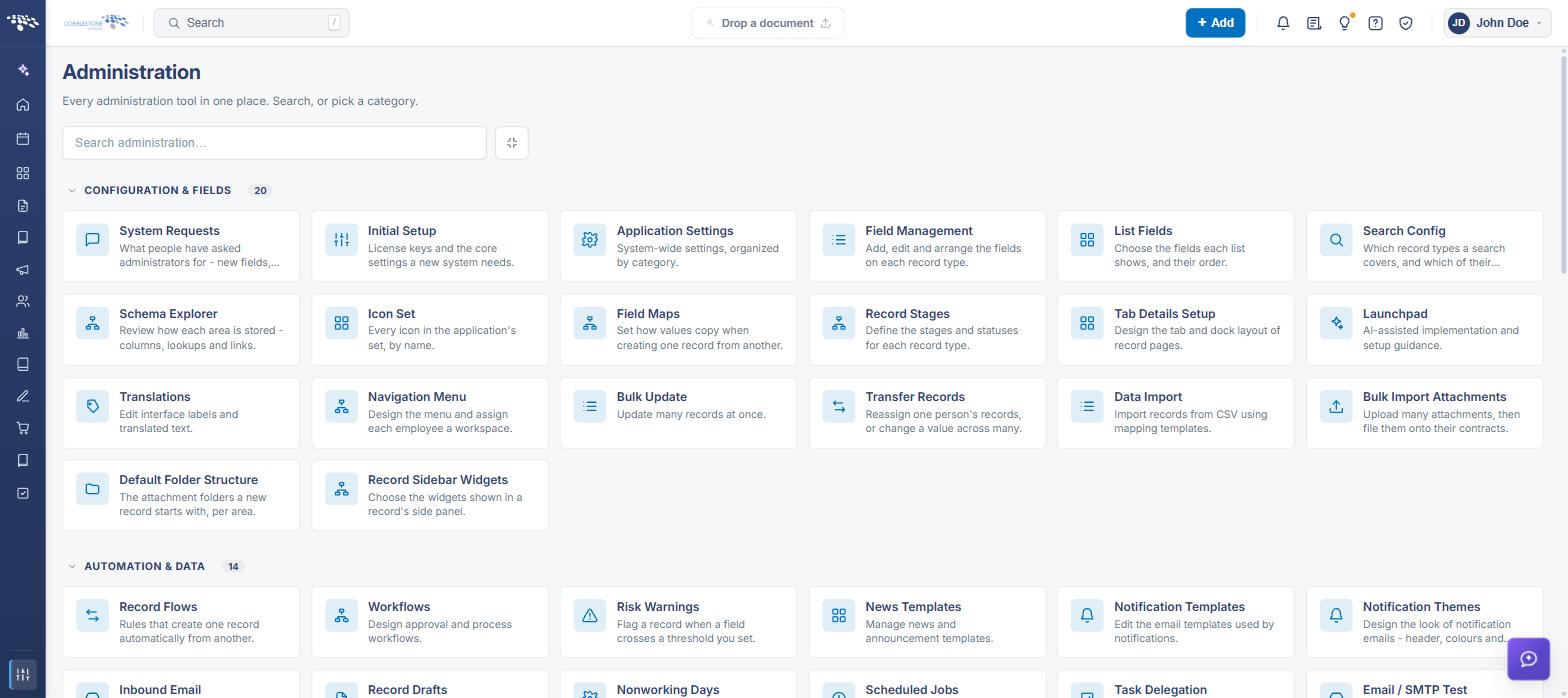
From the Contract Insight homepage, click Administration at the bottom of the left navigation menu. On the Administration page, under Configuration & Fields, select Search Config.
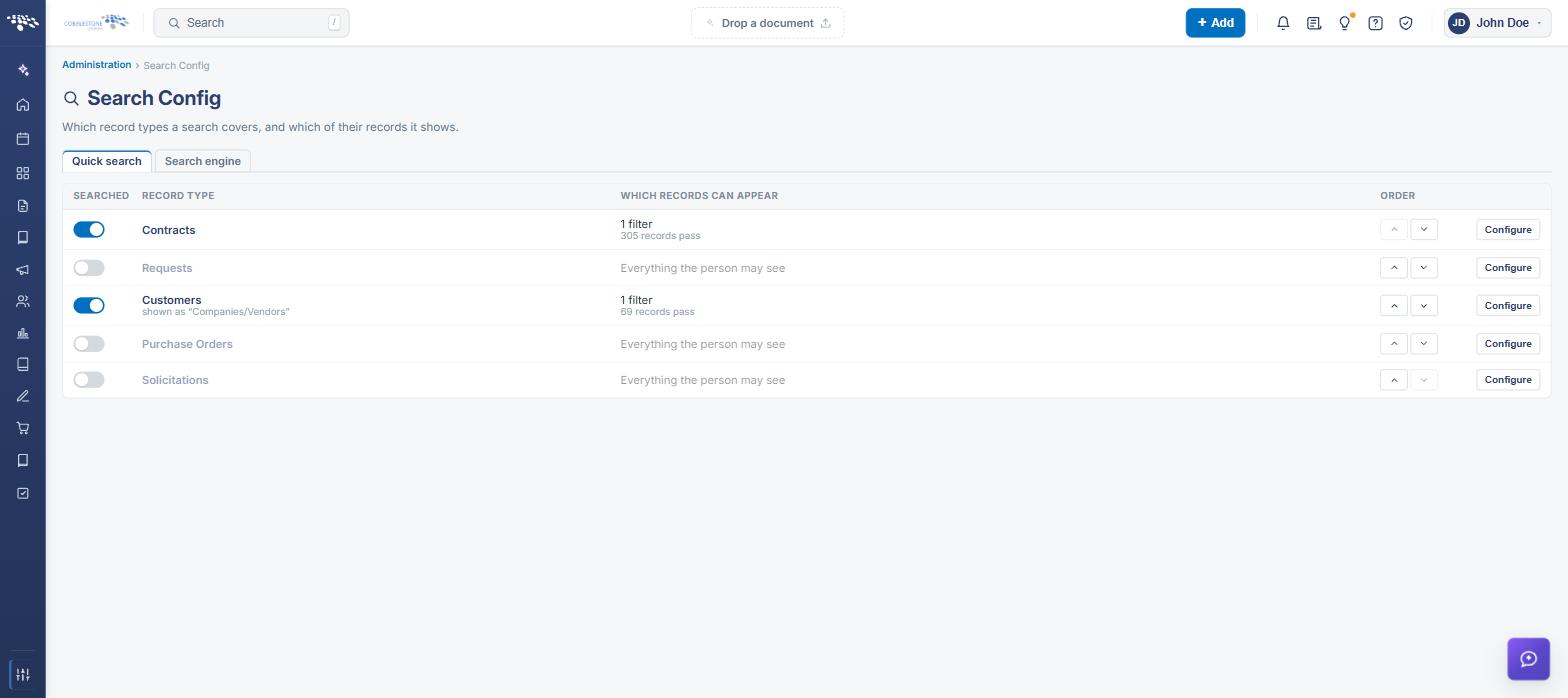
The Search Config screen includes the following elements:
- A Search Config heading with the subtitle “Which record types a search covers, and which of their records it shows.”
- A row for each record type the search can cover — Contracts, Customers, Requests, Solicitations and Purchase Orders
- A SEARCHED switch on each row, which includes or excludes that record type
- A WHICH RECORDS CAN APPEAR column reading either “Everything the person may see” or a count of filters and how many records pass them
- ORDER arrows that move a record type earlier or later in the results
- A per-row Configure button that opens that area’s own settings
3. Choosing Which Record Types Are Searched
Steps:
- From the Contract Insight homepage, click Administration at the bottom of the left navigation menu. On the Administration page, under Configuration & Fields, select Search Config.
- Switch SEARCHED on for each record type a search should cover, and off for any it should ignore.
- Use the ORDER arrows to move a record type up or down. The order set here is the order its results appear in on the results page.
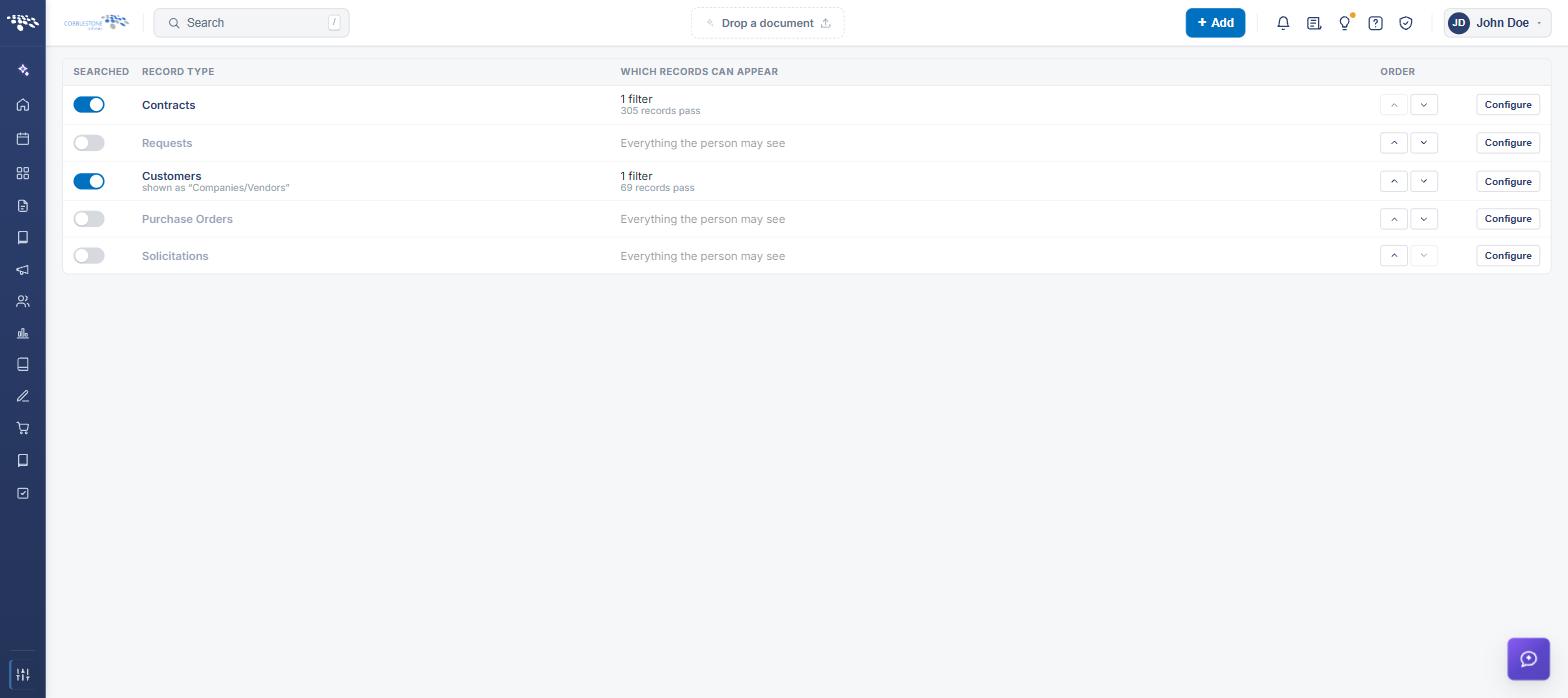
Note: Turning a record type off removes it from search results entirely, for everyone. It does not affect who may open those records, only whether a search returns them.
4. Configuring How an Area Appears
Steps:
- From the Contract Insight homepage, click Administration at the bottom of the left navigation menu. On the Administration page, under Configuration & Fields, select Search Config.
- Click Configure on the row for the record type. The area’s own page opens, with an All areas breadcrumb back to the list.
- In the How it appears in results section, set Heading above these results — the wording shown above that group of results. Left blank, the area’s own name is used.
- Switch Add a note when filters are hiding records on to display a message above those results, so nobody assumes the search is broken.
- Click Save changes, or Discard changes to leave the area as it was.
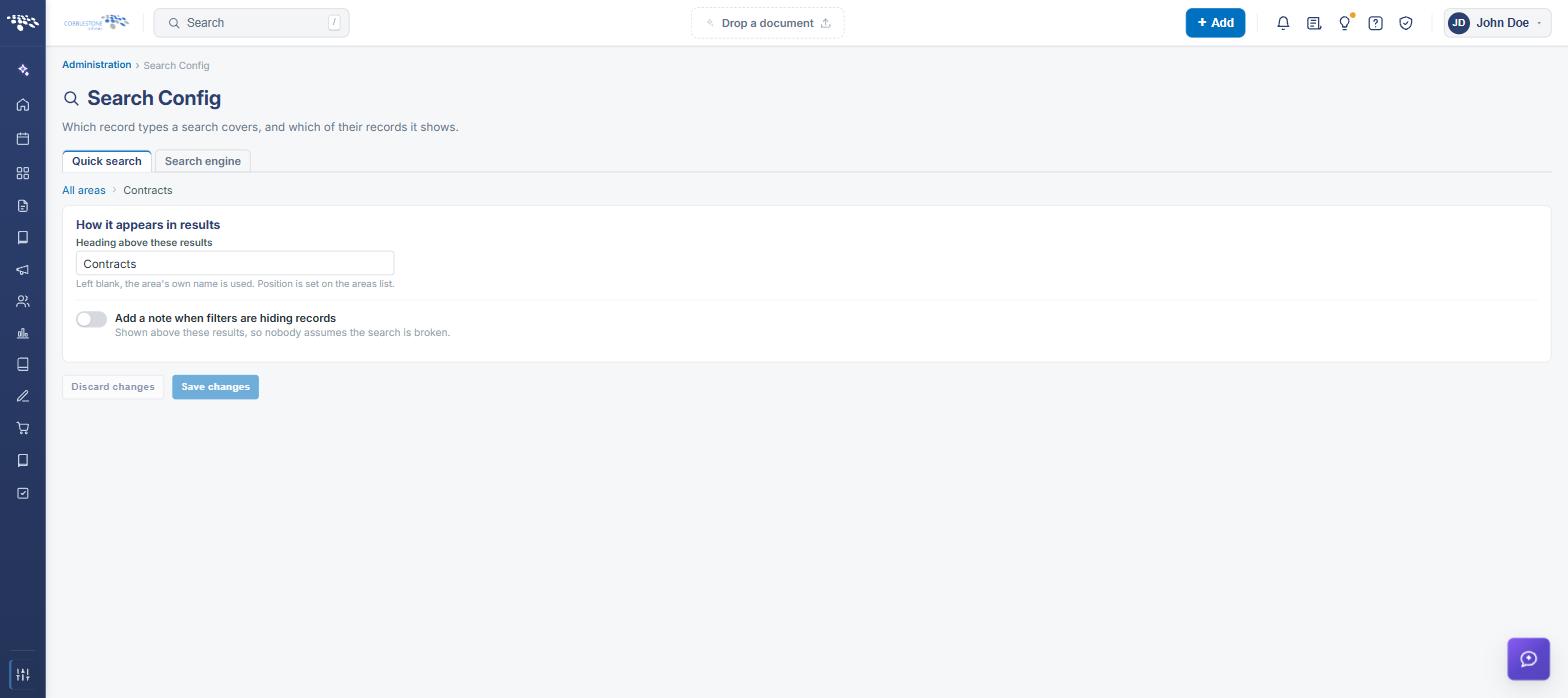
Note: The position of a group in the results is set on the areas list with the ORDER arrows, not on this page.
5. Limiting Which Records Can Appear
The Which records can appear at all section of an area’s page holds its filters. As the screen explains, every filter applies to all searches of that area, for everyone, on top of each person’s own permissions, and the section reports how many records currently pass. Filters are typically used to keep deleted or draft records out of results.
Steps:
- From the Contract Insight homepage, click Administration at the bottom of the left navigation menu. On the Administration page, under Configuration & Fields, select Search Config.
- Click Configure on the row for the record type, then go to Which records can appear at all.
- Click Add a filter. A panel opens headed SEARCH CONFIG | <AREA> / Add a filter, stating “Records must match this for the search to return them.”
- Set Match to ALL or ANY of the rules that follow.
- Use + Condition to add a rule and + Group to nest a set of rules. For each rule, choose the field, choose the operator — contains, does not contain, starts with, ends with, is equal to, is not equal to, is greater than, is less than, is between, is null, is empty and the rest — and enter the value.
- Click Count matching records to check how many records the rules return before committing to them.
- Click Add filter to save it, or Cancel to discard it.
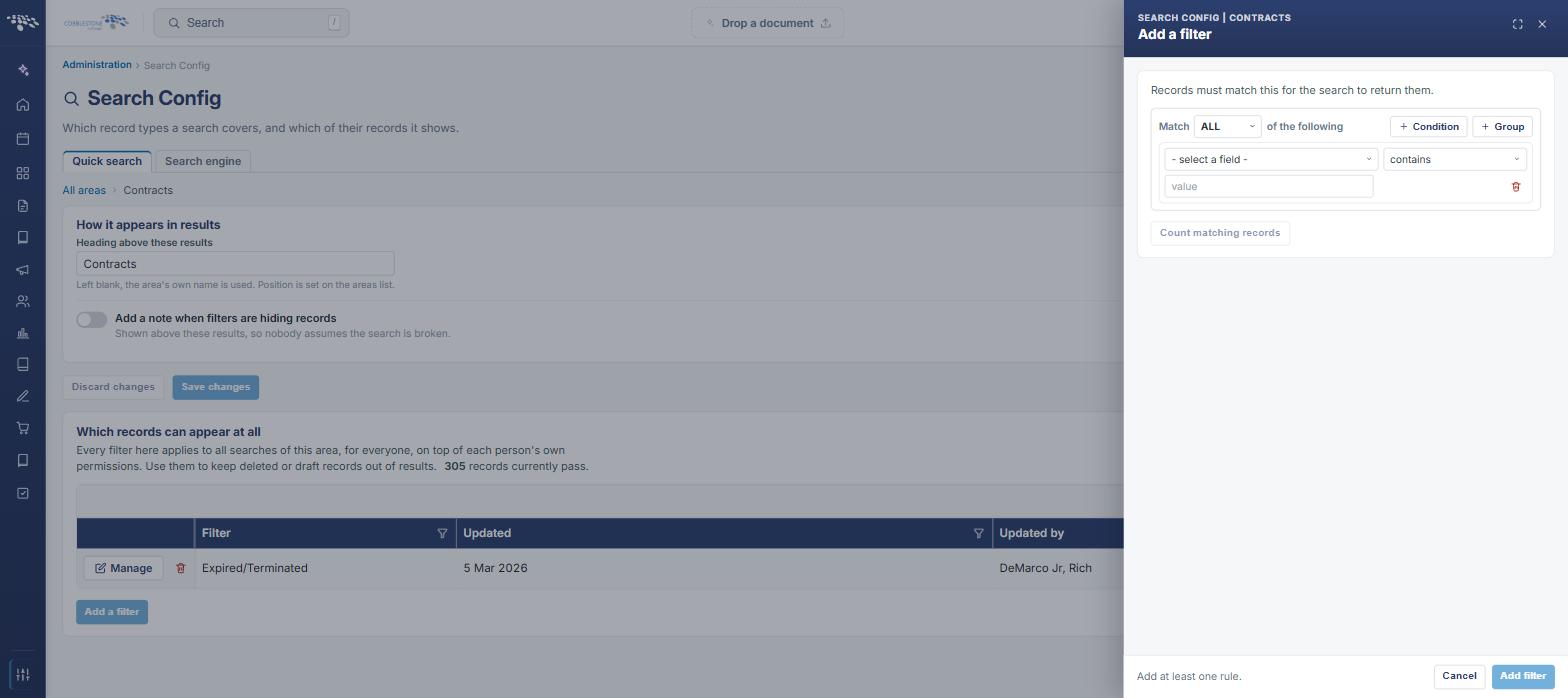
The filter list itself shows:
- A Filter, Updated and Updated by column for each filter, each with its own filter icon, and a Search box above the grid
- A per-row Manage button for editing the filter, and a red delete button for removing it
- A running count of how many records currently pass, shown in the section’s description
Note: A filter never widens what a person can see. Each person’s own permissions apply first, and these filters narrow the result further.
6. Search Engine Application Settings
Steps:
- From the Contract Insight homepage, click Administration at the bottom of the left navigation menu. On the Administration page, under Configuration & Fields, select Application Settings.
- Search for search, or open the Search category.
- Adjust the settings described below.
- Click Save changes to apply them, or Discard to abandon them. A change takes effect as soon as it is saved.
The settings in the Search category are:
- Replace Quick Search — use the system search engine in place of the standard search: Always, Never or User
- Suggest Search Engine — offer the search engine on the standard results page, as a link inviting the person to search the full text of documents
- Search Engine Indexing and Caching Timer — how often the search engine updates its indexes and caches
- Search Engine Maximum Results — the most relevant matches the search engine examines for a single search; raising it lets a search look deeper into large result sets, at the cost of a slower search
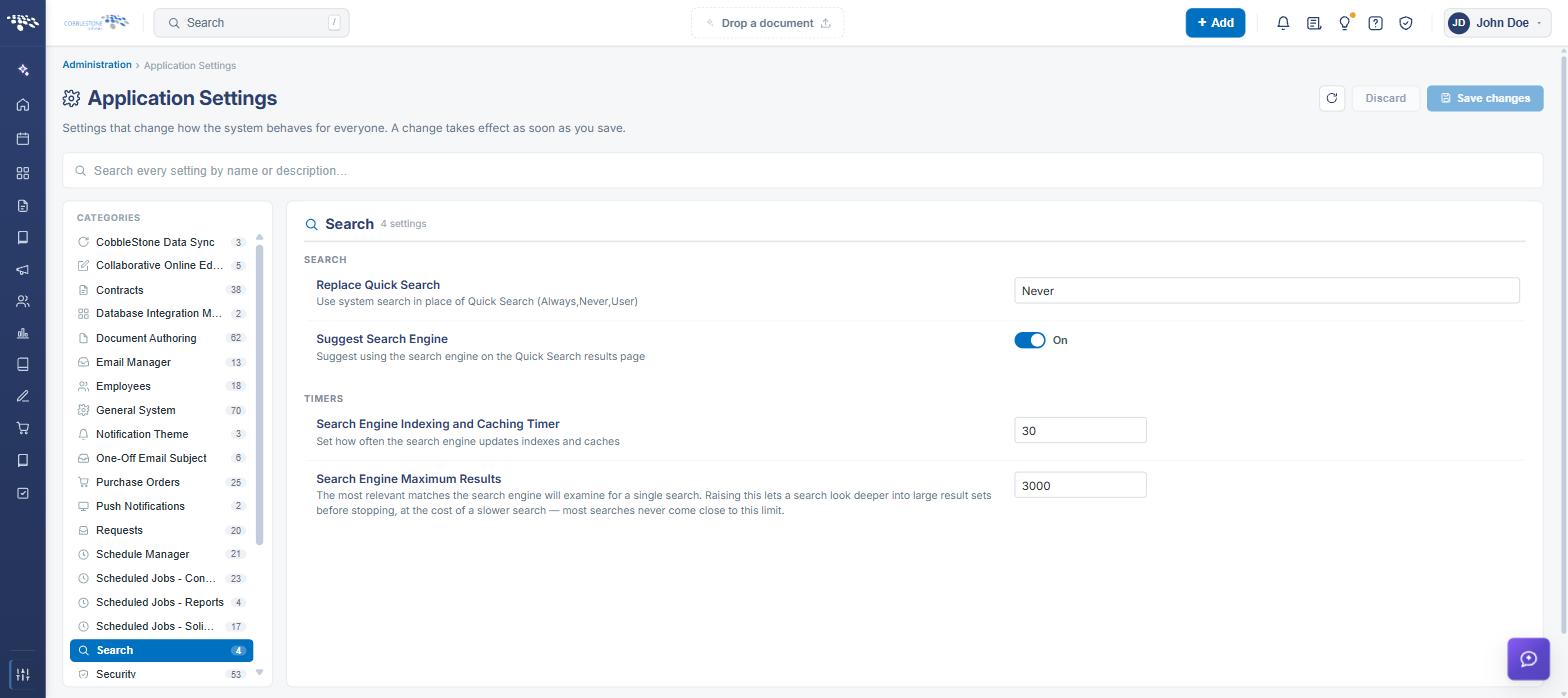
The General System category holds related settings for the standard results page, including Hide Source Column, Hide Top Page Result and Sort Quick Search Results by Primary Key.
7. Search Engine Indexing
The search engine keeps its own index of record and document text. That index is maintained by the Search Engine Indexing and Caching job, which runs on a timer and can also be run on demand.
Steps:
- From the Contract Insight homepage, click Administration at the bottom of the left navigation menu. On the Administration page, under Automation & Data, select Scheduled Jobs.
- Find the Search Engine Indexing and Caching row. The grid shows how often the job runs (Every), its Last run, its Next run and its Status.
- Click Run now to index immediately — useful after a large import, or after changing what the search covers.
- Click Change how often it runs to set the interval in minutes, then Save. Setting it to 0 stops the job running on a schedule, though it can still be run by hand.
- Click History to review the job’s previous runs.
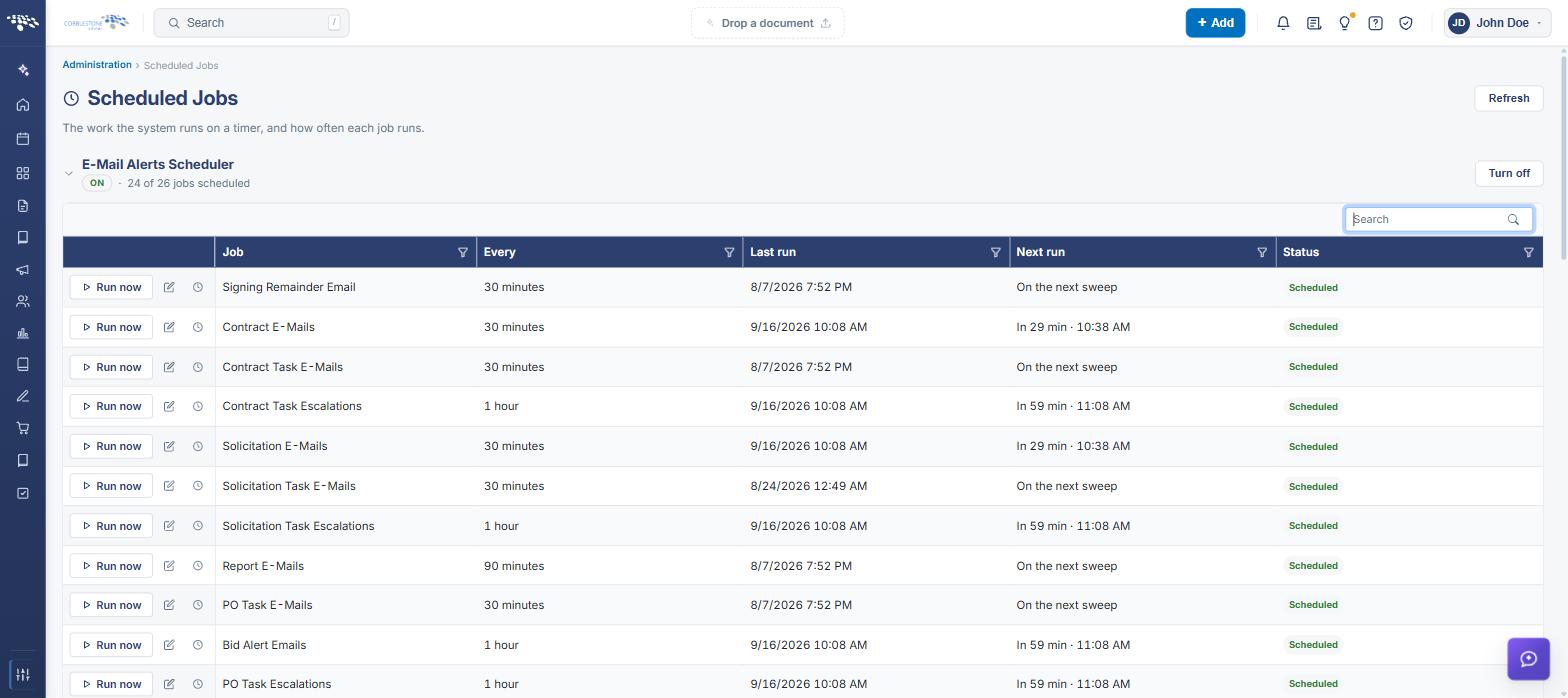
Note: The panel recommends a minimum interval of 30 minutes for this job. Indexing runs in batches, so immediately after a large change the index may lag behind the number of records in the system until the next few runs complete.
8. How Search Appears to Users
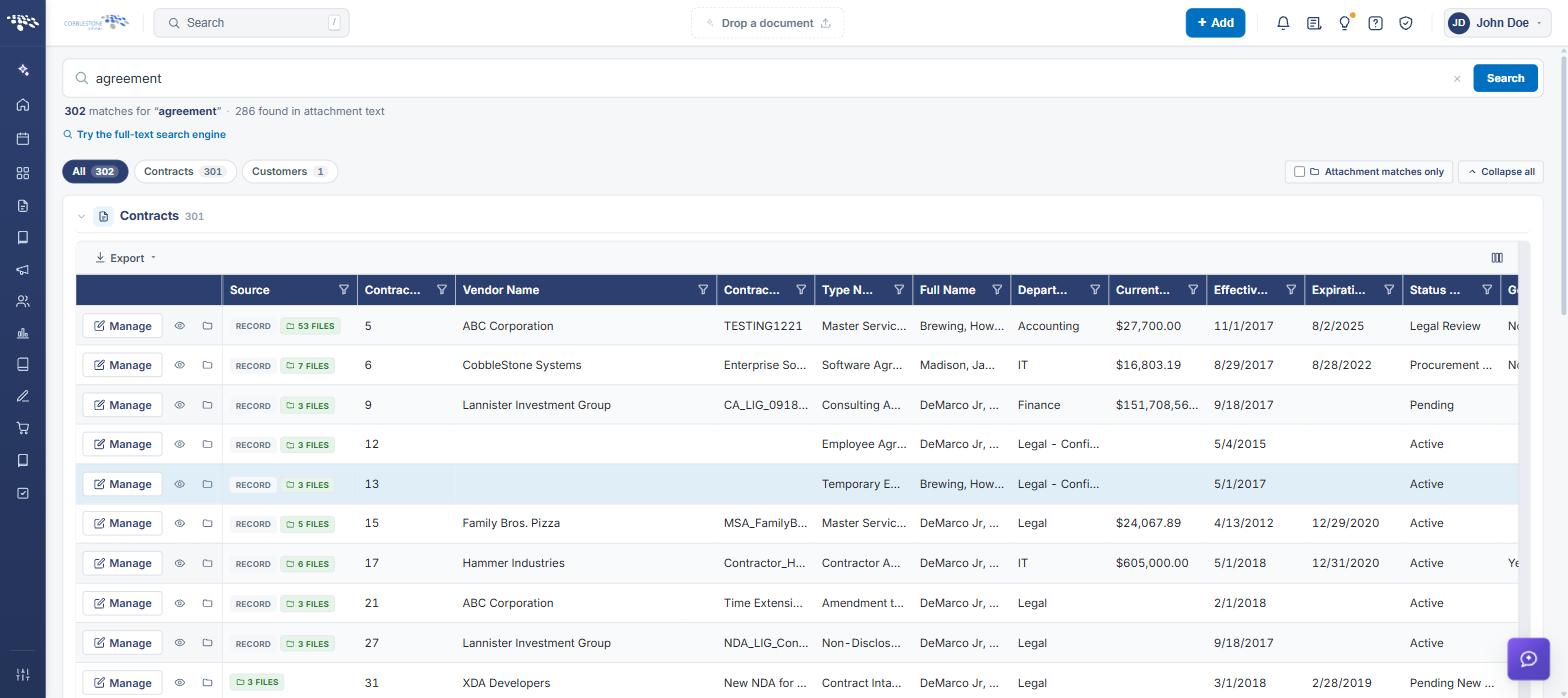
Users search from the box in the application header. The results page reports how many matches were found, how many of them were found in attachment text, and breaks the results down by area:
- A tab for All results and one for each searched record type, each with its own count
- An Attachment matches only option, for narrowing the page to matches found inside documents
- A Collapse all control, and an Export option on each area’s grid
- A Source column showing whether the match came from the record or from a file, and a per-row Manage button
- A link inviting the person to search the full text of documents with the search engine, shown when Suggest Search Engine is on
The Search Engine page itself reports the number of results for the words entered and offers Save this search, along with SAVED SEARCHES and RECENT SEARCHES panels for returning to earlier searches.
9. Quick Reference Summary
Task | How to Complete It |
Open Search Config | Homepage → Administration → Configuration & Fields → Search Config. |
Include a record type | Switch SEARCHED on for that row. |
Order the results | Use the ORDER arrows to move a record type earlier or later. |
Rename a results group | Configure → Heading above these results, then Save changes. |
Explain hidden records | Configure → switch Add a note when filters are hiding records on. |
Restrict an area | Configure → Which records can appear at all → Add a filter, build the rules, Add filter. |
Test a filter | Count matching records in the filter panel, before saving it. |
Search engine settings | Application Settings → Search: Replace Quick Search, Suggest Search Engine, Indexing and Caching Timer, Maximum Results. |
Index on demand | Scheduled Jobs → Search Engine Indexing and Caching → Run now. |
Change the index interval | Scheduled Jobs → Change how often it runs; 0 stops the schedule. |