COBBLESTONE SOFTWARE
Contract Insight — User Guide
Multi-Factor Authentication
Security & Access: Multifactor Authentication (MFA)
Note: Each procedure in this guide begins at the Contract Insight homepage, so any section can be followed on its own. Multifactor authentication settings apply to people who sign in with a password; users authenticated through single sign-on are governed by their identity provider instead.
1. Overview
Multifactor authentication (MFA) adds a second check at sign-in, after the password. With it turned on, a person who enters a correct password is asked for something further — a verification code sent to them, or answers to challenge questions they set up in advance — before the application lets them in.
The MFA screen covers two audiences, each configured separately. Your people covers everyone who signs in to the application itself; Vendors & clients (Gateway) covers the vendors and clients who sign in to the Vendor/Client Gateway. Switching between the two changes every setting on the screen, so an organization can require a second step of one group without imposing it on the other.
Verification methods can be combined. Codes can be emailed, sent by text message, or attempted one way and then the other, and internal users can also be asked challenge questions. Each method that is ticked is applied, so ticking two means a person completes both. The code itself is configurable — its length and the characters it may use — and the email that carries it can be rewritten.
Because these settings govern how everyone signs in, they are maintained from the Administration area and are normally reserved for Application Administrators or users specifically granted the appropriate permission.
2. Accessing the Multifactor Authentication Screen
The Multifactor Authentication screen is the central management screen for the second sign-in step. To open it:
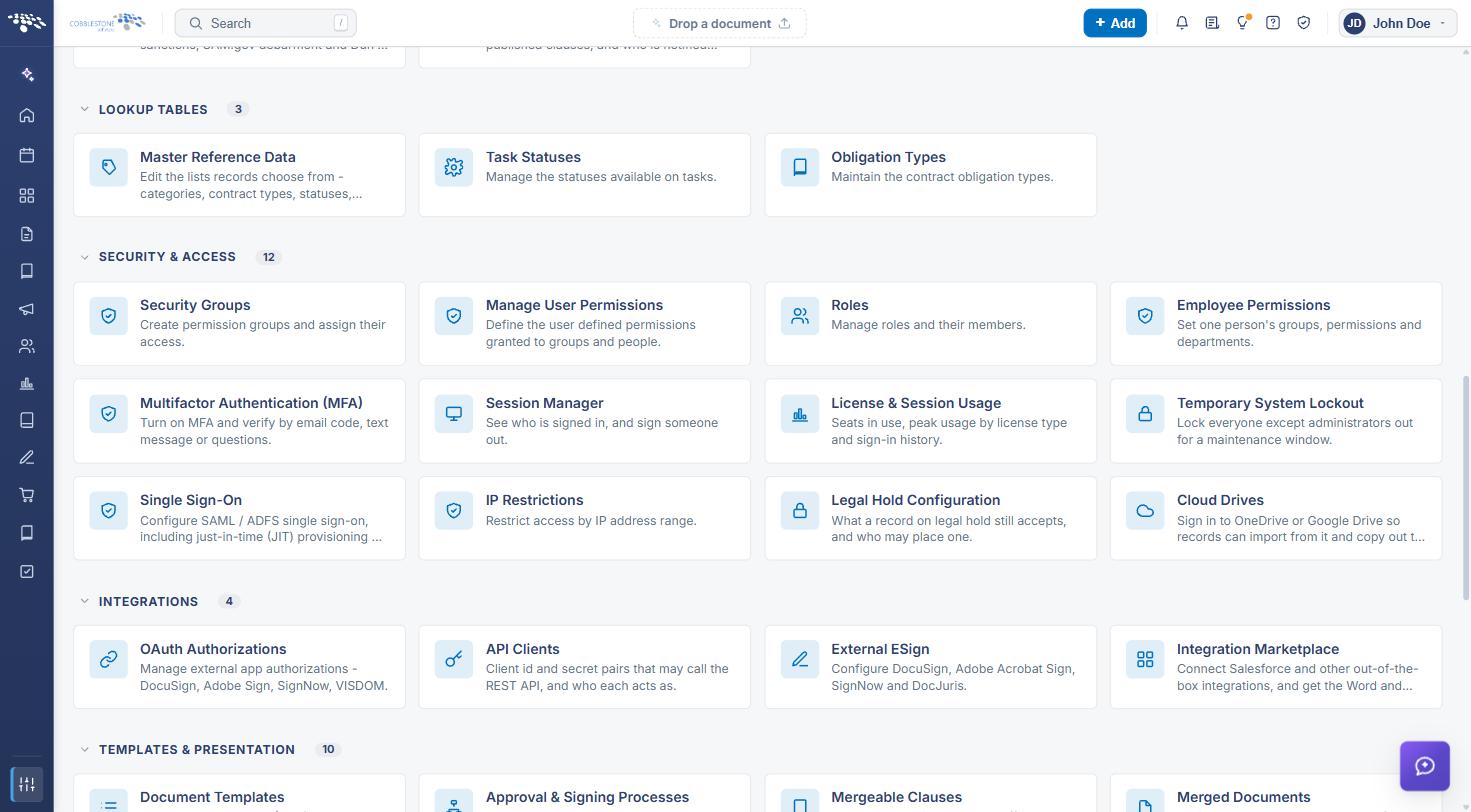
From the Contract Insight homepage, click Administration at the bottom of the left navigation menu. On the Administration page, under Security & Access, select Multifactor Authentication (MFA).
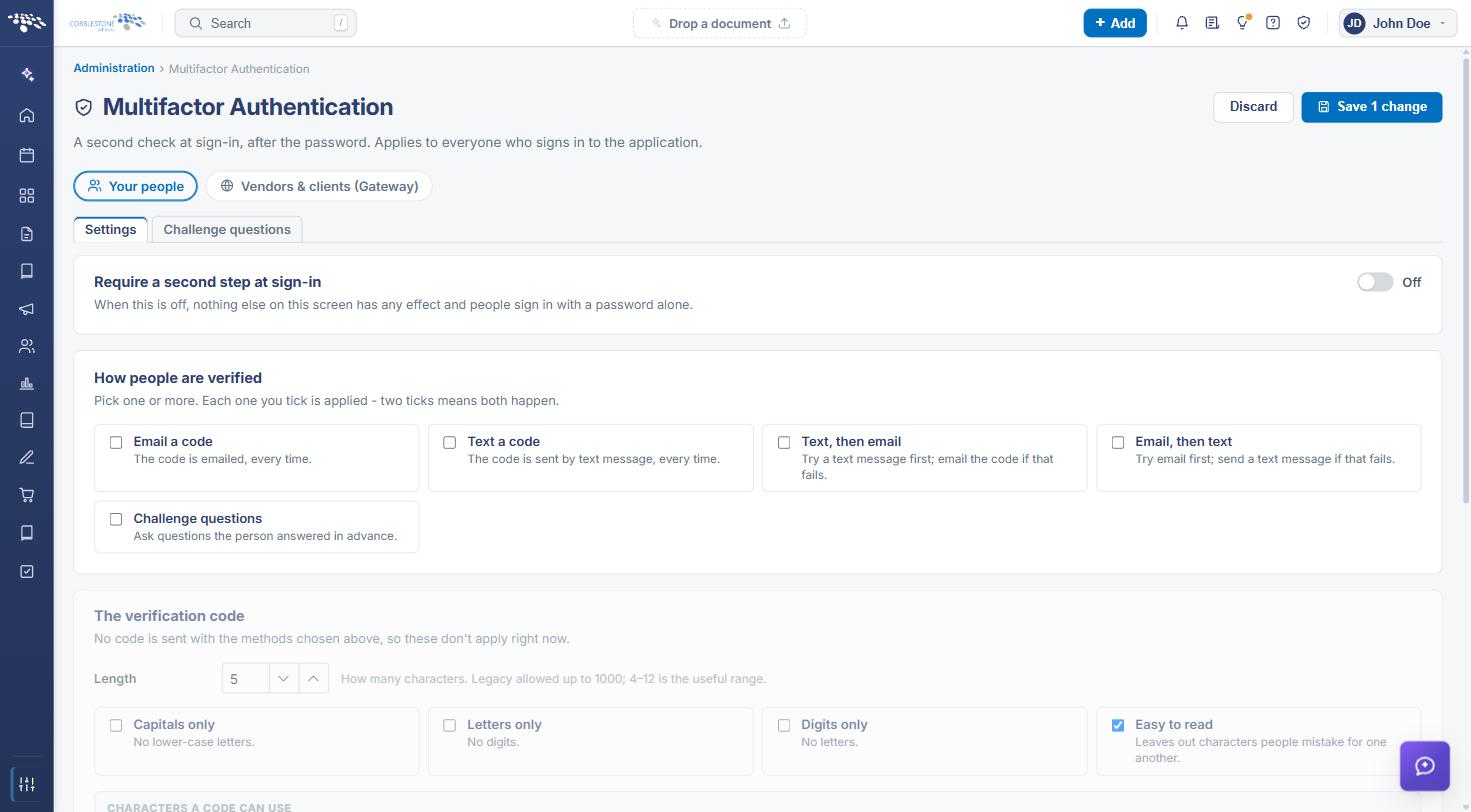
The Multifactor Authentication screen includes the following elements:
- A Multifactor Authentication heading with the subtitle “A second check at sign-in, after the password. Applies to everyone who signs in to the application.”
- An audience switch offering Your people and Vendors & clients (Gateway)
- A Settings tab and, for Your people, a Challenge questions tab
- A Require a second step at sign-in switch at the top of the Settings tab
- A How people are verified section listing the available verification methods
- A The verification code section controlling the length and character set of the code, with a live CHARACTERS A CODE CAN USE preview
- A Challenge questions section setting the pool size and how many questions are asked
- A The email that carries the code section, with a preview of the current message and an Edit message button
- Discard and Save changes buttons in the upper right of the screen
3. Turning Multifactor Authentication On
Steps:
- From the Contract Insight homepage, click Administration at the bottom of the left navigation menu. On the Administration page, under Security & Access, select Multifactor Authentication (MFA).
- Make sure the Your people audience is selected, and that the Settings tab is open.
- Switch Require a second step at sign-in to On.
- Choose the verification methods and code settings described in the sections below.
- Click Save changes in the upper right, or Discard to abandon the changes.
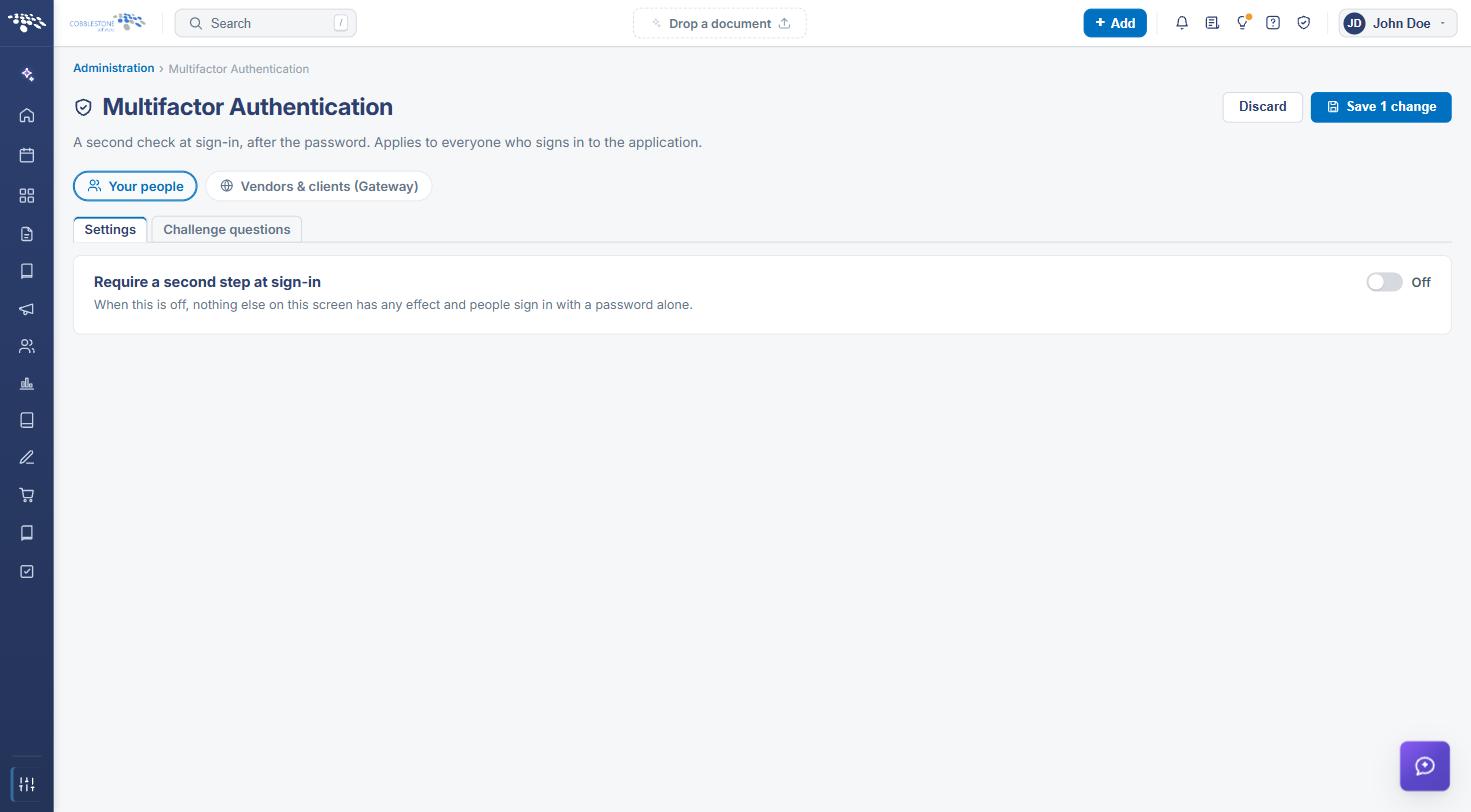
Note: While the switch is off, nothing else on the screen has any effect and people sign in with a password alone, as the screen states: “When this is off, nothing else on this screen has any effect and people sign in with a password alone.”
4. Choosing How People Are Verified
Steps:
- From the Contract Insight homepage, click Administration at the bottom of the left navigation menu. On the Administration page, under Security & Access, select Multifactor Authentication (MFA).
- In the How people are verified section, tick each method to apply.
- Click Save changes.
The available methods are:
- Email a code — the code is emailed, every time
- Text a code — the code is sent by text message, every time
- Text, then email — a text message is tried first, and the code is emailed if that fails
- Email, then text — email is tried first, and a text message is sent if that fails
- Challenge questions — the person is asked questions they answered in advance
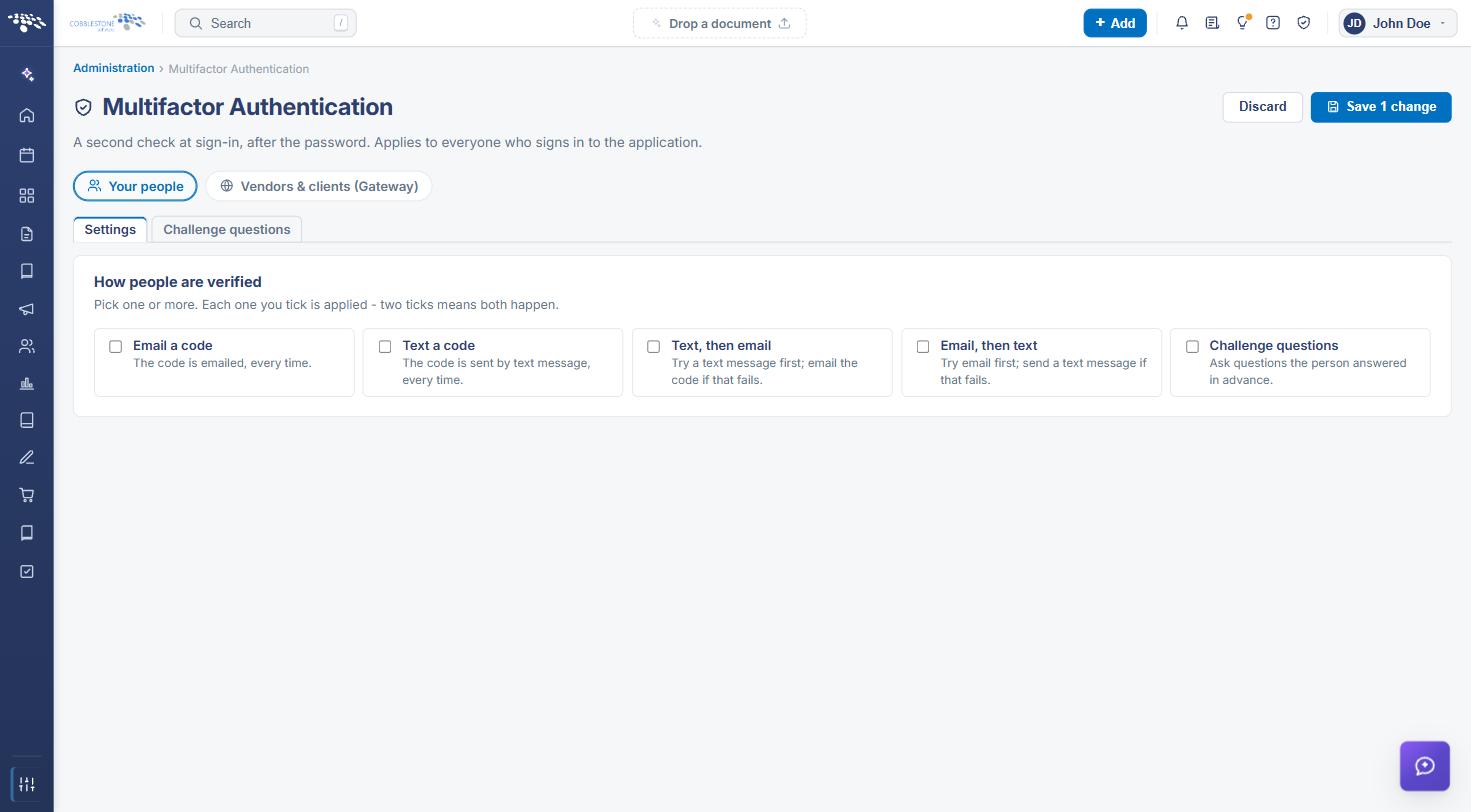
Note: As the section explains, “Pick one or more. Each one you tick is applied — two ticks means both happen.” Challenge questions are offered for internal users only; the Gateway audience is verified by code.
5. Configuring the Verification Code
Steps:
- From the Contract Insight homepage, click Administration at the bottom of the left navigation menu. On the Administration page, under Security & Access, select Multifactor Authentication (MFA).
- In The verification code section, set the Length — how many characters the code contains.
- Tick the character rules to apply: Capitals only (no lower-case letters), Letters only (no digits), Digits only (no letters), and Easy to read (leaves out characters people mistake for one another).
- Check the CHARACTERS A CODE CAN USE line beneath the options — it shows the exact set of characters the rules produce.
- Click Save changes.
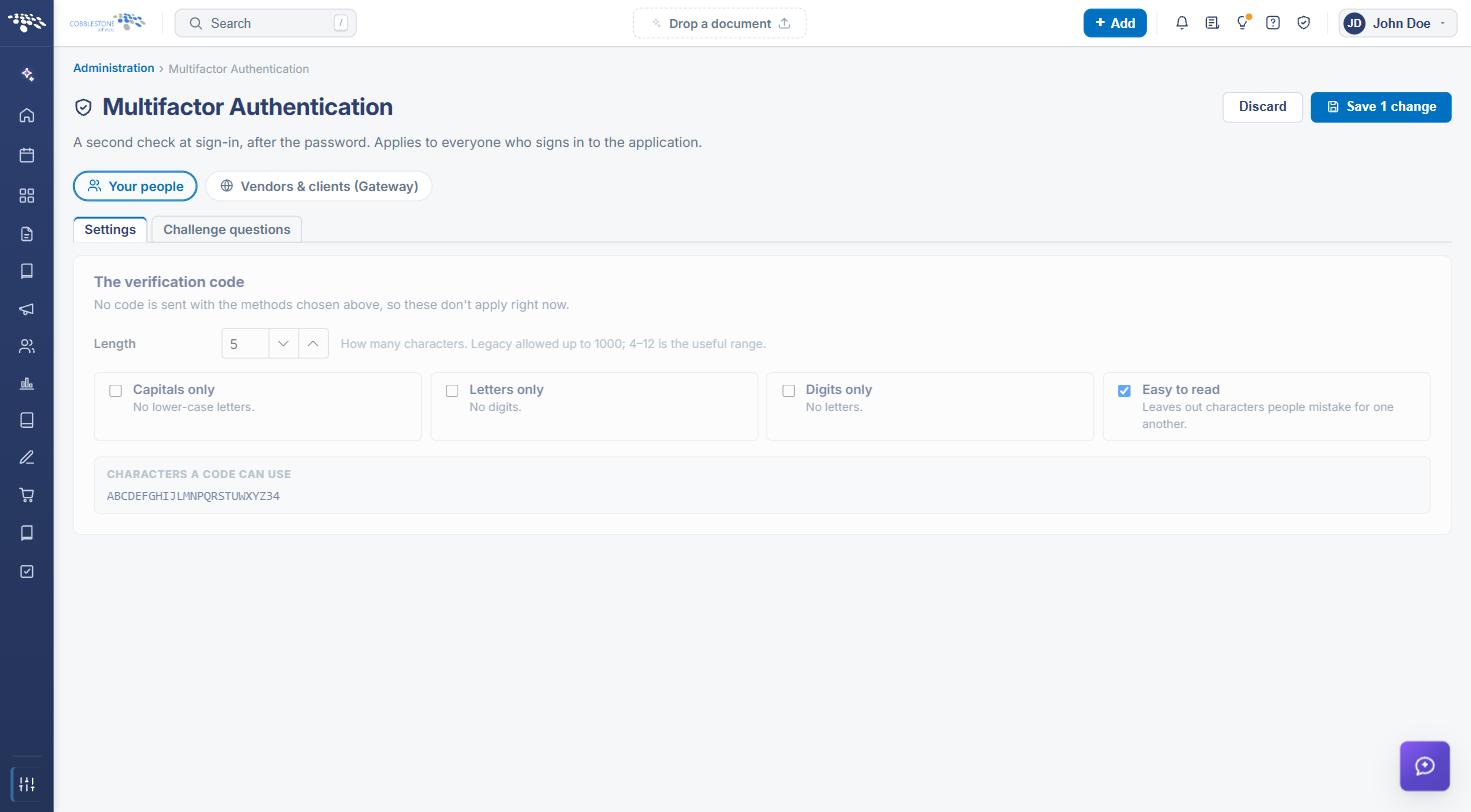
Note: The Length field notes that legacy systems allowed up to 1000 characters, but 4–12 is the useful range.
6. Customizing the Verification Code Email
Steps:
- From the Contract Insight homepage, click Administration at the bottom of the left navigation menu. On the Administration page, under Security & Access, select Multifactor Authentication (MFA).
- Go to The email that carries the code section, which shows a preview of the message currently in use.
- Click Edit message. A panel opens headed MULTIFACTOR AUTHENTICATION / Verification code email, containing the message in a formatting editor.
- Edit the subject and body, keeping the ###VERIFICATION_CODE### placeholder — that is where the code is substituted when the email is sent.
- Click Close to return to the settings, then Save changes.
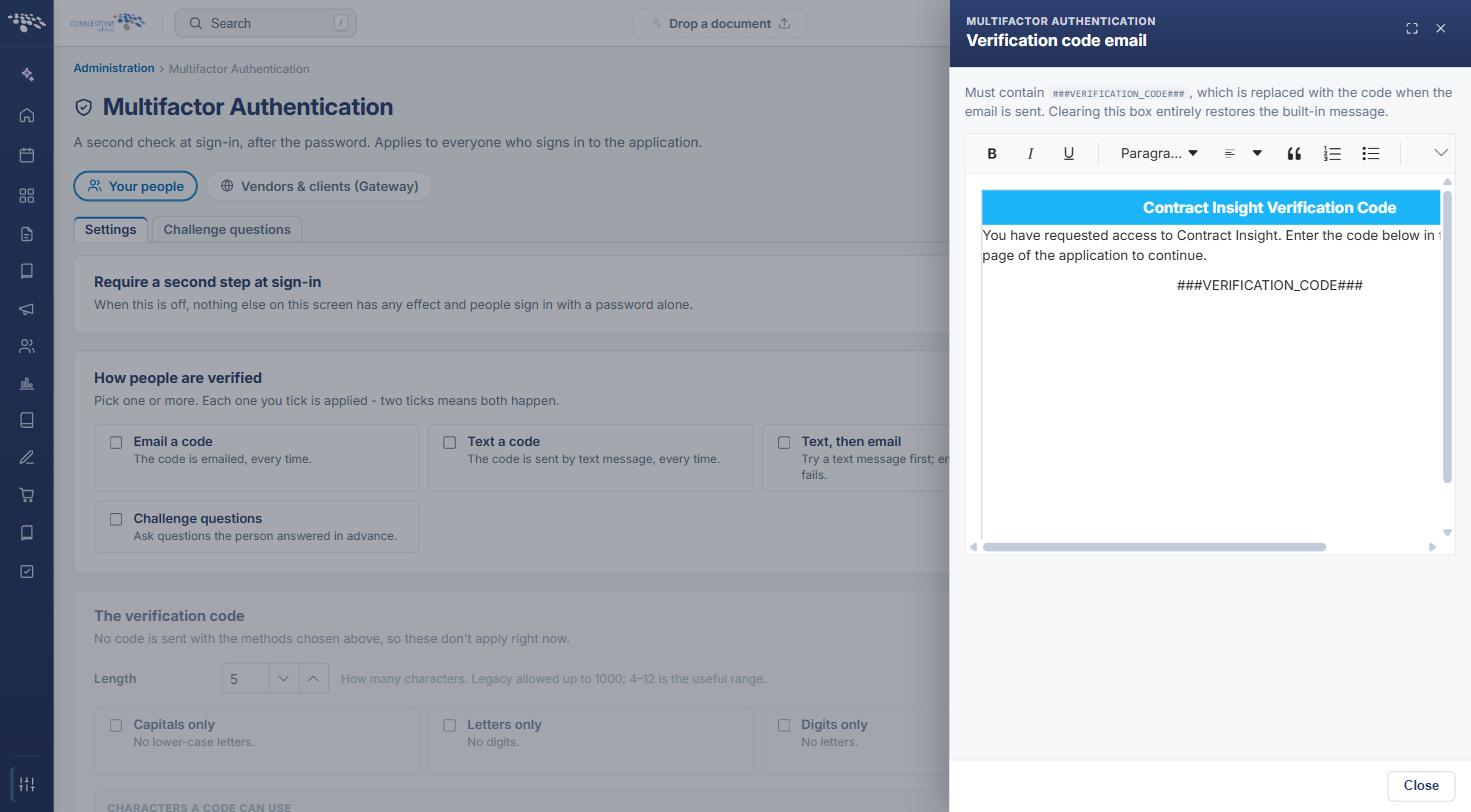
Note: Clearing the message box entirely restores the built-in message, so a customized email can always be reverted.
7. Managing the Challenge Question Pool
Challenge questions are maintained on the Challenge questions tab, which appears for the Your people audience. The Question pool section at the top of the tab holds every question that can be assigned to an employee.
Steps:
- From the Contract Insight homepage, click Administration at the bottom of the left navigation menu. On the Administration page, under Security & Access, select Multifactor Authentication (MFA).
- Click the Challenge questions tab.
- Type the question into the Add a new challenge question… box and click Add question.
- Use the buttons on an existing question’s row to maintain it.
The buttons on a question row are:
- Edit — changes the wording of the question
- Disable question — takes the question out of use without deleting it; the row is then marked DISABLED and the button becomes Enable question
- Delete this question — removes the question from the pool
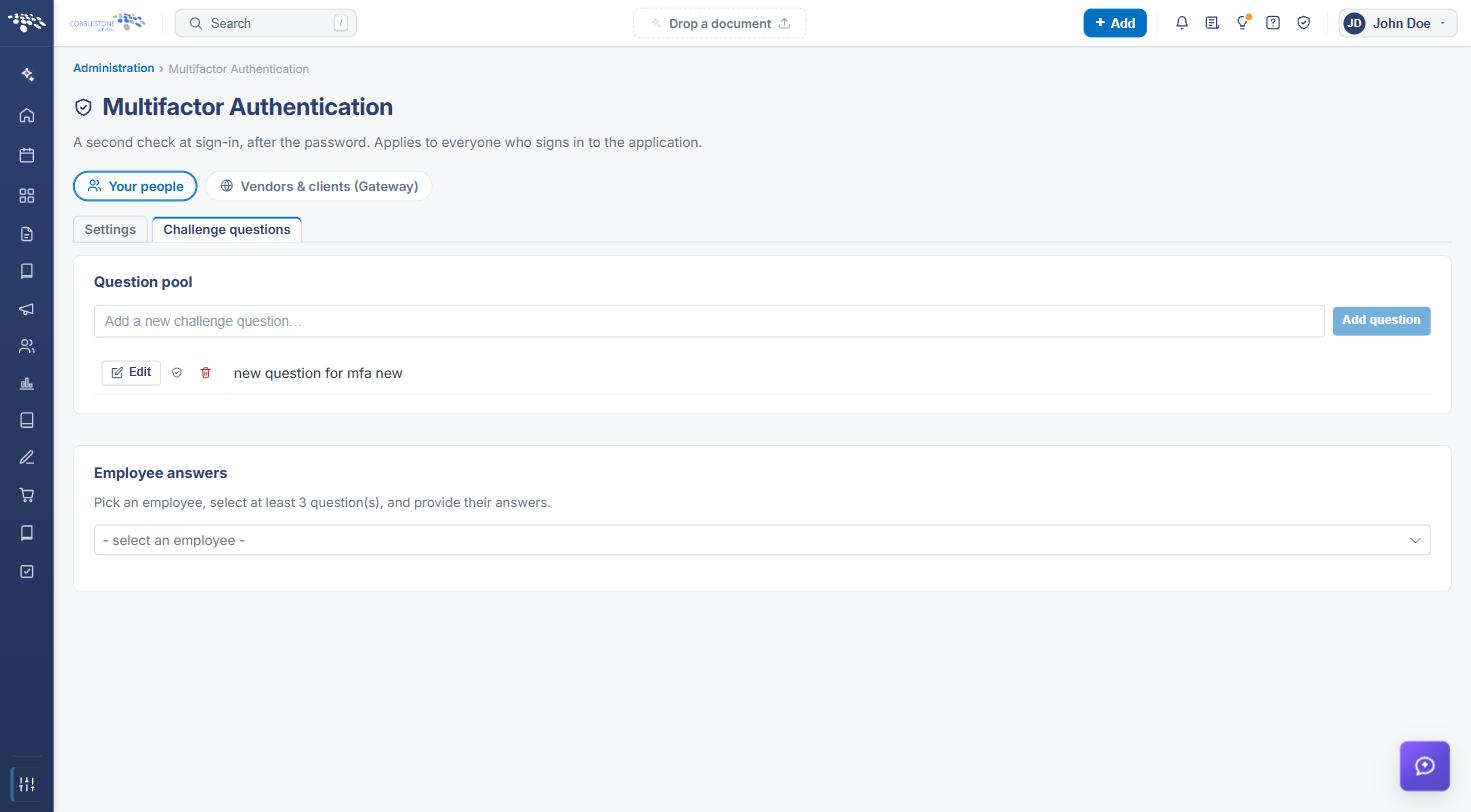
Note: A disabled question stays in the pool but is not offered when assigning questions to an employee.
8. Setting an Employee’s Questions and Answers
The Employee answers section at the foot of the Challenge questions tab records which questions a person is asked and what their answers are. As the section states, “Pick an employee, select at least 2 question(s), and provide their answers.”
Steps:
- From the Contract Insight homepage, click Administration at the bottom of the left navigation menu. On the Administration page, under Security & Access, select Multifactor Authentication (MFA).
- Click the Challenge questions tab and scroll to Employee answers.
- Choose the person from the — select an employee — list. The questions in the pool are listed with USE, QUESTION and ANSWER columns.
- Tick USE beside each question the person should be asked.
- Type the person’s answer in the ANSWER box for each question ticked.
- Click Save answers.
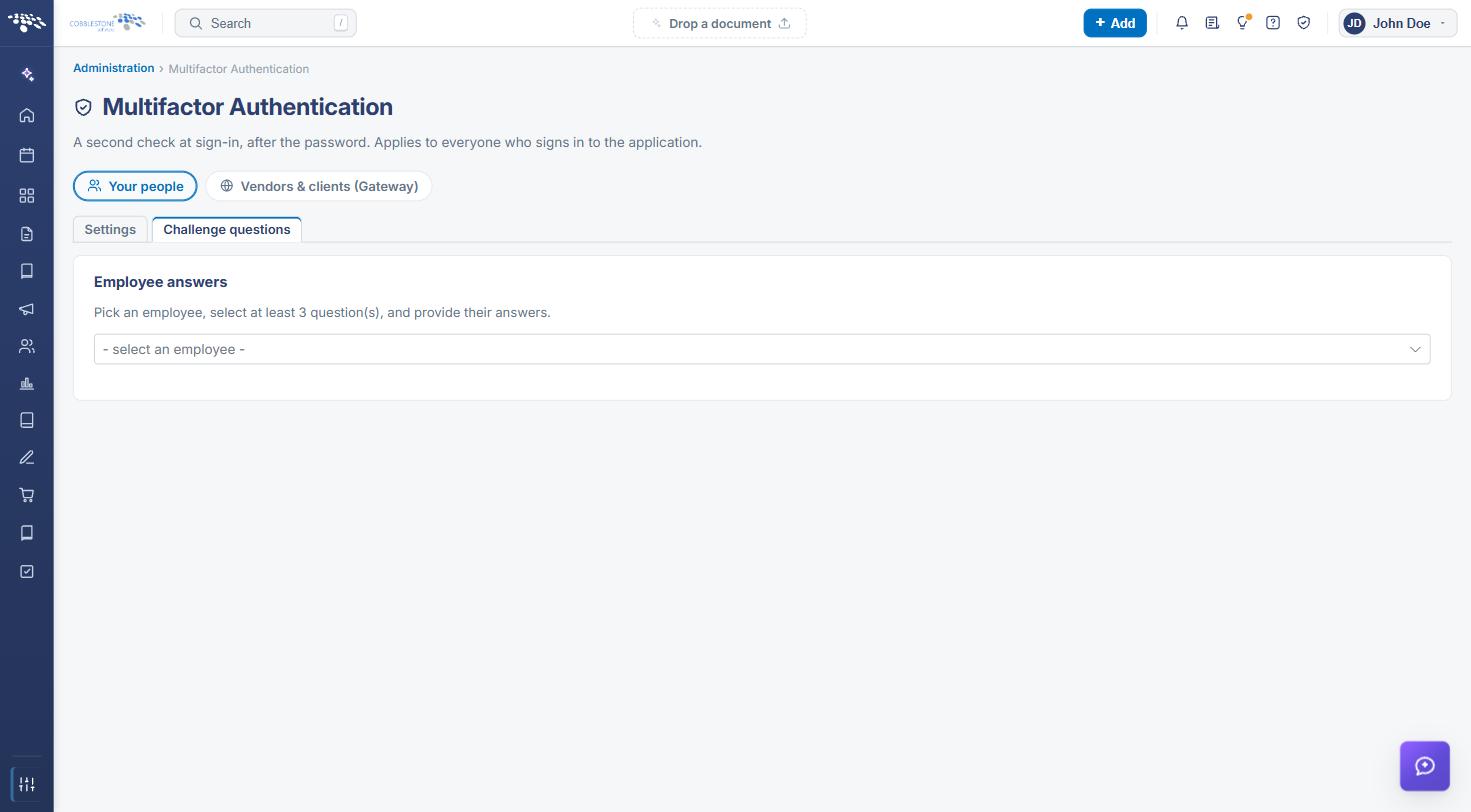
Two settings on the Settings tab govern how these questions are used:
- Pool size — how many questions each person must answer up front
- Asked at sign-in — how many of them are asked, drawn from that pool
Note: When challenge questions are not one of the methods ticked in How people are verified, the screen notes that these settings do not apply at the moment. At the next sign-in, a person set up this way is prompted for the number of questions configured, and answers them to complete the second step.
9. Multifactor Authentication for the Gateway
Vendors and clients who sign in to the Vendor/Client Gateway are configured separately, under the Vendors & clients (Gateway) audience. The screen then reads “A second check when a vendor or client signs in to the Gateway, after their password.”
Steps:
- From the Contract Insight homepage, click Administration at the bottom of the left navigation menu. On the Administration page, under Security & Access, select Multifactor Authentication (MFA).
- Select the Vendors & clients (Gateway) audience.
- Switch Require a second step at sign-in to On and tick the verification methods to apply.
- Set the code Length and character rules, and edit the Gateway verification email if required.
- Click Save changes.
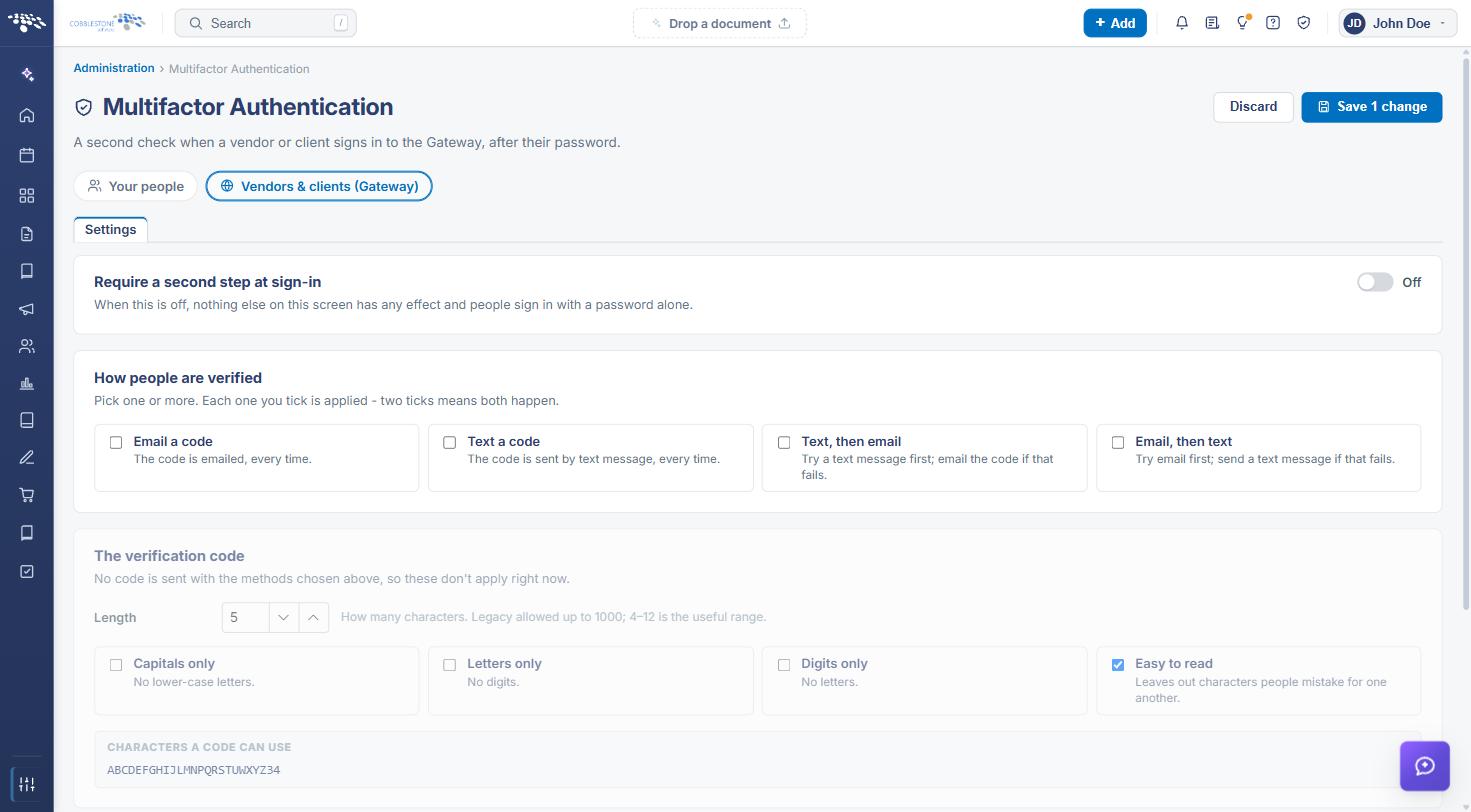
Note: The Gateway audience offers only the Settings tab, and its verification methods are the code-based ones — challenge questions apply to internal users only. Its verification email is a separate message from the one used inside Contract Insight.
10. Quick Reference Summary
Task | How to Complete It |
Open the settings | Homepage → Administration → Security & Access → Multifactor Authentication (MFA). |
Turn MFA on | Switch Require a second step at sign-in to On, then Save changes. |
Pick the audience | Your people for internal users; Vendors & clients (Gateway) for the portal. |
Choose the method | Tick Email a code, Text a code, Text then email, Email then text, or Challenge questions. |
Shape the code | Set Length and tick Capitals only, Letters only, Digits only or Easy to read. |
Edit the email | The email that carries the code → Edit message; keep ###VERIFICATION_CODE###. |
Restore the built-in email | Clear the message box entirely and save. |
Add a question | Challenge questions tab → type it in, then Add question. |
Retire a question | Disable question keeps it in the pool but out of use; Delete this question removes it. |
Assign questions | Employee answers → pick the employee, tick USE, enter each ANSWER, then Save answers. |