COBBLESTONE SOFTWARE
Contract Insight — User Guide
Quick Search Configuration
Searching & Reporting: Search Config
Note: Each procedure in this guide begins at the Contract Insight homepage, so any section can be followed on its own. The areas listed on the Search Config screen are the record types configured for the environment, so the exact list may vary between environments.
1. Overview
Quick Search is the search box at the top of every screen, used to find records and the text of their attachments by keyword. Search Config is where administrators set what that search covers: which record types it searches, which of their records may appear in the results, and how each set of results is presented.
Configuration is held per area. Each searchable record type — Contracts, Customers, Requests, Solicitations, and Purchase Orders, for example — is one area, and each carries three things: whether it is searched at all, where its results appear in the order, and the filters that decide which of its records can be returned.
Filters recorded here apply to every search of that area, for everyone, and are applied on top of each person’s own permissions. They narrow what a search can return — typically to keep deleted or draft records out of results — and never widen it, so a filter cannot expose a record a person is not otherwise permitted to see.
Because Search Config is maintained from the Administration area, only Application Administrators — or other users specifically granted the appropriate permission — can change which areas are searched or the filters applied to them. The settings then apply to every user of the environment.
2. Accessing Search Config
The Search Config screen opens on the list of searchable areas. To open it:
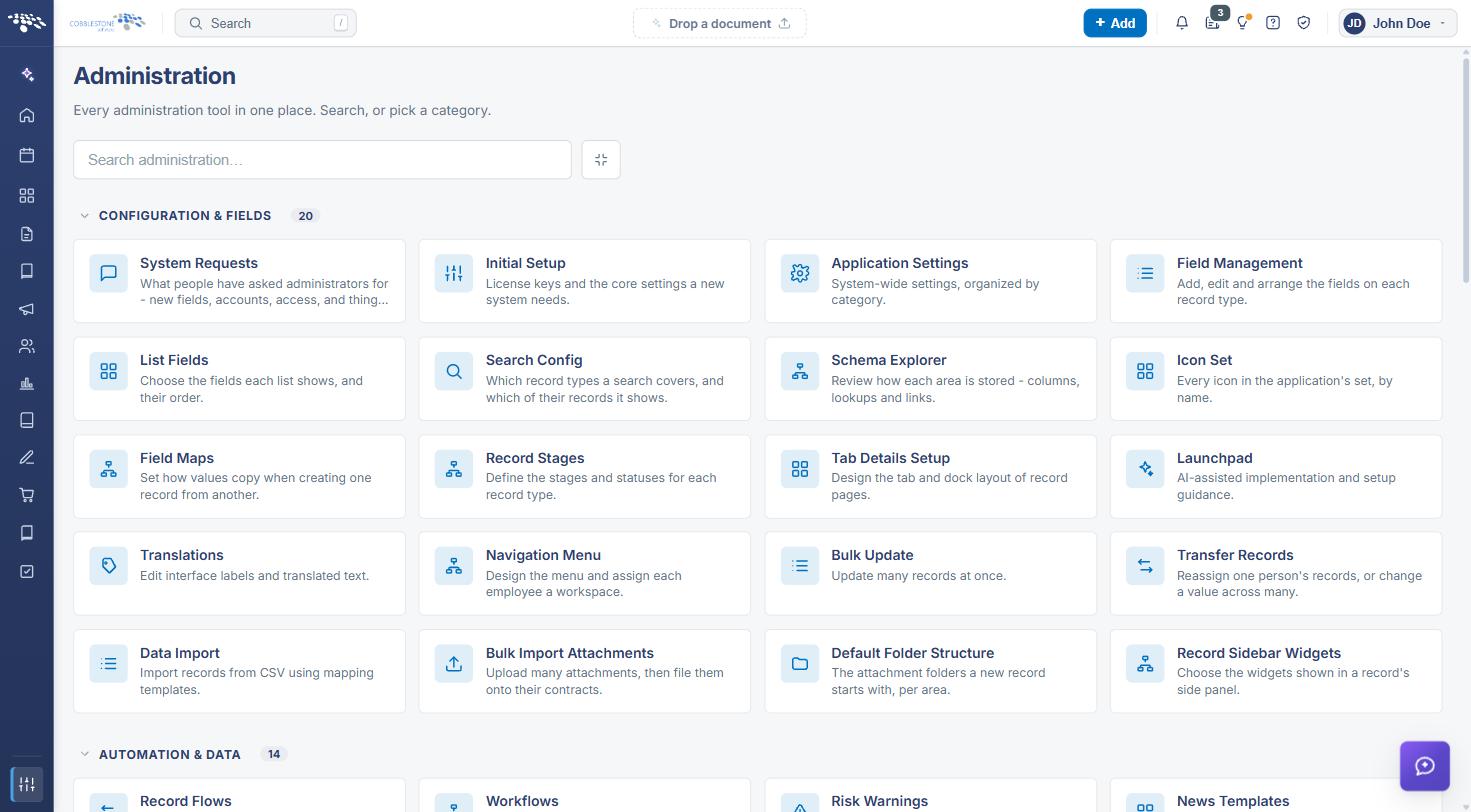
From the Contract Insight homepage, click Administration at the bottom of the left navigation menu. On the Administration page, under Configuration & Fields, select Search Config.
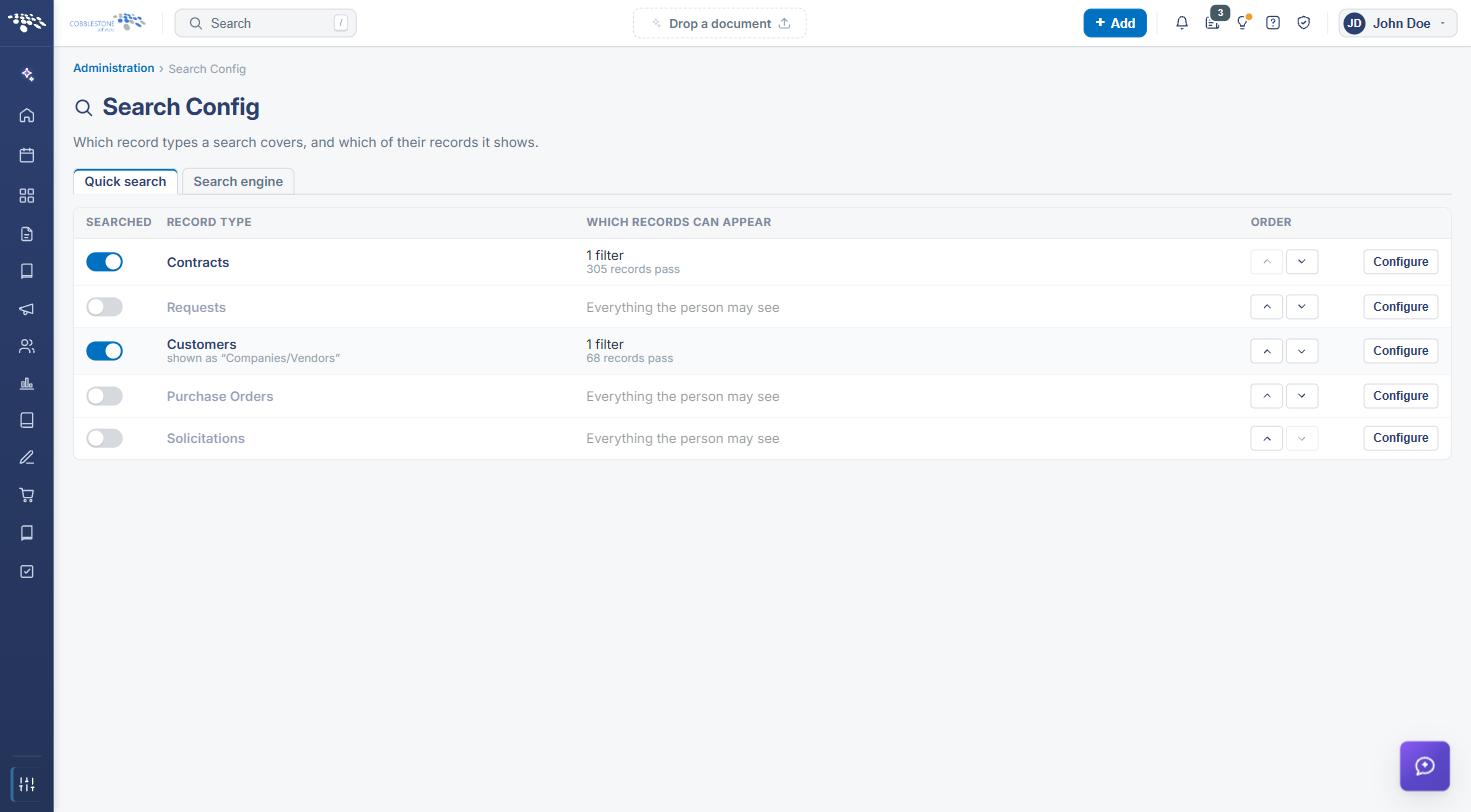
The Search Config areas list includes the following elements:
- A breadcrumb trail of Administration › Search Config, and the page title Search Config with the subtitle “Which record types a search covers, and which of their records it shows.”
- A Searched column with a toggle for each area, controlling whether that record type is searched at all
- A Record Type column naming each searchable area
- A Which Records Can Appear column summarising the filters in force — either “Everything the person may see” or the number of filters and how many records currently pass them
- An Order column with up and down arrows, labelled Show earlier in the results and Show later in the results
- A Configure button on each row, opening that area’s own settings
3. Choosing Which Areas Are Searched
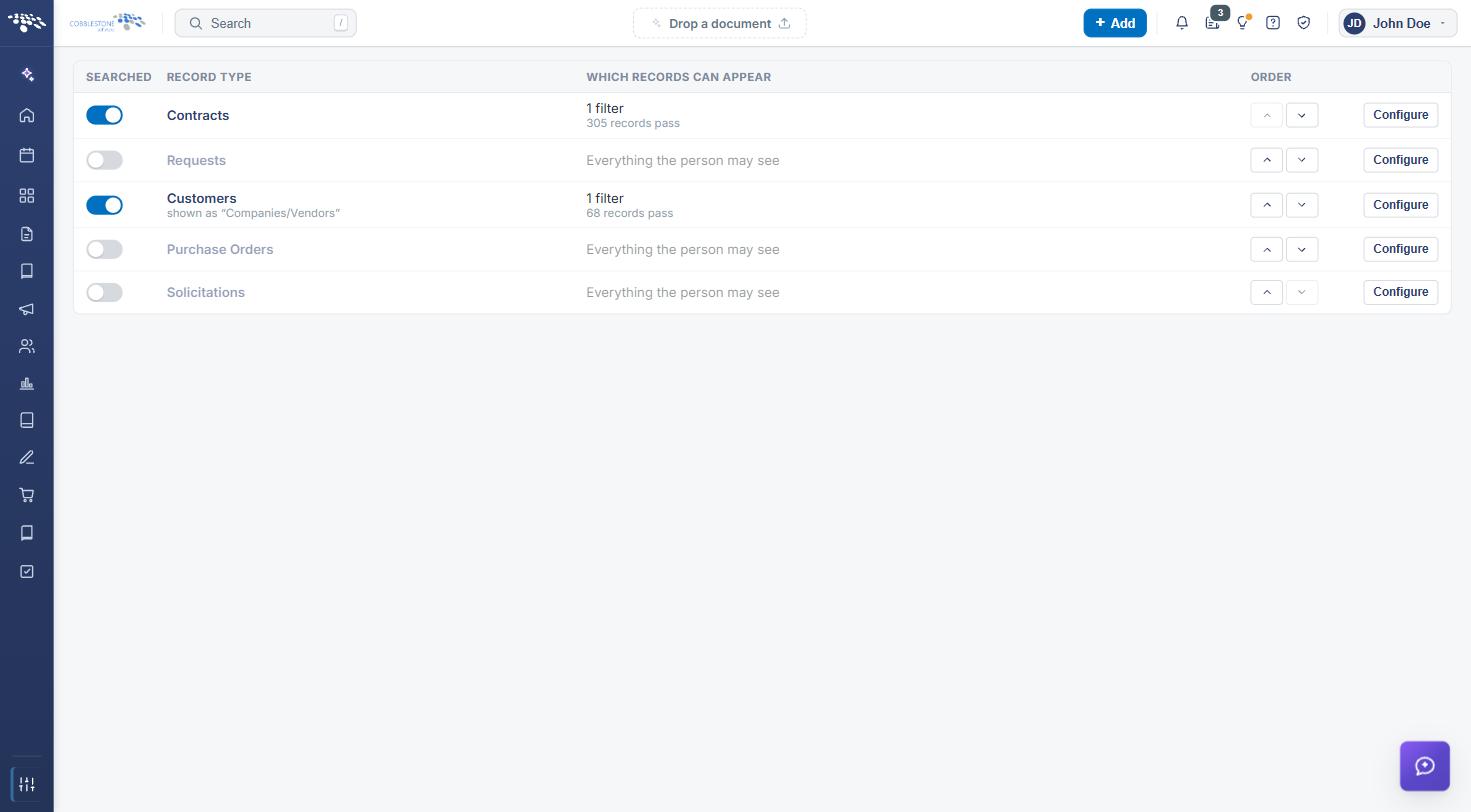
Function: Determines which record types Quick Search covers. An area that is switched off is not searched at all, and no results are returned for it.
Steps:
- From the Contract Insight homepage, click Administration at the bottom of the left navigation menu. On the Administration page, under Configuration & Fields, select Search Config.
- Locate the record type in the areas list.
- Click the toggle in the Searched column to include the area in searches, or click it again to exclude the area.
Note: Switching an area off removes it from every user’s search results. Where the intention is to hide only some of an area’s records rather than the whole record type, use a filter instead — see Section 6.
4. Changing the Order of Areas in Results
Function: Sets the order the areas appear in when a search returns results from more than one record type.
Steps:
- From the Contract Insight homepage, click Administration at the bottom of the left navigation menu. On the Administration page, under Configuration & Fields, select Search Config.
- Locate the record type in the areas list.
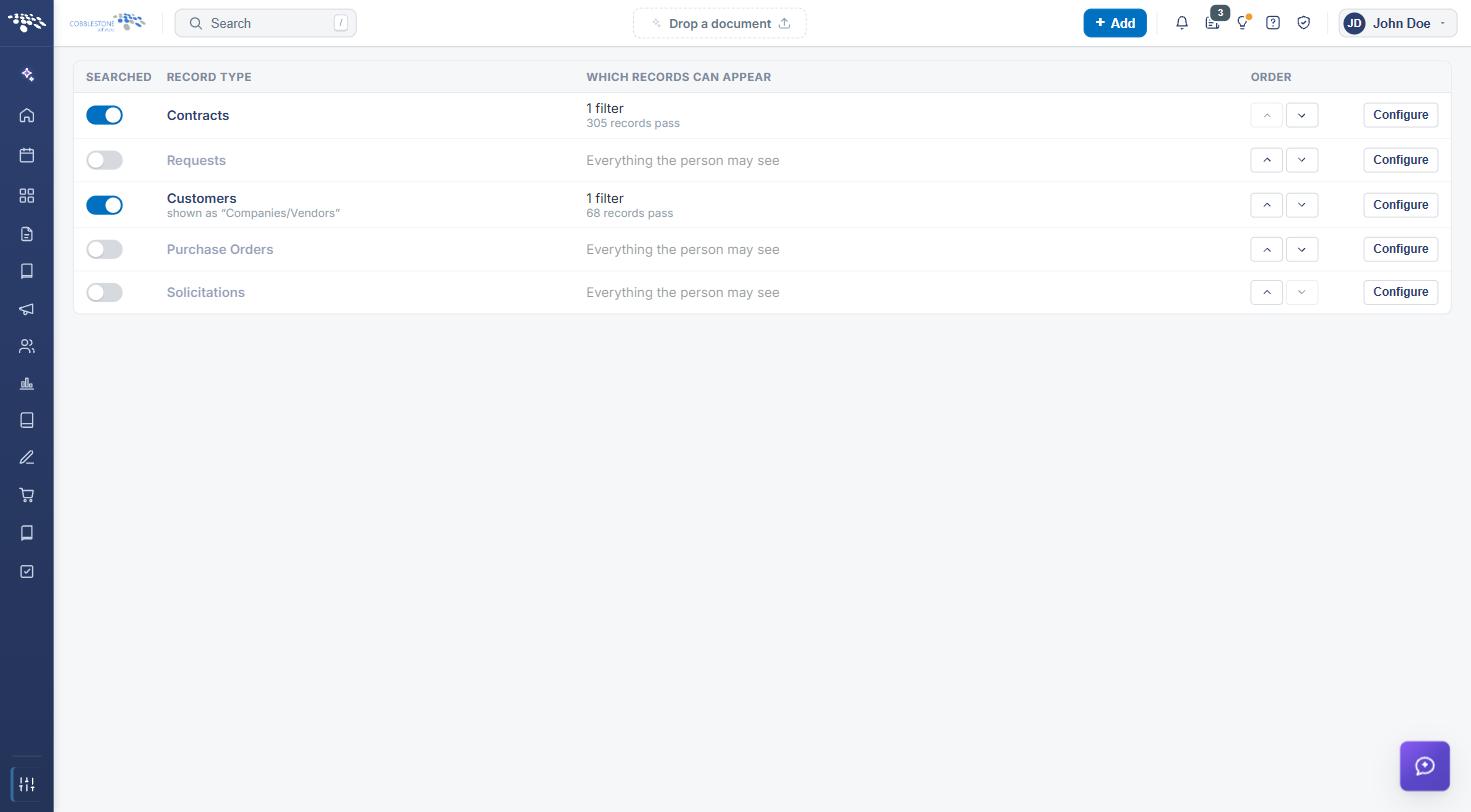
- In the Order column, click the up arrow — Show earlier in the results — to move the area higher, or the down arrow — Show later in the results — to move it lower.
- Repeat until the areas are in the order you want. The arrow is unavailable where an area is already first or last.
Put the record types people search for most often at the top, so the results they expect appear first without scrolling.
5. Configuring How an Area Appears in Results
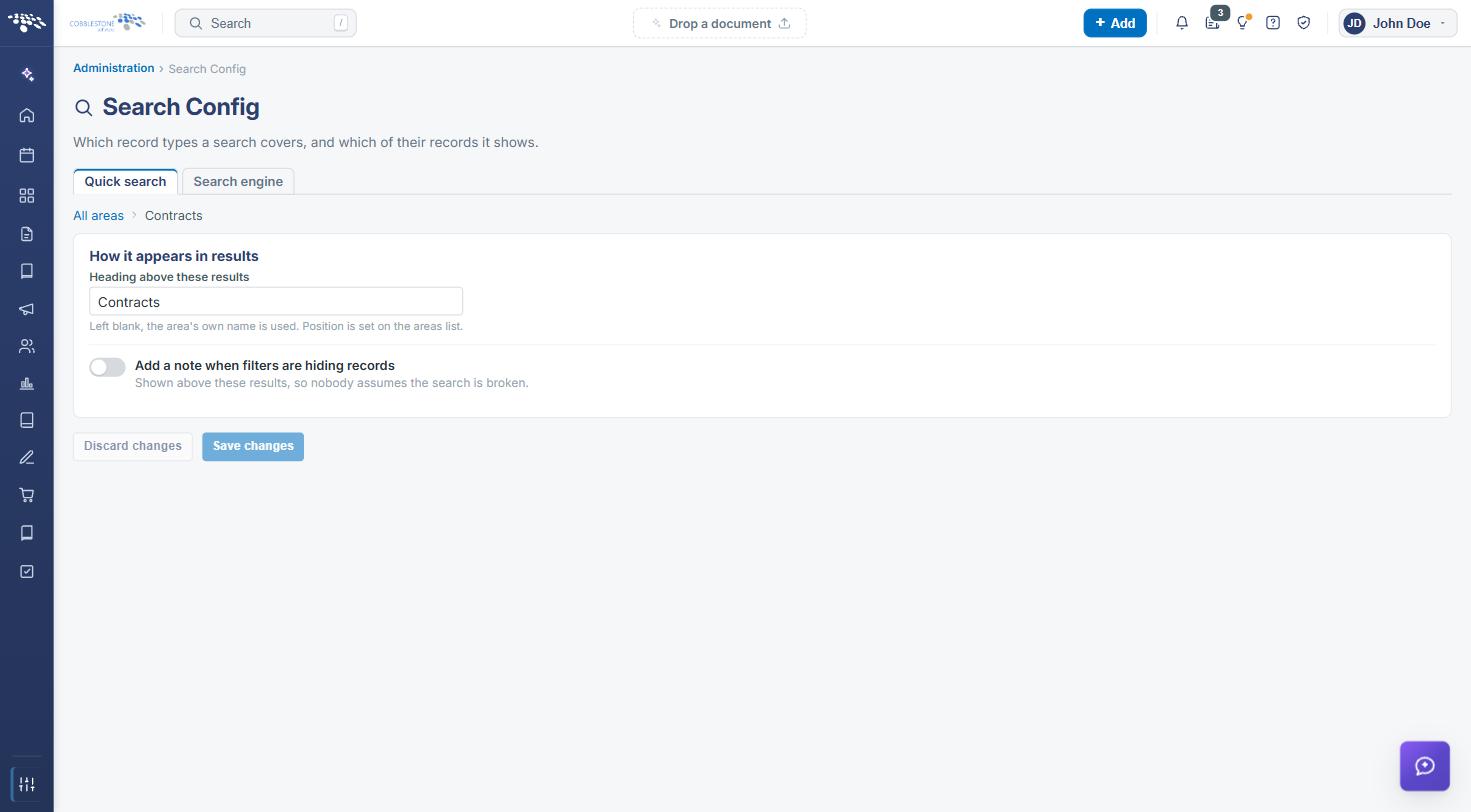
Click Configure on an area’s row to open its settings. The breadcrumb changes to All areas › the area name, and the How it appears in results card is shown first.
5.1 Heading Above These Results
The Heading above these results box sets the label shown above that area’s results. Left blank, the area’s own name is used. The position of the heading is set on the areas list, as described in Section 4.
5.2 Adding a Note When Filters Are Hiding Records
Where filters are in force, the Add a note when filters are hiding records toggle displays a short message above that area’s results. Switch the toggle on and enter the message in the Note box that appears.
Steps:
- From the Contract Insight homepage, click Administration at the bottom of the left navigation menu. On the Administration page, under Configuration & Fields, select Search Config.
- Click Configure on the row for the area.
- Enter a label in Heading above these results, or leave it blank to use the area’s name.
- Switch on Add a note when filters are hiding records and enter the wording in the Note box, if a note is wanted.
- Click Save changes to apply the settings, or Discard changes to abandon them. An Unsaved changes indicator appears beside the buttons until the settings are saved.
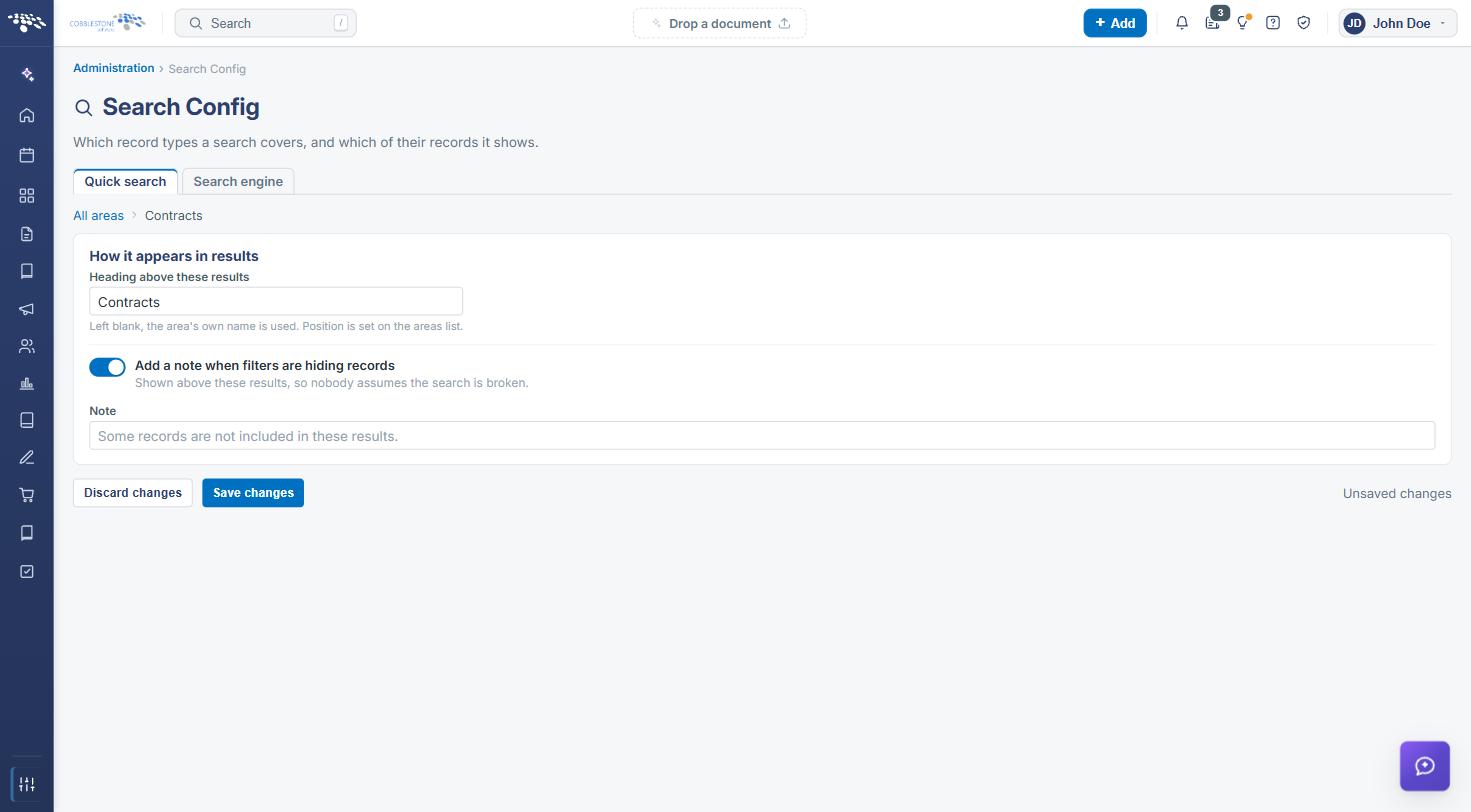
Note: The note exists so that nobody assumes the search is broken. Where a filter deliberately keeps records out of results, a short explanation above the results saves the support call that follows.
6. Controlling Which Records Can Appear
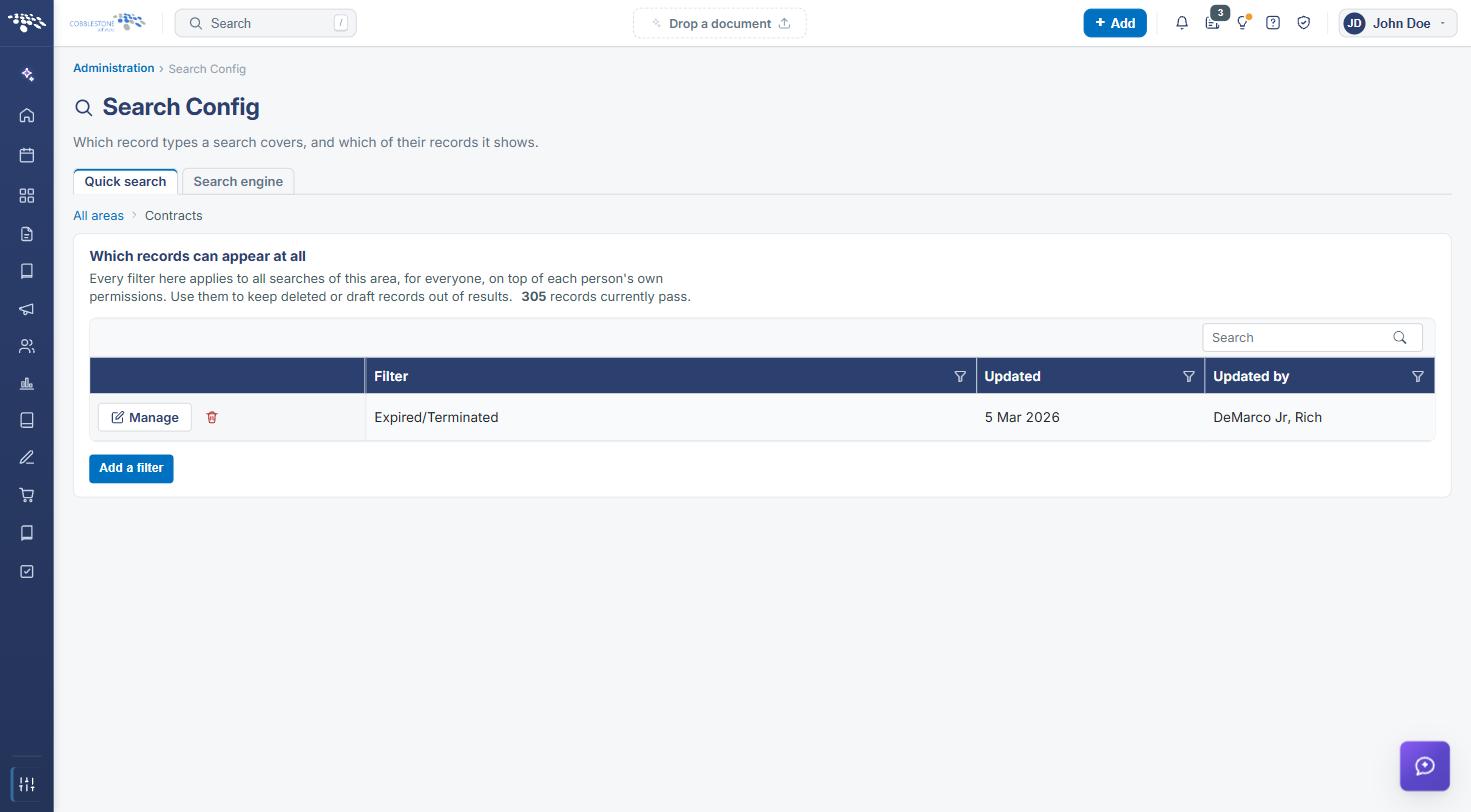
The Which records can appear at all card on an area’s configuration page holds the filters for that area. Where no filters are recorded it reads “No filters — every record a person is allowed to see can appear in results.” Where filters exist, the card reports how many records currently pass them and lists each filter in a grid with Filter, Updated, and Updated by columns, a Search box, and per-row Manage and Remove this filter buttons.
6.1 Adding a Filter
Steps:
- From the Contract Insight homepage, click Administration at the bottom of the left navigation menu. On the Administration page, under Configuration & Fields, select Search Config.
- Click Configure on the row for the area.
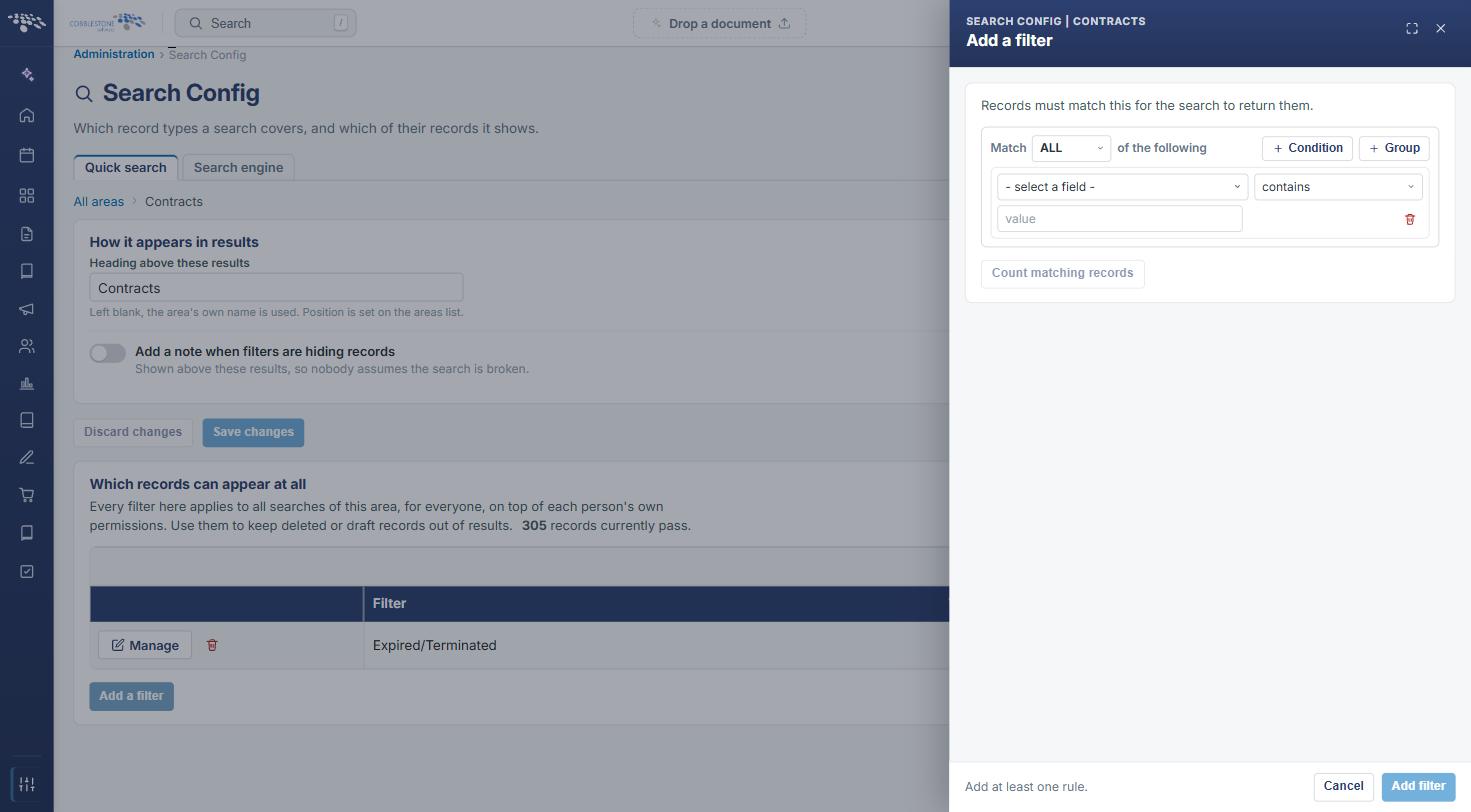
- Click Add a filter. The Add a filter panel opens from the right, headed with the area name and the line “Records must match this for the search to return them.”
- Set Match to ALL or ANY of the following, to decide whether every rule must be met or any one of them.
- On the rule row, choose the field from the select a field dropdown, choose the operator — contains, does not contain, starts with, ends with, is equal to, is not equal to, is greater than, is less than, is between, is null, is empty, and their variants — and enter the value where the operator needs one.
- Click + Condition to add another rule, or + Group to add a nested group of rules with its own Match setting. The bin icon at the right of a rule removes it.
- Click Count matching records to check the effect before committing it. The panel reports how many records would still be searchable.
- Click Add filter to save the filter, or Cancel to close the panel without adding it. At least one rule is required — the panel reads “Add at least one rule.” until one is set.
6.2 Editing or Removing a Filter
Steps:
- From the Contract Insight homepage, click Administration at the bottom of the left navigation menu. On the Administration page, under Configuration & Fields, select Search Config.
- Click Configure on the row for the area.
- In the filter grid, click Manage on the row for the filter. The Edit filter panel opens with the existing rules.
- Change the rules as needed, click Count matching records to check the effect, then click Save filter to commit the change or Cancel to leave it unchanged.
- To remove a filter instead, click the bin icon on its row — its tooltip reads Remove this filter — and confirm the removal if prompted.
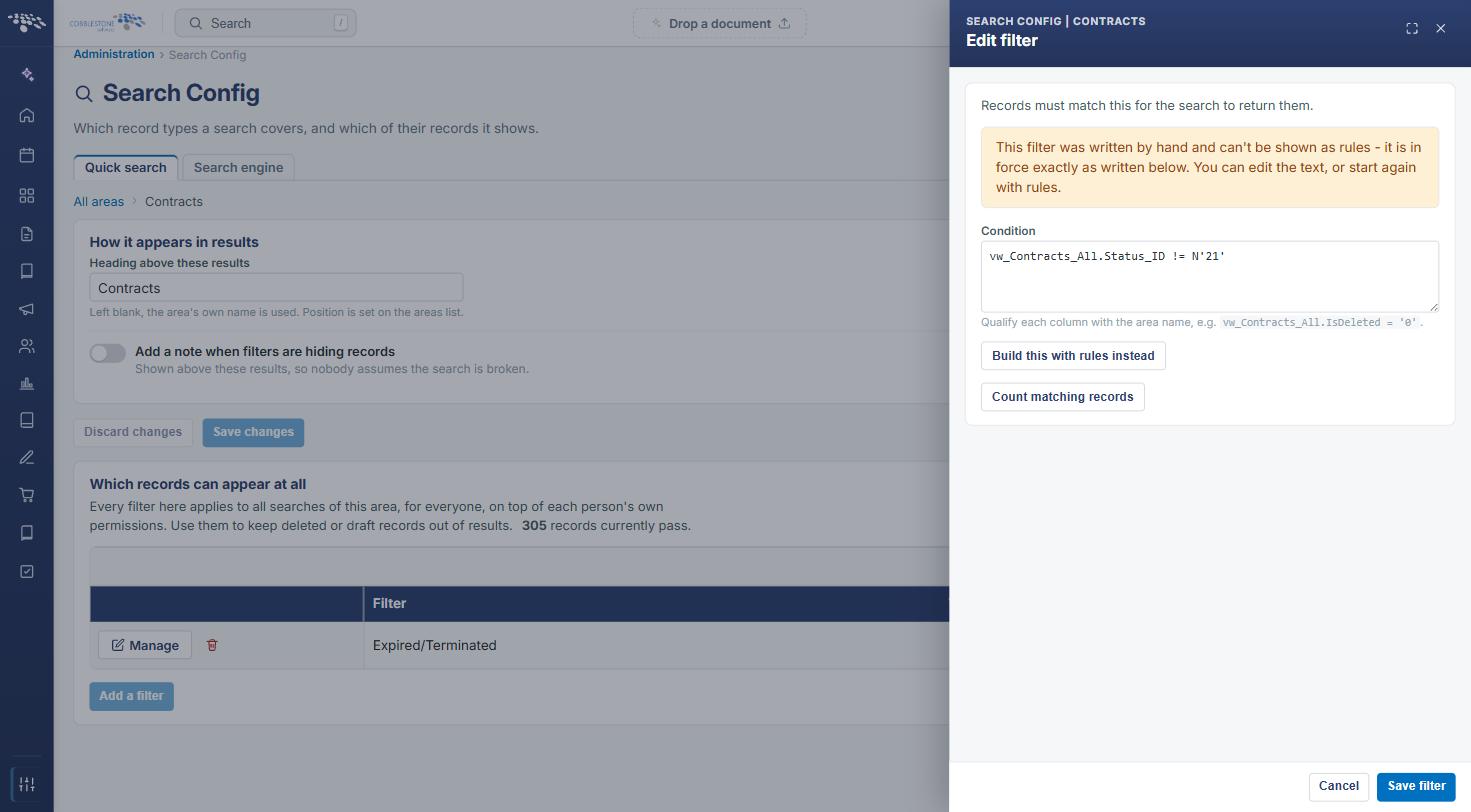
Note: A filter written directly as a condition rather than built from rules is shown as text, with the message that it is in force exactly as written. The text can be edited in the Condition box — each column qualified with the area name, for example vw_ContractExternalRequest.IsDeleted = ‘0’ — or replaced with a rule-built filter using Build this with rules instead.
7. How the Configuration Appears to Users
The settings recorded here shape what every user sees when they use the search box at the top of the application:
- Only the areas switched on in the Searched column are searched, and their results appear in the order set in the Order column
- Each set of results carries the heading recorded for that area, or the area’s own name where no heading is set
- Only records that pass the area’s filters, and that the person is permitted to see, are returned
- Where a note is configured, it is shown above that area’s results to explain that some records are being held back
Because filters apply on top of each person’s permissions, two people running the same search still see different results — the filters set the outer limit, and each person’s permissions narrow it further.
8. Quick Reference Summary
Task | How to Complete It |
Open Search Config | Homepage → Administration → Configuration & Fields → Search Config. |
Include or exclude an area | Click the toggle in the Searched column on that area’s row. |
Reorder the results | Show earlier in the results / Show later in the results arrows in the Order column. |
Rename a results heading | Configure → Heading above these results → Save changes. |
Explain hidden records | Configure → Add a note when filters are hiding records → enter the Note → Save changes. |
Limit which records appear | Configure → Add a filter → set Match and the rules → Add filter. |
Check a filter’s effect | Count matching records in the filter panel, before saving it. |
Edit a filter | Manage on its row in the filter grid, then Save filter. |
Remove a filter | Remove this filter on its row in the filter grid. |