COBBLESTONE SOFTWARE
Contract Insight — User Guide
Punchout Catalog Integration
Procurement: Shopping a Supplier Catalog
Note: Each procedure in this guide begins at the Contract Insight homepage, so any section can be followed on its own. Catalogs, the items they hold, and the employees allowed to shop them are all configurable, so the suppliers and items offered on the Shopping page vary between environments and between users.
1. Overview
Punchout catalog integration lets a buyer shop a supplier’s catalog from inside Contract Insight and turn the resulting cart into a purchase order or a request. Ordering details are captured once, at the point of shopping, and carried onto the record rather than being re-keyed.
In Contract Insight this is handled from the Shopping page under Procurement. The page pairs a Supplier catalog selector with a running cart: choose a supplier, review the items that supplier offers, add what is needed, then turn the cart into a purchase order or a request.
A supplier’s items reach that page through a purchasing catalog — a bundle of items with a catalog type, a date window, and a list of employees allowed to shop it. Items are either added to a catalog directly or offered by the vendor through the Gateway and approved into a catalog first.
Because catalogs are shared employee by employee, the supplier list is not the same for everyone. Only catalogs that are active, inside their date window, and shared with the signed-in user return items on the Shopping page. The catalogs themselves are maintained under Procurement › Catalogs, which is typically restricted to purchasing administrators.
2. Accessing the Shopping Page
The Shopping page is the starting point for every catalog order. To open it:
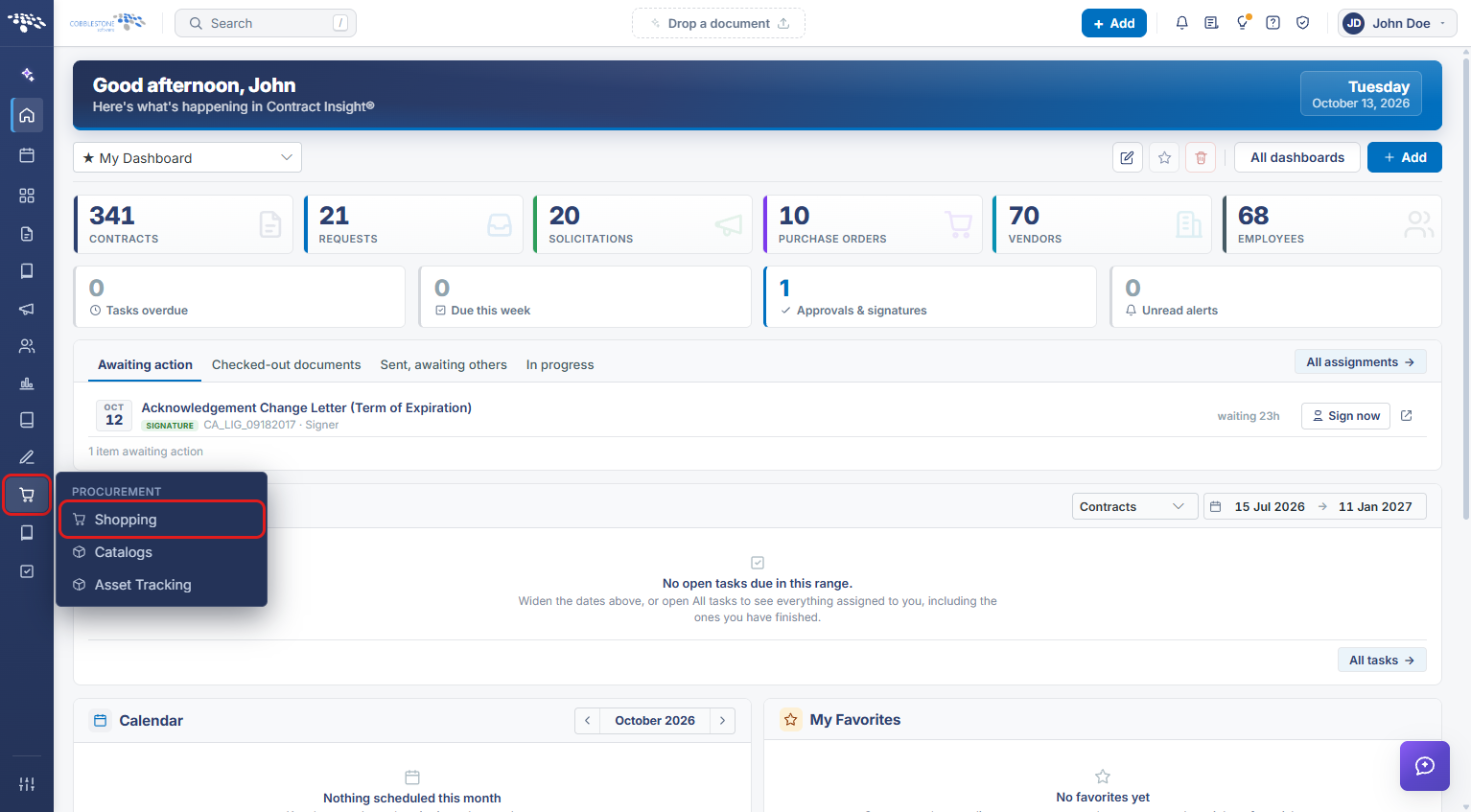
From the Contract Insight homepage, click Procurement in the left navigation menu, then click Shopping.
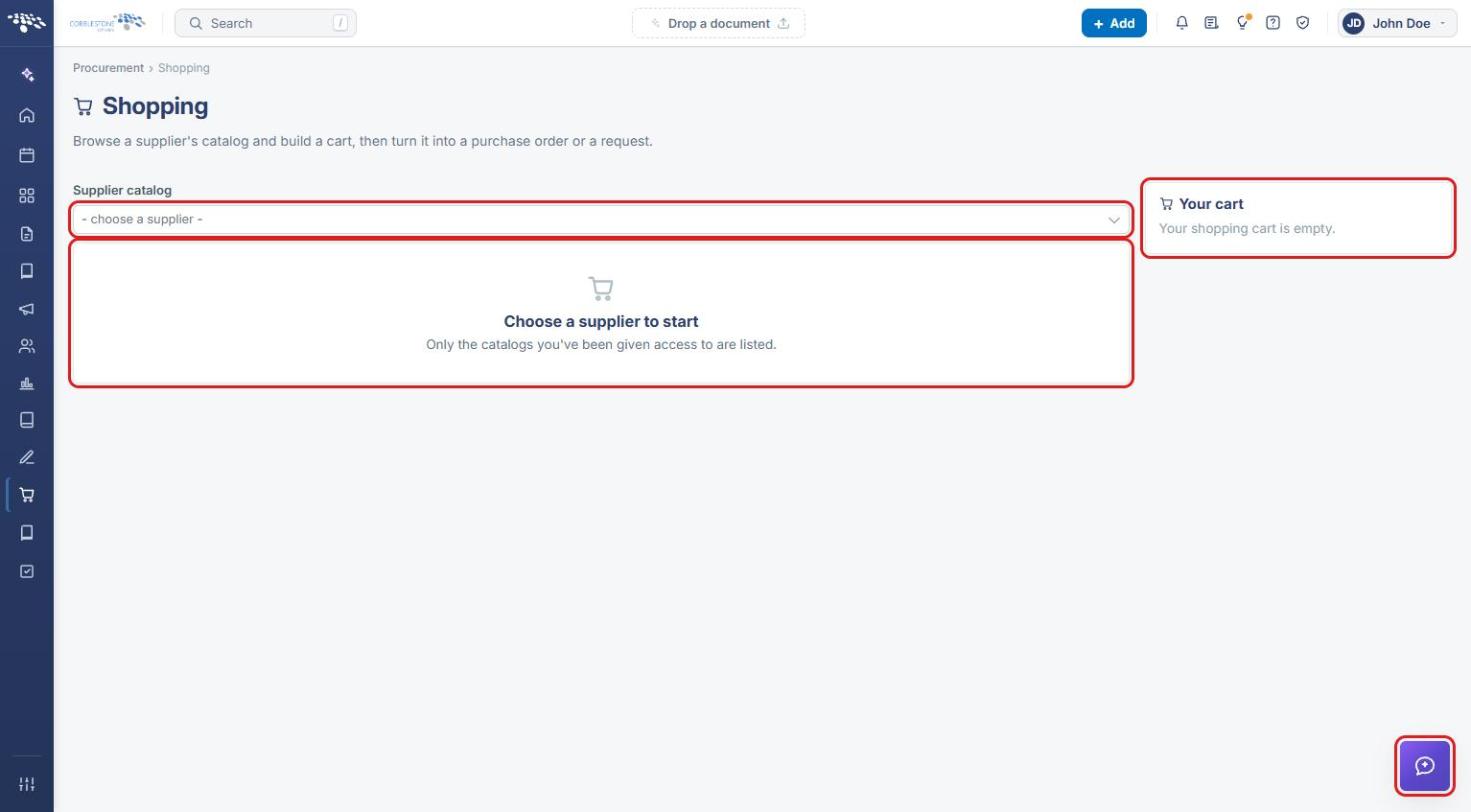
The Shopping page includes the following elements:
- A breadcrumb trail of Procurement › Shopping
- A Shopping heading with the subtitle “Browse a supplier’s catalog and build a cart, then turn it into a purchase order or a request.”
- A Supplier catalog field with a searchable dropdown, which opens with the placeholder “— choose a supplier —” and a type-ahead box for filtering the supplier list
- A clear (×) control and a chevron at the right of the dropdown, for resetting the selection or reopening the supplier list
- A main panel reading “Choose a supplier to start”, with the subtitle “Only the catalogs you’ve been given access to are listed.”, shown until a supplier is chosen
- A Your cart panel on the right-hand side, reading “Your shopping cart is empty.” until items are added
- An Ask VISDOM button in the lower right of the page
3. Choosing a Supplier Catalog
Steps:
- From the Contract Insight homepage, click Procurement in the left navigation menu, then click Shopping.
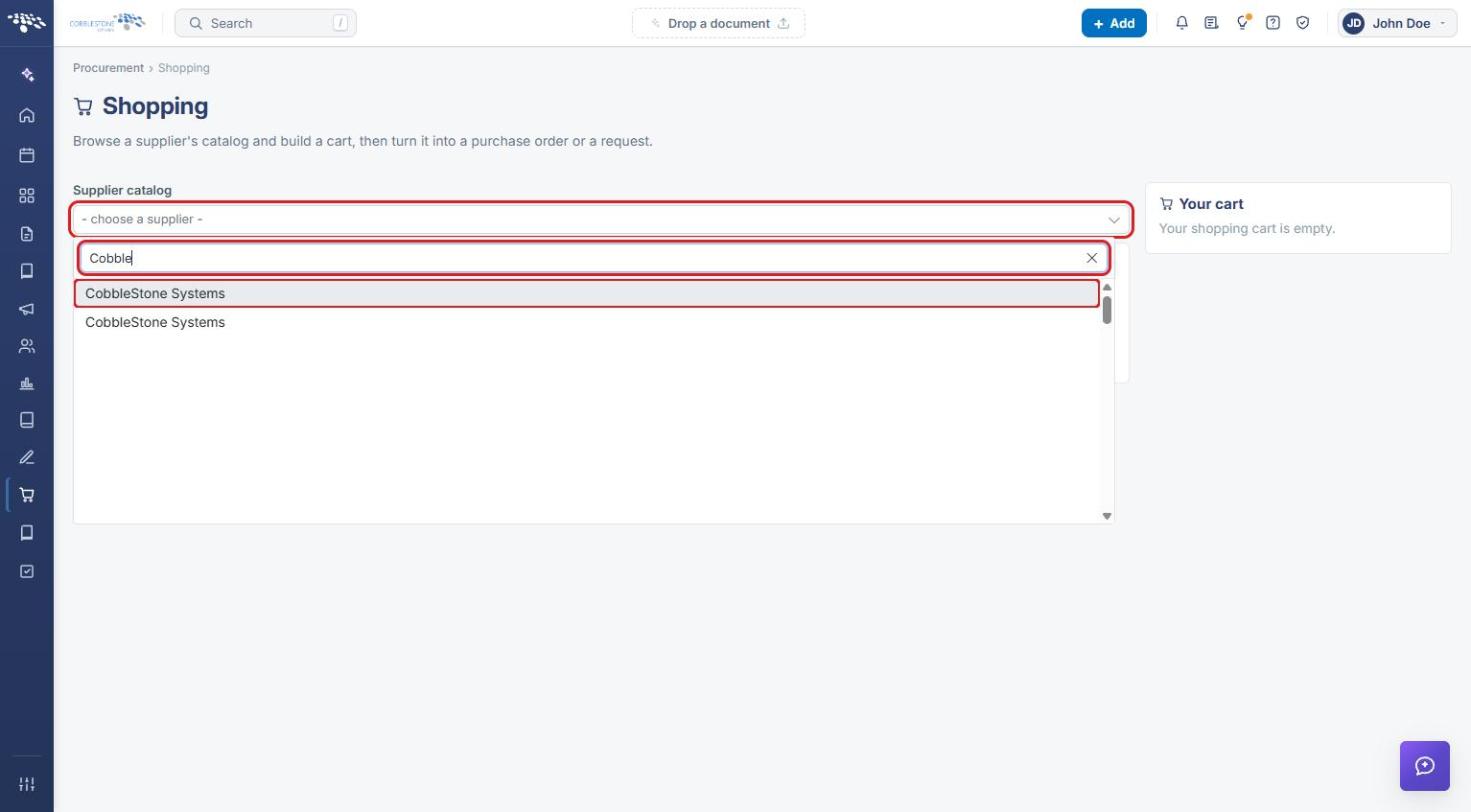
- Click the Supplier catalog dropdown to open the supplier list.
- Type part of a supplier’s name in the search box at the top of the list to filter it — the list is long, and several suppliers may share a similar name.
- Click the supplier you want to shop. The page loads the items that supplier offers through the catalogs shared with you.
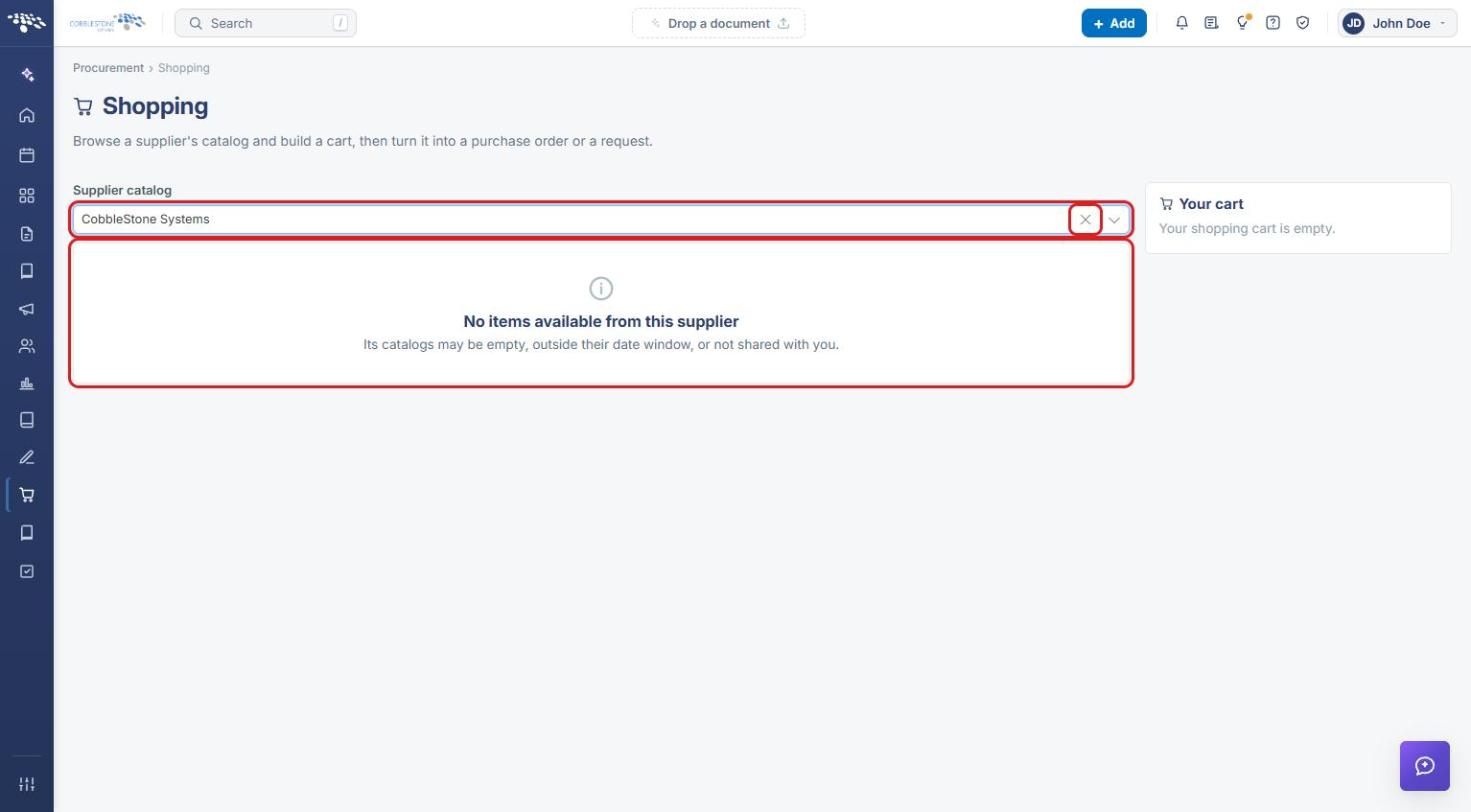
- To shop a different supplier, click the × in the Supplier catalog field to clear the current selection, then choose another.
Note: If the page returns “No items available from this supplier”, the message explains why: “Its catalogs may be empty, outside their date window, or not shared with you.” Check the supplier’s catalog under Procurement › Catalogs — confirm it holds items, that today falls inside its Window, and that you appear on its Who can shop it tab.
4. Building a Cart
Steps:
- Choose a supplier on the Shopping page as described in Section 3.
- Review the items that supplier offers. Each catalog item carries the values set on the catalog — its Unit price, Unit, Tax rate, GL code, Budget code, and its own availability Window.
- Add the items you need to the cart, setting a quantity for each.
- Watch the Your cart panel on the right-hand side of the page. It replaces the “Your shopping cart is empty.” message with the items you have added as the order is built.
- Adjust quantities or remove items from the Your cart panel before checking out.
Note: The cart belongs to the signed-in user. Only items from catalogs that are shared with that user, and inside their date window, can be added to it.
5. Turning a Cart into a Purchase Order or a Request
Steps:
- Build a cart on the Shopping page as described in Section 4.
- Review the contents of the Your cart panel — the supplier, the items, and their quantities.
- Check the cart out. As the page subtitle states, a cart can be turned into either a purchase order or a request.
- Choose the purchase order route when the order is ready to be placed with the supplier. The shopped items become the PO Line Items on a new purchase order record.
- Choose the request route when the order has to be submitted for approval first. The request is then routed like any other request record before an order is raised.
Note: The route the cart takes determines where the order appears afterwards. Purchase orders are listed under Sourcing › Purchase Orders; requests are listed under Contracts › Requests.
6. Where Catalog Items Come From
Two administration screens under Procurement control what a shopper is offered.
6.1 Purchasing Catalogs
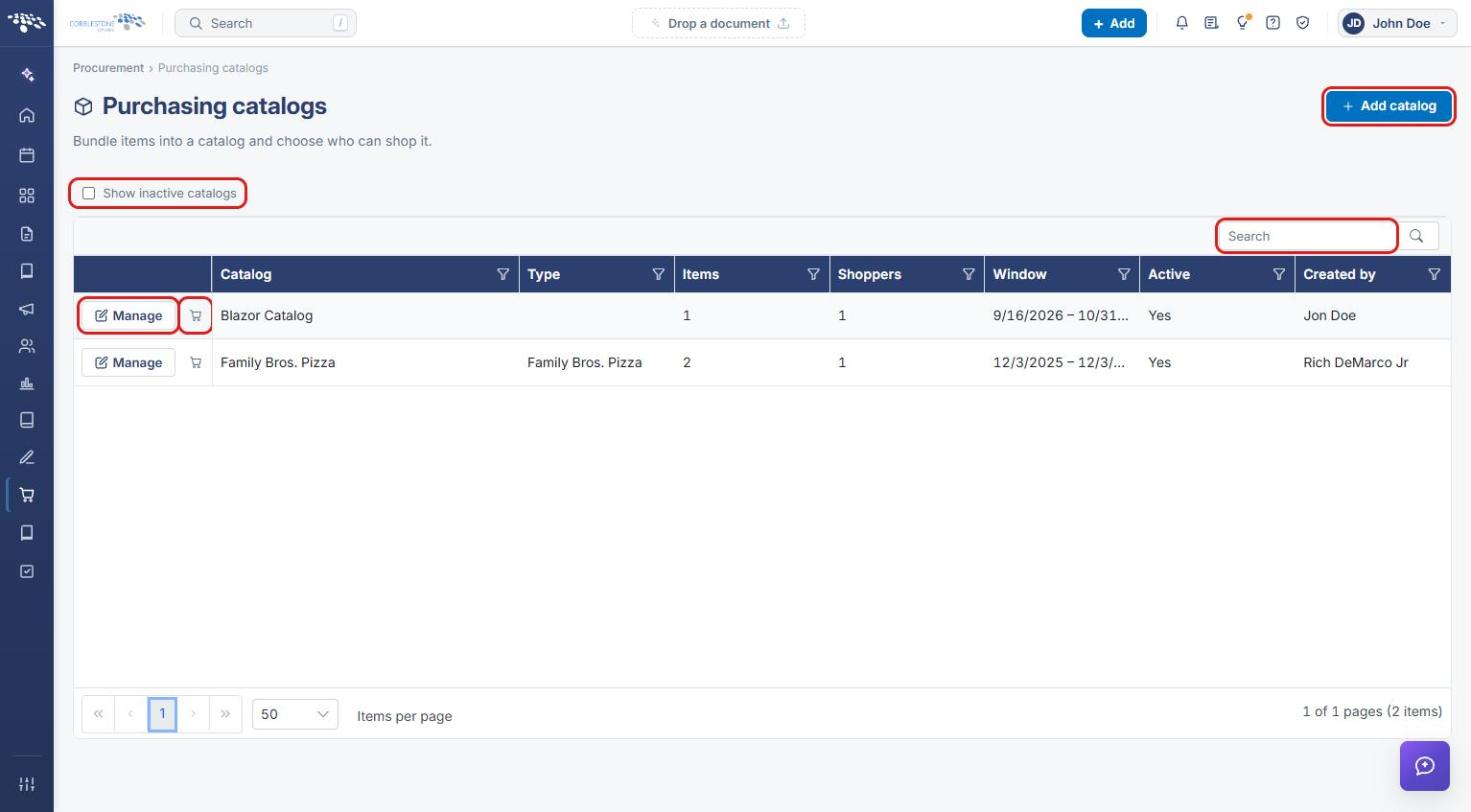
Procurement › Catalogs opens the Purchasing catalogs list, subtitled “Bundle items into a catalog and choose who can shop it.” The list screen includes:
- A + Add catalog button for creating a new catalog
- A Show inactive catalogs checkbox for including catalogs that have been deactivated
- A Search box at the right of the grid toolbar
- A sortable, filterable grid with Catalog, Type, Items, Shoppers, Window, Active, and Created by columns, each with its own filter icon
- Per-row Manage and Shop these items (cart icon) actions
- Pagination controls at the bottom of the grid, with a live page and record count and an Items per page selector
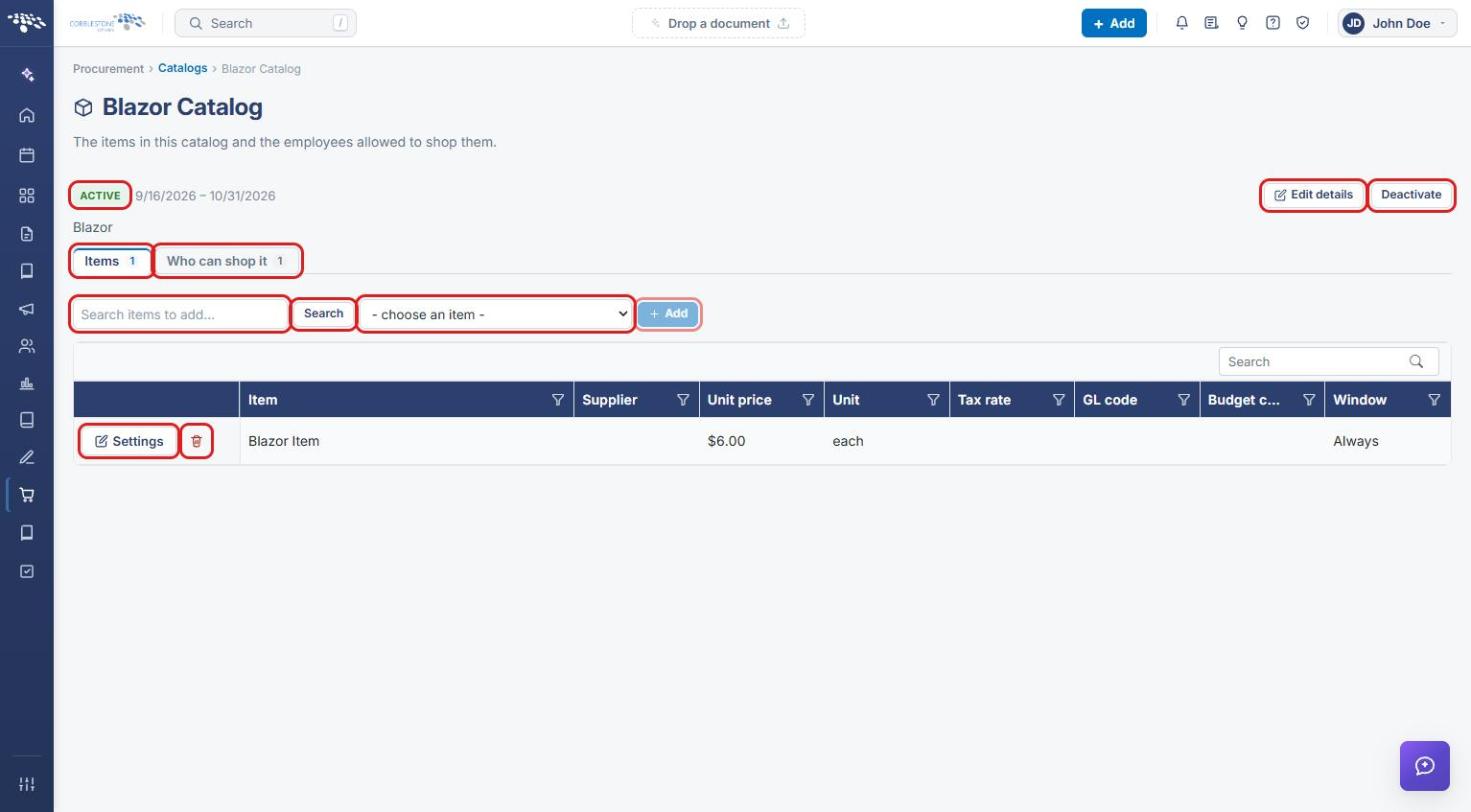
Clicking Manage opens the catalog record, subtitled “The items in this catalog and the employees allowed to shop them.” The record shows an ACTIVE badge, the catalog type and date window, Edit details and Deactivate buttons, and two tabs: Items and Who can shop it. On the Items tab, items are searched for and added with + Add, and each row carries Settings and delete controls alongside its Supplier, Unit price, Unit, Tax rate, GL code, Budget code, and Window values.
6.2 Items from the Gateway
Procurement › Gateway Items opens the Items from the Gateway list, subtitled “Items vendors and clients offered through the Gateway. Approving one allows it into a catalog.” The screen shows a line reporting whether anything is waiting for approval, Purchasing catalogs and Approve buttons, a Search box, and a grid with Approve, Item, Status, Company, Price, Unit, Currency, and Description columns.
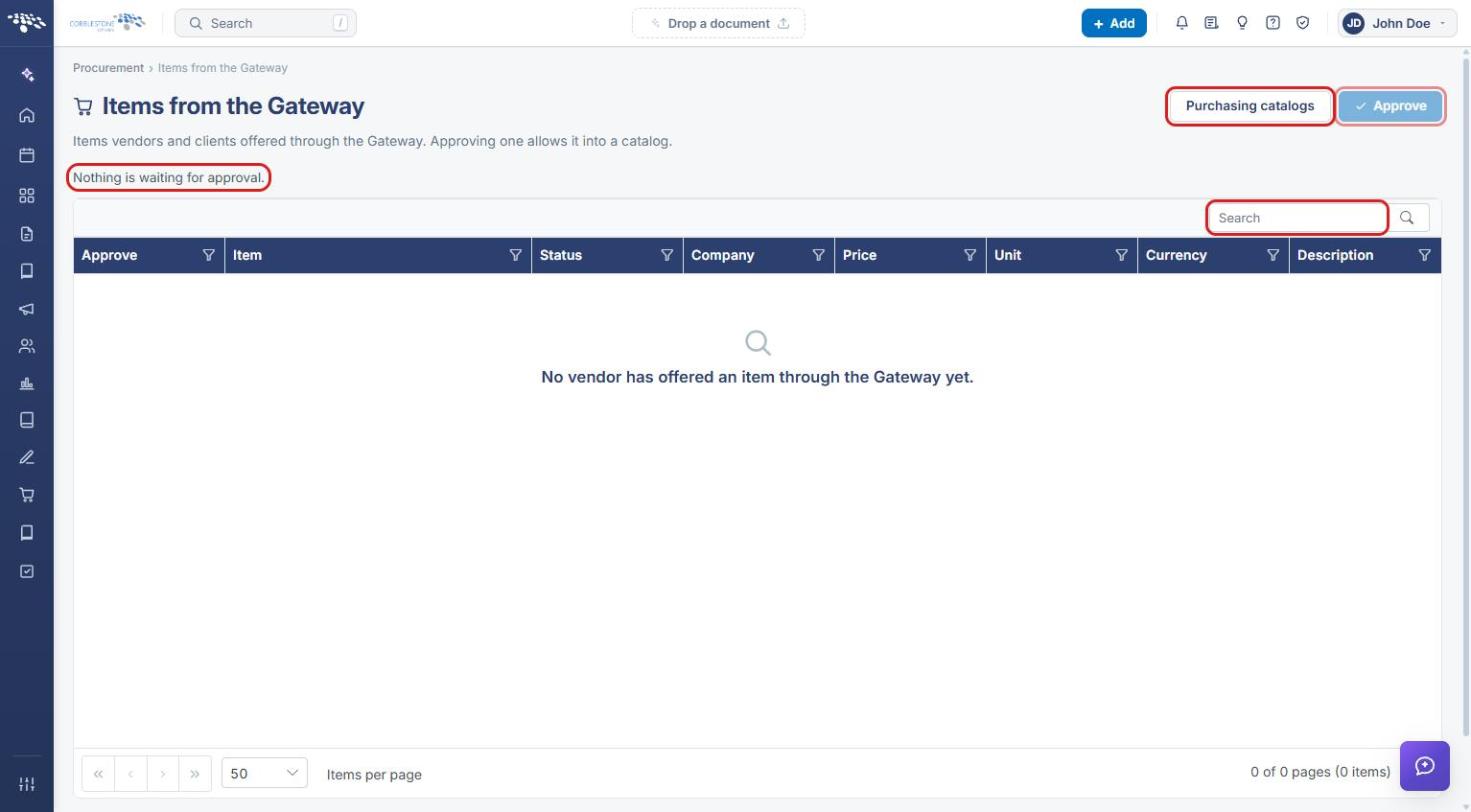
Approving an item allows it to be added to a purchasing catalog, and from there it becomes available on the Shopping page to everyone that catalog is shared with.
7. Granting Access to a Supplier Catalog
Function: Controls which employees can shop a catalog, and therefore which suppliers return items on their Shopping page.
Steps:
- From the Contract Insight homepage, click Procurement in the left navigation menu, then click Catalogs.
- Click Manage on the row for the catalog you want to share.
- Open the Who can shop it tab. It shows a count beside the tab name and lists the employees already granted access, with Employee and Department columns.
- Click Grant access and select the employee to add.
- Confirm the catalog is ACTIVE and that today’s date falls inside its Window — a shared catalog outside its date window still returns no items on the Shopping page.
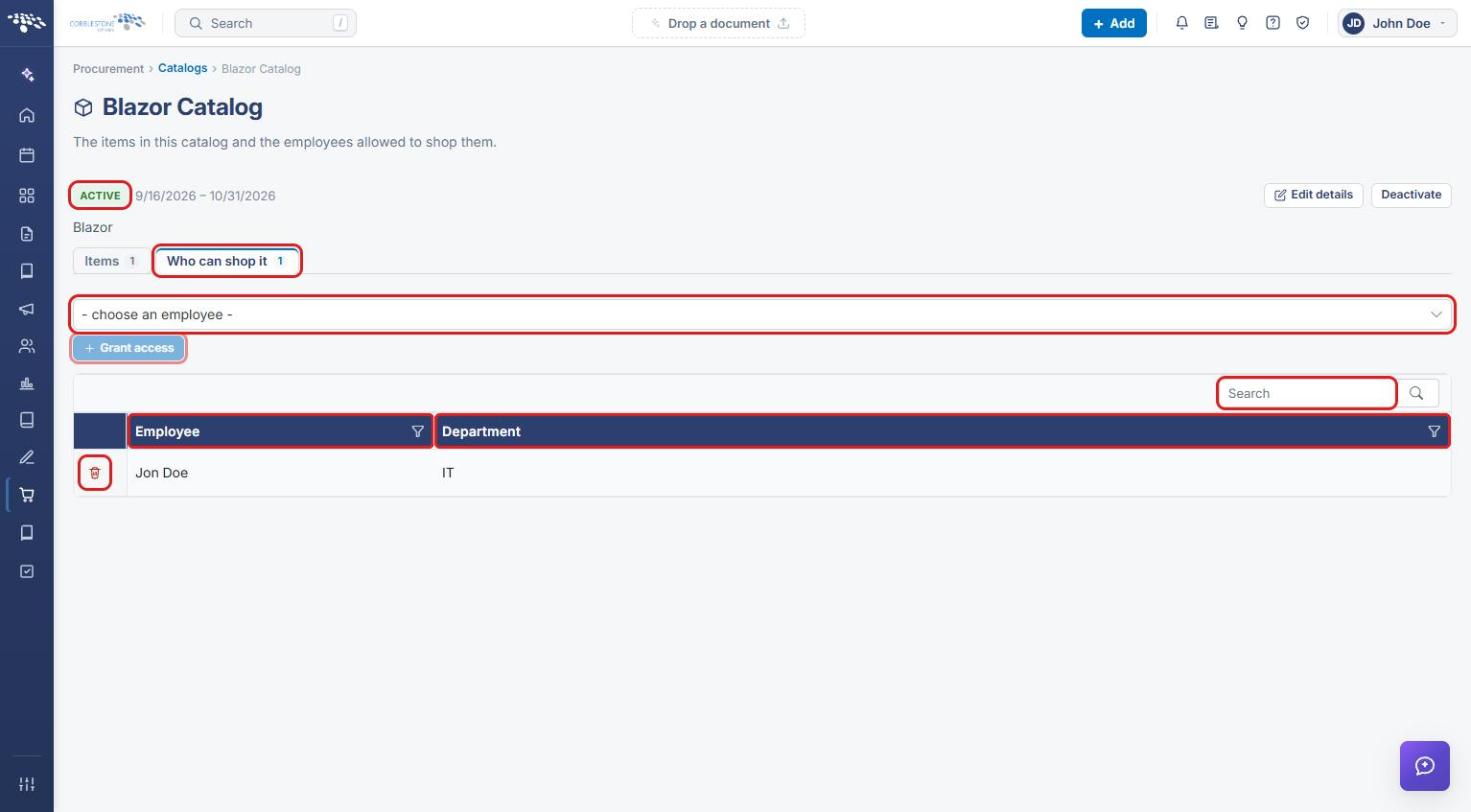
Note: Access is granted employee by employee on this tab, so a new buyer has to be added to each catalog they are expected to shop.
8. Reviewing the Resulting Purchase Order
Function: Confirms that a checked-out cart produced the purchase order you expected.
Steps:
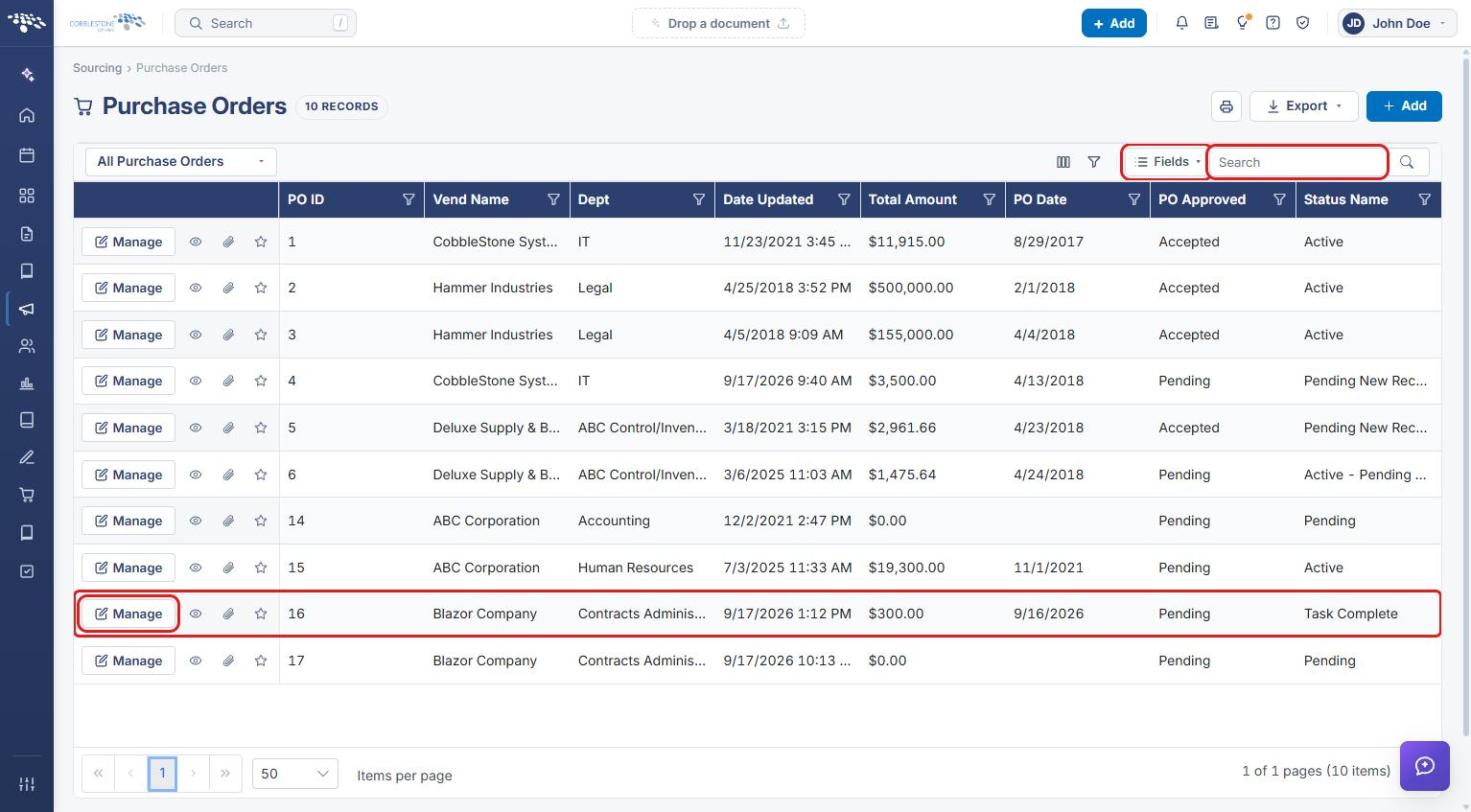
- From the Contract Insight homepage, click Sourcing in the left navigation menu, then click Purchase Orders.
- Locate the new purchase order in the grid. The list shows PO ID, PO Title, Status Name, Entered By, Entry Date, Updated By, and Date Updated columns, with a record count beside the page title and Export, + Add, and Search controls on the toolbar.
- Click Manage on its row to open the full purchase order record.
- On the Record Details tab, check the Details section — PO Title, PO Type, Vendor, Contact Person, Confirmation Number, Buyer/Assigned To, Status, Order Placed, Department/Business Unit, Location, and Payment Terms are among the fields carried on the record.
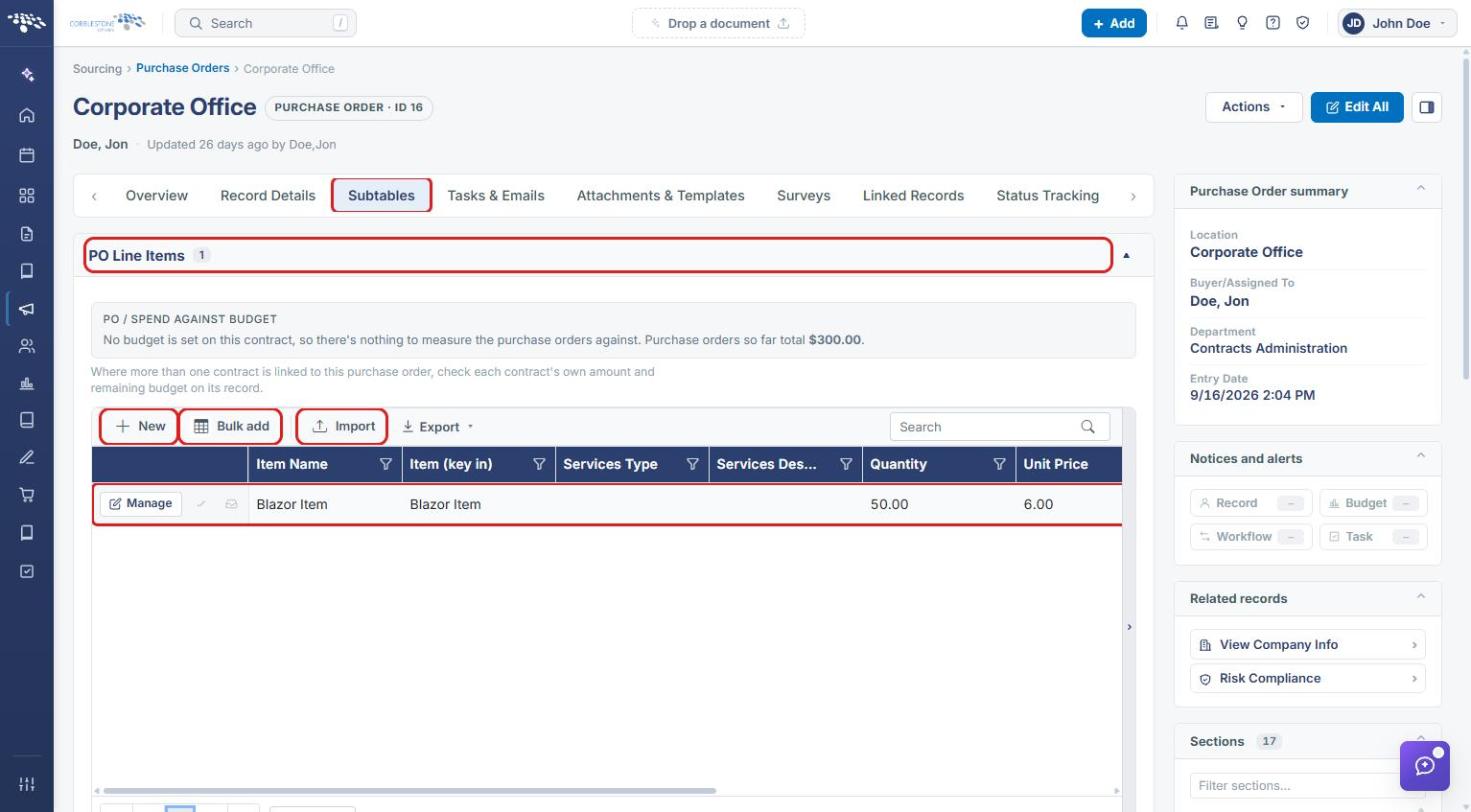
- Open the Subtables tab and review PO Line Items — the items shopped from the catalog. Line items can also be added there directly with + Add, Bulk add, or Import.
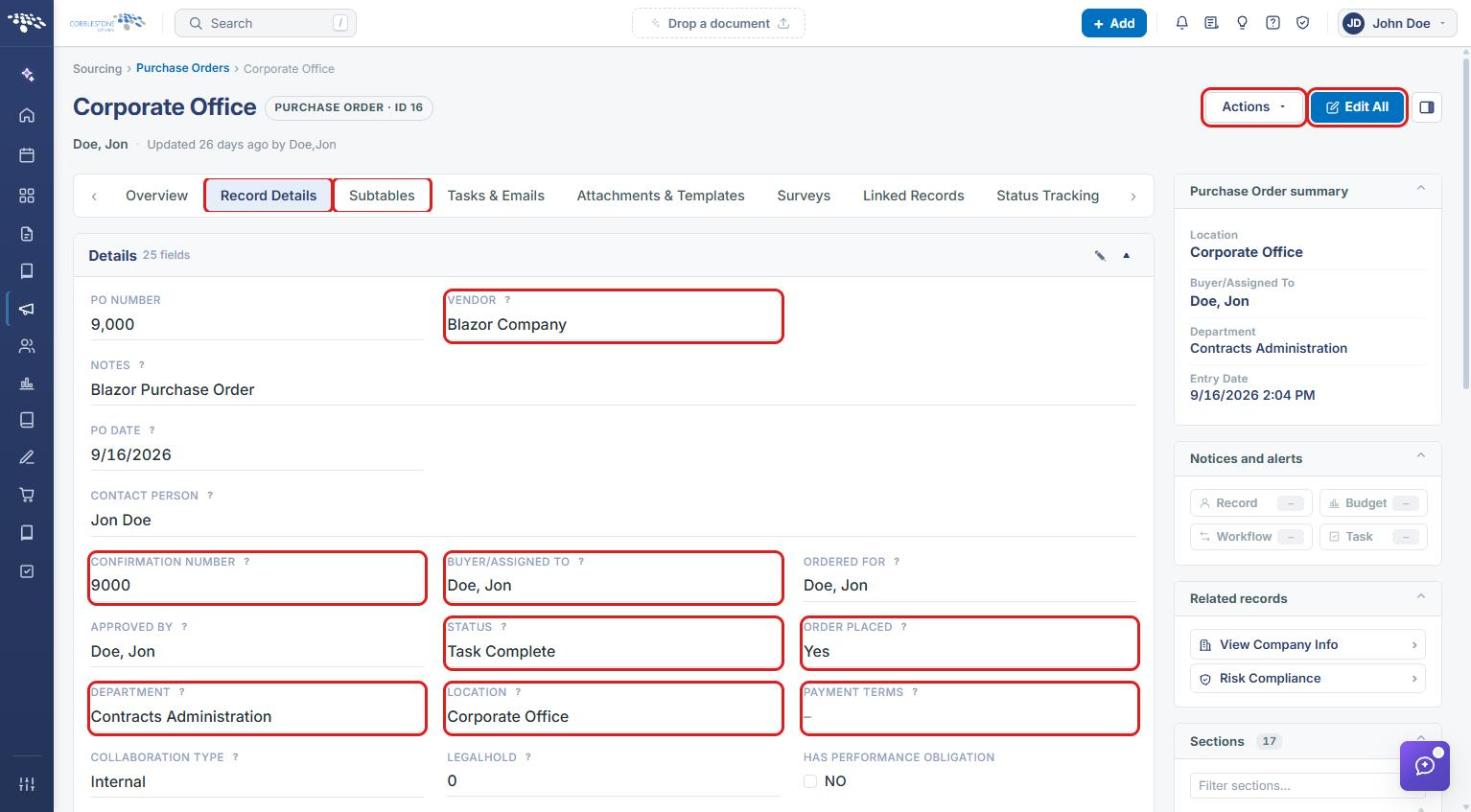
Note: The right-hand rail carries a Purchase Order summary panel (PO Title, Department/Business Unit, Entry Date, and PO Approved), a Notices and alerts panel, and a Risk register. The Actions and Edit All buttons in the upper right manage the record itself.
9. Related Screens
The screens that make up catalog ordering sit in two areas of the navigation menu:
- Procurement › Shopping — choose a supplier, build a cart, and turn it into a purchase order or a request
- Procurement › Catalogs — bundle items into catalogs, set each catalog’s type and date window, and choose who can shop it
- Procurement › Gateway Items — review and approve the items vendors and clients offer through the Gateway
- Procurement › Asset Tracking — the asset tracking screen in the same Procurement area
- Sourcing › Purchase Orders — the purchase orders produced at checkout, and their PO Line Items
- Contracts › Requests — the requests produced at checkout, before they are approved into orders
10. Quick Reference Summary
Task | How to Complete It |
Open the Shopping page | Homepage → Procurement → Shopping. |
Choose a supplier | Supplier catalog dropdown, type to filter the list, then click the supplier. |
Clear a supplier | The × in the Supplier catalog field, then choose another supplier. |
Build a cart | Add catalog items and quantities; the Your cart panel on the right tracks the order. |
Check out | Turn the cart into either a purchase order or a request. |
No items shown | The catalog is empty, outside its date window, or not shared with you — check it under Procurement → Catalogs. |
Share a catalog | Catalogs → Manage → Who can shop it → Grant access. |
Approve vendor items | Procurement → Gateway Items, then Approve. |
Review the order | Sourcing → Purchase Orders → Manage → Subtables → PO Line Items. |