COBBLESTONE SOFTWARE
Contract Insight — User Guide
Notifications & Email Alerts - E-Signature
Module: Document Collaboration Gateway › Document Collaboration Gateway E-Approvals & E-Signatures › Notifications & Email Alerts - E-Signature
Note: Each procedure in this guide begins at the Contract Insight homepage, so any section can be followed on its own. Template and theme names shown in the screenshots are from a test environment; yours may differ.
1. Overview
Signature process notifications work the same way as approval notifications. Inside a running process, each signing group and each participant shows when they were last notified, and you can send the invitation again with Resend.
Separately, two system-wide Administration tools control the emails themselves, for every process type:
- Notification Templates: what each email says (title, subject, body and placeholders), and which theme it uses.
- Notification Themes: how the emails look (layout, colors, header and footer).
2. Key Elements
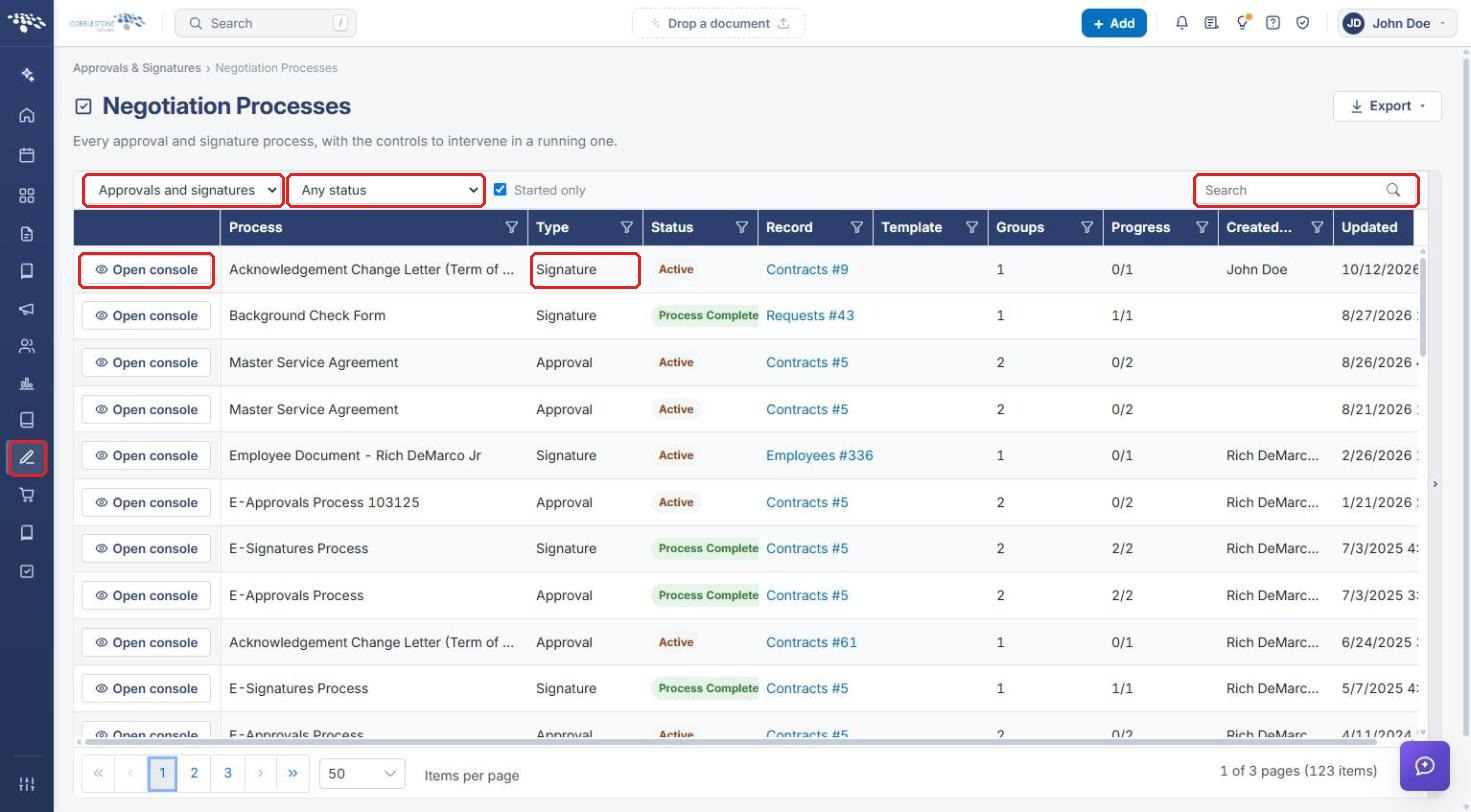
- Approvals & Signatures → Negotiation Processes: lists every approval and signature process, with Open console for each one.
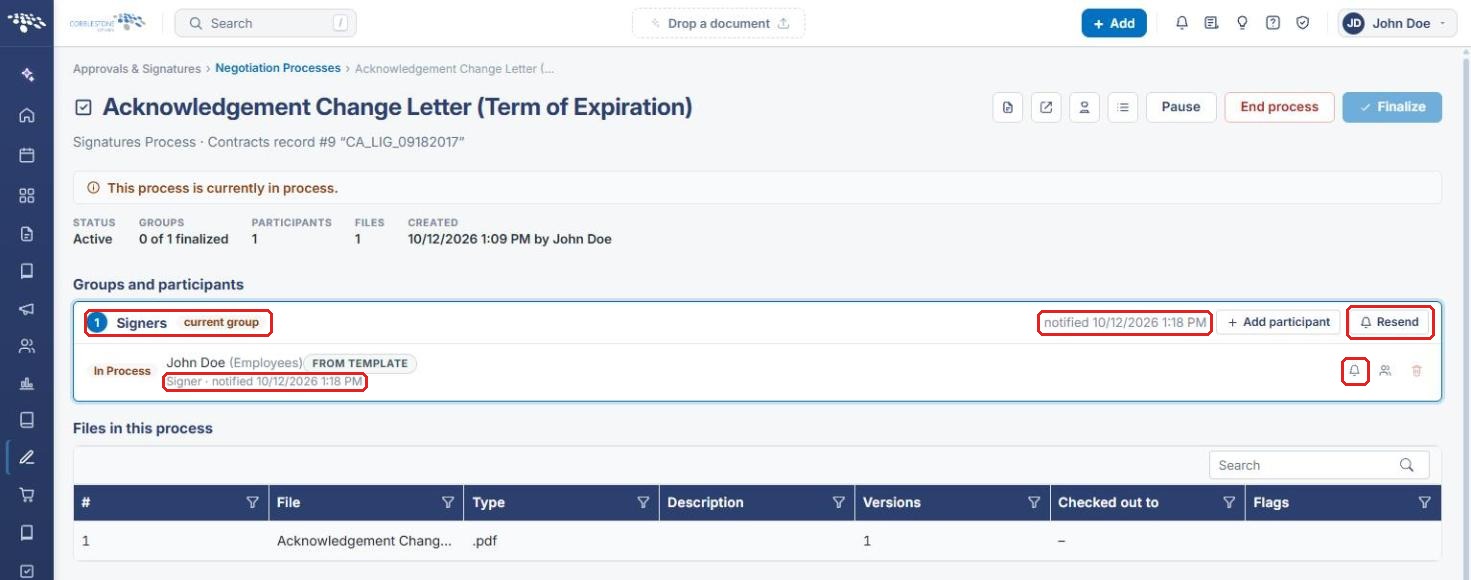
- notified timestamp: shown on each signing group and on each participant in the process console.
- Resend (group) and Re-send this invitation (bell icon, per participant): send the signature invitation again.
- Administration → Notification Templates: edit an email's Title, Subject, and Body, insert record placeholders, choose its Theme, and Preview with sample data before you Save.
- Administration → Notification Themes: add, edit, preview, or set default themes. Each theme has a Base layout (Standard or Task) and its own Colors.
3. Checking When Signers Were Notified
- From the Contract Insight homepage, hover over the Approvals & Signatures icon in the left navigation bar and select Negotiation Processes.
- To show only signature processes, set the first filter to Signatures only. Use the status filter (for example, Active) or the Search box to narrow the list.
- Click Open console on the process.
- Under Groups and participants, find the current group. The group header shows when the group was notified.
- Each participant row also shows its own notified date and time below the participant’s name.
Note: You can also open the console from the record: Attachments & Templates → Saved documents → Manage (gear) icon → Signatures → Open the process console.
4. Resending a Signature Notification
- Open the process console (see Section 3).
- To re-send the invitation to everyone in the current group, click Resend on the group header.
- To re-send to one participant, click the Re-send this invitation (bell) icon on that participant’s row.
- The notified timestamp shows when the notification was sent.
See the screenshot in Section 3.
5. Editing Notification Email Content
5a. Opening Notification Templates
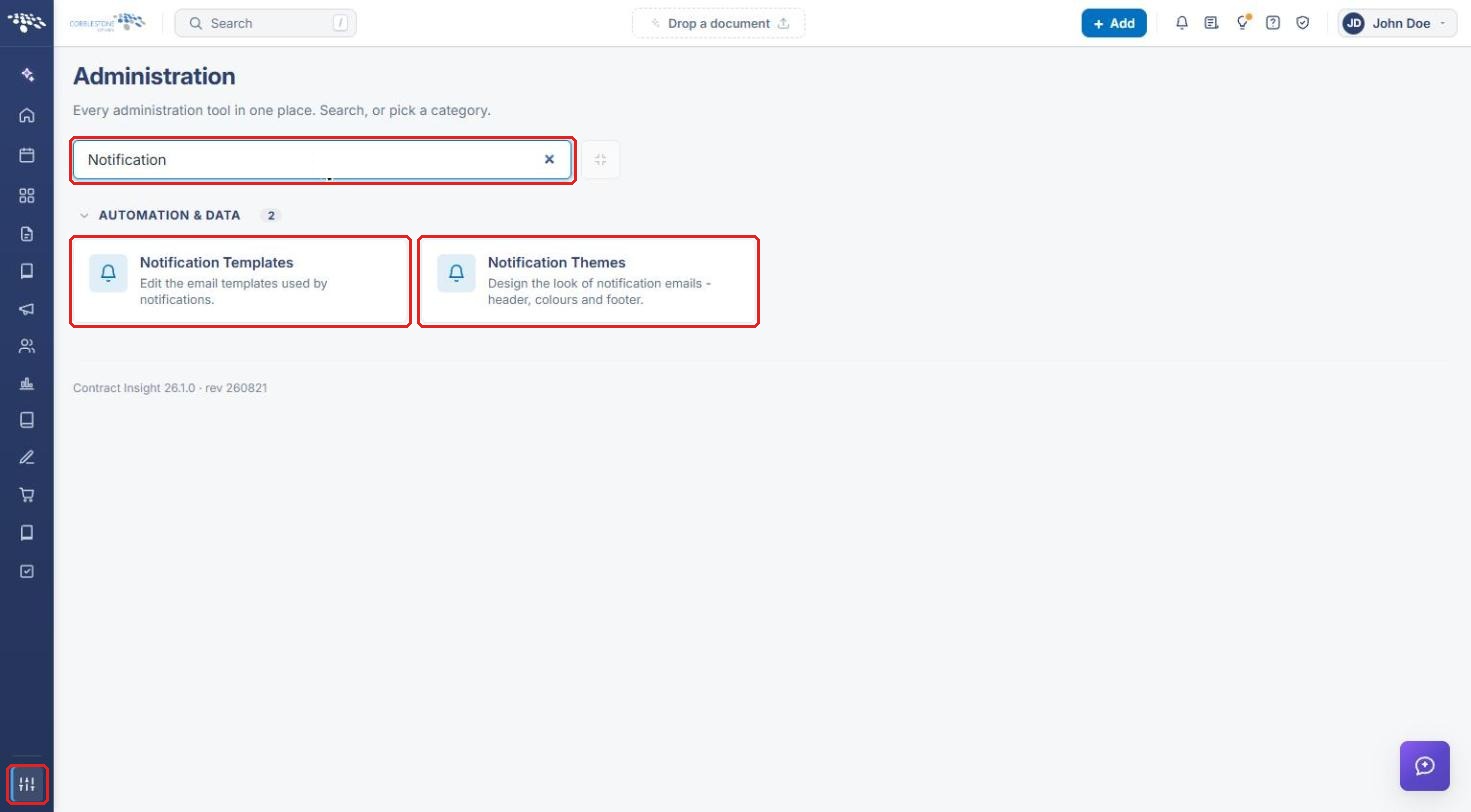
- Click the Administration icon at the bottom of the left navigation bar.
- In Search administration, type Notification.
- Click Notification Templates. (Click Notification Themes to change how emails look; see Section 6.)
5b. Editing a Template
- Choose an area (for example, Contracts & Committals) from the dropdown, then select a template from the list. Use Filter these templates to find one quickly, or click New template to create one.
- On the Message tab, edit the Title, Description, and Subject.
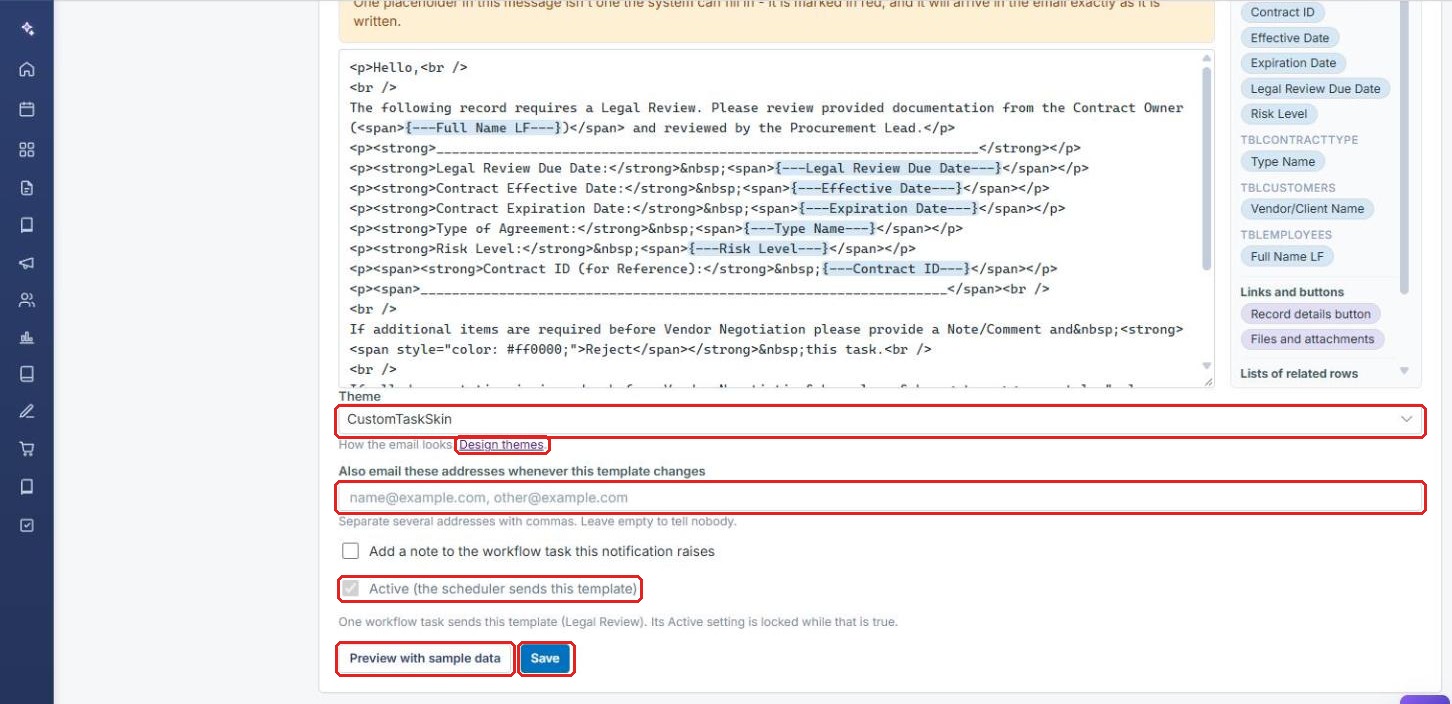
- Edit the Body in HTML or Rich text mode. To add record details, type { where you want one, or click a placeholder in the Insert a placeholder panel.
- Use the Fields and Rules tabs to set which record details the template can show and which records it applies to.
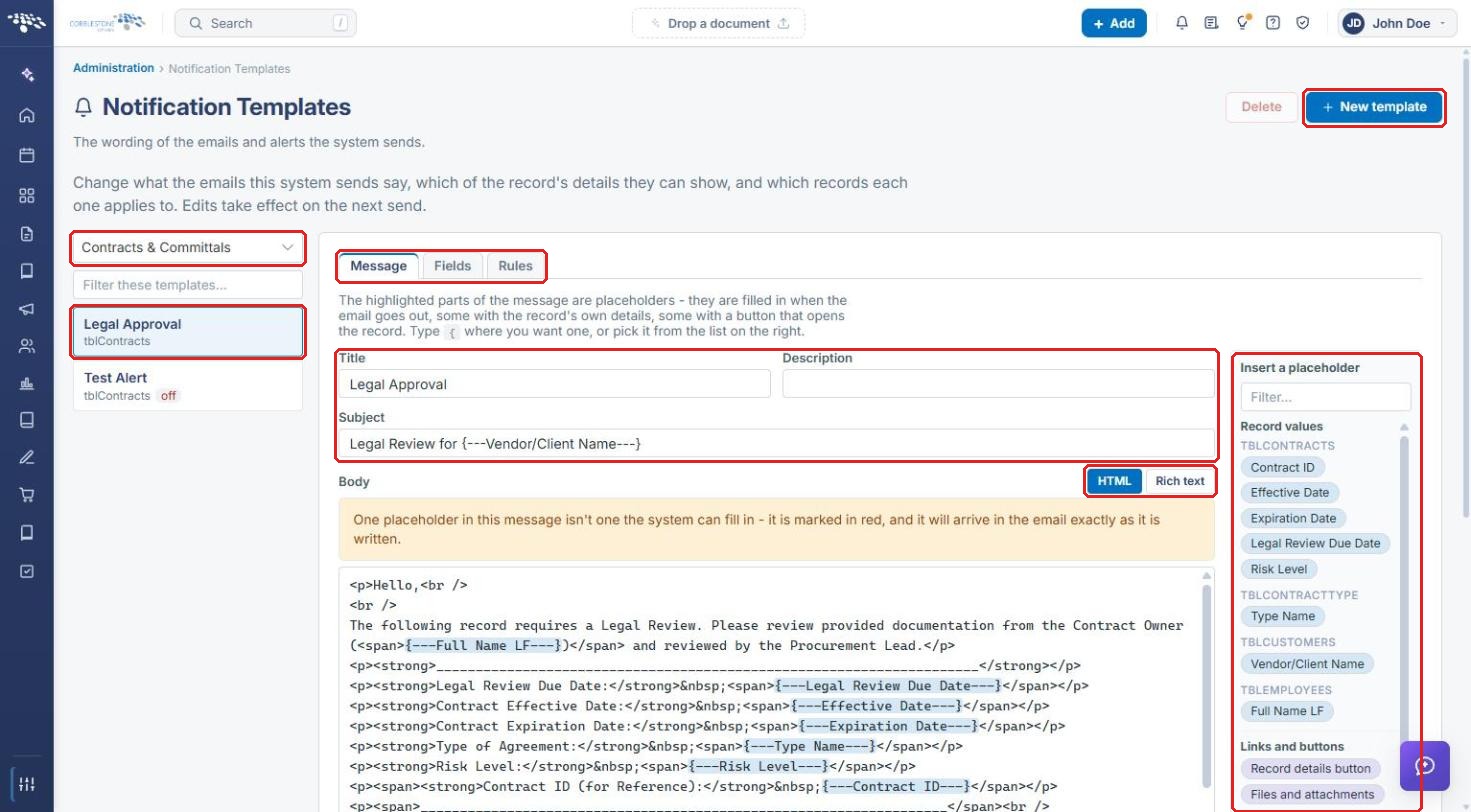
Note: If the body contains a placeholder the system can’t fill in, a warning appears above the body, and that placeholder is marked in red. It will arrive in the email exactly as written.
5c. Choosing a Theme and Saving
- Scroll below the body and select a Theme (click Design themes to open Notification Themes).
- Optionally, enter addresses in Also email these addresses whenever this template changes.
- Check or uncheck Active to turn the template on or off. This setting is locked while a workflow task uses the template.
- Click Preview with sample data to check the email, then click Save. Edits take effect on the next send.
6. Changing How Notification Emails Look
6a. Notification Themes List
- Open Administration → Notification Themes (see Section 5a).
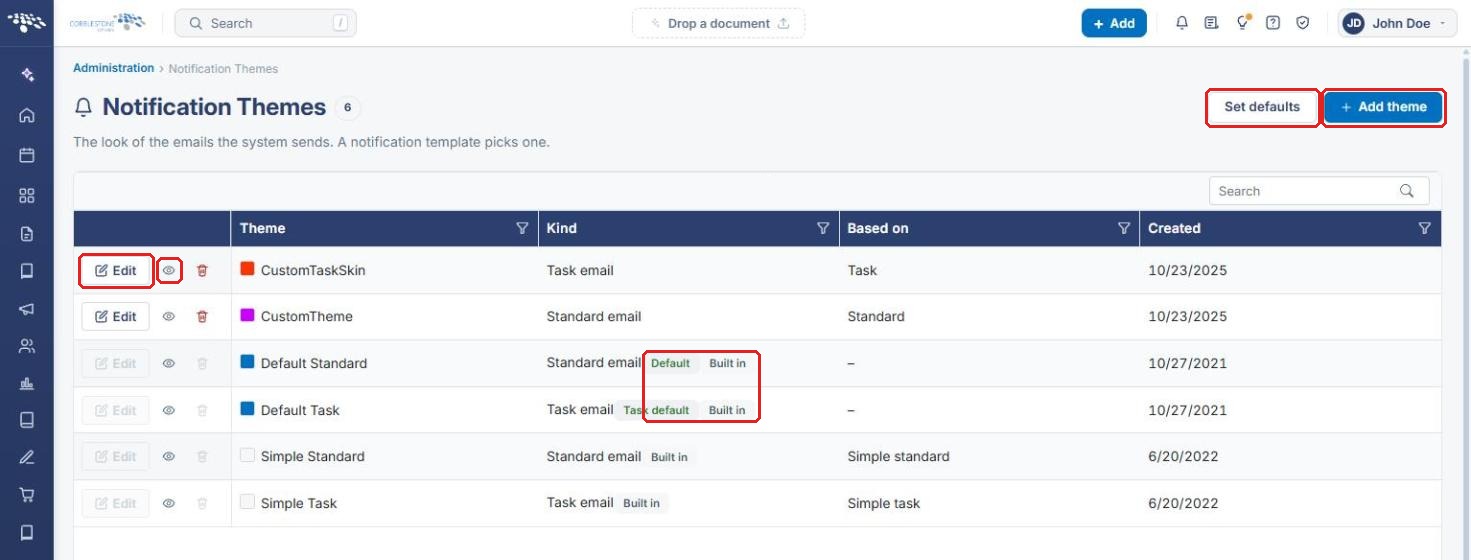
- Review the themes. Kind shows whether each is a Standard email or Task email theme. Badges mark the Default and Task default themes, and Built in themes can't be edited or deleted.
- Click the Preview this theme (eye) icon to see a theme, Edit to change a custom theme, or Add theme to create one.
- Click Set defaults to choose which themes are used by default.
6b. Editing a Theme
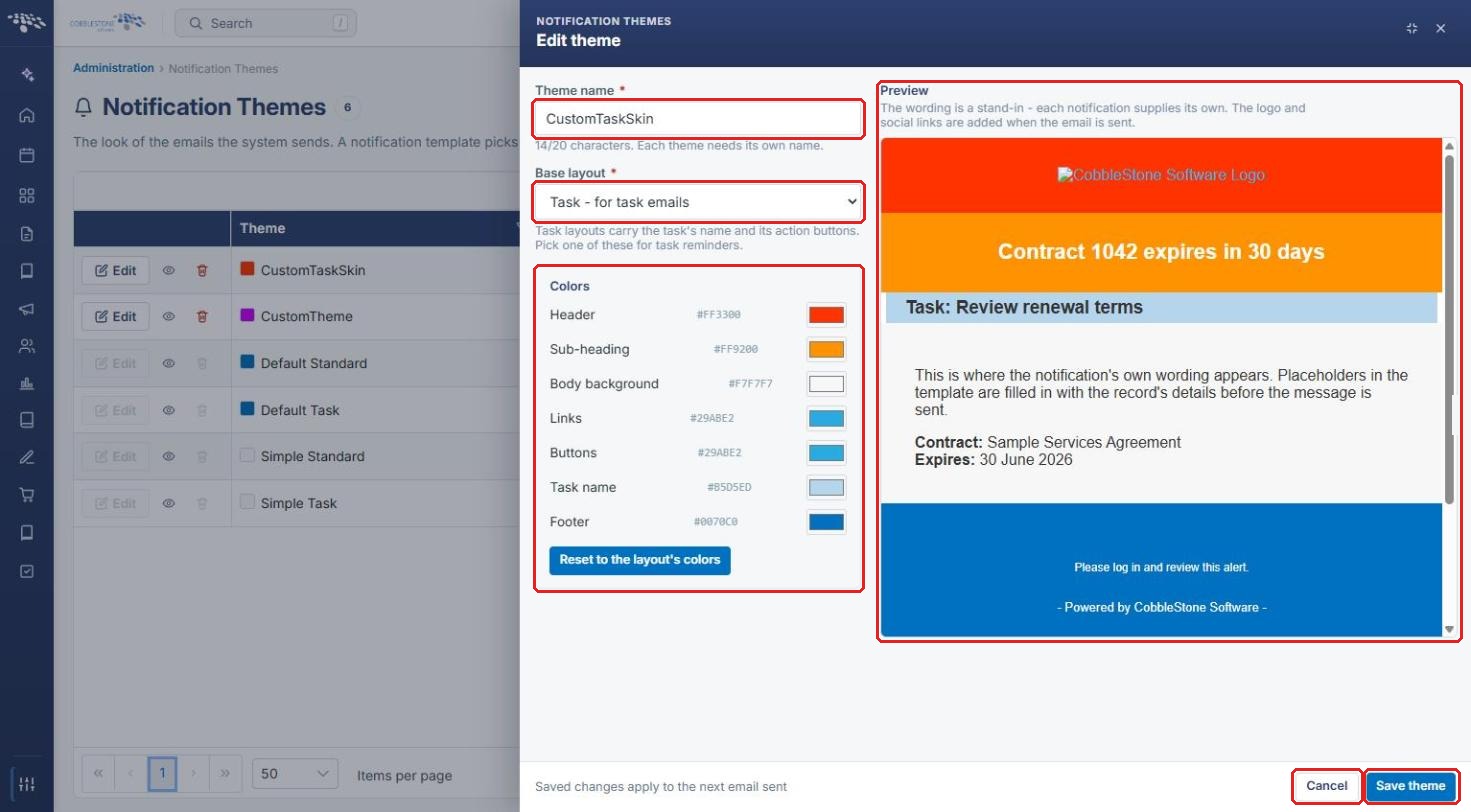
- Enter or change the Theme name (up to 20 characters, and unique).
- Select a Base layout. Task layouts include the task's name and action buttons, so pick one for task reminders.
- Under Colors, set the Header, Sub-heading, Body background, Links, Buttons, Task name, and Footer colors. Click Reset to the layout's colors to start over.
- Check the Preview on the right.
- Click Save theme, or Cancel to discard changes. Saved changes apply to the next email sent.
7. Quick Reference Summary
| Task | Where | Action |
|---|---|---|
| Find a signature process | Approvals & Signatures → Negotiation Processes | Filter Signatures only → Open console |
| See when a group or signer was notified | Process console → Groups and participants | notified timestamp |
| Re-send to a whole group | Process console | Resend |
| Re-send to one signer | Process console | Bell icon (Re-send this invitation) |
| Change email wording | Administration → Notification Templates | Choose area → template → edit → Save |
| Insert record details into an email | Notification Templates → Body | Type { or use Insert a placeholder |
| Change which theme an email uses | Notification Templates → Theme | Select a theme → Save |
| Change how emails look | Administration → Notification Themes | Edit / Add theme → Save theme |