COBBLESTONE SOFTWARE
Contract Insight — User Guide
Manage Main Menu: Core Application Menus
Configuration & Fields: Navigation Menu — Core Application
Note: Each procedure in this guide begins at the Contract Insight homepage, so any section can be followed on its own. The Core Application menu is the default menu, so changes made to it are seen by every employee who is not assigned to another work space.
1. Overview
The Core Application menu is the main menu that displays down the left-hand side of Contract Insight. System Administrators can add, edit, reorder, hide, and remove the items on it, and can group items together under headings, so that the menu reflects how the organization actually uses the system.
Core Application is the default work space. Every employee who has not been assigned to another work space sees this menu, which is why the employee count beside the WORKSPACE pick-list is the full employee list. Changes made here therefore apply system-wide unless the employee has been assigned a different work space.
A menu item is either a heading, which has no page of its own and expands to show its sub-items, or a link, which opens a page in the application or an external address. Each item carries a label, an icon, an order, and a visibility setting; user permissions and module licensing still govern whether an item is usable once it is shown.
2. Accessing the Core Application Menu
The Menu items tab of the Navigation Menu screen is where the Core Application menu is maintained. To open it:
From the Contract Insight homepage, click Administration at the bottom of the left navigation menu. On the Administration page, under Configuration & Fields, select Navigation Menu. The Menu items tab opens with Core Application selected in the WORKSPACE pick-list.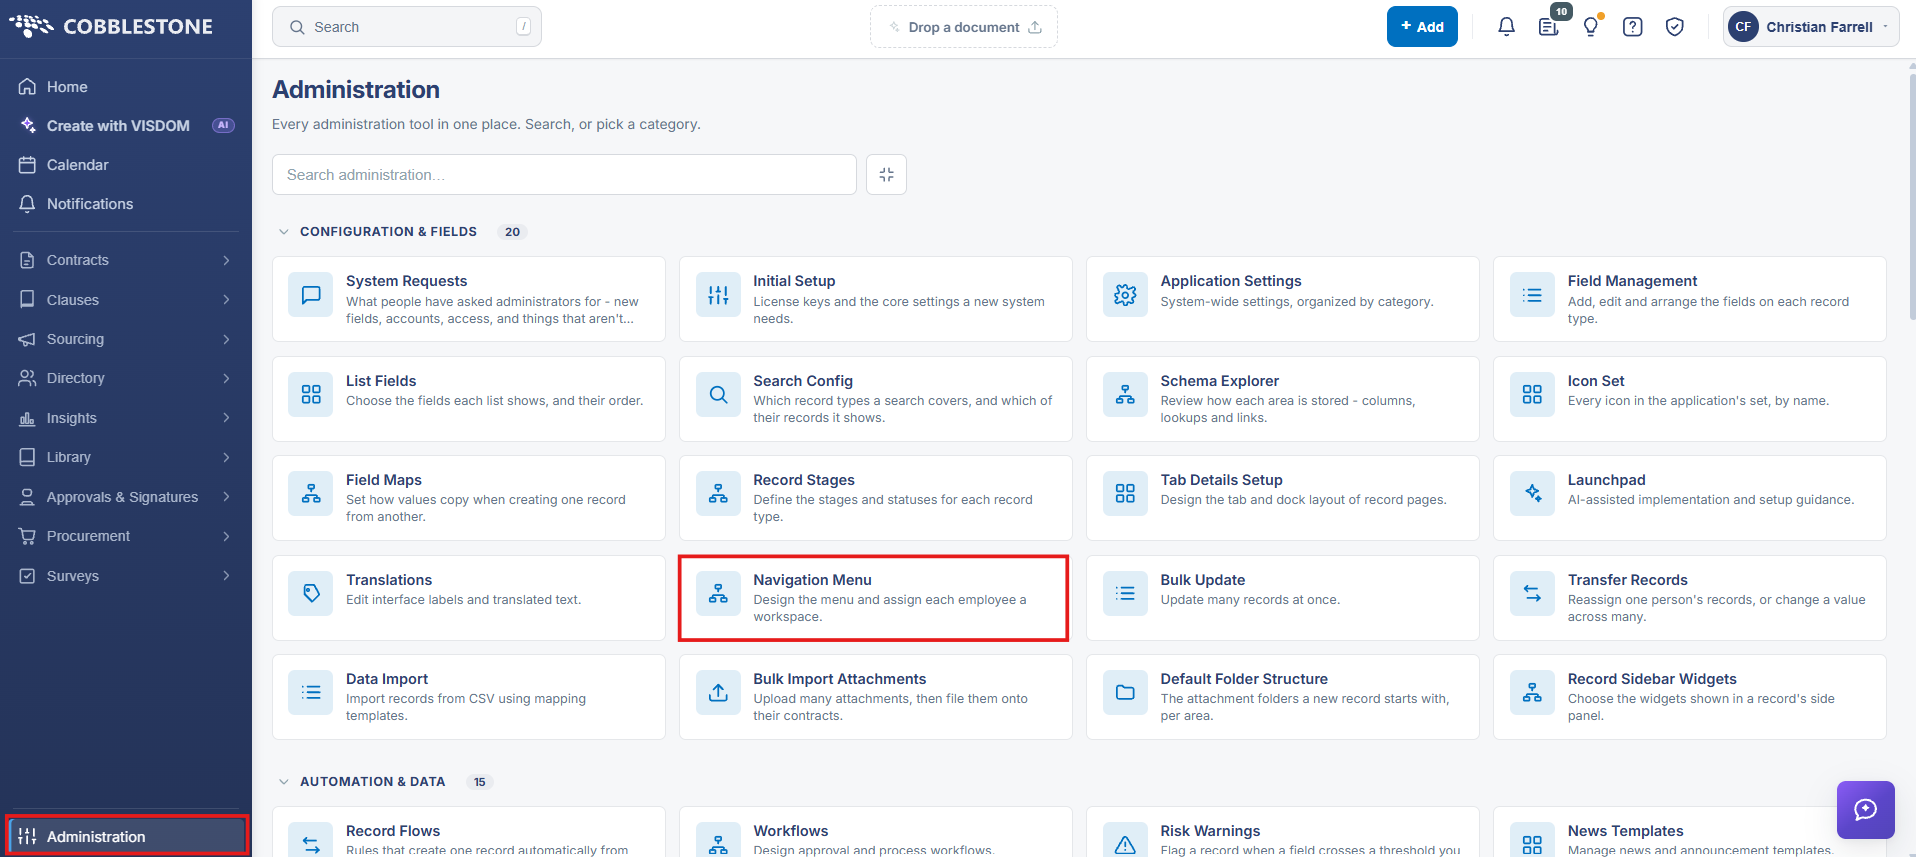
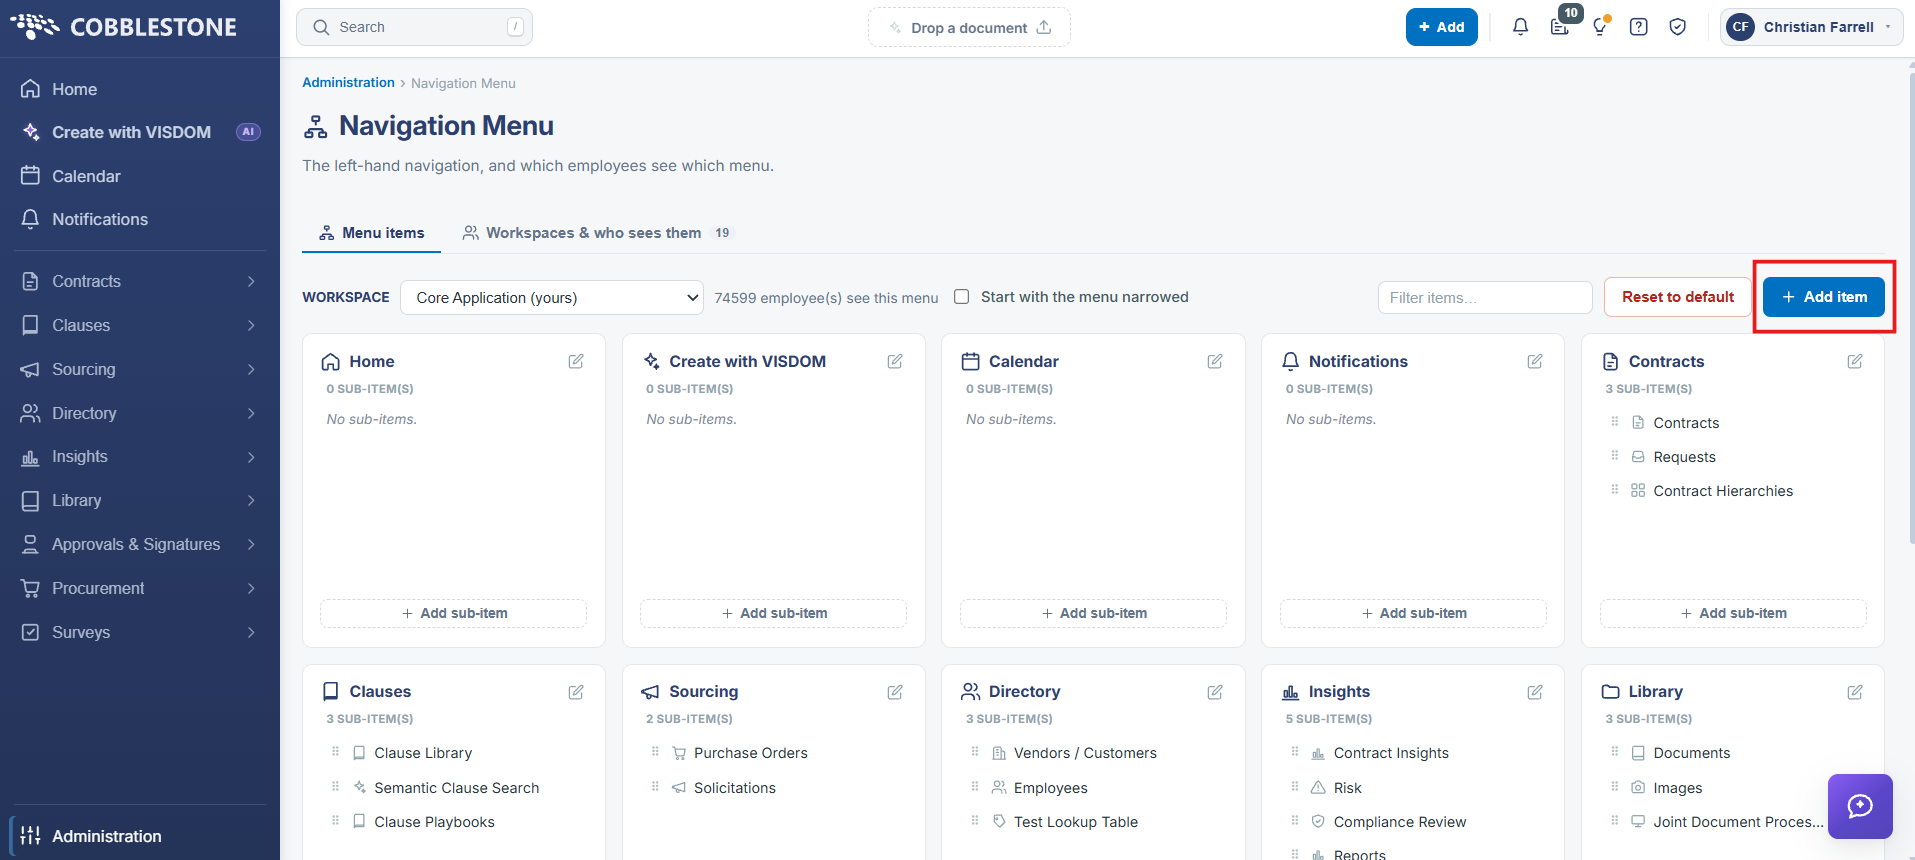
The Menu items tab includes the following elements:
- A WORKSPACE pick-list, set to Core Application (yours) by default
- A live count of the employees who see this menu
- A Start with the menu narrowed checkbox — everyone in the work space starts with a narrow, icon-only menu and can widen it with the ☰ button
- A Filter items box that narrows the cards to items matching a keyword
- A Reset to default button that replaces the work space’s entire menu with the default menu
- An + Add item button that creates a new top-level menu item
- A card for each top-level menu item, showing its icon, label, any badges, its sub-item count, its sub-items, an edit (pencil) icon, and an + Add sub-item control
3. The Core Application Menu Breakdown
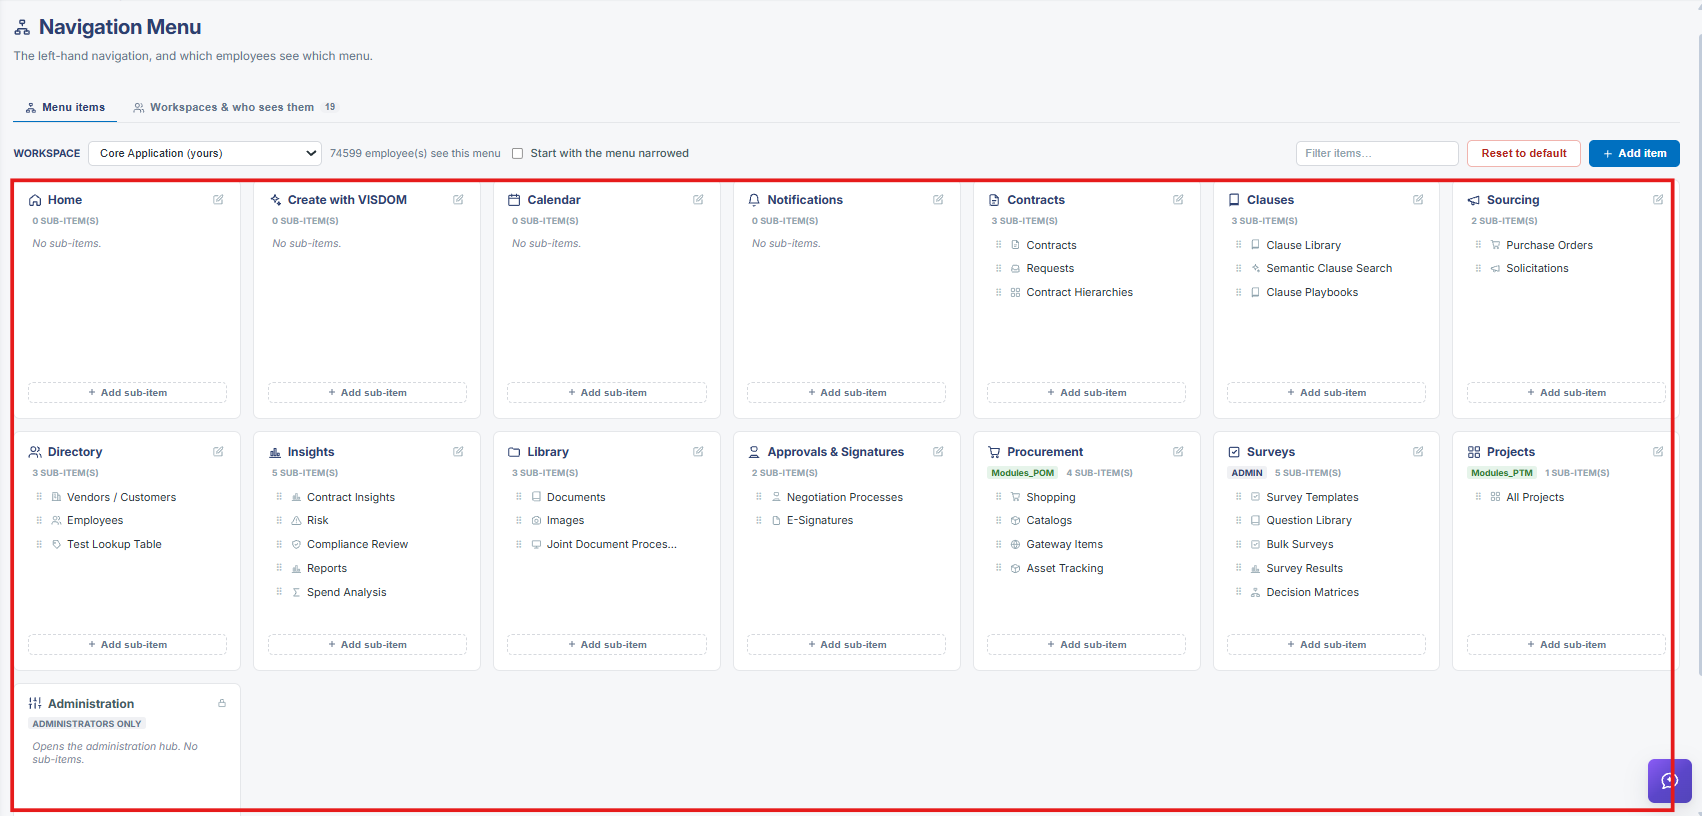
Each top-level menu item appears as its own card, and the sub-items belonging to it are listed inside that card. As delivered, the Core Application menu contains the following top-level items:
- Home — no sub-items
- Create with VISDOM — no sub-items
- Calendar — no sub-items
- Notifications — no sub-items
- Dashboards — no sub-items
- Contracts — Contracts and Requests
- Clauses — Clause Library, Semantic Clause Search, and Clause Playbooks
- Sourcing — Purchase Orders and Solicitations
- Directory — Vendors / Customers and Employees
- Insights — Contract Insights, Risk, Compliance Review, Reports, and Spend Analysis
- Library — Documents, Images, and Joint Document Processes
- Approvals & Signatures — Negotiation Processes and E-Signatures
- Procurement — Shopping, Catalogs, Gateway Items, and Asset Tracking
- Surveys — Survey Templates, Bulk Surveys, Survey Results, and Decision Matrices
- Projects — All Projects
- Administration — opens the administration hub; no sub-items
3.1 Badges on a Menu Item
Small badges beneath an item’s label describe how it behaves:
- HIDDEN — shown in red on an item that is not visible in the menu
- A module key — for example Modules_POM on Procurement or Modules_PTM on Projects; the item only appears when that module is licensed
- ADMIN or ADMINISTRATORS ONLY — the item is restricted to administrators
- UNAVAILABLE — shown in red on an item pointing at a page that does not exist in this application. These items appear greyed out in the sidebar and explain themselves when anyone selects them
Note: The Administration item at the end of the menu is managed by the application. Its card carries a lock rather than an edit icon: it is always shown to administrators, always last, and cannot be renamed, moved, or given sub-items.
4. Adding a Menu Item
Function: Adds a heading, an application page, or a link to the Core Application menu.
Steps:
- From the Contract Insight homepage, click Administration at the bottom of the left navigation menu. On the Administration page, under Configuration & Fields, select Navigation Menu. The Menu items tab opens with Core Application selected in the WORKSPACE pick-list.
- Click + Add item to create a top-level menu item, or + Add sub-item at the bottom of a card to create an item beneath that heading. The New menu item panel slides out from the right, headed MAIN MENU · APPEARS IN CORE APPLICATION.
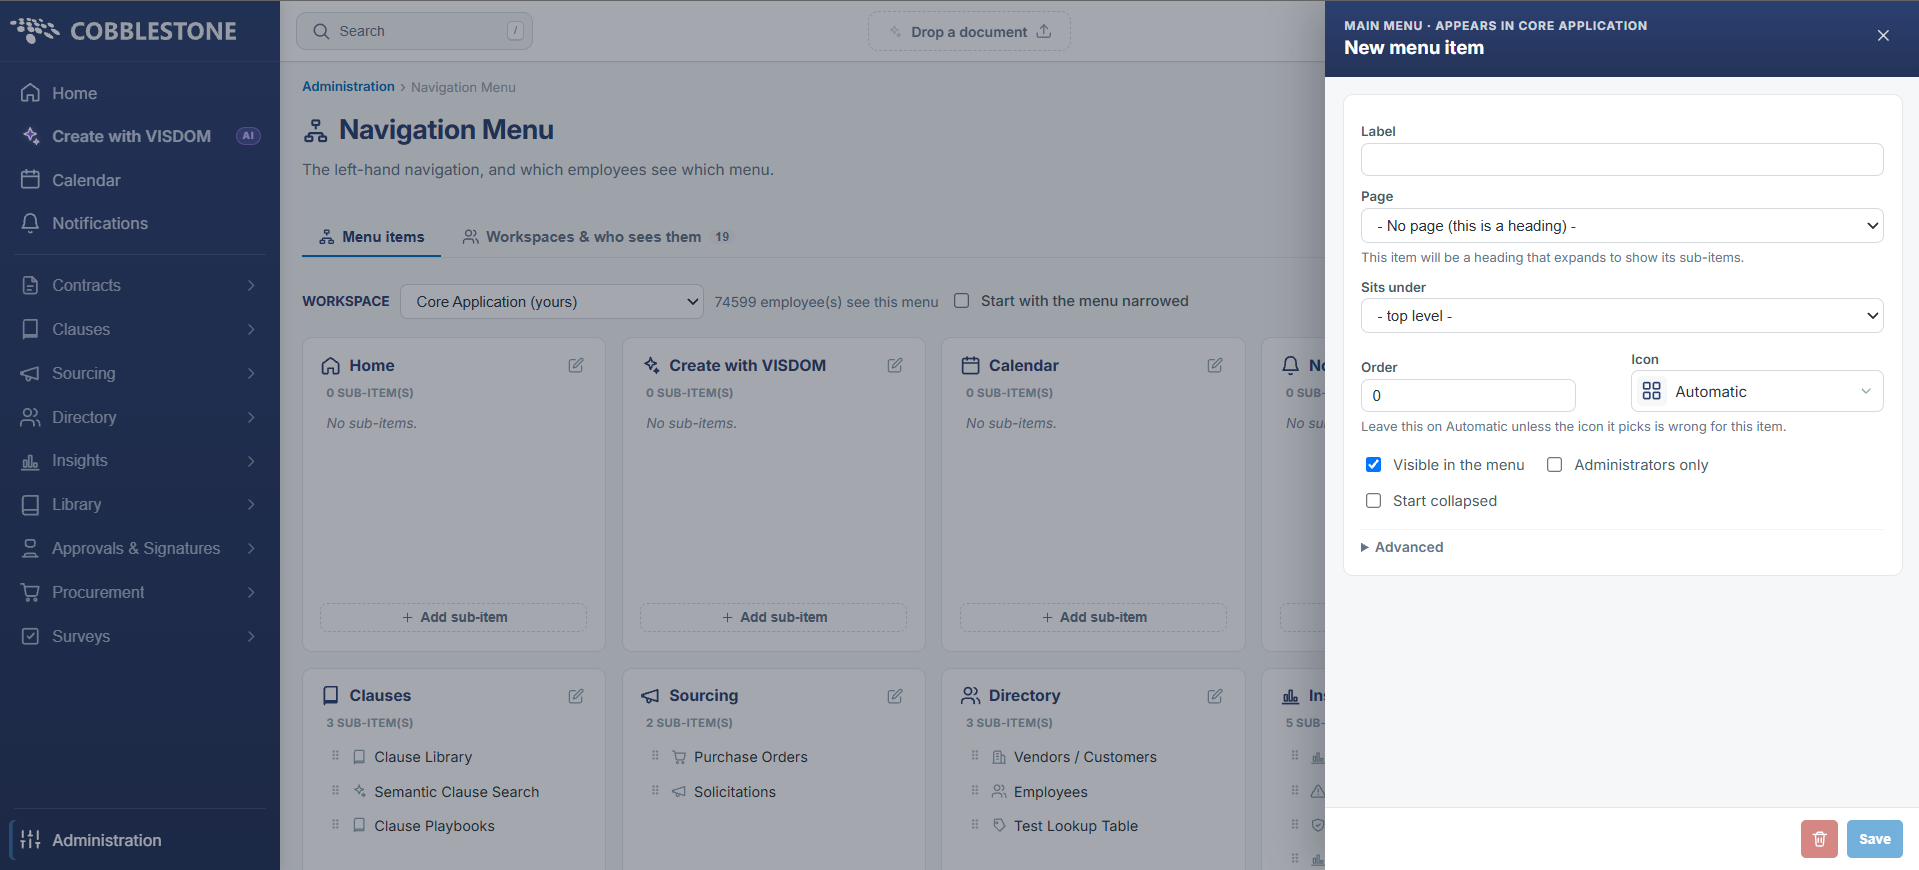
- Enter the Label for the item exactly as it should read in the menu.
- Choose the Page the item opens:
- An application page — select it from the list of Contract Insight pages
- “Enter a link manually…” — select this to reveal a URL field, then provide the address. It accepts an external web address or an existing page name, and confirms beneath the field whether the value is recognised
- “— No page (this is a heading) —” — leave the item without a page to create a heading that expands to show its sub-items
- Set Sits under to the parent item, or leave it on “— top level —” to place the item on the top level of the menu.
- Enter the Order number that determines where the item displays among its siblings, and choose an Icon if the automatic one is not right.
- Leave Visible in the menu ticked, tick Administrators only if the item should be restricted, and tick Start collapsed if a new heading should open closed.
- Complete any Advanced options required, then click Save in the lower right of the panel to add the item to the menu.
5. Editing a Menu Item
Function: Renames an item, changes the page it opens, or moves it under a different heading.
Steps:
- From the Contract Insight homepage, click Administration at the bottom of the left navigation menu. On the Administration page, under Configuration & Fields, select Navigation Menu. The Menu items tab opens with Core Application selected in the WORKSPACE pick-list.
- Use the Filter items box to find the item if the menu is long.
- Click the edit (pencil) icon in the upper right of a top-level item’s card, or click a sub-item in the list beneath it. The Edit menu item panel opens.
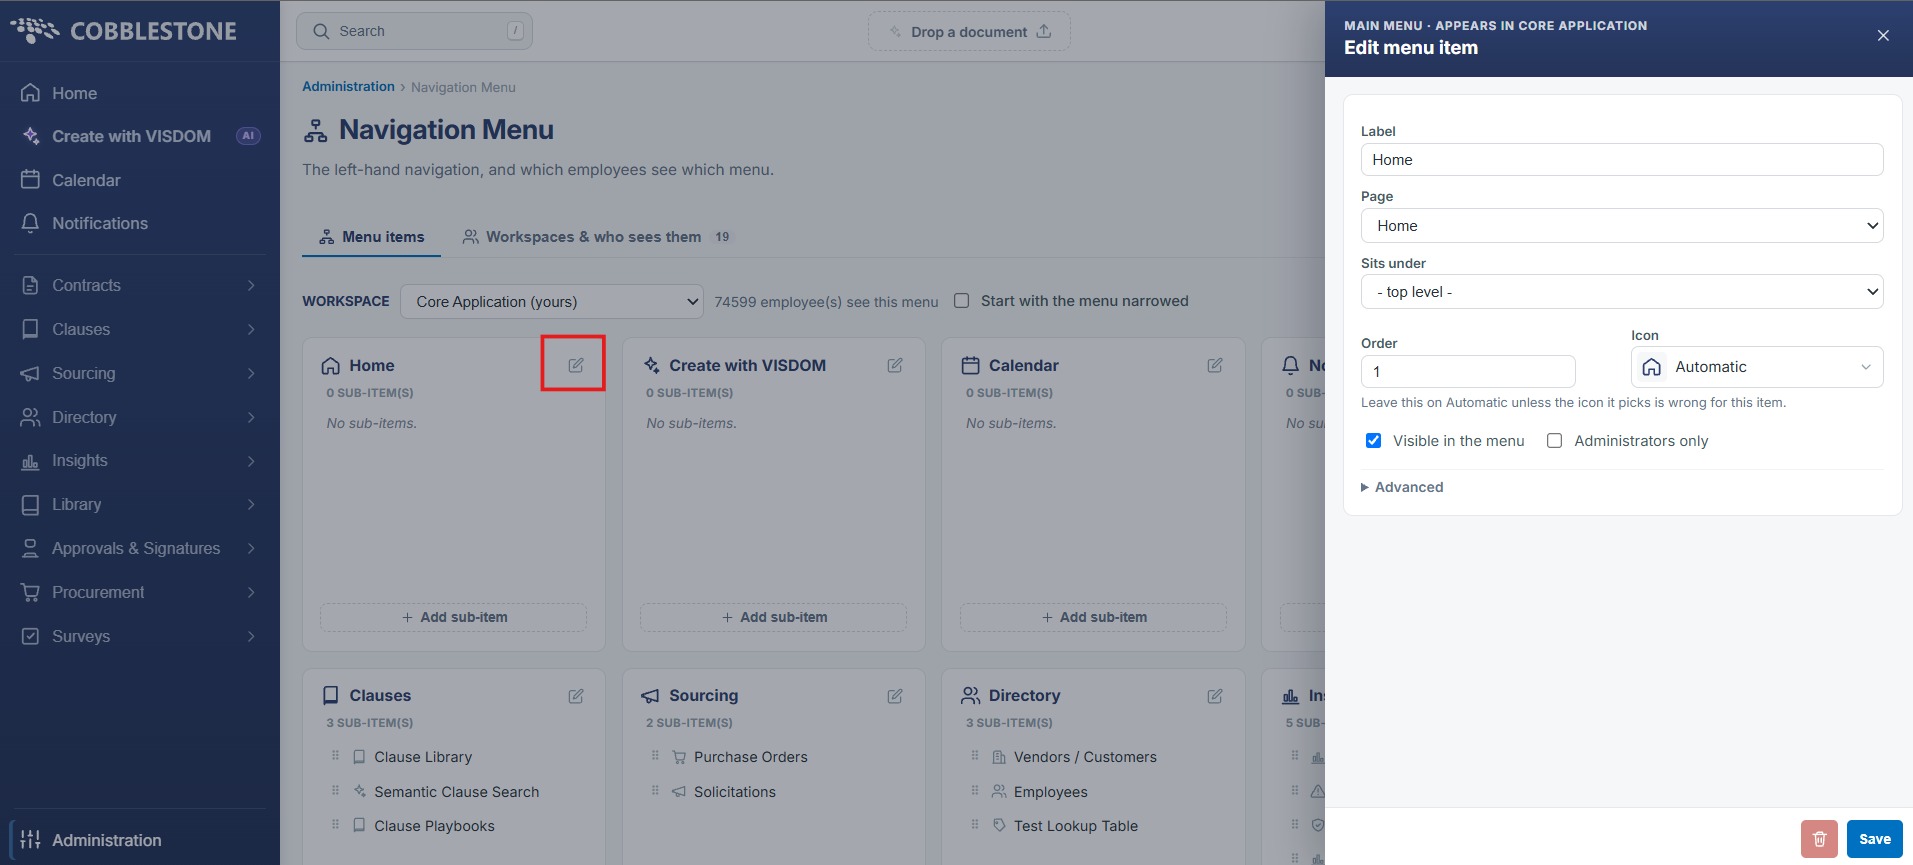
- Change the Label, Page, Sits under, Order, or Icon as required. Changing Sits under moves the item beneath a different heading, or up to the top level of the menu.
- Click Save in the lower right of the panel to commit the change.
Note: The Icon control opens a searchable picker with an Automatic — matched to the page this points to option at the top, followed by the icon set. Leave it on Automatic unless the icon it picks is wrong for the item.
6. Reordering Menu Items
Function: Sets the sequence in which menu items display.
Steps:
- From the Contract Insight homepage, click Administration at the bottom of the left navigation menu. On the Administration page, under Configuration & Fields, select Navigation Menu. The Menu items tab opens with Core Application selected in the WORKSPACE pick-list.
- To reorder a sub-item, drag it by the handle at the left of its row into the position required, or select the handle and use the arrow keys. The change applies to the sub-items within that card.
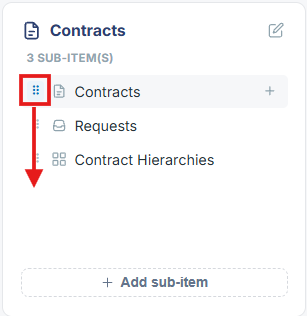
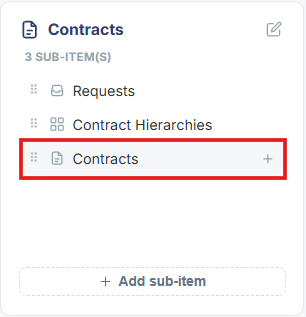
- To reorder a top-level item, open its card with the edit (pencil) icon and change the Order number, then click Save. Items display in ascending order.
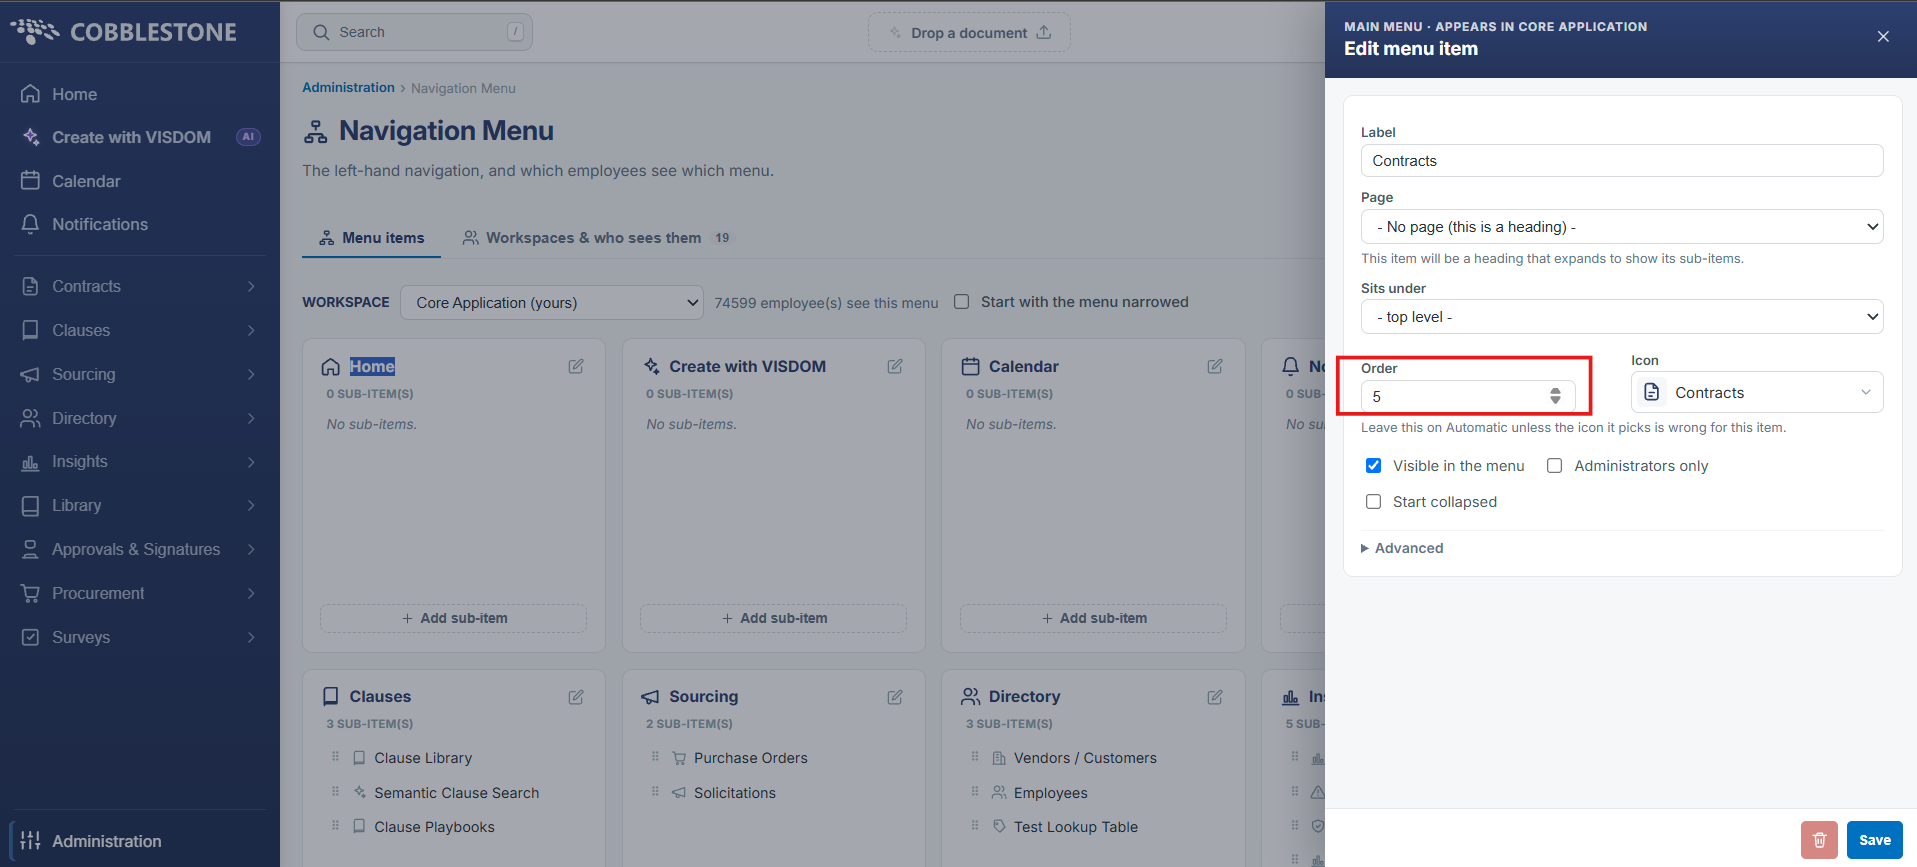
- Repeat for each item that needs to move, so that no two items on the same level compete for the same position.
Note: The Administration item is always placed last, whatever order values are set on the other items.
7. Hiding a Menu Item
Function: Removes an item from the menu without deleting it, so it can be restored later.
Steps:
- From the Contract Insight homepage, click Administration at the bottom of the left navigation menu. On the Administration page, under Configuration & Fields, select Navigation Menu. The Menu items tab opens with Core Application selected in the WORKSPACE pick-list.
- Open the item with the edit (pencil) icon on its card, or by clicking the sub-item.
- Untick Visible in the menu.
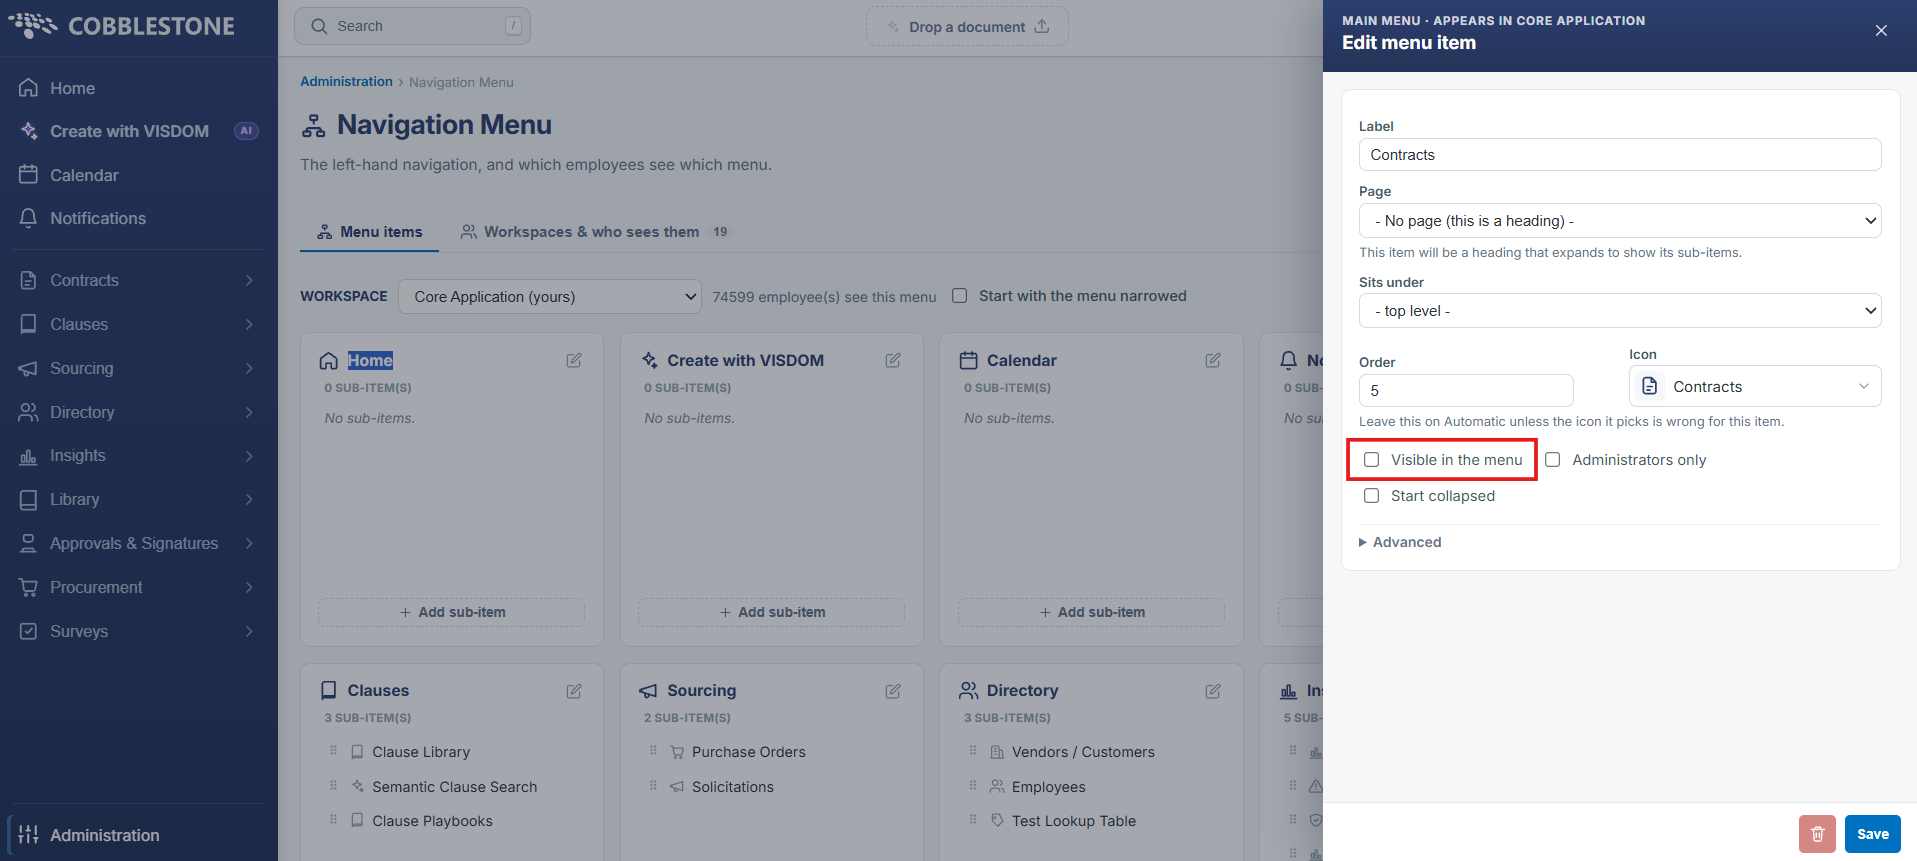
- Click Save. The item no longer displays in the left navigation, and its card is badged HIDDEN in red on the Menu items tab.
- To restore the item, open it again, tick Visible in the menu, and click Save.
Note: Hiding is preferable to deleting when an item may be needed again, or when only some groups of users should see it. To show an item to one group but not another, hide it on a separate work space rather than on Core Application.
8. Deleting a Menu Item
Note: Prior to deleting a menu item, make sure it is not needed. Deleting a heading removes it from the menu, so re-parent any sub-items beneath it first if they should stay in the menu.
Steps:
- From the Contract Insight homepage, click Administration at the bottom of the left navigation menu. On the Administration page, under Configuration & Fields, select Navigation Menu. The Menu items tab opens with Core Application selected in the WORKSPACE pick-list.
- Open the item with the edit (pencil) icon on its card, or by clicking the sub-item.
- Click the delete (trash) icon in the lower left of the panel, beside Save.
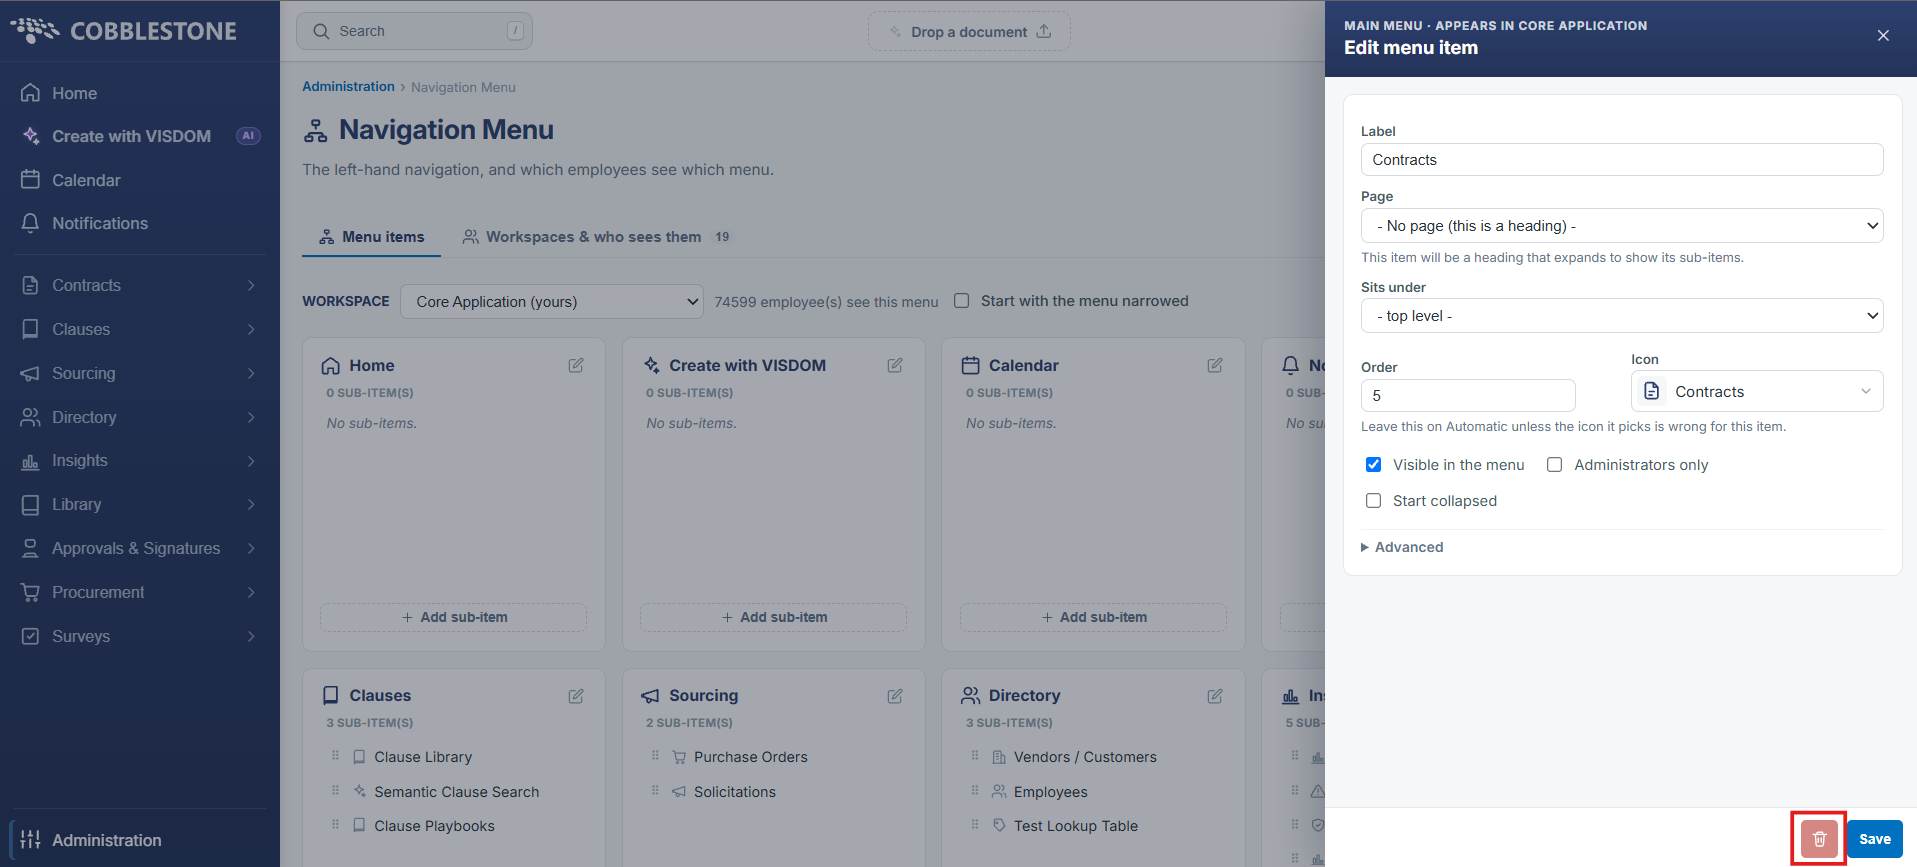
- Confirm the deletion when prompted. The item is removed from the menu.
9. Resetting the Core Application Menu
Note: Resetting replaces the work space’s entire menu with the default menu, discarding every customization made to it. Confirm that Core Application is the work space selected, and that the customizations are no longer needed, before using this control.
With Core Application selected in the WORKSPACE pick-list, click Reset to default at the right of the toolbar.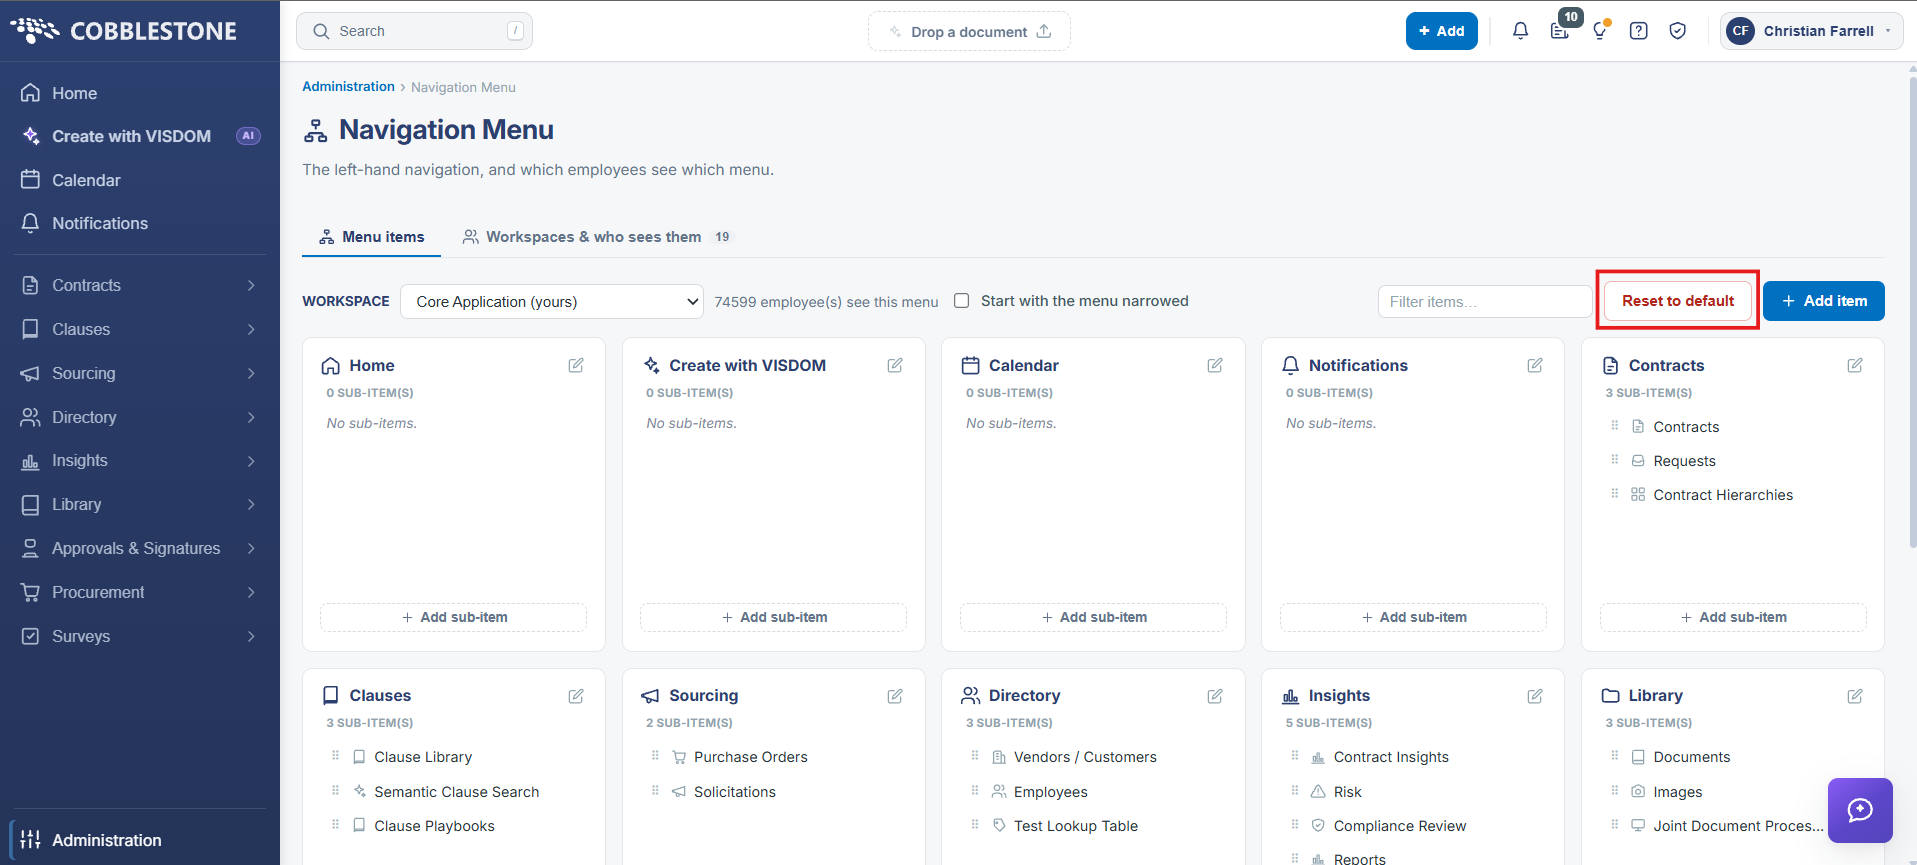
The Start with the menu narrowed checkbox beside the employee count is a separate, per-work-space setting: ticking it means everyone in the work space starts with a narrow, icon-only menu, which they can widen with the ☰ button.
10. Menu Item Fields
The New menu item and Edit menu item panels expose the same set of fields: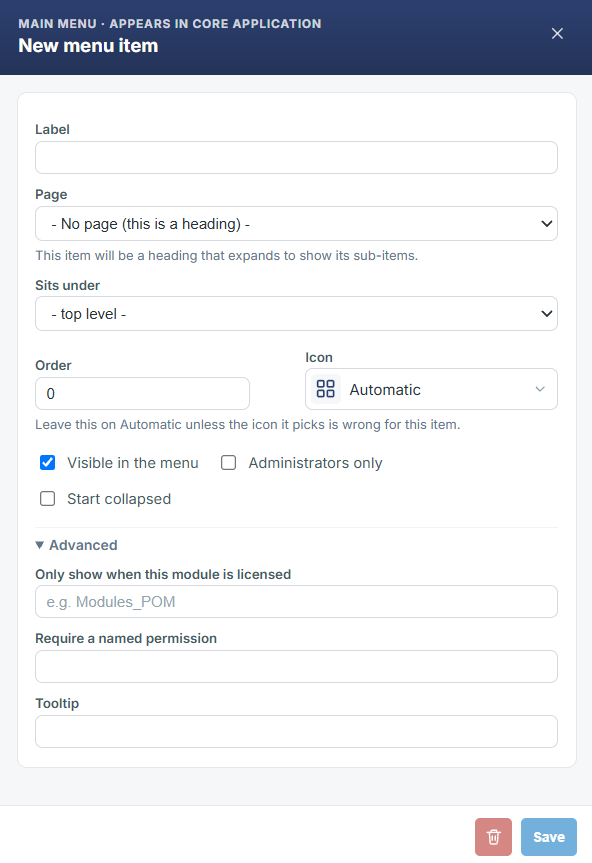
- Label — the text displayed for the item in the menu
- Page — the page the item opens: an application page, a manually entered link, or no page at all, which makes the item a heading
- Sits under — the parent item the entry belongs to, or “— top level —” for a top-level item
- Order — the sequence number that sets where the item displays among its siblings
- Icon — the icon displayed beside the label, chosen from a searchable picker or left on Automatic
- Visible in the menu — whether the item displays; unticking it badges the item HIDDEN
- Administrators only — restricts the item to administrators
- Start collapsed — for a heading, whether it opens closed
- Only show when this module is licensed — an Advanced option taking a module key such as Modules_POM
- Require a named permission — an Advanced option restricting the item to users holding that permission
- Tooltip — an Advanced option providing the mouse-over text for the item
11. Quick Reference Summary
Task | How to Complete It |
Open the menu | Homepage → Administration → Configuration & Fields → Navigation Menu; Core Application is selected by default. |
Add a menu item | + Add item for a top-level item, or + Add sub-item on a card; set the Label and Page, then Save. |
Create a heading | Add the item with the Page set to “— No page (this is a heading) —” and provide no URL. |
Add an external link | Add the item and set the Page to “Enter a link manually…”, then enter the address. |
Edit a menu item | Pencil icon on the card, or click a sub-item; change the fields, then Save. |
Move an item | Change Sits under in the panel to place it under a different heading or at the top level. |
Reorder items | Drag a sub-item by its handle, or change the Order number on a top-level item and Save. |
Hide a menu item | Untick Visible in the menu, then Save. Hidden items are badged HIDDEN in red. |
Delete a menu item | Open the item and click the trash icon beside Save, then confirm. |
Find an item | Filter items box at the right of the Menu items toolbar. |
Reset the menu | Reset to default at the right of the Menu items toolbar. |