COBBLESTONE SOFTWARE
Contract Insight — User Guide
Manage Main Menu: Work Spaces
Configuration & Fields: Navigation Menu
Note: Each procedure in this guide begins at the Contract Insight homepage, so any section can be followed on its own. Menu changes take effect for everyone assigned to the workspace, so make changes on a test workspace first where possible.
1. Overview
System Administrators can customize the main menu and assign it to groups of users through Work Spaces. A workspace is one menu: every employee sees the menu of the workspace they are assigned to. Work Spaces allow System Administrators to show and hide specific menu items from specific users, to allow greater security and ease of use.
User permissions still impact menu items. If a menu item is assigned, the permissions applied can impact its use and availability. An employee with no workspace falls back to the default menu, so all users have access to the Core Application work space unless a System Administrator assigns them elsewhere.
The Navigation Menu screen is organized into two tabs:
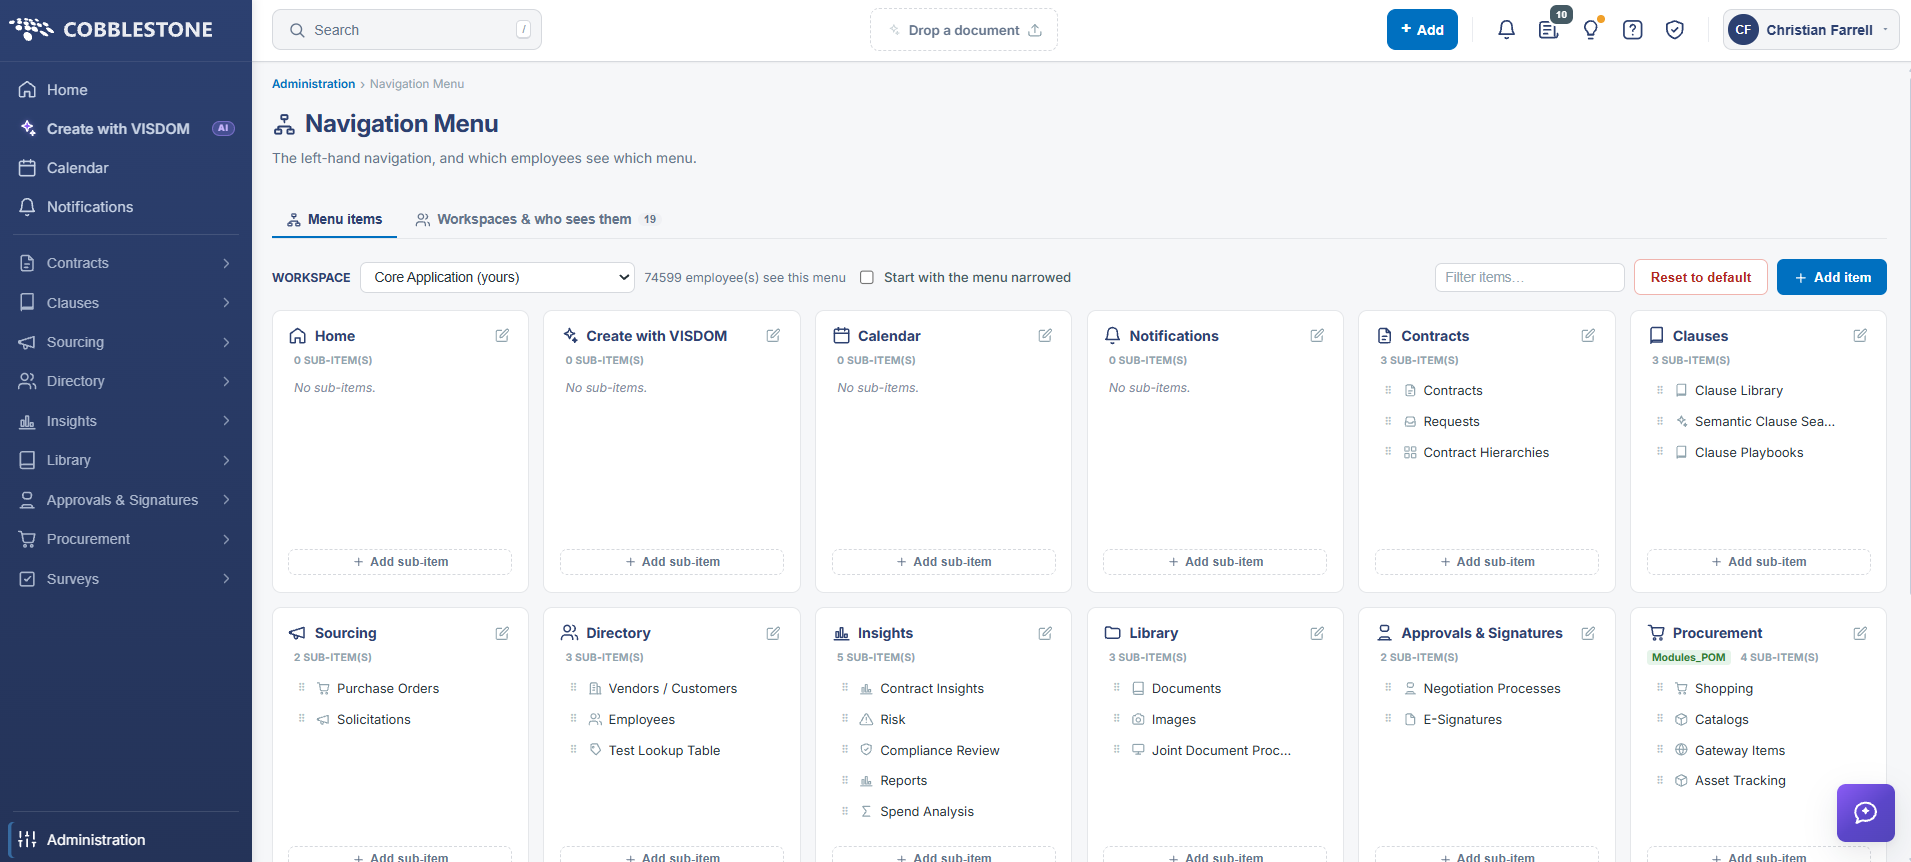
- Menu items — The menu of the selected workspace, shown as a card for each top-level item with its sub-items listed beneath. This is where items are added, renamed, reordered, hidden, and moved.
- Workspaces & who sees them — A card for each workspace, with its description, menu item count, and employee count, plus the controls to create workspaces and assign employees to them.
Because the Navigation Menu is maintained from the Administration area, only Application Administrators — or other users specifically granted the appropriate permission — can create workspaces, edit menus, or assign employees to a workspace.
2. Accessing Work Space Configuration
The Navigation Menu screen is the central management screen for work spaces and the menus they contain. To open it:
From the Contract Insight homepage, click Administration at the bottom of the left navigation menu. On the Administration page, under Configuration & Fields, select Navigation Menu.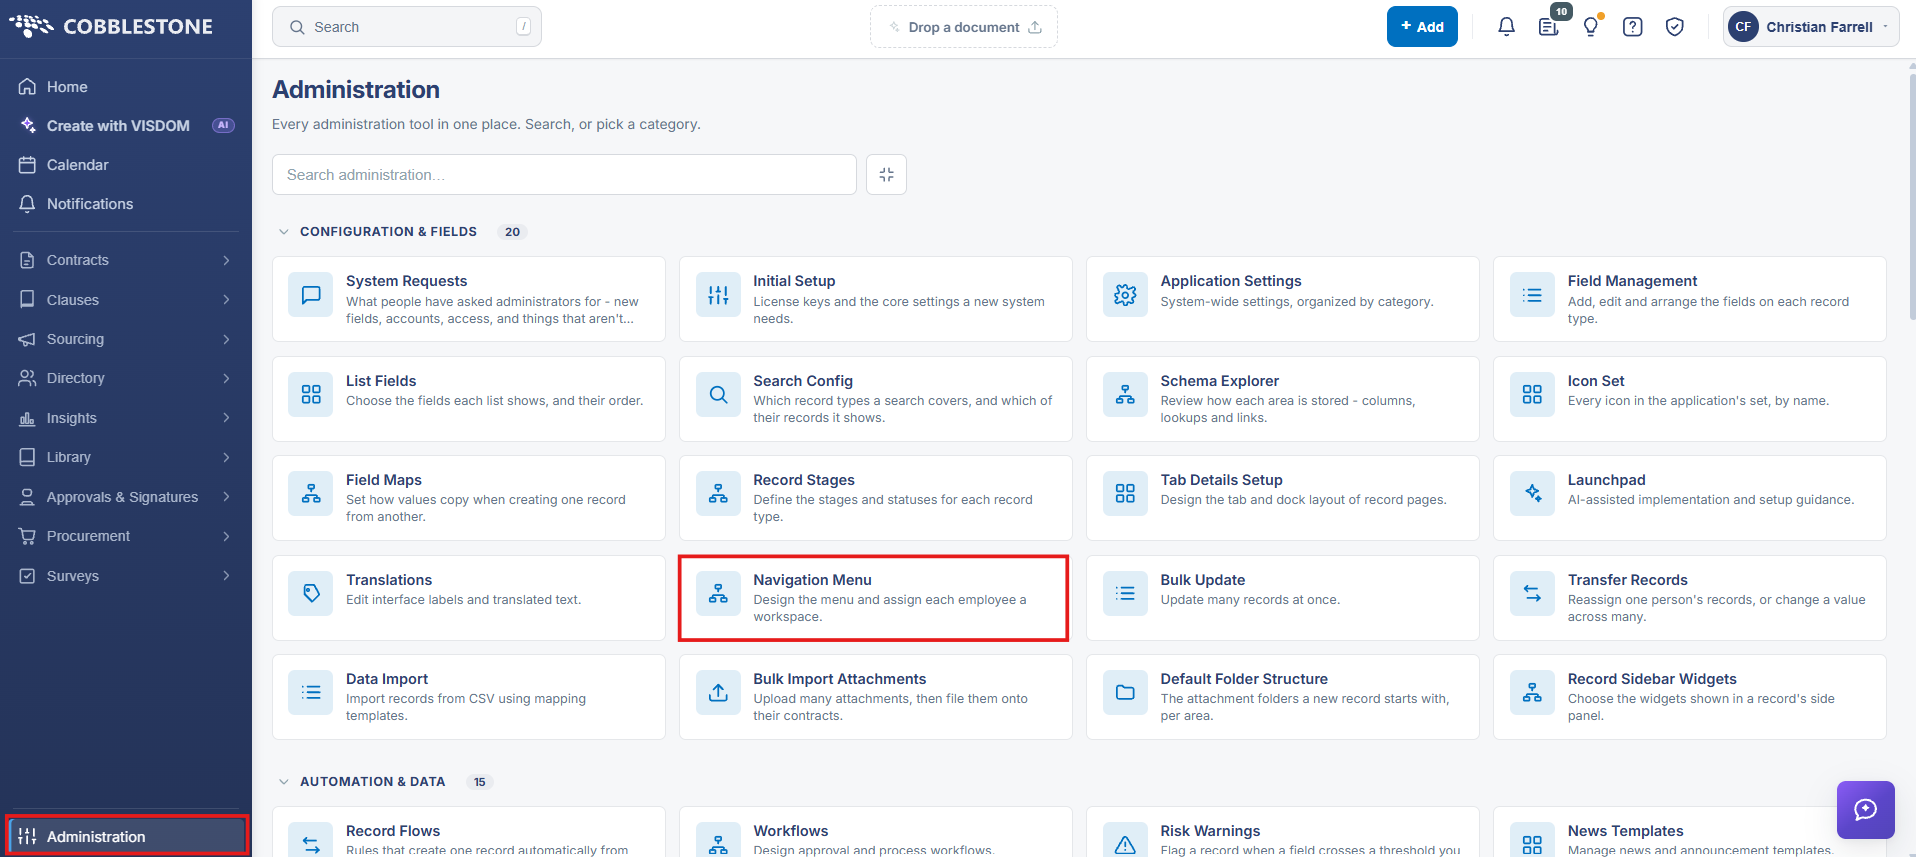
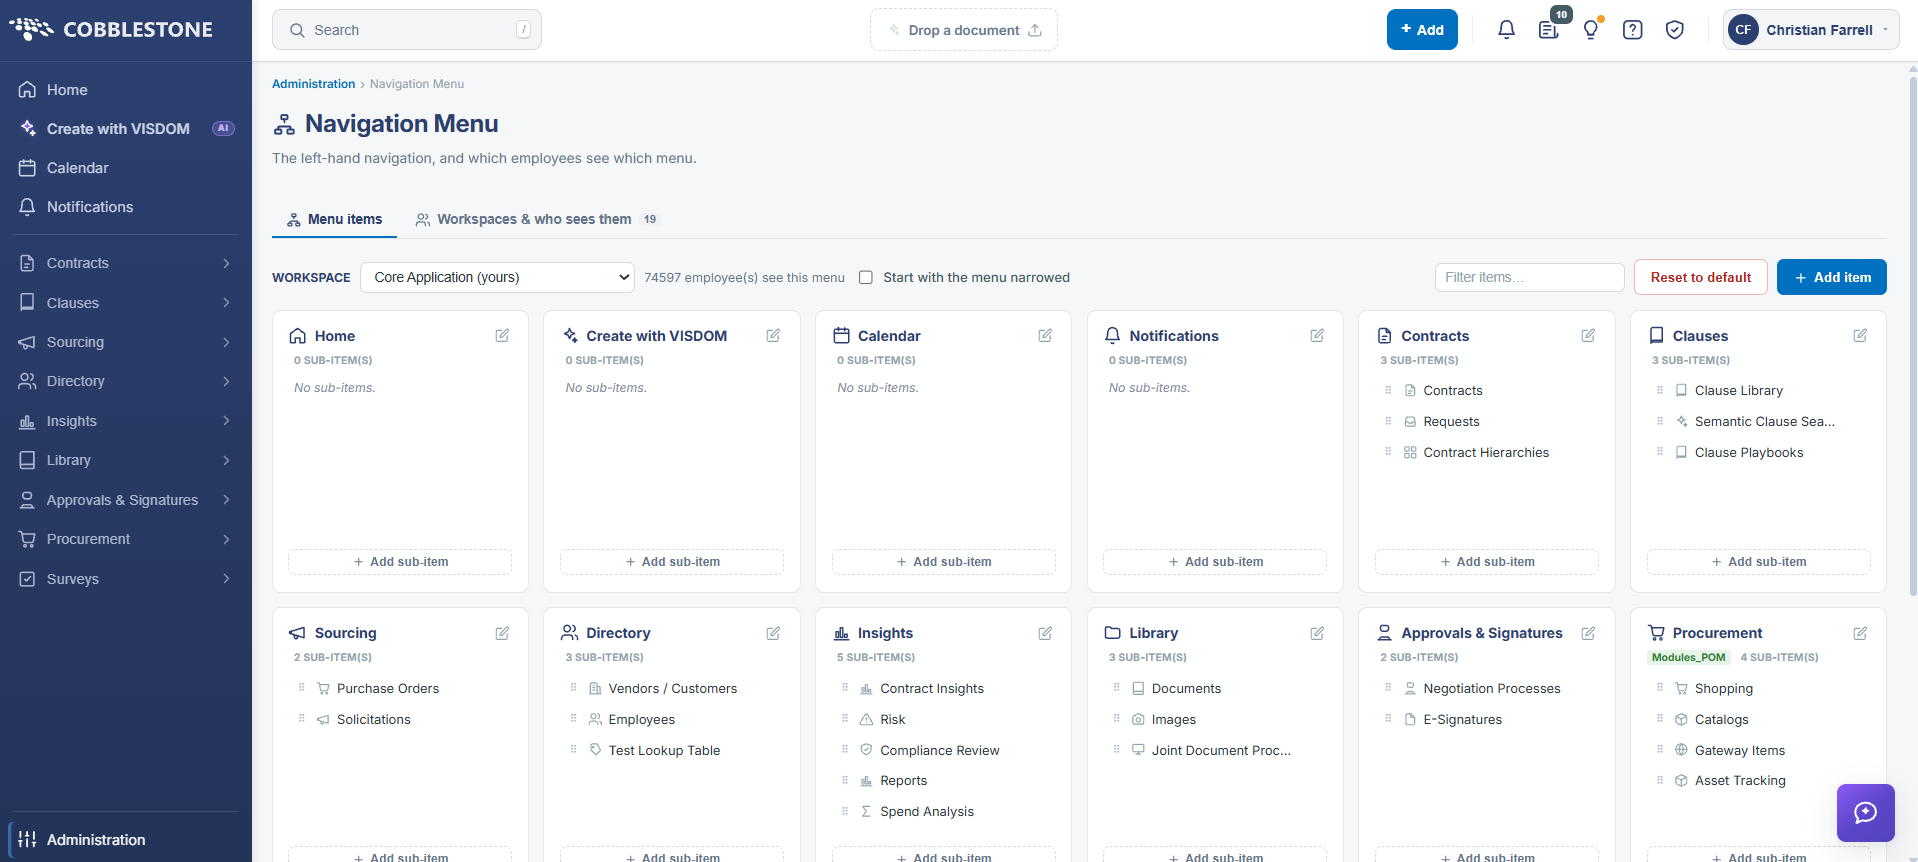
The Navigation Menu screen includes the following elements:
- A breadcrumb trail of Administration › Navigation Menu
- A Navigation Menu heading with the subtitle “The left-hand navigation, and which employees see which menu.”
- A Menu items tab and a Workspaces & who sees them tab, the second showing a count of the workspaces defined
- A Workspace pick-list on the Menu items tab, listing every workspace and marking inactive ones
- A live count of the employees who see the selected menu
- A Start with the menu narrowed checkbox, which controls whether the sidebar opens collapsed for that workspace
- A Filter items box to narrow the cards to items matching a keyword
- A Reset to default button that restores the workspace menu to the delivered layout
- An + Add item button that creates a new top-level menu item
- A card for each top-level menu item, showing its sub-item count, its sub-items, an edit (pencil) icon, and an + Add sub-item control
Note: On the Menu items tab, an admin user can modify the Core Application (default) work space, modify any work space already created, and — from the Workspaces & who sees them tab — assign employees to existing work spaces and create new ones.
3. Creating a Work Space
Function: Creates a new menu that can then be assigned to specific employees.
Steps:
- From the Contract Insight homepage, click Administration at the bottom of the left navigation menu. On the Administration page, under Configuration & Fields, select Navigation Menu.
- Click the Workspaces & who sees them tab.
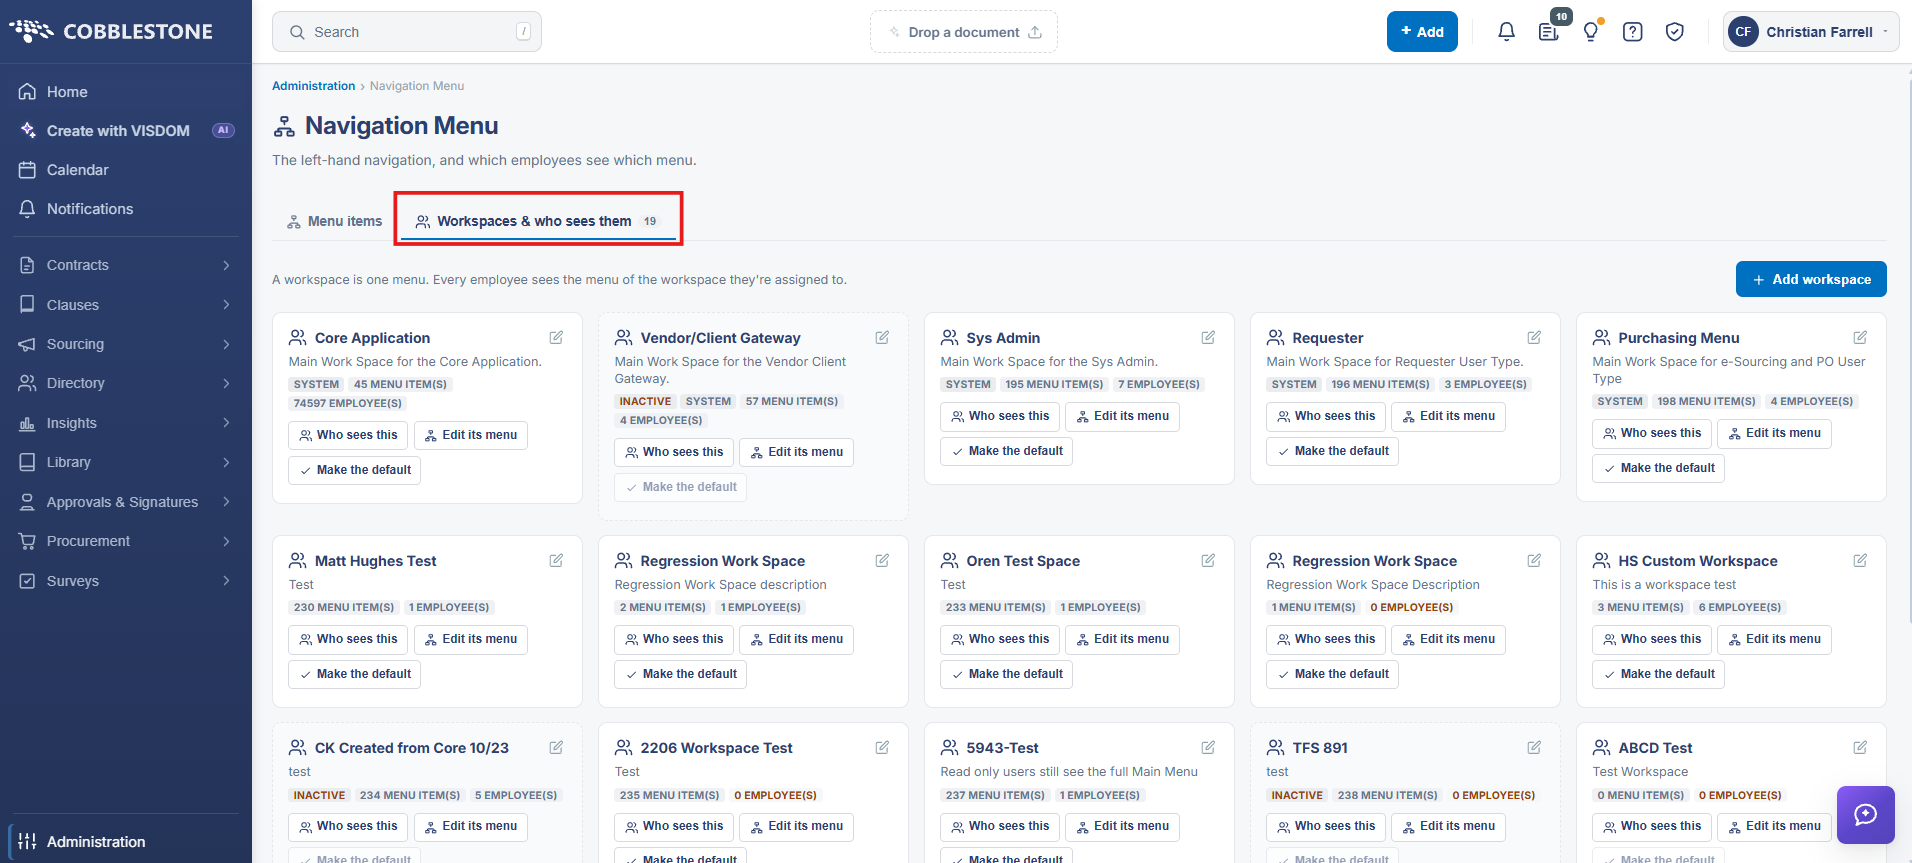
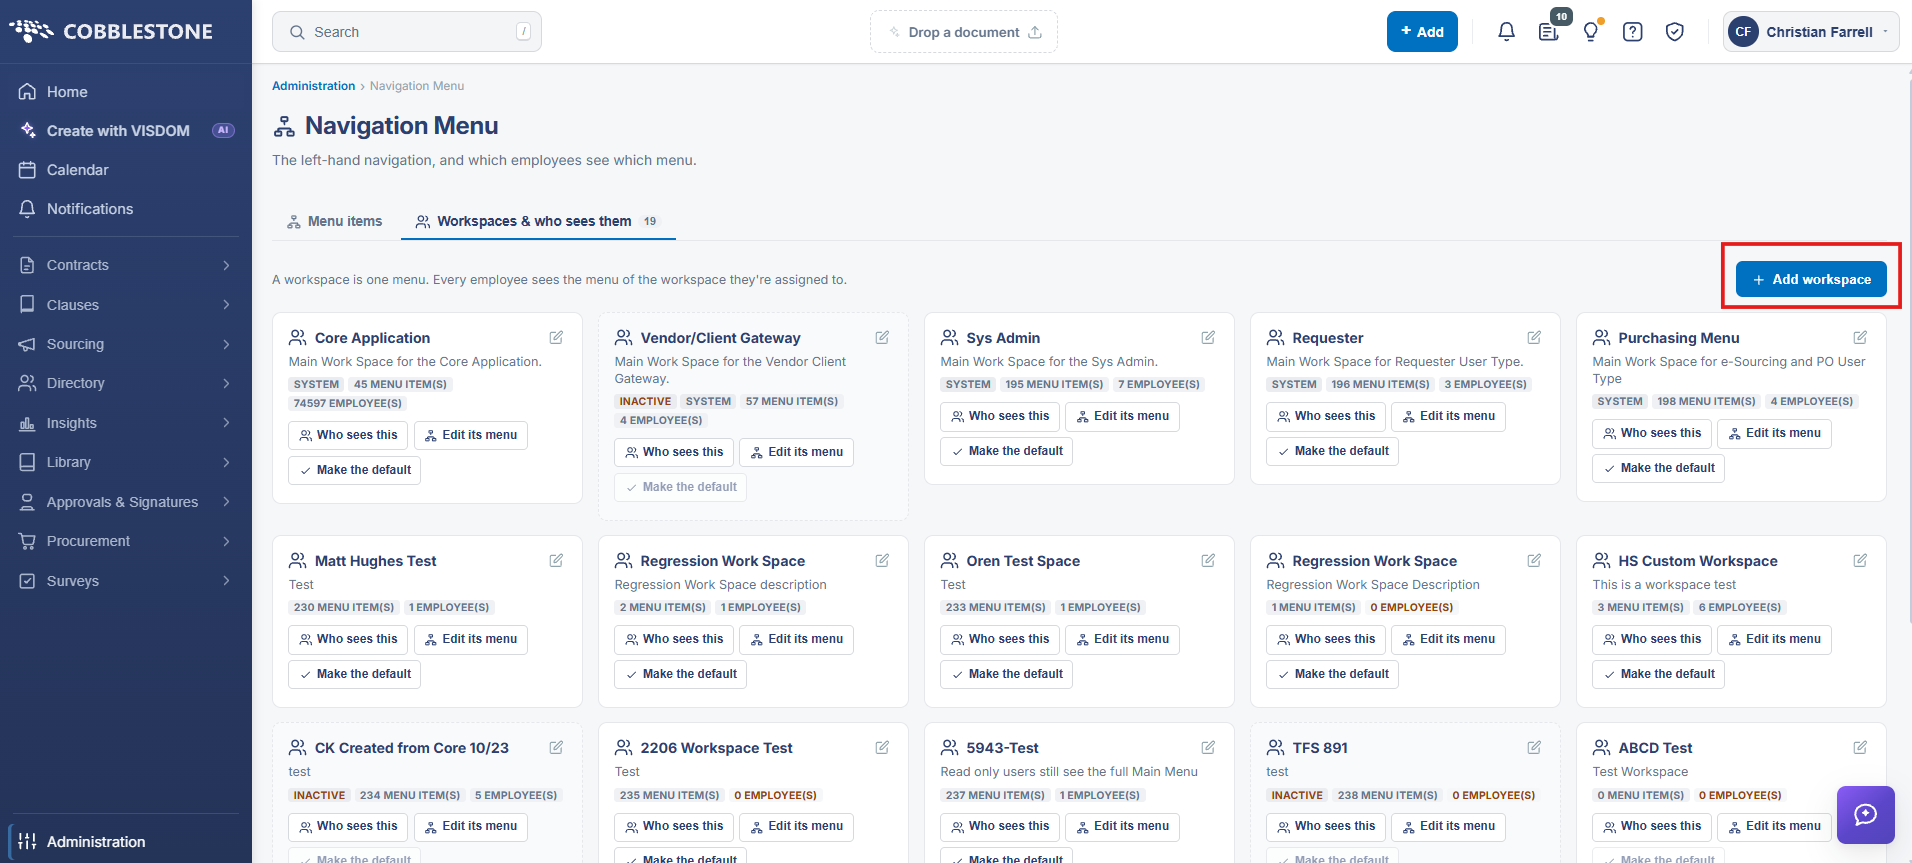
- Click + Add workspace at the right of the tab. The New workspace panel slides out from the right, headed MAIN MENU · WORKSPACES.
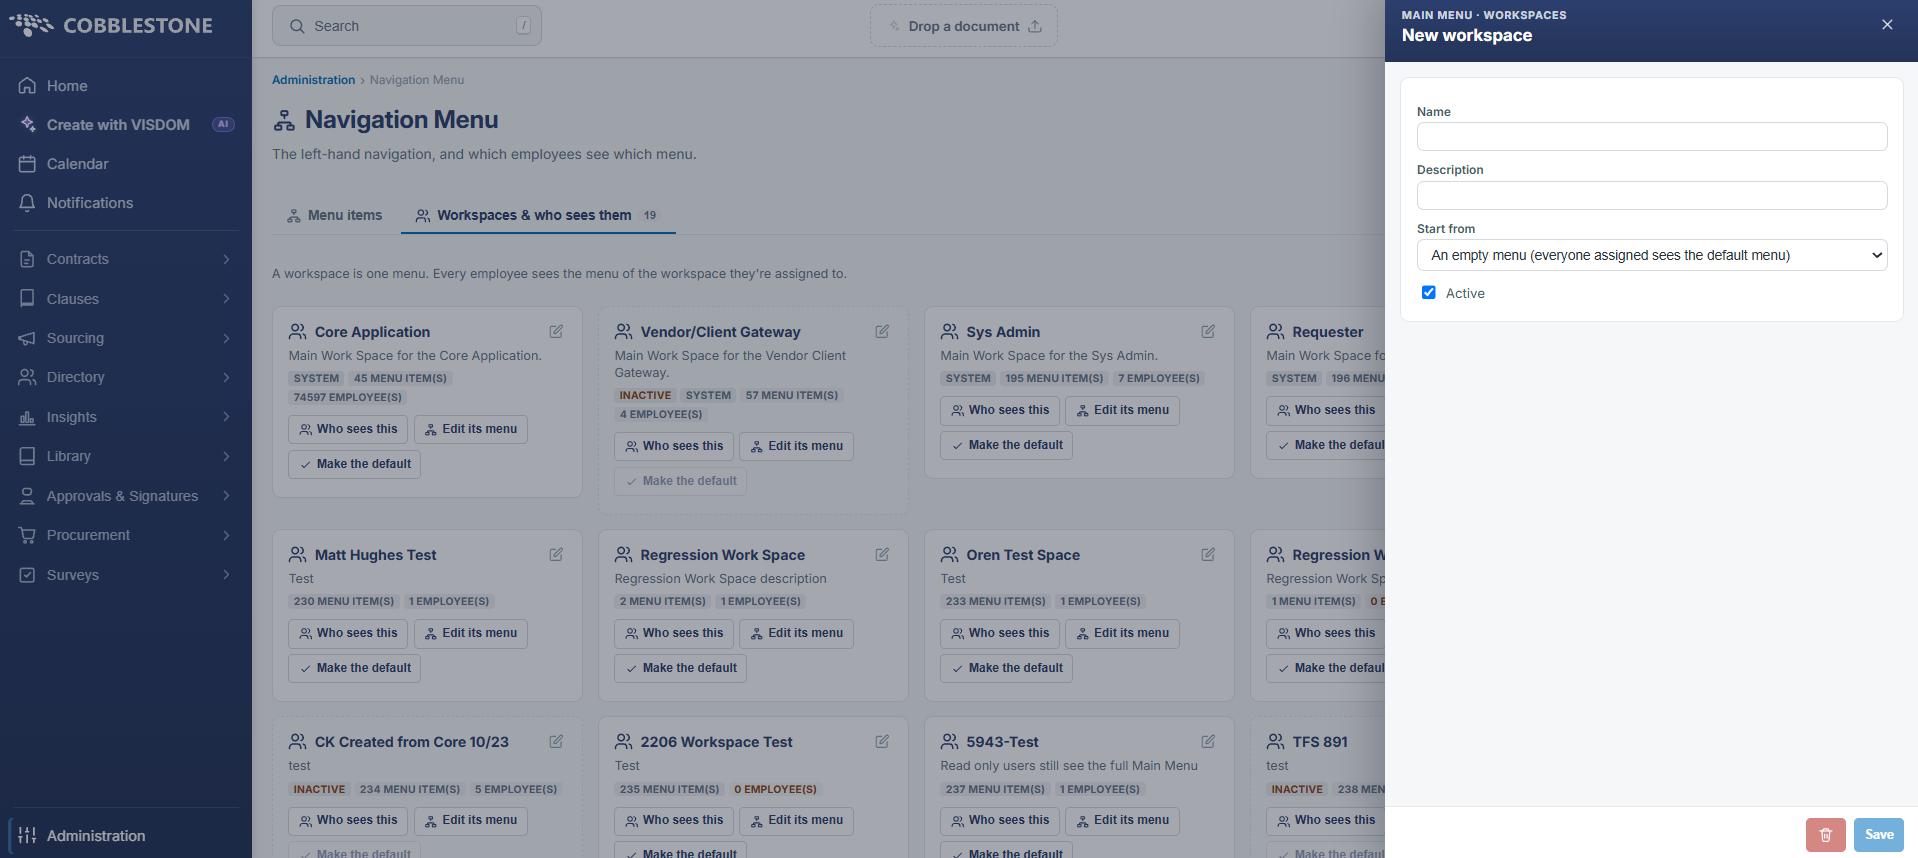
- Enter a short, descriptive title into the Name field, and a short Description explaining who the workspace is for.
- Choose a starting point from the Start from pick-list. The options are an empty menu — “An empty menu (everyone assigned sees the default menu)” — or a copy of any existing workspace, each listed with its menu item count.
- Leave Active ticked to enable the workspace. Unticking it marks the workspace INACTIVE on its card.
- Click Save in the lower right of the panel to create the workspace.
Note: If creating from an empty menu, no menu items populate and everyone assigned to it sees the default menu. Best practice is to copy from an existing work space and then hide whichever menu items you do not want that group to see.
4. Editing or Deleting a Work Space
Function: Changes a workspace’s name, description, or active status, or removes it entirely.
Steps:
- From the Contract Insight homepage, click Administration at the bottom of the left navigation menu. On the Administration page, under Configuration & Fields, select Navigation Menu.
- Click the Workspaces & who sees them tab.
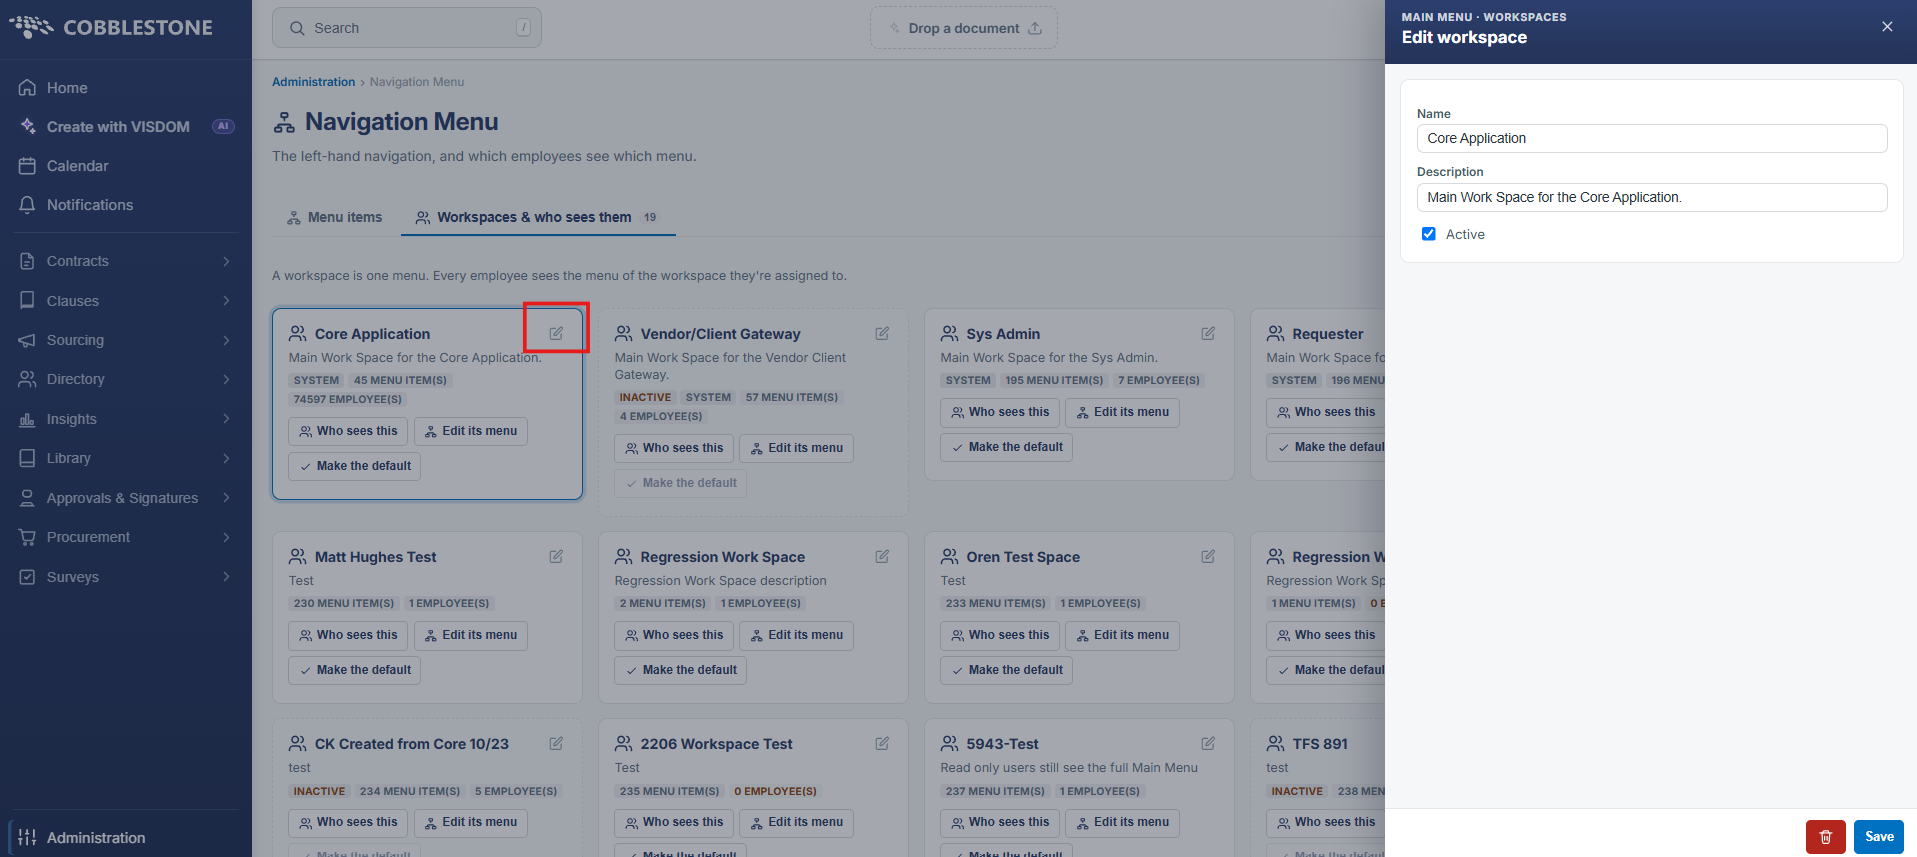
- Click the edit (pencil) icon in the upper right of the workspace card. The Edit workspace panel opens with the Name, Description, and Active fields.
- Make the changes required and click Save in the lower right of the panel.
- To remove a workspace, click the delete (trash) icon beside Save. This deletes the workspace and its menu.
Note: Workspaces delivered with the application are marked SYSTEM on their cards. Take particular care with these — the Core Application workspace is the menu every unassigned employee falls back to. Confirm no one depends on a workspace before deleting it.
5. Assigning Employees to a Work Space
Function: Controls which employees see the workspace’s menu.
Steps:
- From the Contract Insight homepage, click Administration at the bottom of the left navigation menu. On the Administration page, under Configuration & Fields, select Navigation Menu.
- Click the Workspaces & who sees them tab.
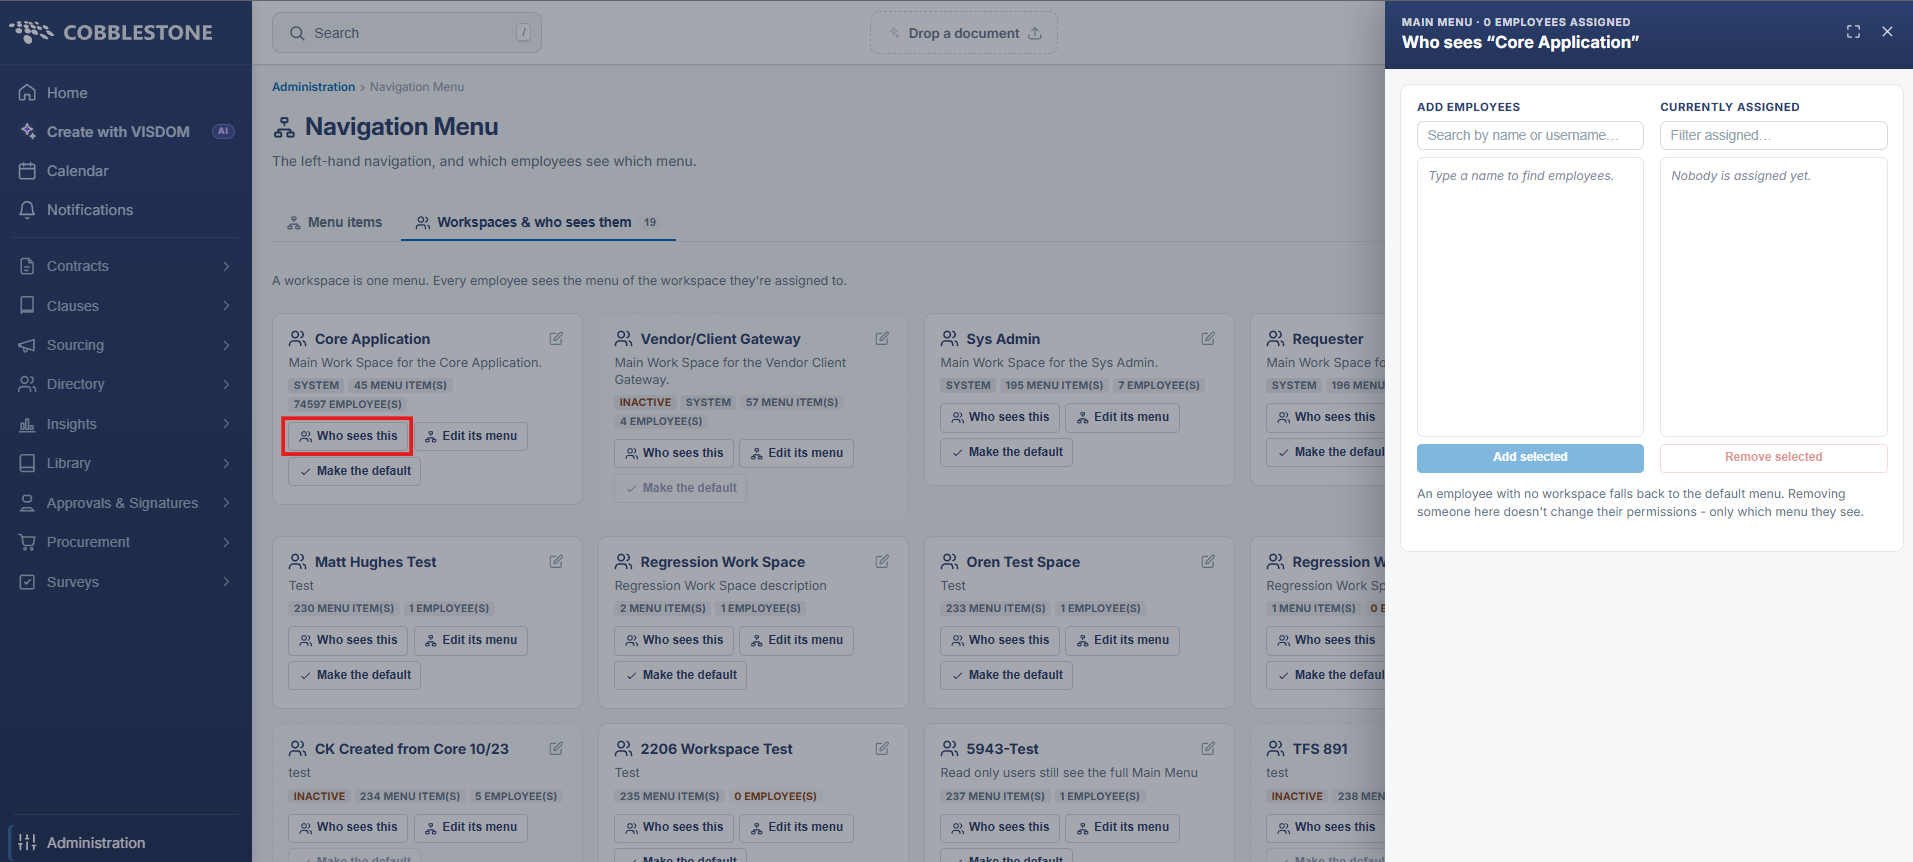
- Click Who sees this on the workspace card. The assignment panel opens with two lists side by side: ADD EMPLOYEES on the left and CURRENTLY ASSIGNED on the right.
- In the ADD EMPLOYEES list, type into the “Search by name or username…” box to find employees, select the employee name or names returned, and click Add selected to assign them to the workspace.
- To remove an assigned employee, select the employee name or names in the CURRENTLY ASSIGNED list — using the “Filter assigned…” box to find them if the list is long — and click Remove selected.
- The employee count on the workspace card updates to reflect the assignment.
Note: An employee with no workspace falls back to the default menu. Removing someone here does not change their permissions — only which menu they see.
6. Editing the Menu Items for a Work Space
Navigate to the Navigation Menu screen as described in Section 2. There are two ways to open a workspace’s menu for editing:
6.1 From the Workspaces Tab
On the Workspaces & who sees them tab, click Edit its menu on the appropriate workspace card. The Menu items tab opens with that workspace selected.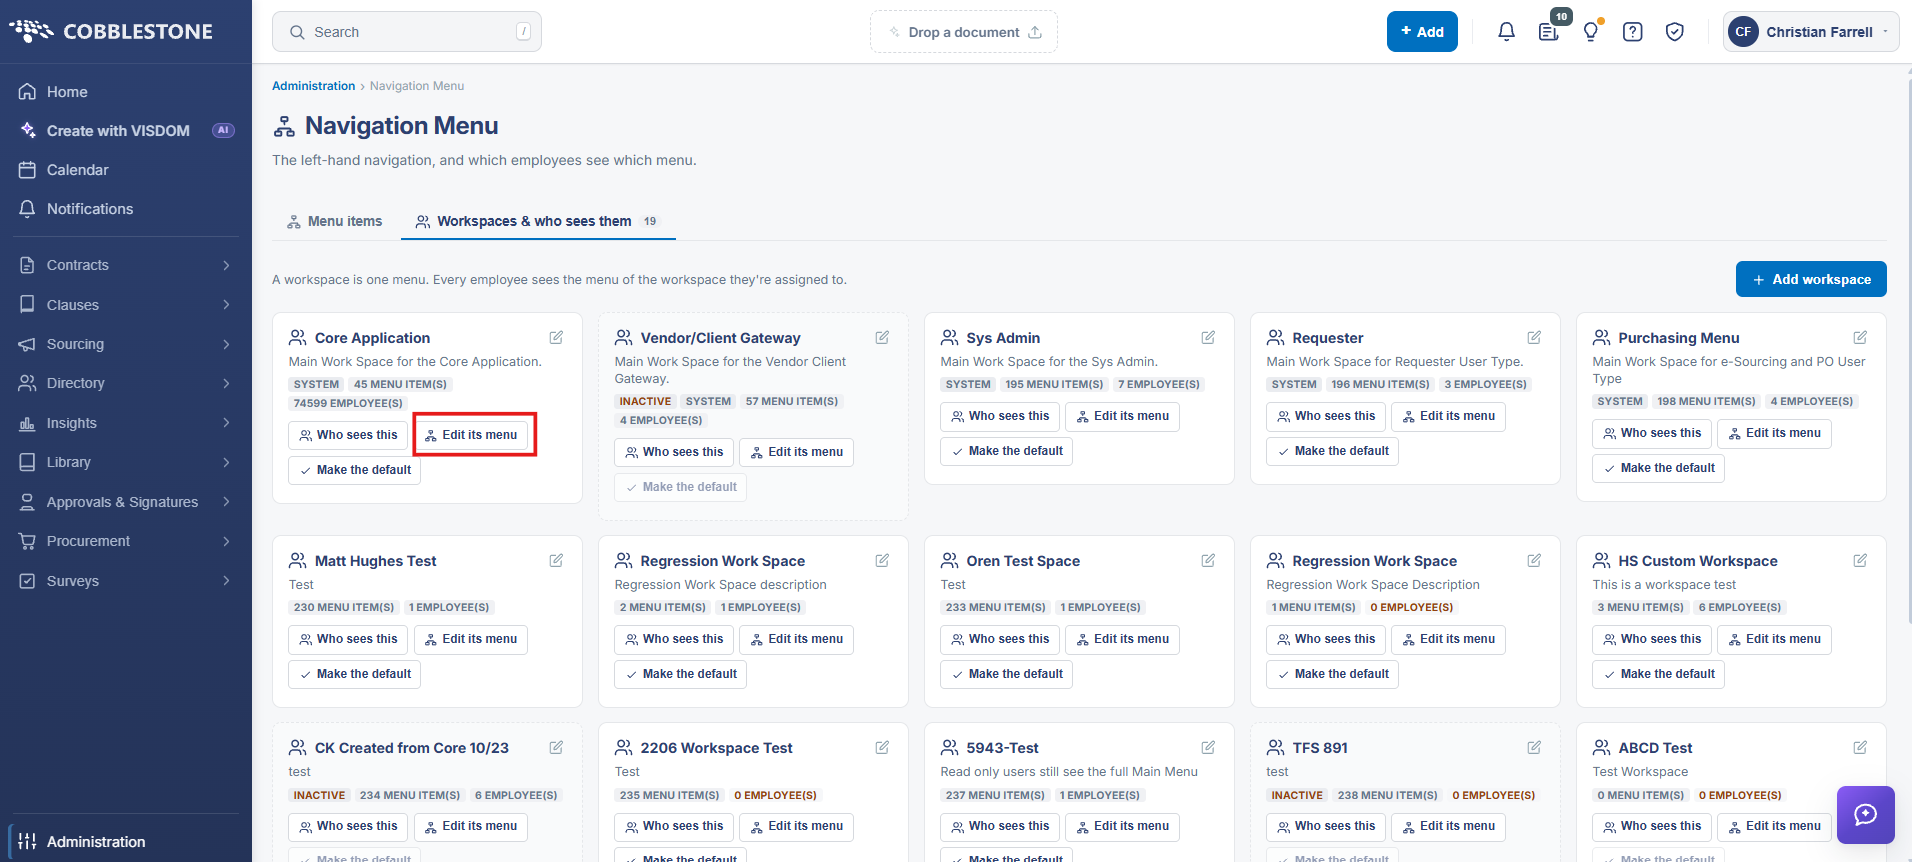
6.2 From the Menu Items Tab
On the Menu items tab, select the workspace from the WORKSPACE pick-list. The menu breakdown below refreshes to show that workspace’s menu.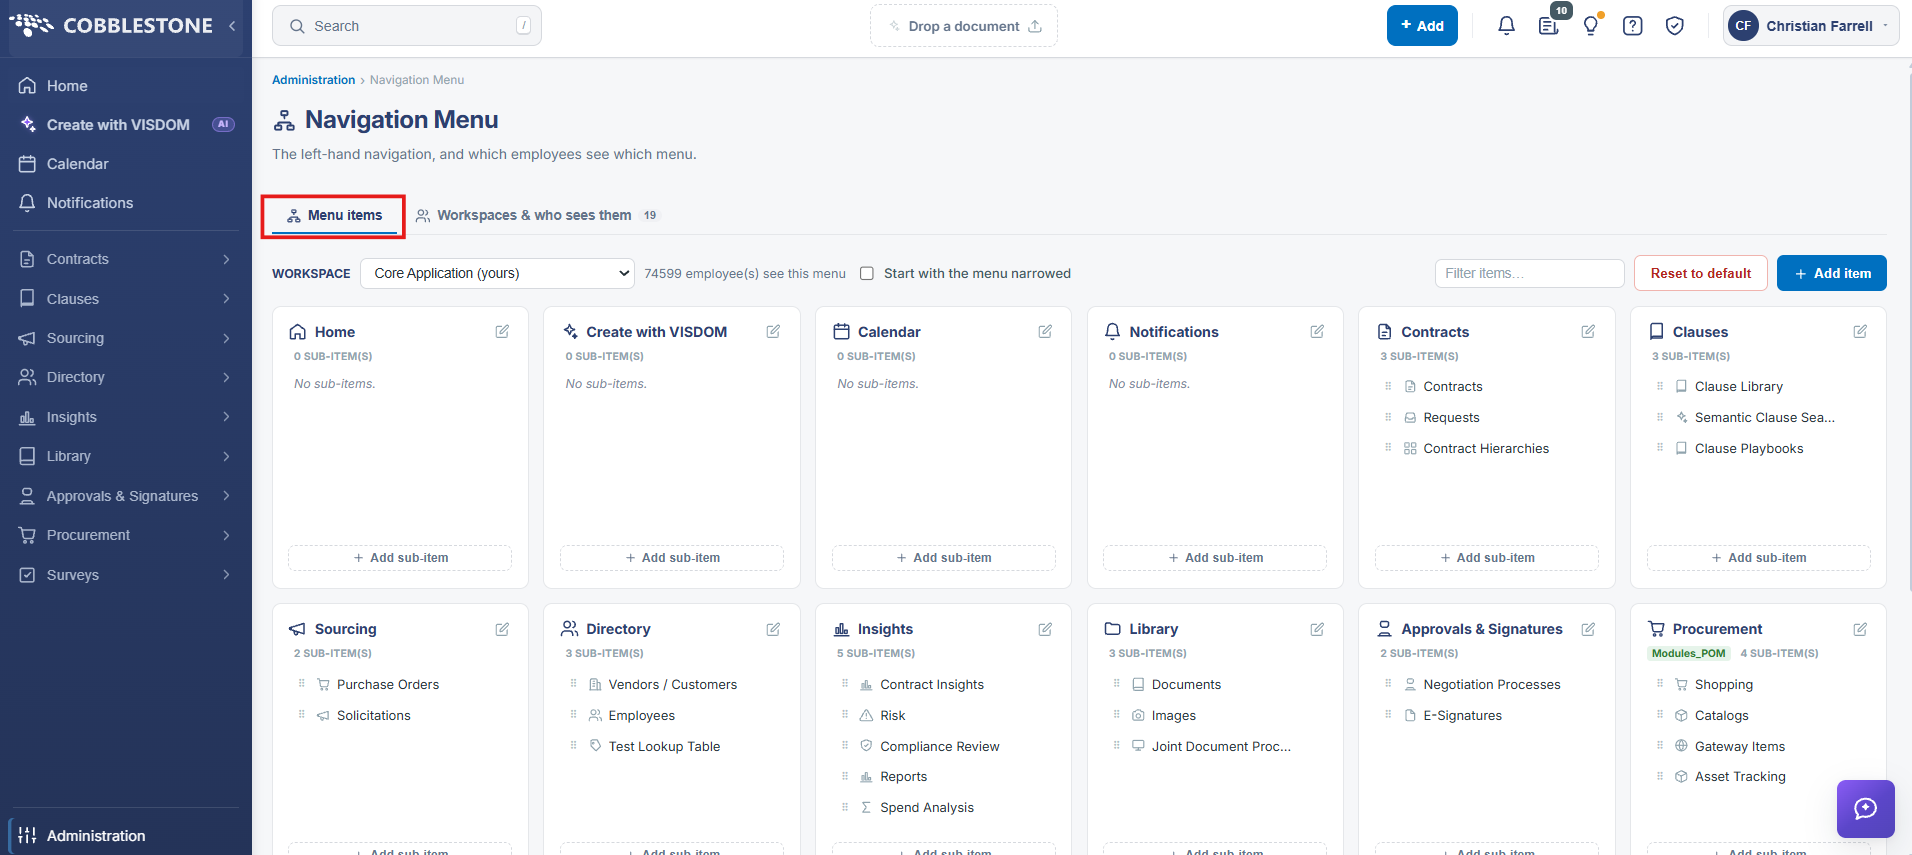
The menu breakdown shows one card per top-level menu item. Each card displays:
- The item name and icon — as they appear in the left navigation
- A HIDDEN badge — shown in red on any item that is not visible in the menu. By default all items show, so none are badged
- A module badge — for example Modules_POM or Modules_SMM, on items that only appear when that module is licensed
- An ADMIN or ADMINISTRATORS ONLY badge — on items restricted to administrators
- A sub-item count — with the sub-items listed beneath, each with a drag handle for reordering
- An UNAVAILABLE badge — on any item pointing at a page that does not exist in this application
Note: When a workspace contains items that point at a page which does not exist, a banner appears above the cards reporting how many items are affected, noting that they are marked UNAVAILABLE and appear greyed out in the sidebar, with a Review them button beside it.
7. Modifying a Menu Item
Function: Renames, repositions, hides, or re-parents an existing menu item.
Steps:
- From the Contract Insight homepage, click Administration at the bottom of the left navigation menu. On the Administration page, under Configuration & Fields, select Navigation Menu.
- Select the workspace from the WORKSPACE pick-list on the Menu items tab. Use the Filter items box to narrow the cards if the menu is long.
- Click the edit (pencil) icon on a top-level item’s card, or click a sub-item in the list beneath it. The Edit menu item panel opens, headed with the workspace the item appears in.
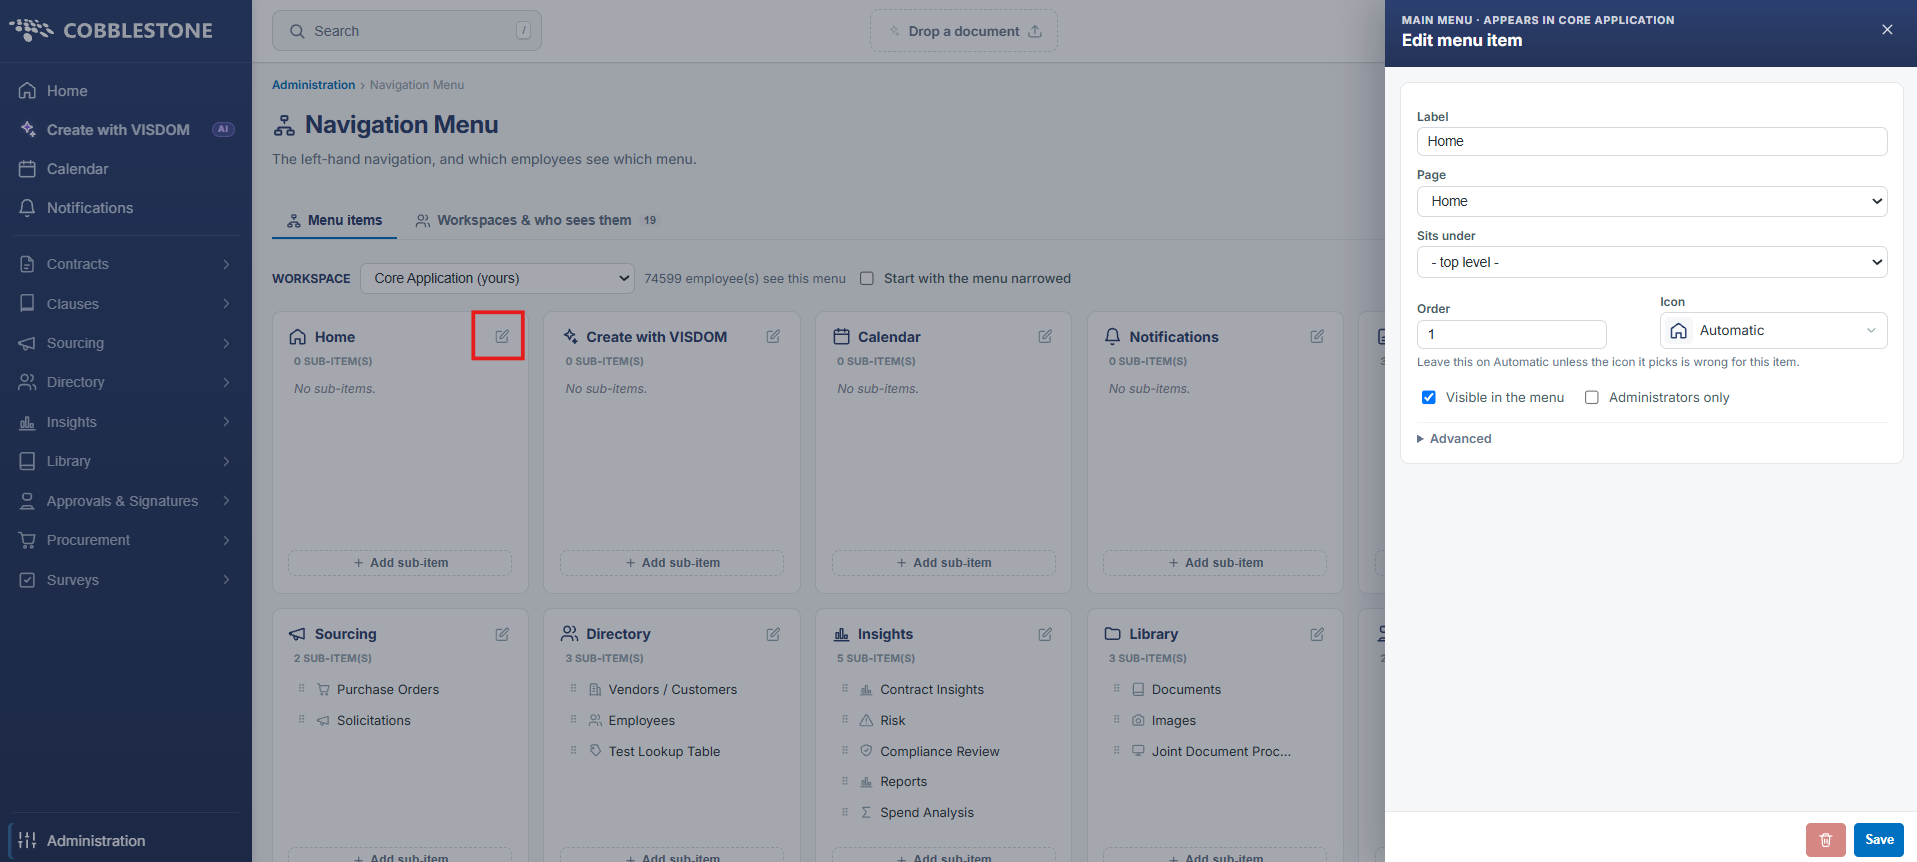
- Alter the item as required:
- Label — the text shown in the menu
- Page — the page the item opens, chosen from the list of application pages; “— No page (this is a heading) —” makes the item a heading that expands to show its sub-items
- Sits under — the parent item, or “— top level —” to place it on the top level of the menu
- Order — the sequence number that sets where the item displays among its siblings
- Icon — the icon shown beside the label; leave this on Automatic unless the icon it picks is wrong for the item
- Visible in the menu — untick to hide the item, which badges it HIDDEN on the card
- Administrators only — tick to restrict the item to administrators
- Expand Advanced for the remaining options: Only show when this module is licensed (a module key such as Modules_POM), Require a named permission, and Tooltip for the mouse-over text.
- Click Save in the lower right of the panel to commit the change, or the delete (trash) icon beside it to remove the item from the menu.
Note: Sub-items can also be reordered directly on the card by dragging them by the handle at the left of the row, without opening the panel.
8. Adding a New Menu Item
Function: Adds a heading, an application page, or a link to the workspace menu.
Steps:
- From the Contract Insight homepage, click Administration at the bottom of the left navigation menu. On the Administration page, under Configuration & Fields, select Navigation Menu.
- Select the workspace from the WORKSPACE pick-list.
- Click + Add item to create a top-level item, or + Add sub-item at the bottom of a card to create an item beneath that heading. The New menu item panel opens.
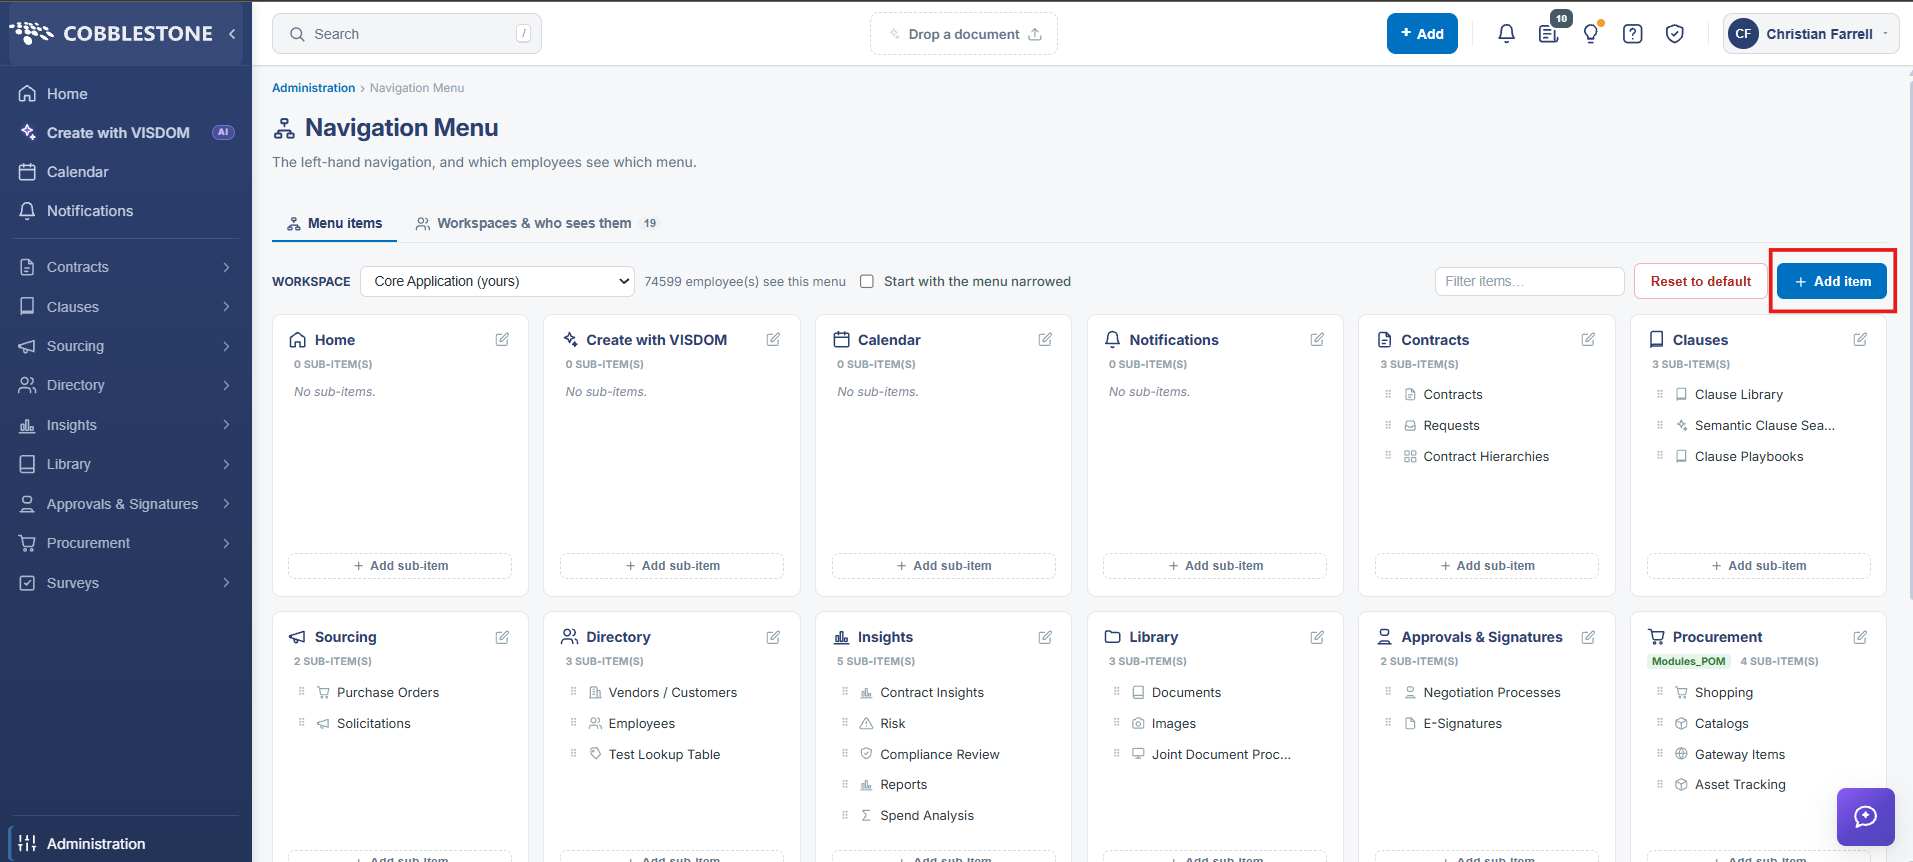
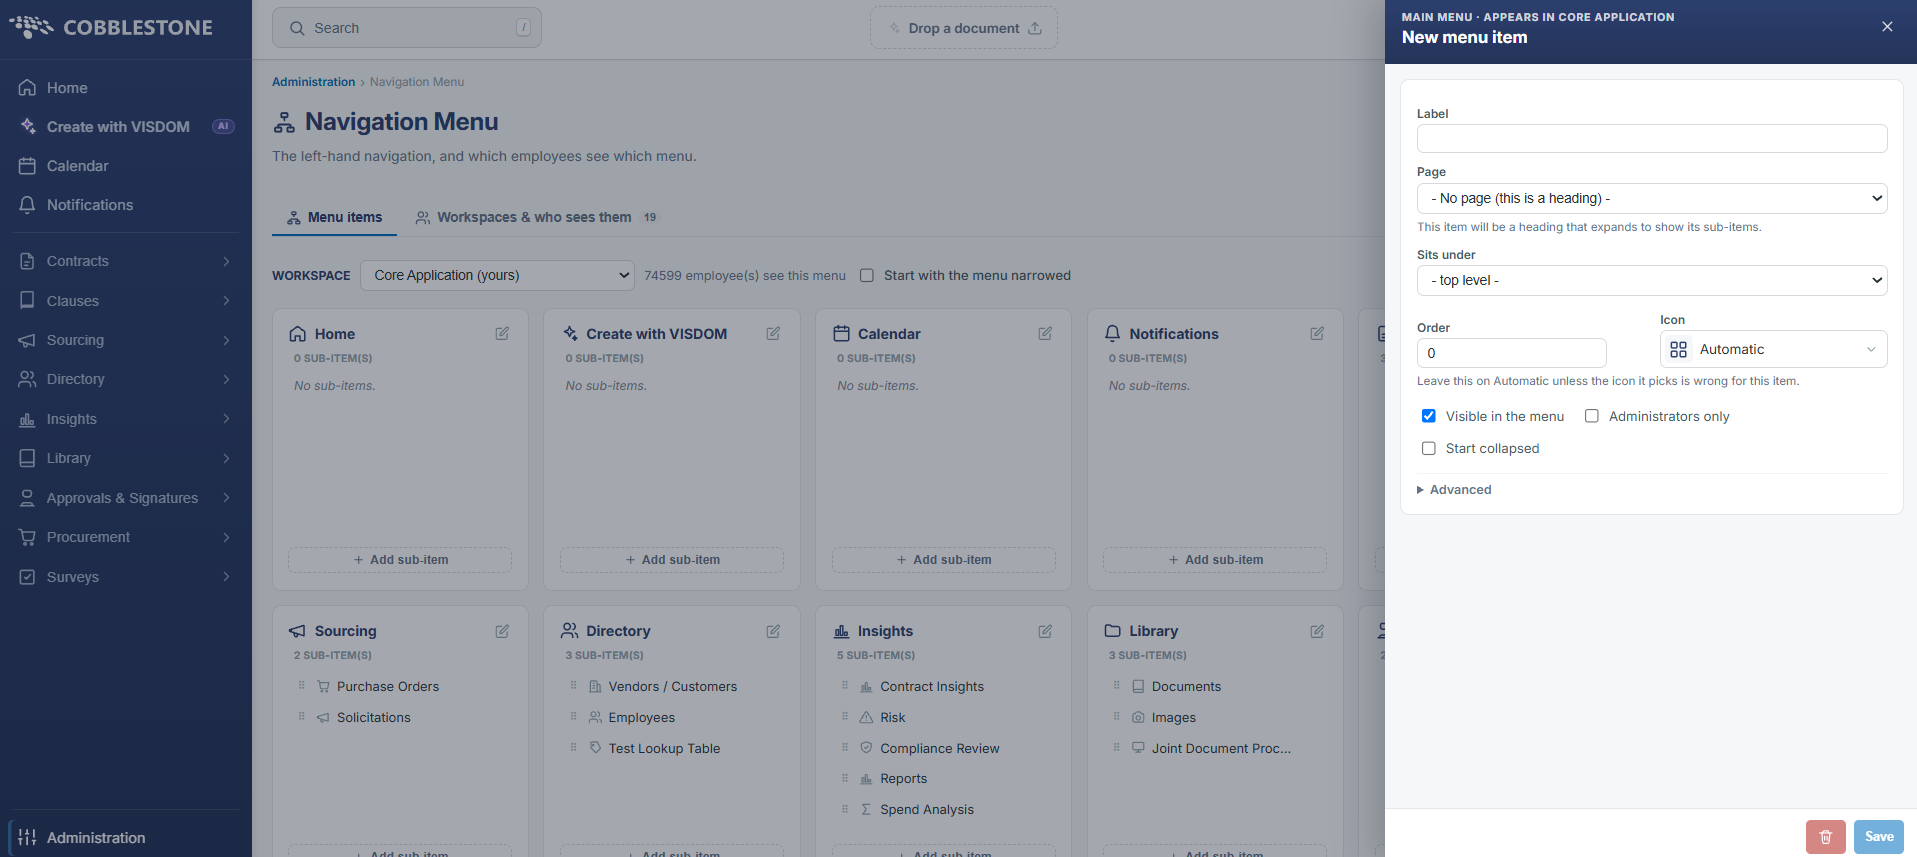
- Enter the Label for the item as it should read in the menu.
- Choose the Page the item opens:
- An application page — select it from the list; this covers internal links such as a saved report or another Contract Insight page
- Enter a link manually… — select this to reveal a URL field, then provide the address. It accepts an external web address or an existing page name, and confirms beneath the field whether the value is recognised
- “— No page (this is a heading) —” — provide no URL when creating a folder for other menu items. The item becomes a heading that expands to show its sub-items
- Set Sits under, Order, and Icon as needed, and tick Start collapsed if a new heading should open closed.
- Complete any Advanced options required, then click Save to add the item to the menu.
9. Resetting a Work Space Menu
Note: Resetting discards the customizations made to the selected workspace’s menu. Confirm the workspace is the one you intend before using this control.
With the workspace selected on the Menu items tab, click Reset to default at the right of the toolbar to restore the menu to the delivered layout. The Start with the menu narrowed checkbox beside the employee count is a separate, per-workspace setting that controls whether the left navigation opens collapsed for the employees assigned to it.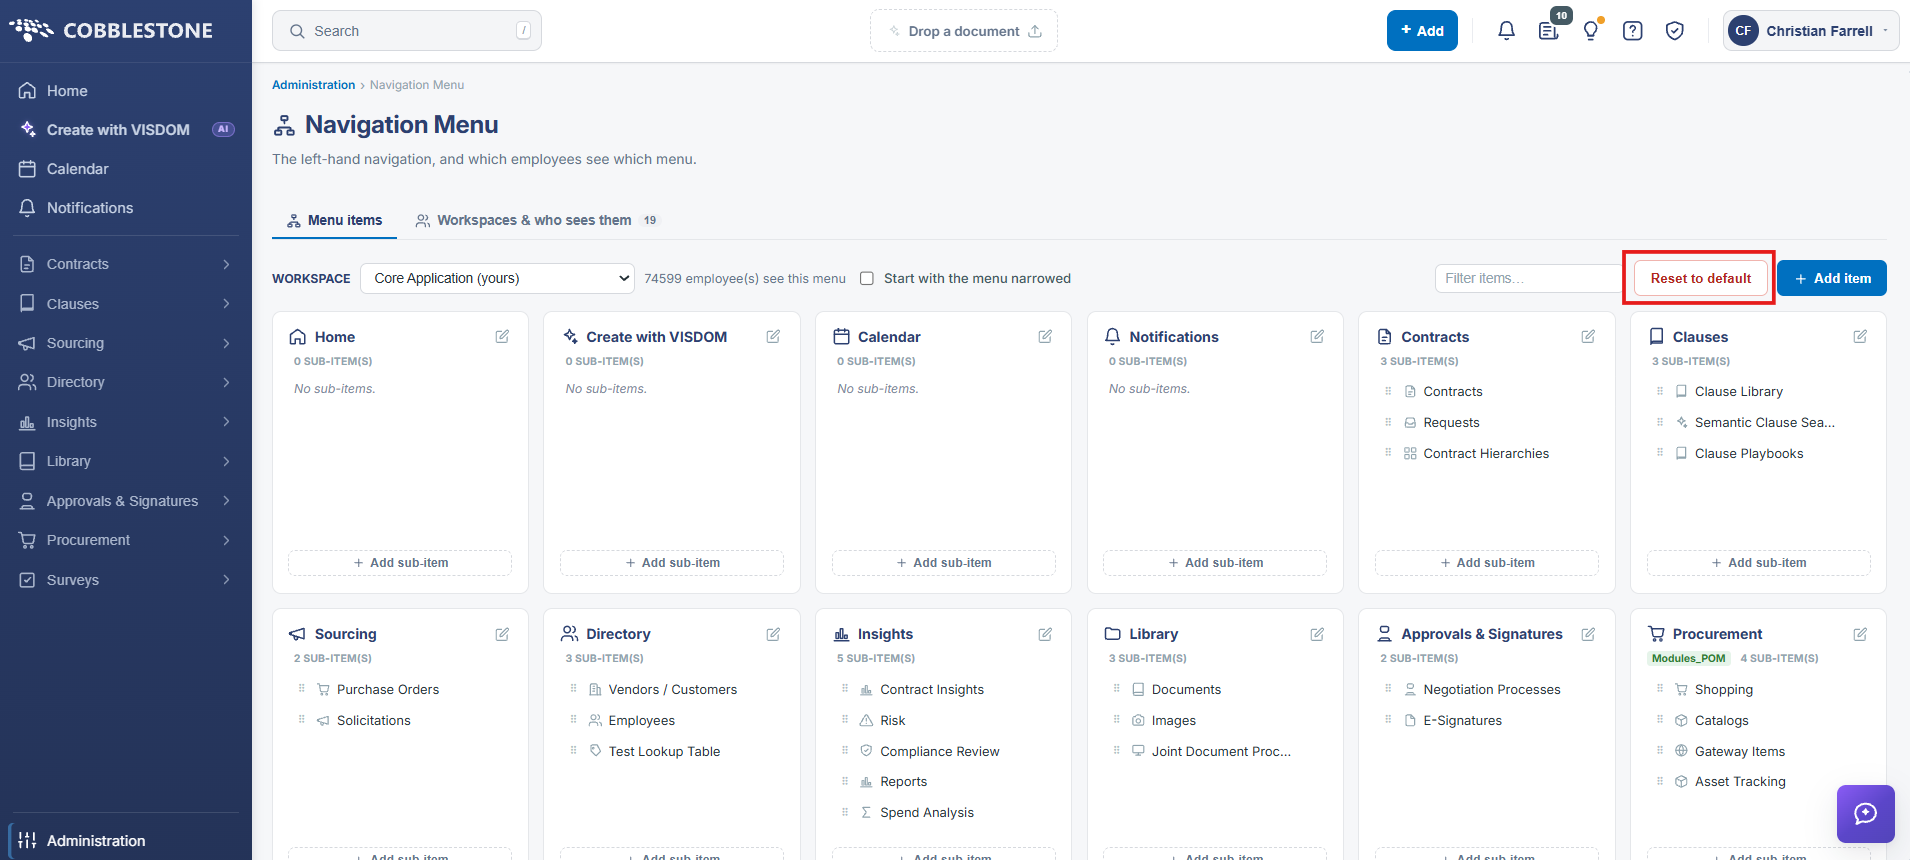
10. Quick Reference Summary
Task | How to Complete It |
Open the screen | Homepage → Administration → Configuration & Fields → Navigation Menu. |
Create a work space | Workspaces & who sees them → + Add workspace, enter a Name and Description, choose Start from, leave Active ticked, then Save. |
Edit or delete a work space | Workspaces & who sees them → edit (pencil) icon on the card → Save, or the trash icon to delete the workspace and its menu. |
Assign employees | Who sees this on the card, search under ADD EMPLOYEES, then Add selected; Remove selected takes them off. |
Open a menu for editing | Edit its menu on the workspace card, or pick the workspace from the WORKSPACE list on the Menu items tab. |
Edit a menu item | Pencil icon on the card, or click a sub-item; change Label, Page, Sits under, Order, Icon, or visibility, then Save. |
Hide a menu item | Untick Visible in the menu in the Edit menu item panel. Hidden items are badged HIDDEN in red. |
Move a menu item | Change Sits under in the panel, or drag a sub-item by its handle on the card. |
Add a menu item | + Add item for a top-level item, or + Add sub-item on a card; set the Page, or choose Enter a link manually for an external address. |
Create a heading | Add the item with the Page set to “— No page (this is a heading) —” and provide no URL. |
Reset a menu | Reset to default at the right of the Menu items toolbar. |