COBBLESTONE SOFTWARE
Contract Insight — User Guide
Document Library
Library Management: Shared Documents and Images
Note: Each procedure in this guide begins at the Contract Insight homepage, so any section can be followed on its own. The documents and images available in the Library depend on what has been uploaded, so the exact lists will differ between environments.
1. Overview
The Library stores documents that belong to the system as a whole rather than to any one contract or record. A document uploaded to the Library is available to everyone who is allowed to see it, which makes it the right place for policies, standard forms, instructions and reference material that people need to reach without opening a record first.
The Library holds two kinds of content, each on its own tab. The Documents tab holds shared files, and the Images tab holds the image assets that screens and templates use — branding, watermarks, notification headers, profile pictures and similar.
Every Library document is versioned. The file uploaded first becomes the initial version and is published immediately; uploading a new version publishes it and archives the version that was published before it. Any version can be previewed, downloaded, renamed, archived or published again from the document’s Manage panel.
Each document also carries a Visible for setting — Internal, Gateway or Public — and an Active setting that determines whether anyone other than an administrator can see it. Because these settings and the upload, version and delete actions are administrative, they are normally reserved for Application Administrators or users specifically granted the appropriate permission; other users simply open the documents made available to them.
2. Accessing the Document Library
The Documents tab of the Library is the central management screen for every shared document. To open it:
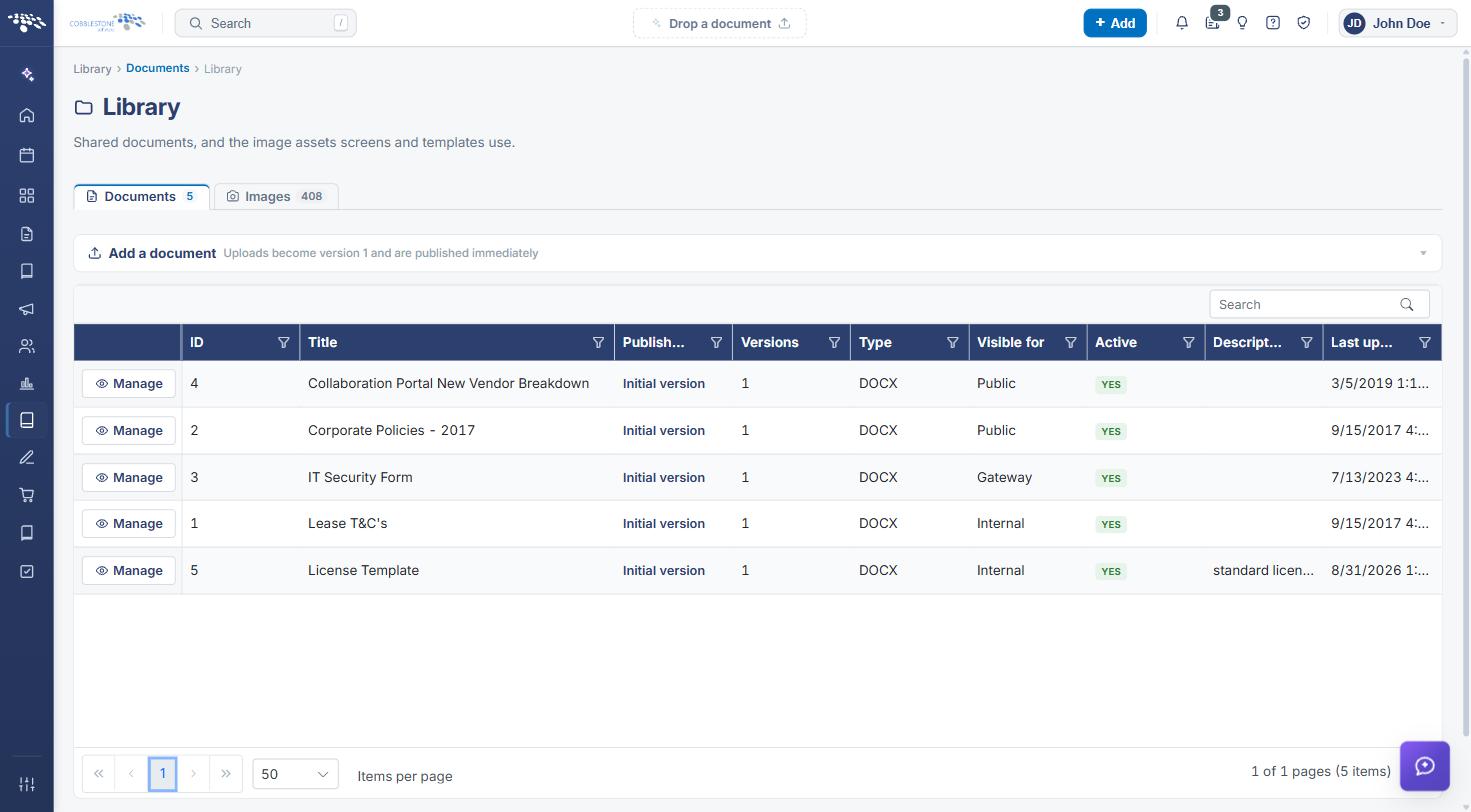
From the Contract Insight homepage, click Library in the left navigation menu, then select Documents. The Library opens on the Documents tab.
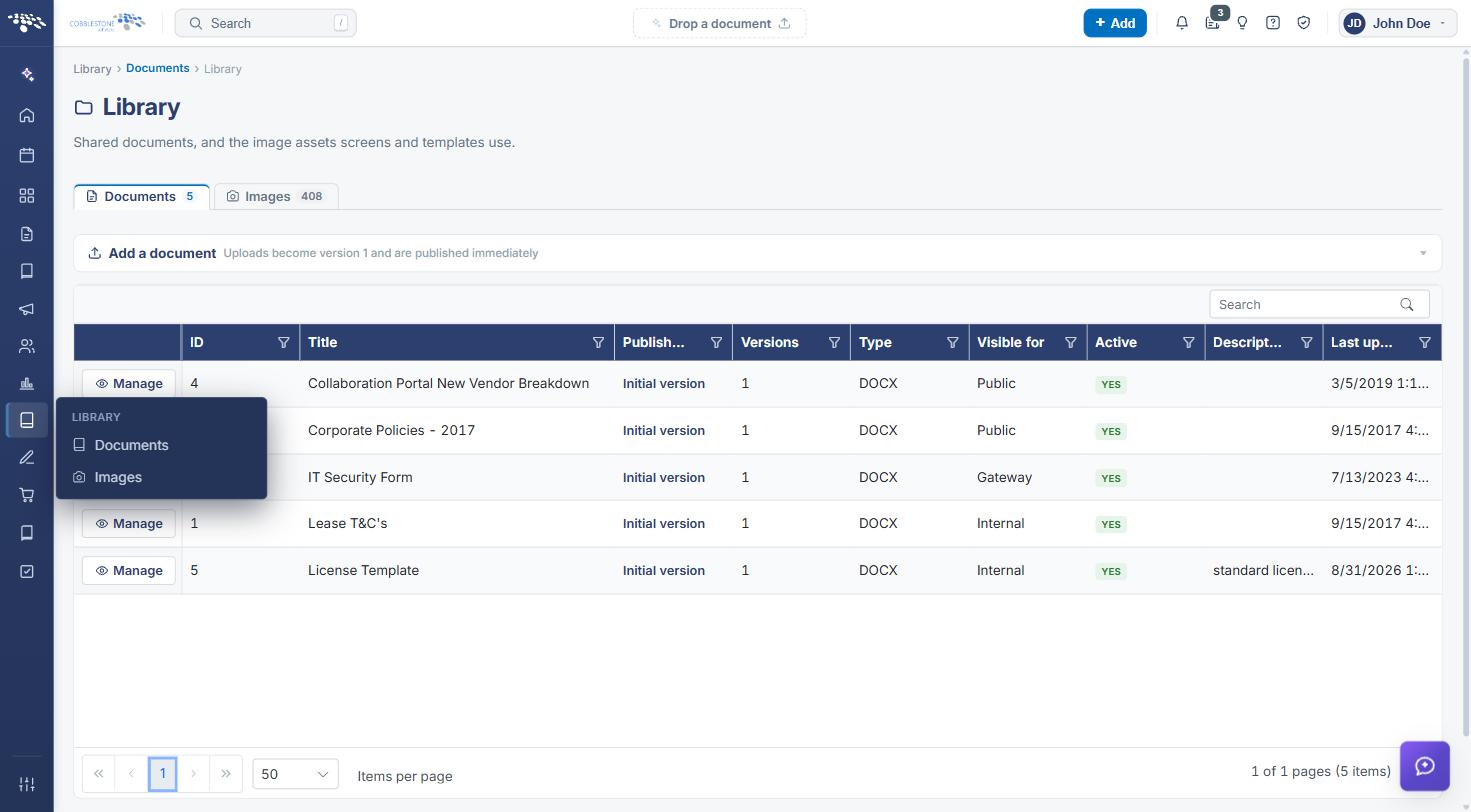
The Documents tab includes the following elements:
- A Library heading with the subtitle “Shared documents, and the image assets screens and templates use.”
- A Documents tab and an Images tab, each showing a live count of the items it holds
- An Add a document panel, labelled “Uploads become version 1 and are published immediately”, which expands when clicked
- A Search box above the grid to filter it by keyword
- A sortable, filterable grid with ID, Title, Published version, Versions, Type, Visible for, Active, Description and Last updated columns, each with its own filter icon
- A Published version value — “Initial version”, “Version 2” and so on — that opens the published file when clicked
- An Active value of YES or NO, and a Visible for value of Internal, Gateway or Public
- A per-row Manage button that opens the document’s panel
- Pagination controls at the bottom of the grid, with a live page and record count and an Items per page selector
3. Adding a Document
Steps:
- From the Contract Insight homepage, click Library in the left navigation menu, then select Documents. The Library opens on the Documents tab.
- Click Add a document to expand the upload panel.
- Click Choose File and select the file to upload.
- Optionally enter a Title — the name the document is listed under. Left blank, it defaults to the file name.
- Click Upload. The document is added to the list with a system-assigned ID.
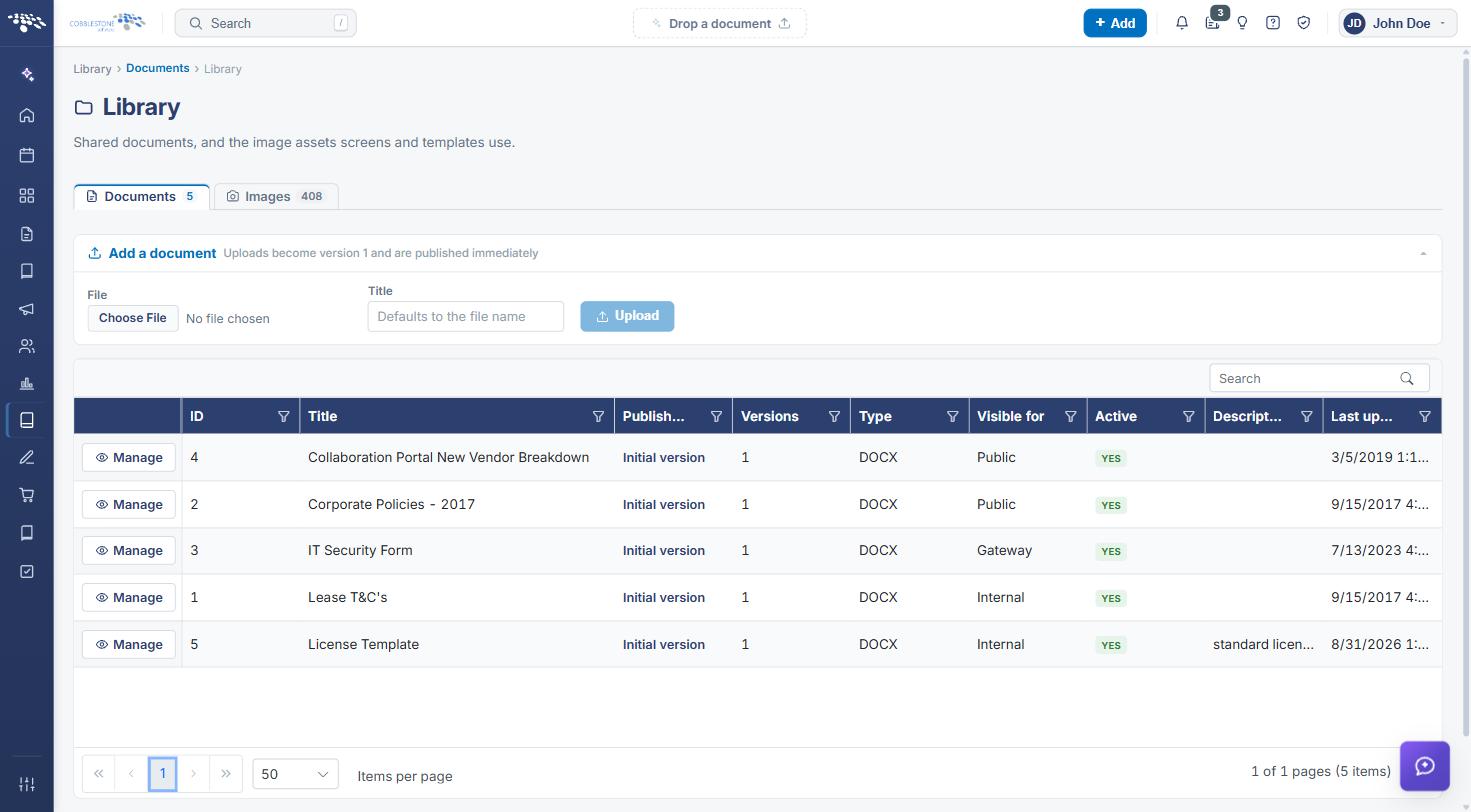
Note: An upload becomes version 1 and is published immediately, so the document is listed with a published Initial version as soon as it is added. Use Manage to set how widely it is visible.
4. Managing a Document’s Details
Steps:
- From the Contract Insight homepage, click Library in the left navigation menu, then select Documents. The Library opens on the Documents tab.
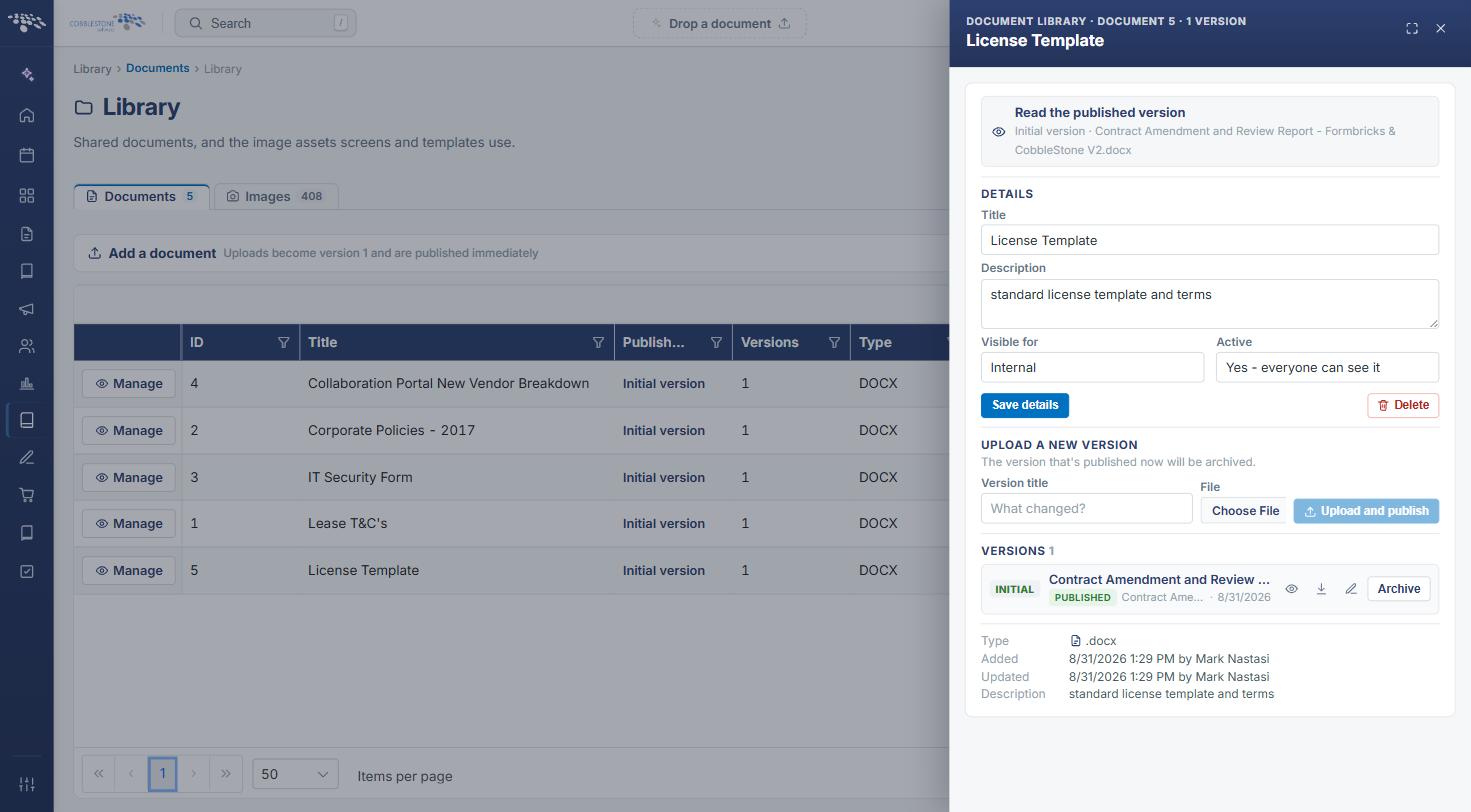
- Click Manage on the row for the document. A panel opens on the right, headed DOCUMENT LIBRARY · DOCUMENT <ID> · <N> VERSIONS with the document title beneath it.
- Use Read the published version at the top of the panel to open the file that is published now — the link names the version and the file.
- Edit the fields in the DETAILS section as required.
- Click Save details to keep the changes.
The DETAILS section contains:
- Title — the name the document is listed under
- Description — “What this document is for (shown in the list)”; the text appears in the Description column of the grid
- Visible for — Internal (people signed in to Contract Insight), Gateway (also available in the Vendor/Client Gateway) or Public
- Active — Yes — everyone can see it or No — hidden from non-admins
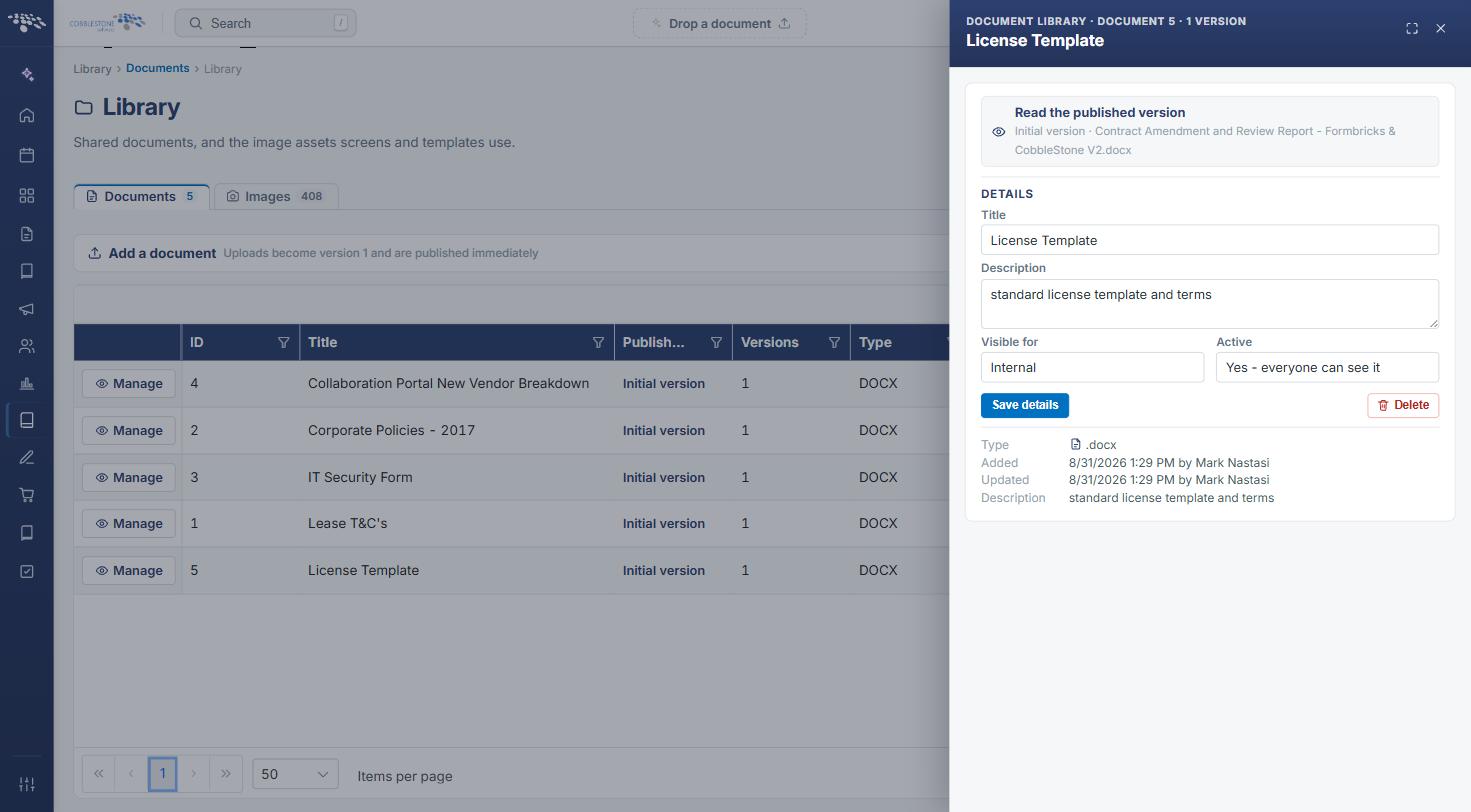
The foot of the panel records the document’s Type — its file extension — along with Added and Updated dates and the user responsible for each.
5. Uploading a New Version
Steps:
- From the Contract Insight homepage, click Library in the left navigation menu, then select Documents. The Library opens on the Documents tab.
- Click Manage on the row for the document.
- Go to the UPLOAD A NEW VERSION section of the panel.
- Enter a Version title describing what changed.
- Click Choose File and select the updated file.
- Click Upload and publish. The new version becomes the published version and appears at the top of the versions list.
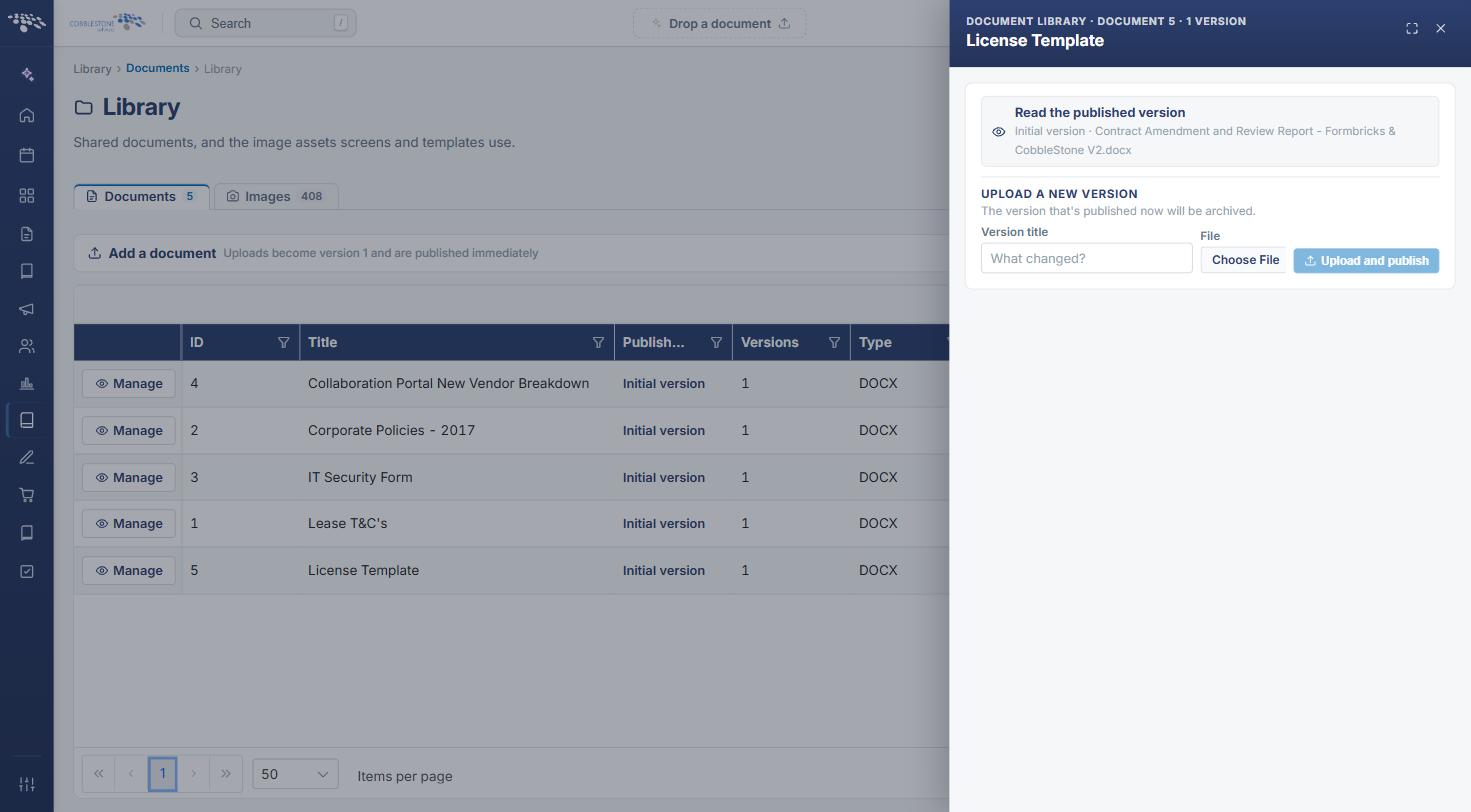
Note: The version that is published at the time is archived automatically, as the panel states: “The version that’s published now will be archived.” Nothing is lost — archived versions stay on the document and can be published again later.
6. Working with Versions
The VERSIONS section of the Manage panel lists every version of the document, newest first, with a running count beside the heading. Each row shows a version badge — INITIAL, V2 and so on — the version title, a PUBLISHED or ARCHIVED status, and the file name and date.
The buttons on a version row are:
- Preview this version — opens the file in a preview
- Download this version — saves a copy of that version’s file
- Rename this version — changes the version title
- Archive this version — archives the published version; the document is then left with no published version
- Publish this version — publishes an archived version; the version published at the time is archived in its place
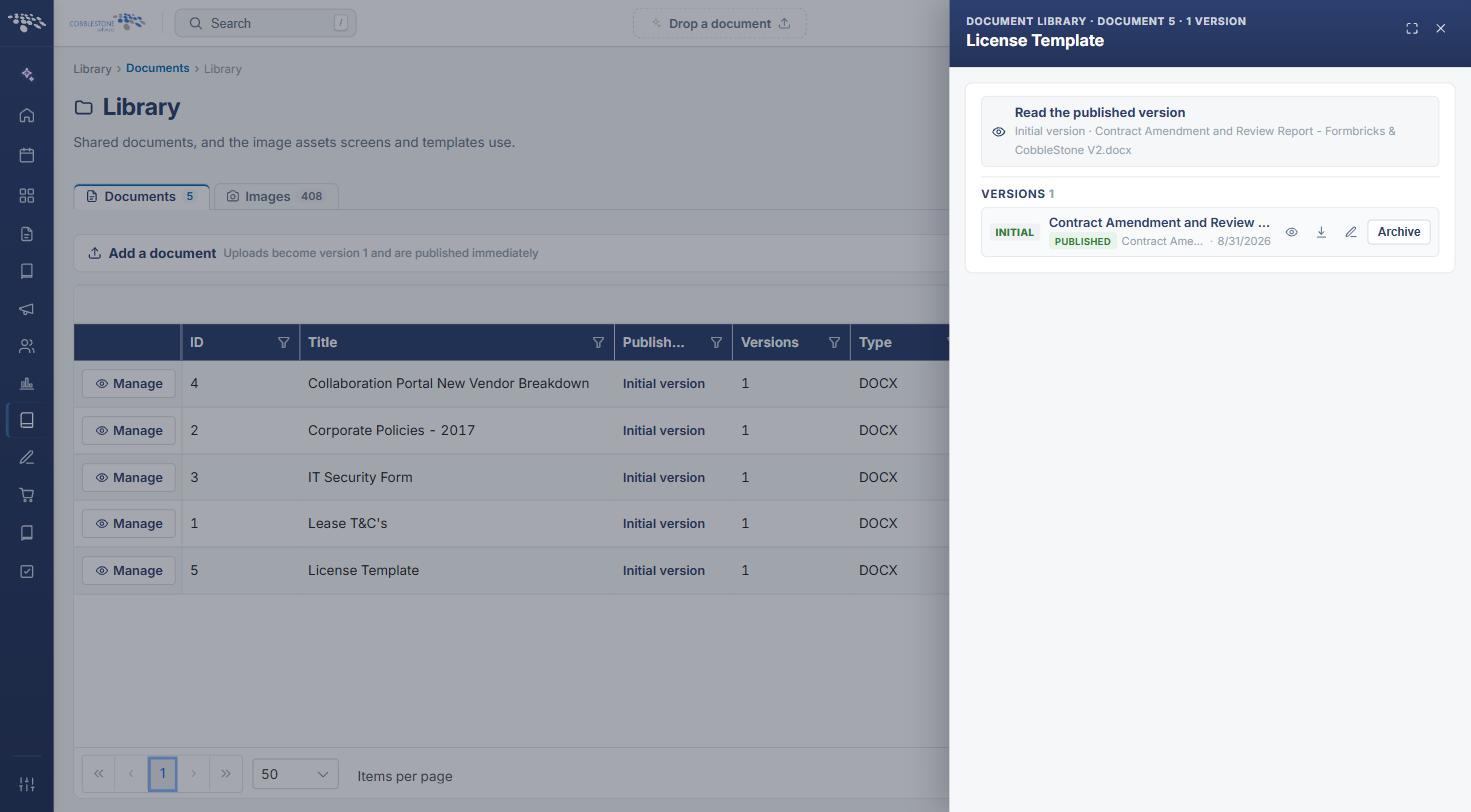
Note: Only one version is published at a time. The Published version column on the Documents list always reflects whichever version is published, and the Versions column shows how many versions the document has in total.
7. Deleting a Document
Note: Deleting a document removes it and every version it holds. Check that the document is not being relied on elsewhere — for example linked from a dashboard, a template or the Vendor/Client Gateway — before removing it.
Steps:
- From the Contract Insight homepage, click Library in the left navigation menu, then select Documents. The Library opens on the Documents tab.
- Click Manage on the row for the document you want to remove.
- Click Delete (shown in red beside Save details).
- Confirm the deletion when prompted.
Where a document should stay in the system but no longer be seen, set Active to No — hidden from non-admins instead of deleting it.
8. The Images Tab
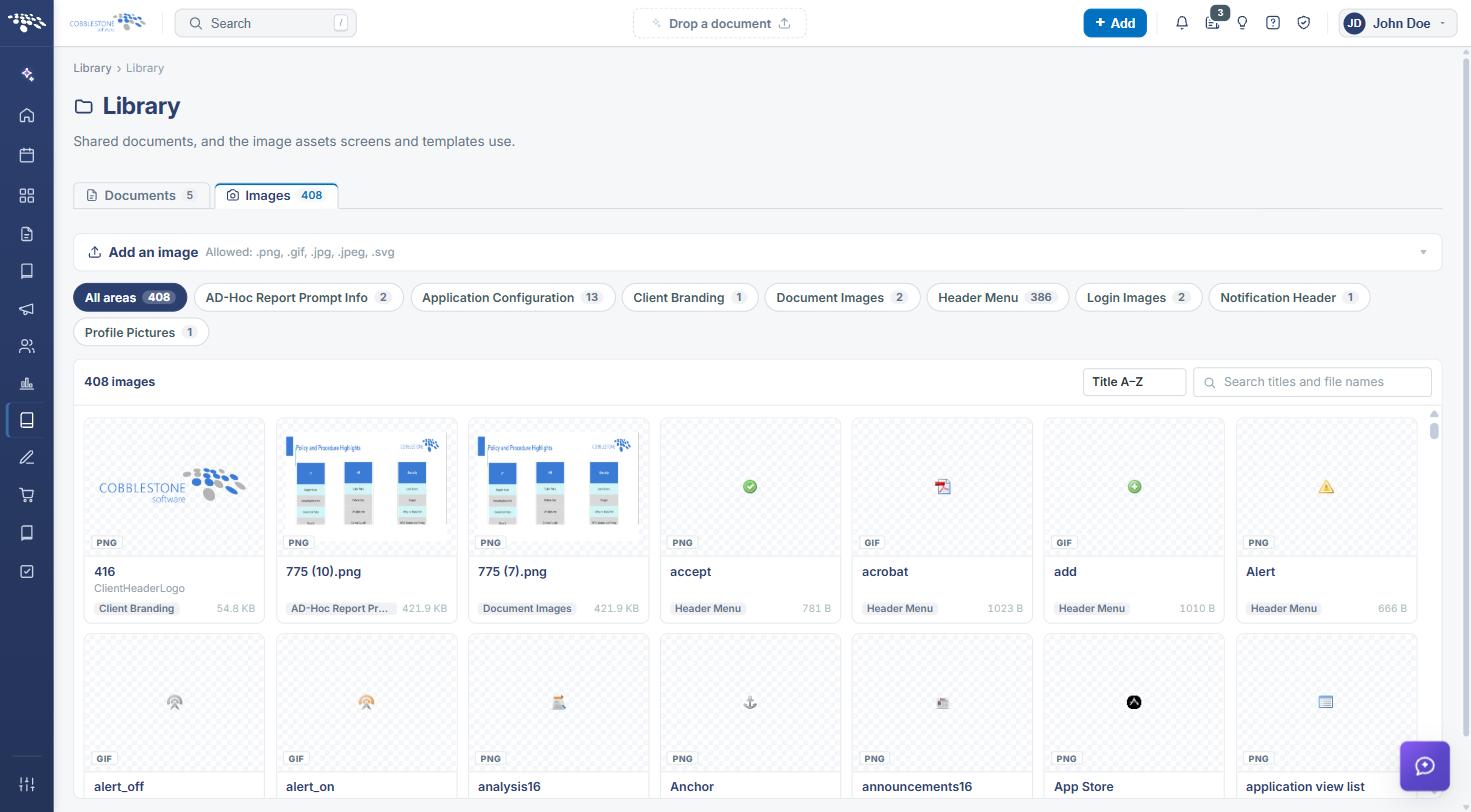
The Images tab holds the image assets the application uses, grouped by the area each one belongs to. Images are managed separately from documents: they are not versioned, and each is filed under an area rather than given a visibility setting.
Steps:
- From the Contract Insight homepage, click Library in the left navigation menu, then select Images, or click the Images tab on the Library screen.
- Click Add an image to expand the upload panel. The allowed file types are listed beside it: .png, .gif, .jpg, .jpeg and .svg.
- Choose the Area the image is used in — AD-Hoc Report Prompt Info, Application Configuration, Client Branding, Document Images, Header Menu, Login Images, Notification Header, Profile Pictures or Watermarks.
- Click Choose File and select the image, then optionally enter a Title (it defaults to the file name).
- Click Upload.
The Images tab also provides:
- A row of area filters — All areas plus one for each area in use — each showing how many images it holds
- A sort selector offering Title A–Z, Newest first and Largest first
- A Search titles and file names box
- A card for each image showing its thumbnail, file type, title, file name, area and file size
- Hover actions on each card: Open full size and Remove this image
9. Quick Reference Summary
Task | How to Complete It |
Open the library | Homepage → Library → Documents (or the Documents tab on the Library screen). |
Add a document | Add a document → Choose File, optionally set a Title, then Upload. |
Open a document | Click its Published version link, or Manage → Read the published version. |
Edit details | Manage → change Title, Description, Visible for or Active, then Save details. |
Control who sees it | Visible for: Internal, Gateway or Public; Active: Yes, or No to hide it from non-admins. |
Add a version | Manage → UPLOAD A NEW VERSION → Version title, Choose File, Upload and publish. |
Manage versions | Preview, Download, Rename, Archive or Publish any version from the VERSIONS list. |
Delete a document | Manage → Delete, then confirm. Removes the document and all of its versions. |
Find a document | Search box above the grid, or the column filter icons; Items per page controls the page size. |
Manage images | Images tab → Add an image (choose an Area), then filter, sort or search the cards. |