COBBLESTONE SOFTWARE
Contract Insight — User Guide
Managing E-Signature & PIN
Module: Document Collaboration Gateway › Document Collaboration Gateway Settings & Functionality (Internal Users) › Managing E-Signature & PIN
Note: Each procedure in this guide begins at the Contract Insight homepage, so any section can be followed on its own. Custom fields are configurable, so the exact field list on a contract category record may vary between environments.
1. Overview
Each user manages their own e-signatures and Secure PIN from the My Signature Settings page, opened from the user menu in the top-right corner. The page describes itself as “Your saved e-signatures and document-collaboration Secure PIN,” and has three sections: My Secure PIN, My Default Signature, and My Signatures. Saved signatures can be uploaded as an image, drawn, or typed, and one of them can be set as the default that is pre-selected when you e-sign.
A PIN requirement is managed at the process level, shown as a SECURE PIN badge on the process console alongside its Status and Steps summary — when set, the signer supplies that PIN as part of completing their signing step, adding a second factor beyond simply opening the signing page.
2. Key Elements
- My Signature Settings: opened from your name in the top-right corner of any page.
- My Secure PIN: the Secure PIN field and Save PIN button. “Your PIN is required to access the document-collaboration gateway.”
- My Default Signature: the Choose a signature drop-down and Save Default button. This is “The signature pre-selected when you e-sign.”
- My Signatures: lists your saved signatures, with an Add New Signature button.
- Add New Signature window: a Title plus three ways to create the signature — Upload, Draw, or Type.
- SECURE PIN badge on the console indicates a PIN is required for that process.
- The PIN is entered as part of completing a signing step, not at general sign-in.
3. Navigating to My Signature Settings
- From the Contract Insight homepage, click your name in the top-right corner to open the user menu.
- Select My Signature Settings.
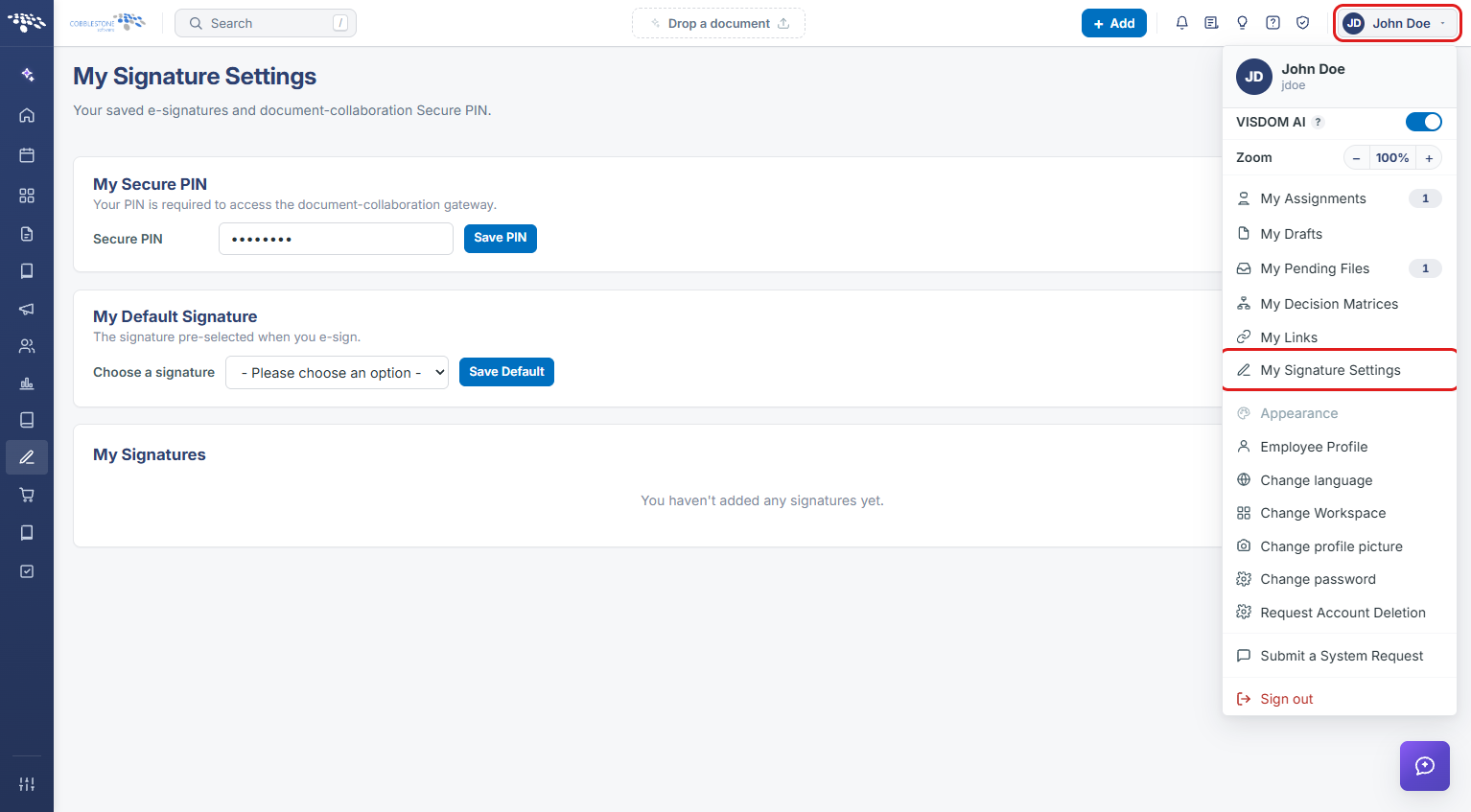
The My Signature Settings page opens, showing the My Secure PIN, My Default Signature, and My Signatures sections.
4. Setting or Changing Your Secure PIN
- Navigate to My Signature Settings (see Section 3).
- In the My Secure PIN section, enter your PIN in the Secure PIN field.
- Click Save PIN.
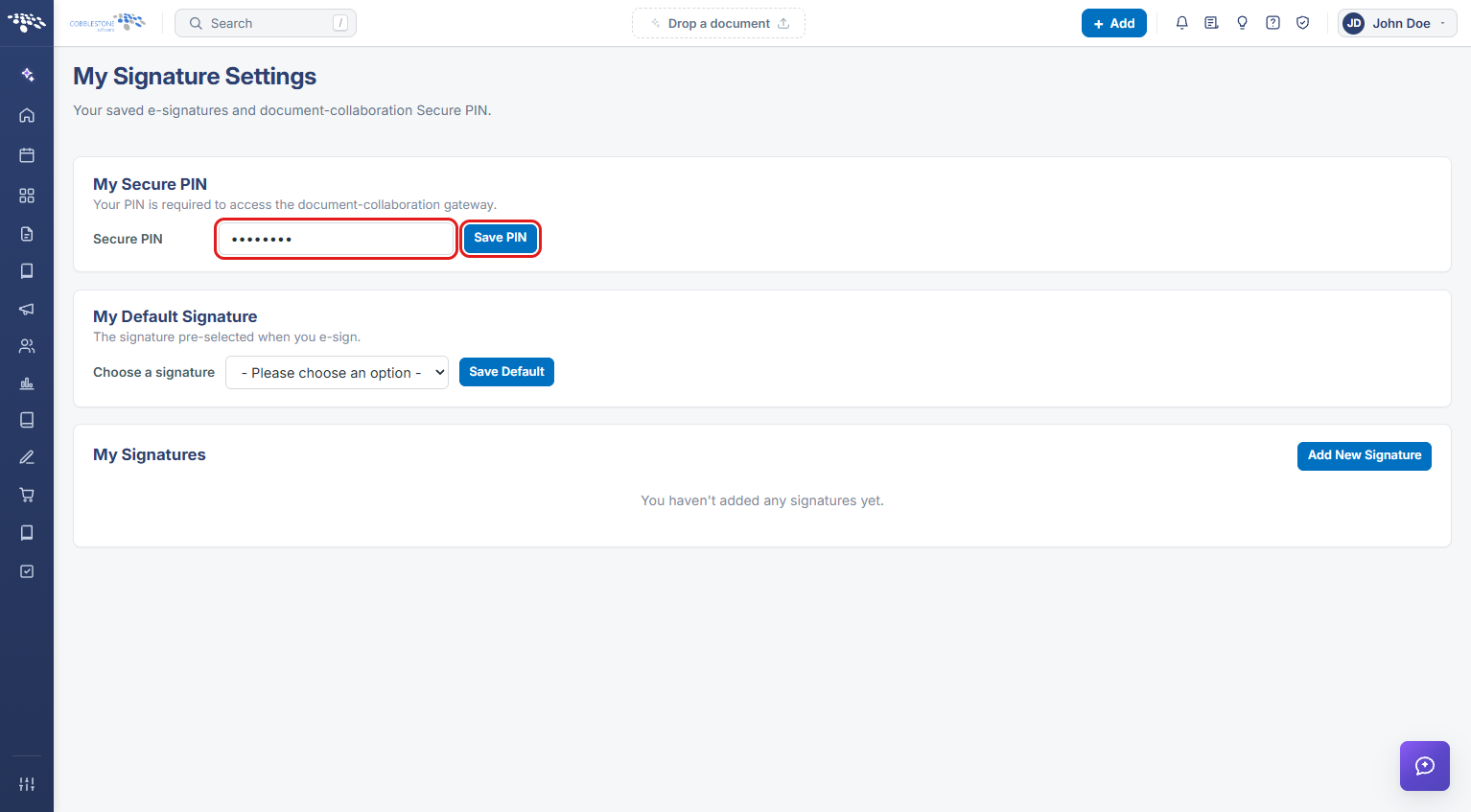
Note: Keep your PIN private. You will need it to access the document-collaboration gateway and to complete a signing step on any process marked SECURE PIN (see Section 7).
5. Adding a Saved Signature
5a. Opening the Add New Signature Window
- Navigate to My Signature Settings (see Section 3).
- In the My Signatures section, click Add New Signature.
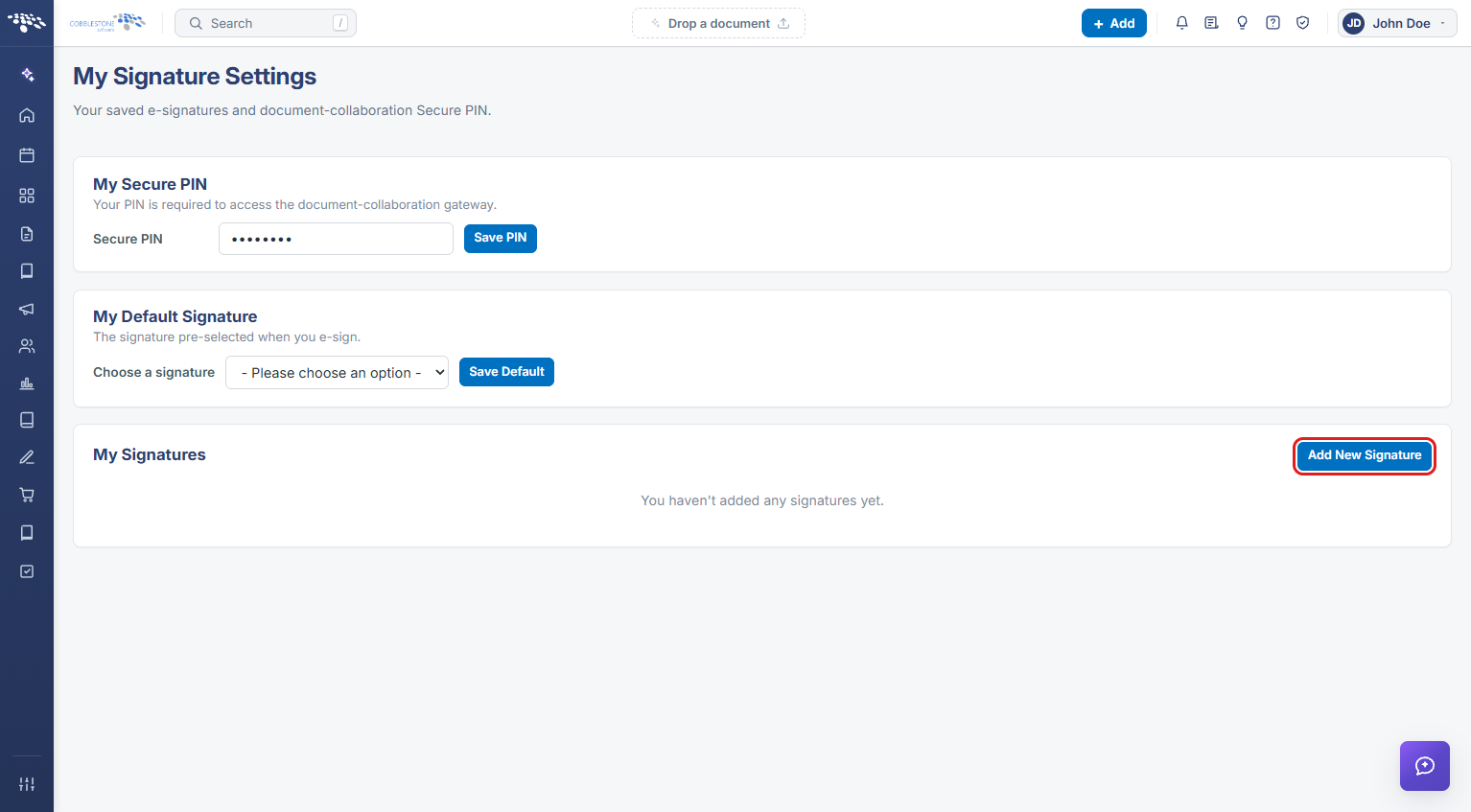
- In the Add New Signature window, enter a Title (for example, “My initials”).
- Choose how to create the signature: Upload (Section 5b), Draw (Section 5c), or Type (Section 5d).
5b. Uploading a Signature Image
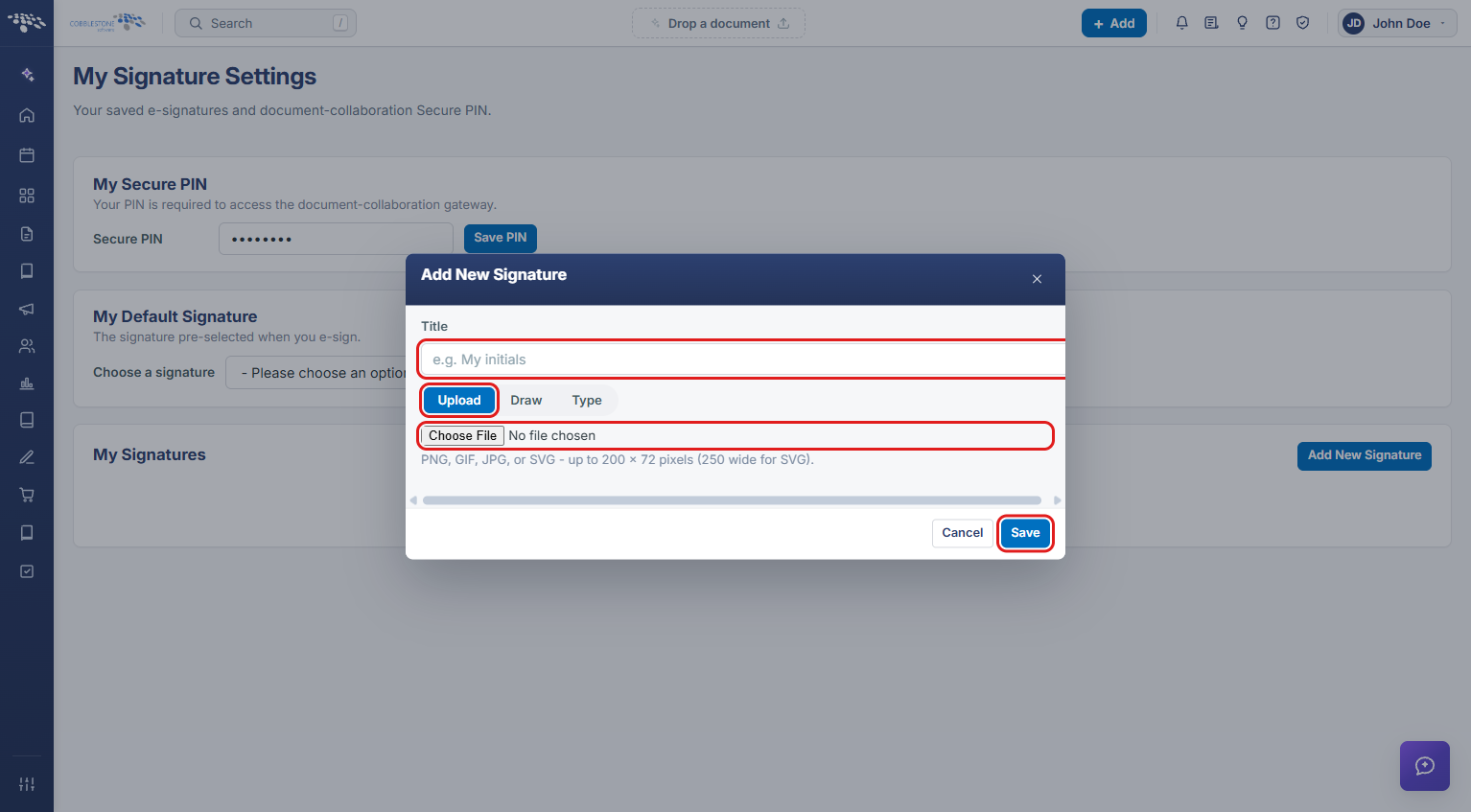
- In the Add New Signature window, click the Upload tab.
- Click Choose File and select your signature image. Accepted formats are PNG, GIF, JPG, or SVG, up to 200 × 72 pixels (250 wide for SVG).
- Click Save.
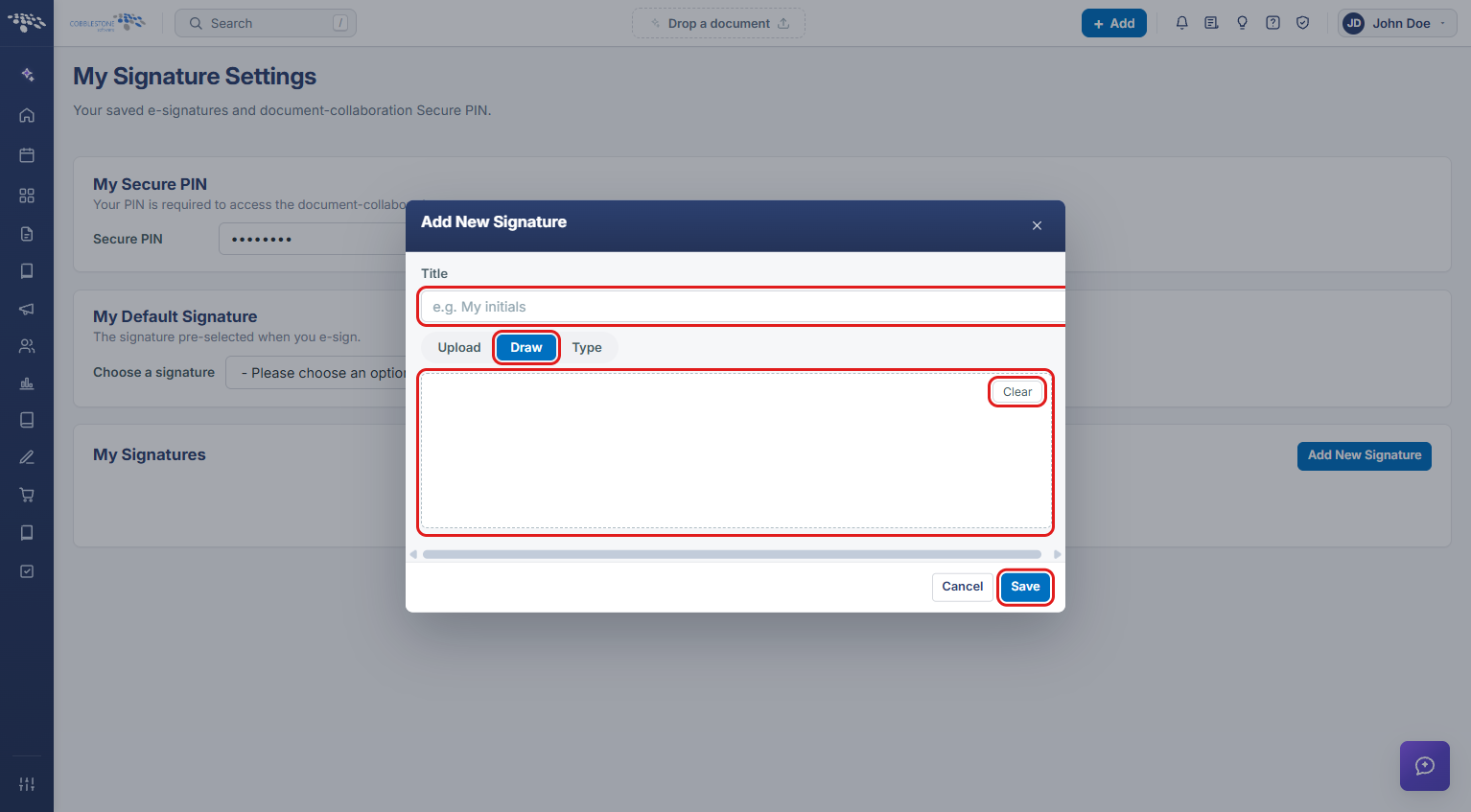
5c. Drawing a Signature
- In the Add New Signature window, click the Draw tab.
- Draw your signature in the box using your mouse, stylus, or touchscreen. Click Clear to erase it and start over.
- Click Save.
5d. Typing a Signature
- In the Add New Signature window, click the Type tab.
- Enter your name in the Type your signature field.
- Choose a font (for example, Segoe Script or Lucida Handwriting), a size (9 pt to 25 pt), and a color (Black, Dark Blue, or Light Blue).
- Check the preview below the drop-downs, then click Save.
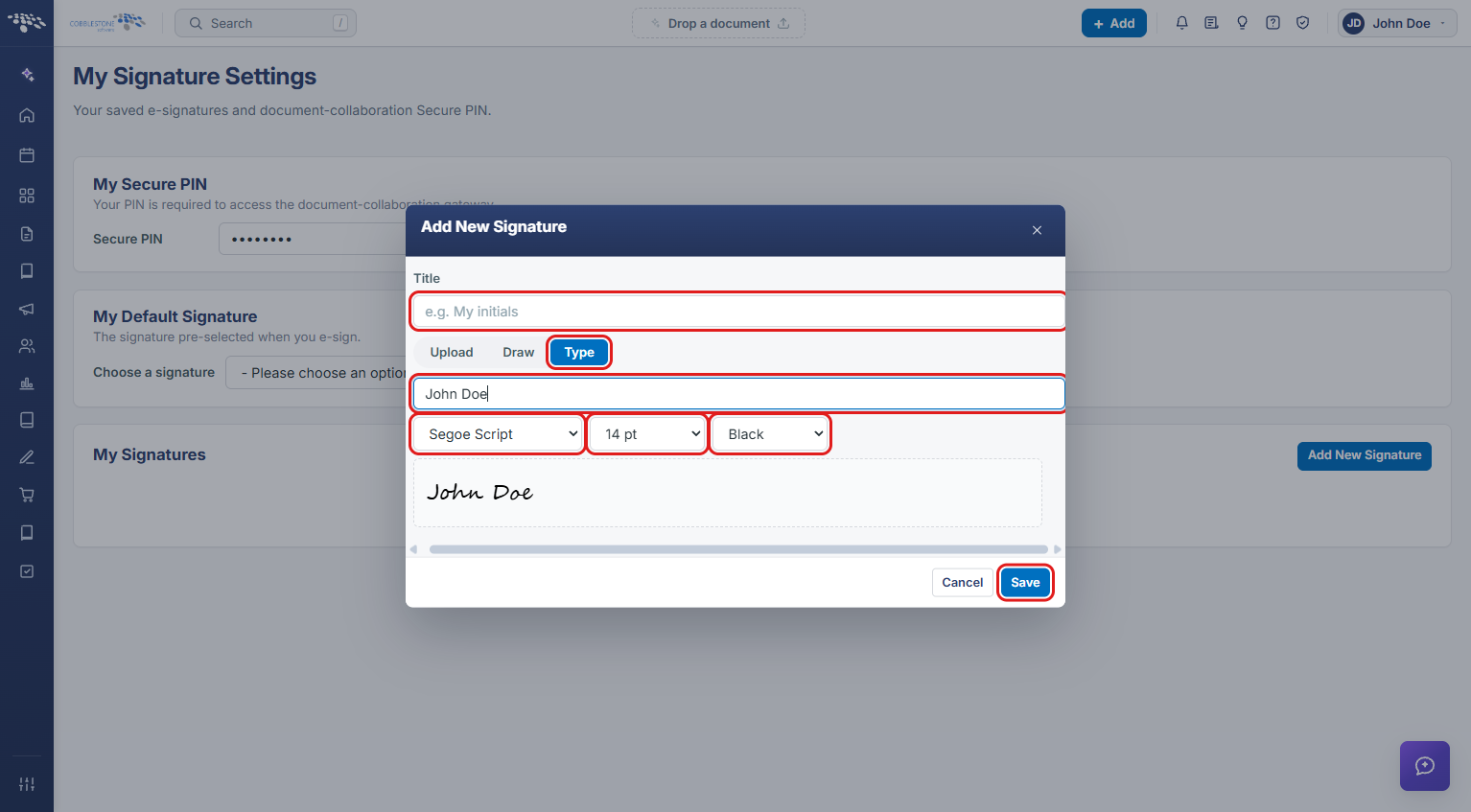
Note: Click Cancel or the × in the window header to close the window without saving.
6. Setting Your Default Signature
- Navigate to My Signature Settings (see Section 3).
- In the My Default Signature section, select a saved signature from the Choose a signature drop-down. Select None to have no signature pre-selected.
- Click Save Default.
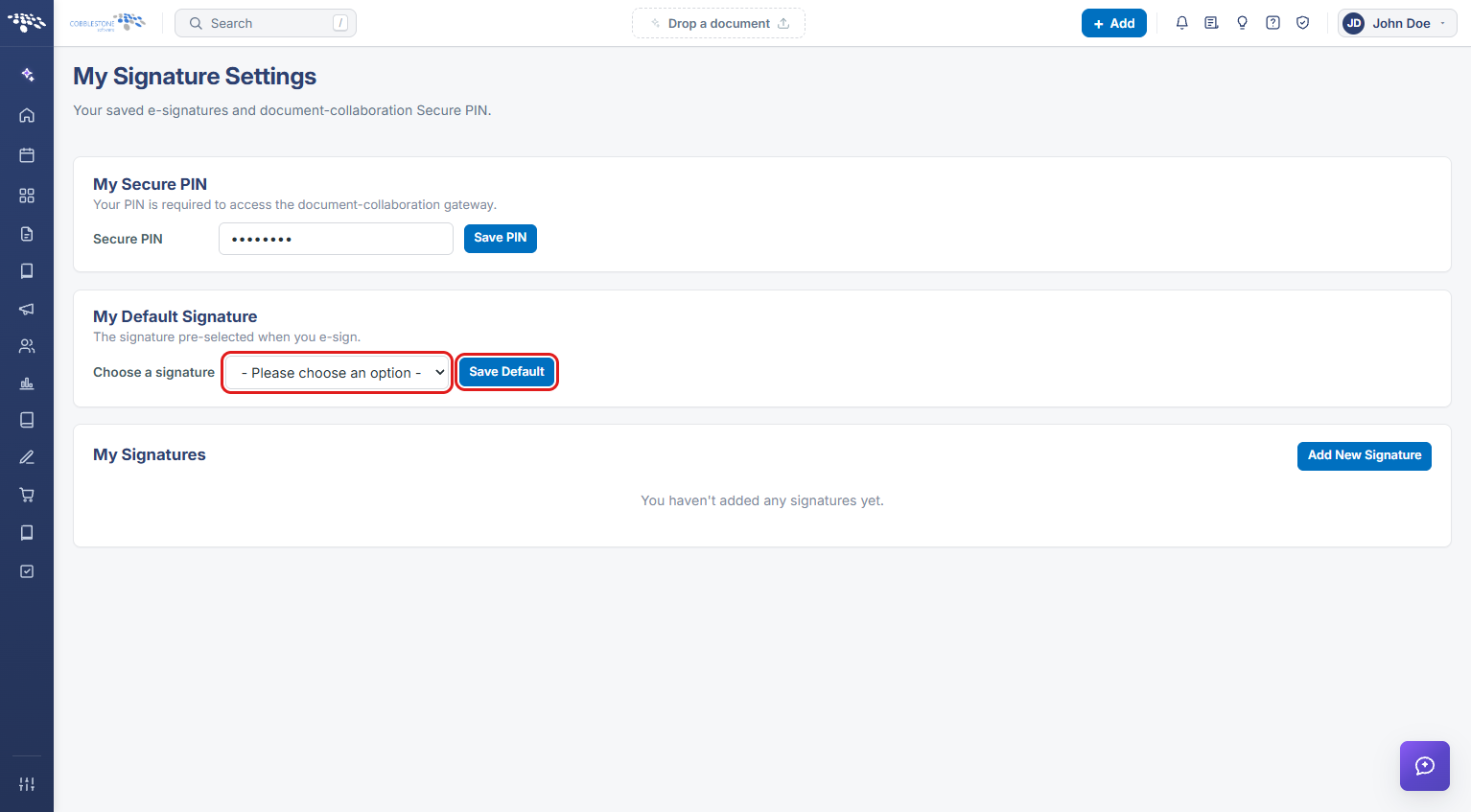
Note: The drop-down only lists signatures you have saved. Add at least one signature first (see Section 5).
7. Checking a Process's PIN Requirement
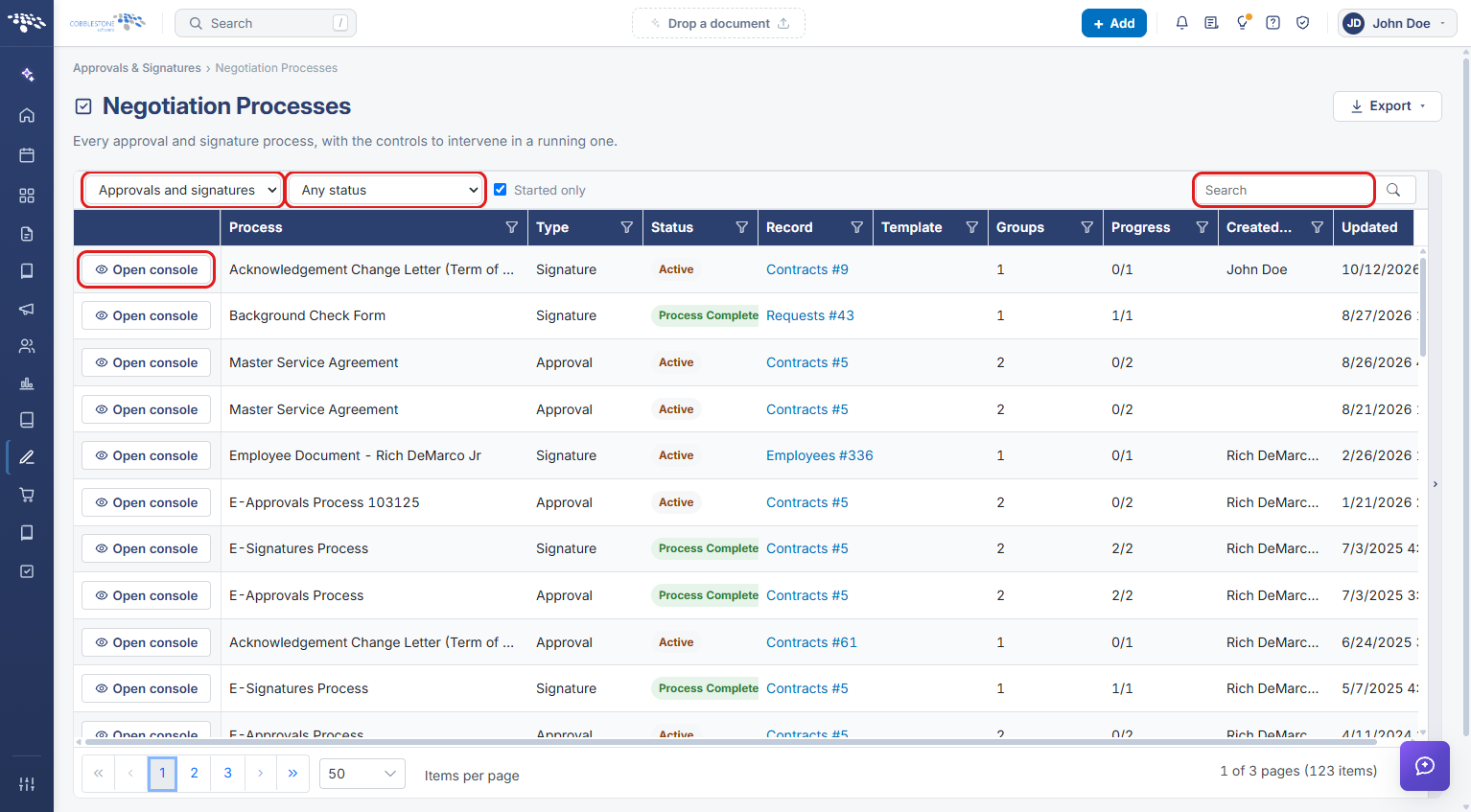
- From the Contract Insight homepage, click the Approvals & Signatures icon in the left navigation bar.
- Select Negotiation Processes.
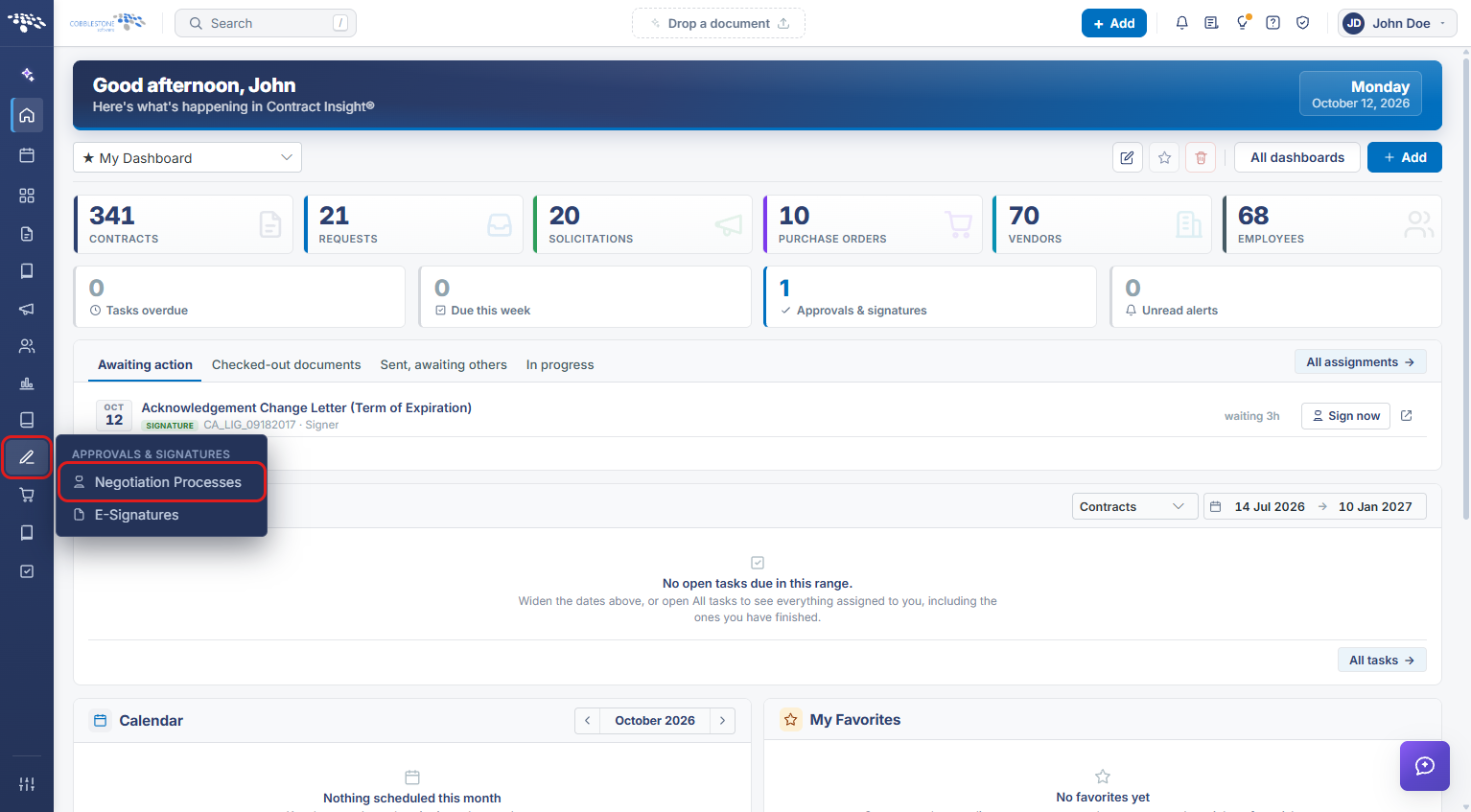
- Find the process using the type filter (Approvals and signatures, Approvals only, or Signatures only), the status filter, or the Search box.
- Click Open console on the process row.
- Review the summary at the top of the console: Status, Groups, Participants, Files, and Created. When the process requires a PIN, a SECURE PIN badge is shown alongside this summary.
- Review Groups and participants to see each signer and their status. Click the Signature receipt icon to see who signed what, and when.
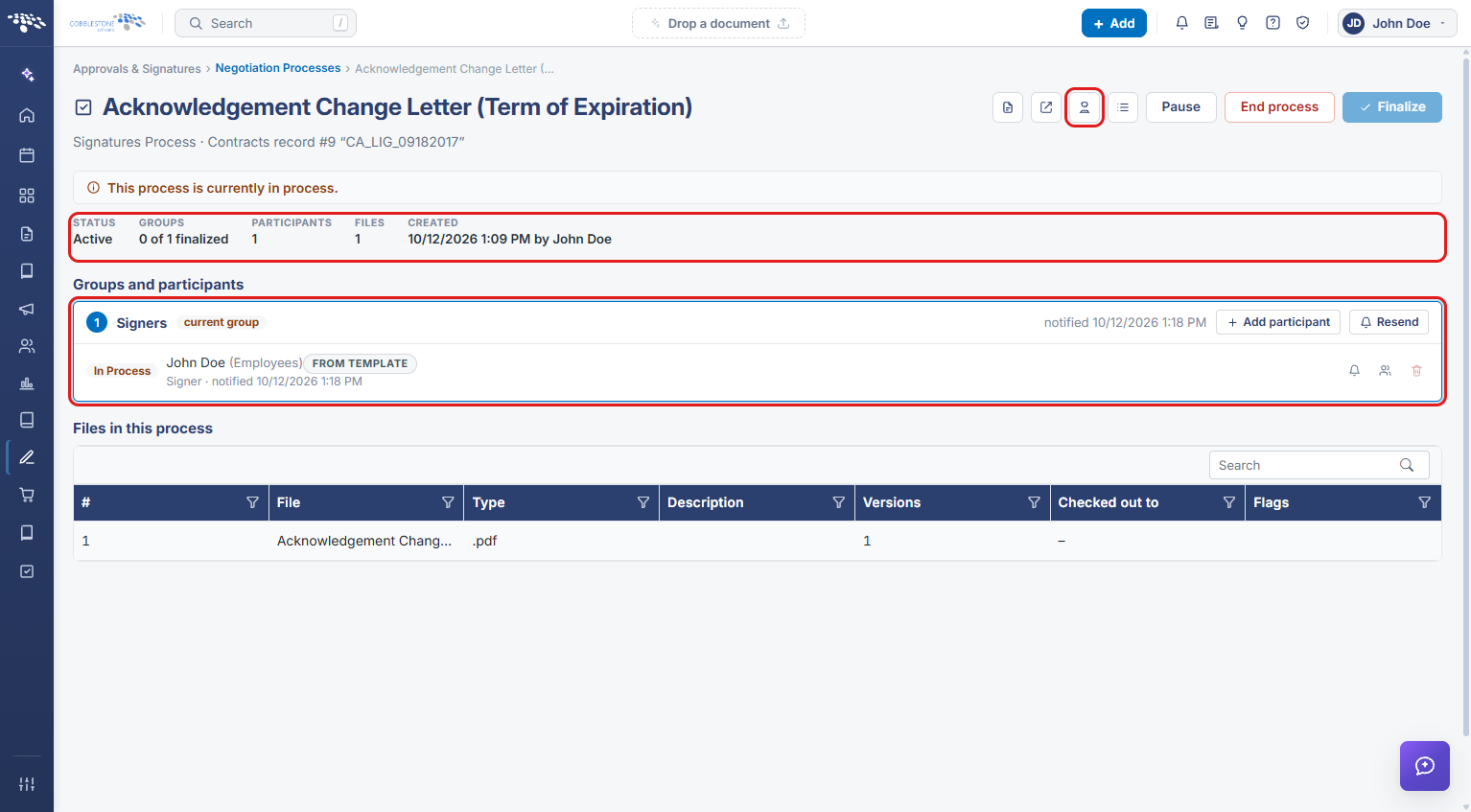
Note: When a process shows the SECURE PIN badge, each signer enters their Secure PIN (see Section 4) as part of completing their signing step.
8. Quick Reference Summary
| Task | How to Complete It |
|---|---|
| Open My Signature Settings | Your name (top-right) → My Signature Settings. |
| Set or change your Secure PIN | My Secure PIN → enter Secure PIN → Save PIN. |
| Add a signature | My Signatures → Add New Signature → enter a Title → Upload, Draw, or Type → Save. |
| Set your default signature | My Default Signature → Choose a signature → Save Default. |
| Check whether a process requires a PIN | Approvals & Signatures → Negotiation Processes → Open console → look for the SECURE PIN badge. |
| See who signed and when | Process console → Signature receipt icon. |