
COBBLESTONE SOFTWARE
Contract Insight — User Guide
IntelliSign Process from Document Toolbox
Module: Document Collaboration Gateway › IntelliSign › IntelliSign Process from Document Toolbox
Note: Each procedure in this guide begins at the Contract Insight homepage, so any section can be followed on its own. Custom fields are configurable, so the exact field list on a contract category record may vary between environments.
1. Overview
As with IntelliApprove, IntelliSign can be initiated from within document authoring/merge tools rather than only from a record's Actions menu — the same Mass Process Jobs and Merged Documents administration screens that govern template-driven document generation and its optional routing for signature.
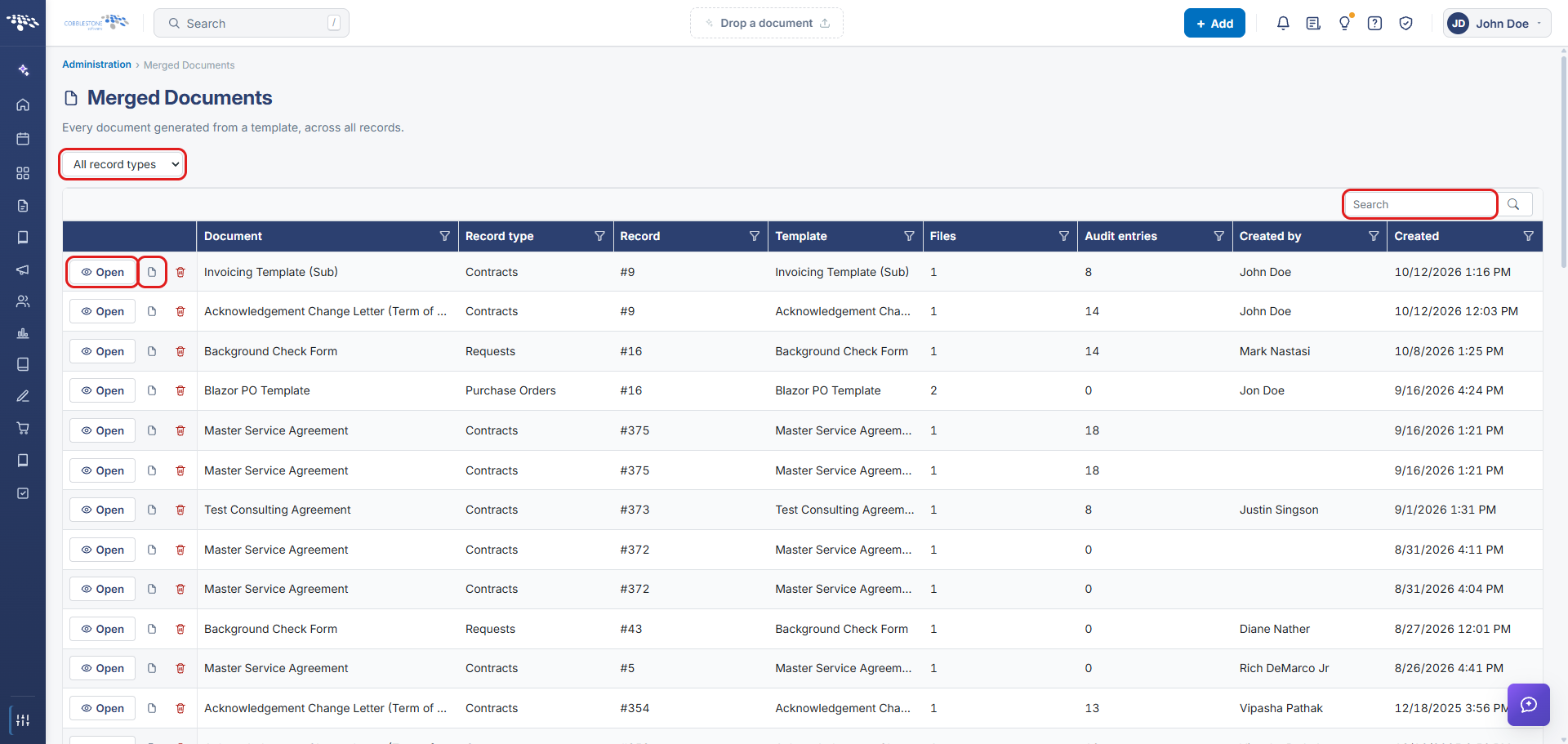
Mass Process Jobs merges one document template across many records at once. Choosing the Merge & Sign job type routes each generated document for signature. Merged Documents lists every document generated from a template, across all records. From there you can open a document, place its signature fields, follow its signing groups, and open its process console.
2. Key Elements
- Mass Process Jobs (Administration) can merge a template across records and route for signature.
- Merged Documents (Administration) reviews documents generated this way.
- Area tabs on Mass Process Jobs: Contracts, Counterparty, E-Procurement, Employees, Purchase Orders, and Requests.
- Job types: Merge ONLY, Merge & Sign, and Merge & Acknowledge. Use Merge & Sign to send the merged documents for signature.
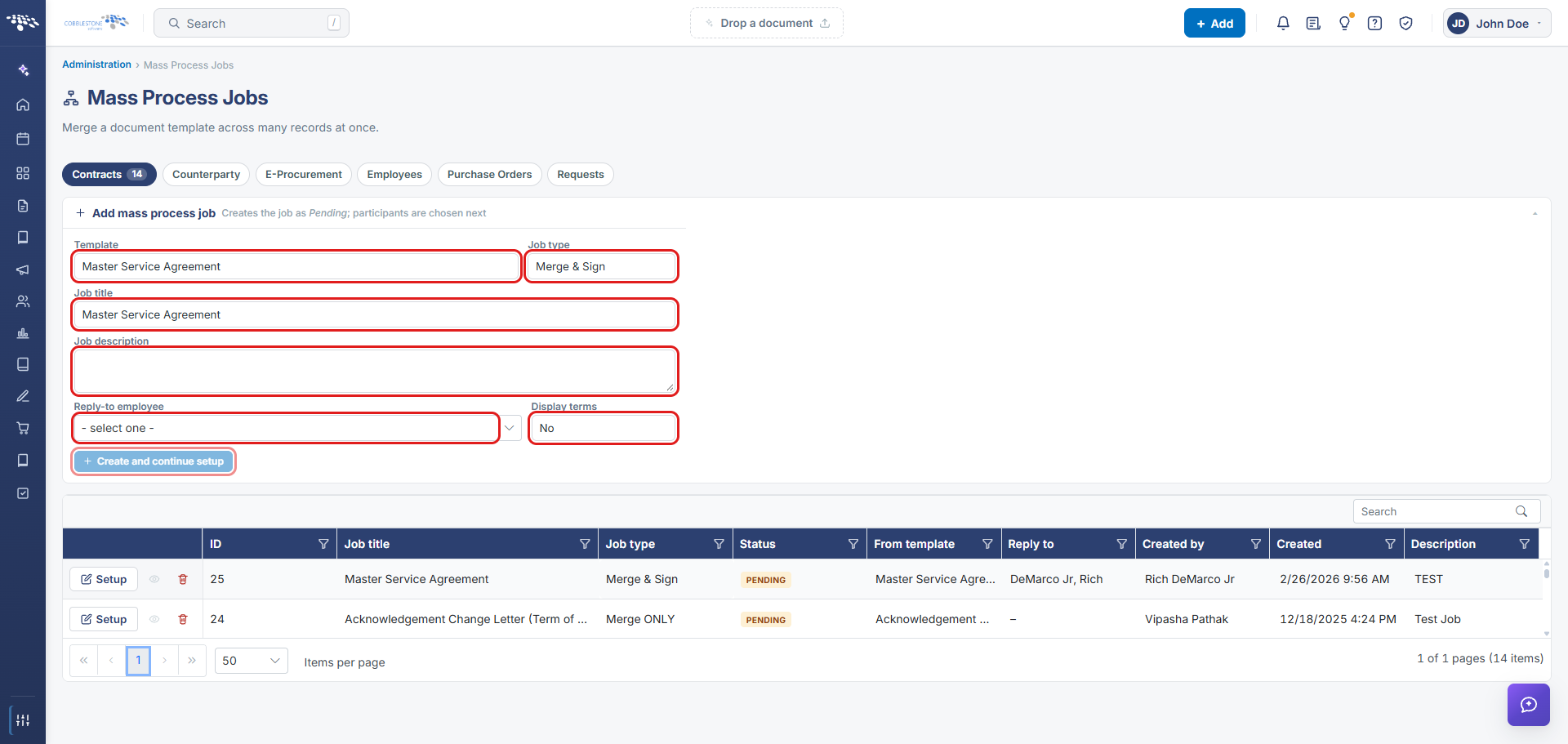
- + Add mass process job: “Creates the job as Pending; participants are chosen next.”
- Job setup has two steps: 1 Which records (the conditions that pick records) and 2 Review and run. One document is created per matching record.
- Merged Documents row actions: Open, Open the source template, and Delete.
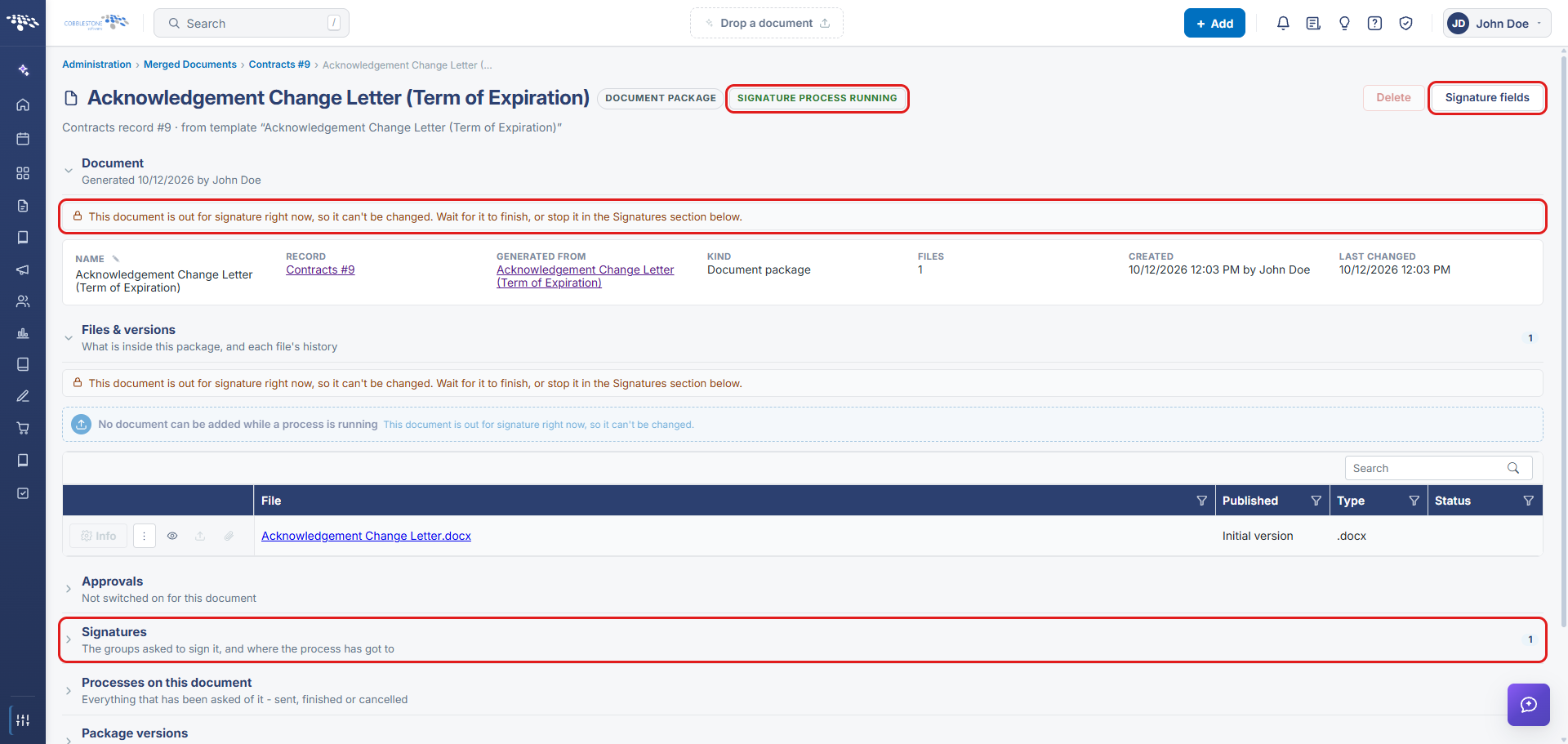
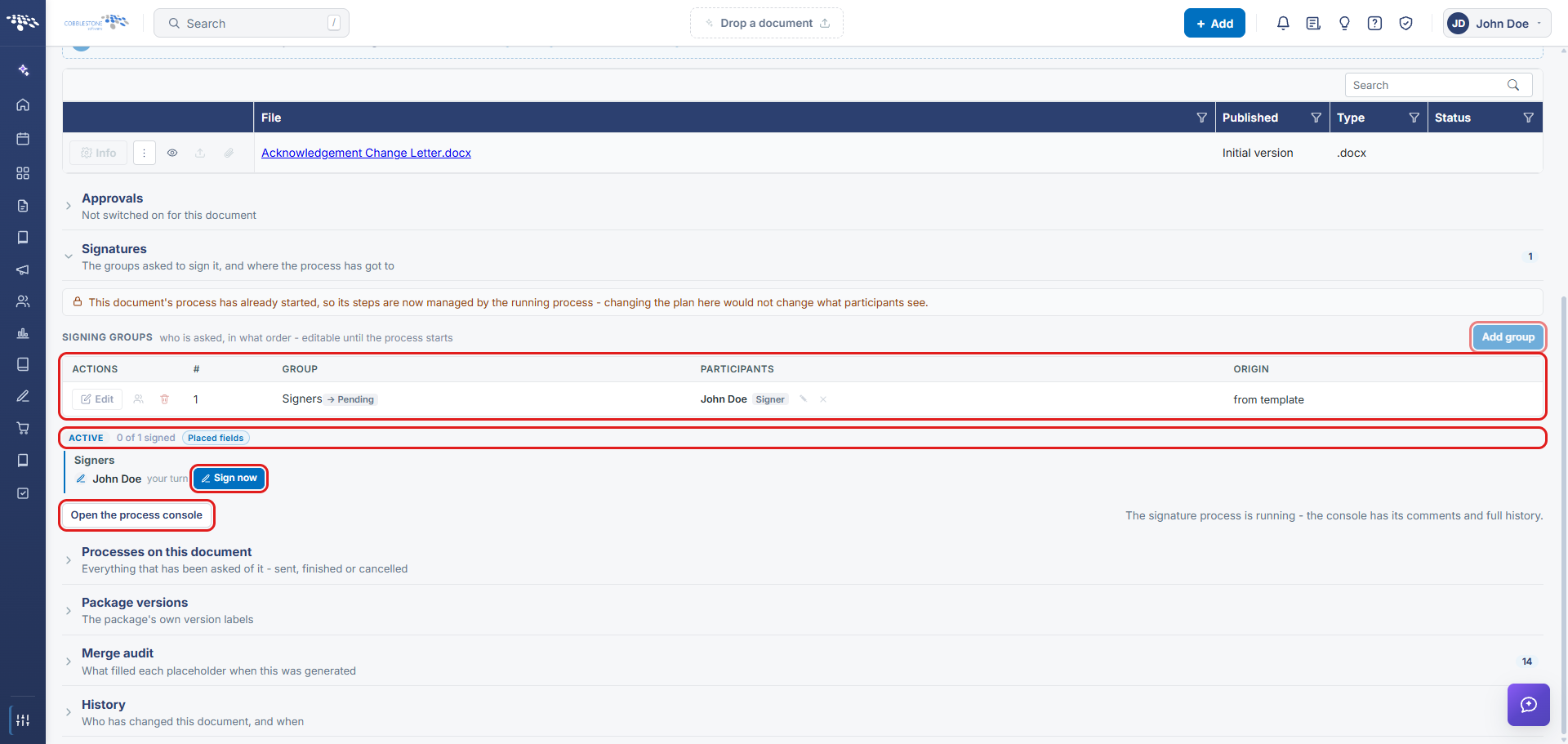
- On a merged document: a SIGNATURE PROCESS RUNNING badge, a Signature fields button, a Signatures section (“The groups asked to sign it, and where the process has got to”), and Open the process console.
3. Navigating to the Document Toolbox
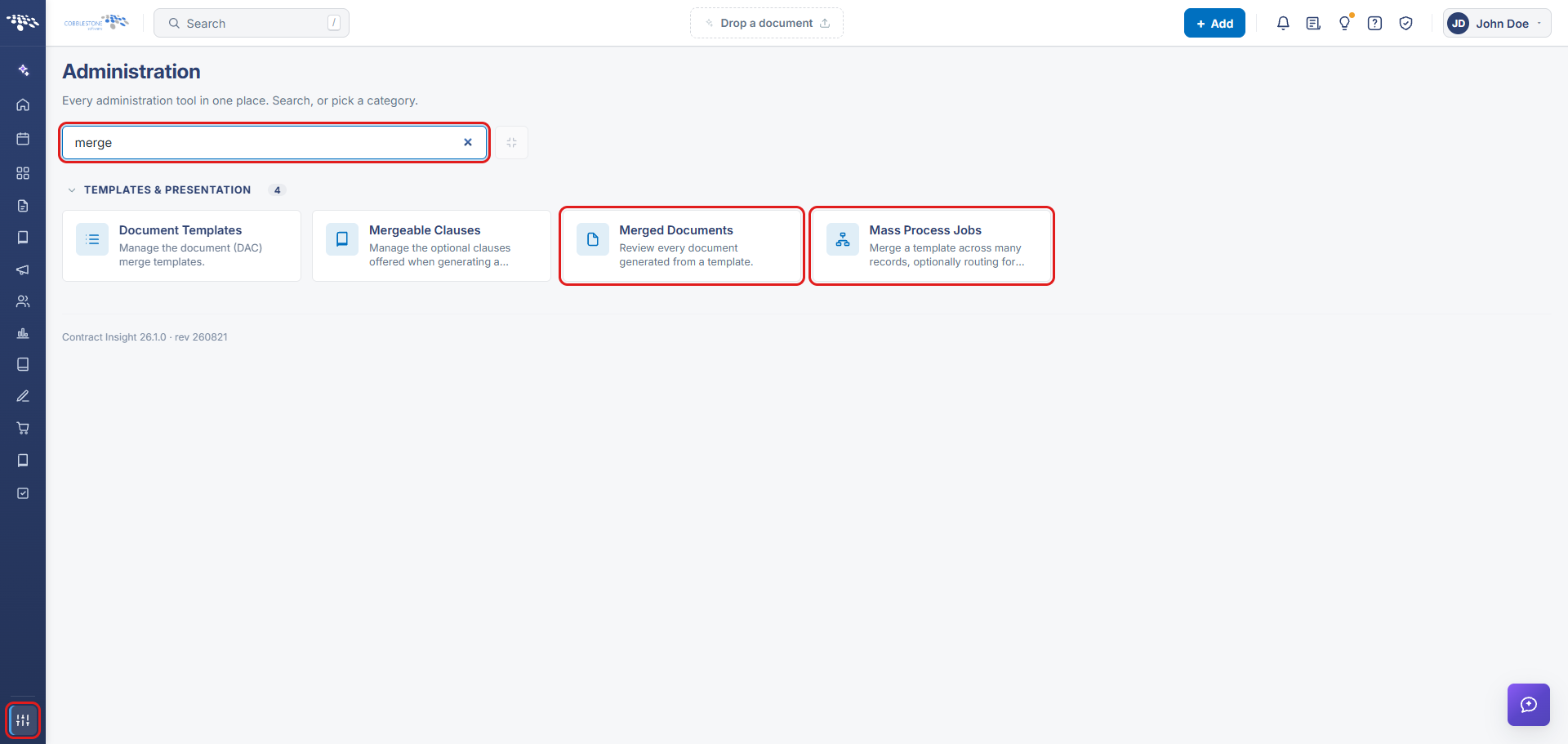
- From the Contract Insight homepage, click the Administration icon at the bottom of the left navigation bar.
- In the Search administration box, type merge. You can also scroll to the Templates & Presentation category.
- Click Mass Process Jobs (Section 4) or Merged Documents (Section 5).
4. Starting IntelliSign with a Mass Process Job
4a. Opening Mass Process Jobs
- Navigate to Administration → Mass Process Jobs (see Section 3).
- Select the tab for the record area, for example Contracts.
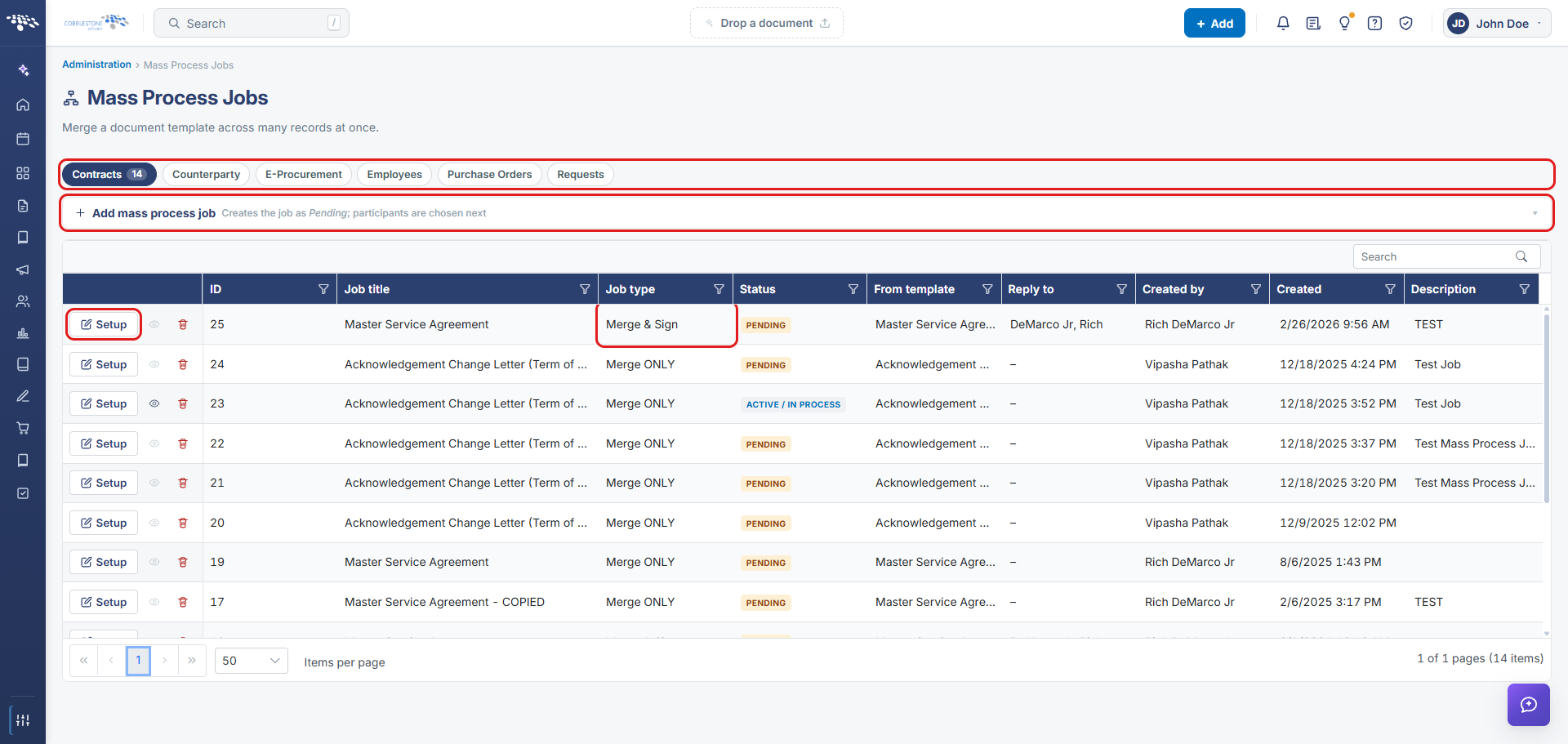
Existing jobs are listed with their Job type, Status (for example Pending or Active / In Process), source template, and Reply to employee. Click Setup on a row to continue an existing job.
4b. Adding a Merge & Sign Job
- Click + Add mass process job to expand the form.
- Select the Template to merge.
- Set Job type to Merge & Sign.
- Review the Job title. It defaults to the template name. Optionally add a Job description.
- Select the Reply-to employee and choose whether to Display terms (No or Yes).
- Click Create and continue setup. The job is created as Pending, and its participants are chosen next.
4c. Choosing Records and Running the Job
- On the Mass Process Jobs list, click Setup on the job's row.
- Check the job summary at the top: Job, Area, Template, Type, and Status.
- Under 1 Which records, choose whether records must match ALL or ANY of the conditions. Click + Condition to add a field, operator, and value, or + Group to nest conditions. Leave the conditions empty to include every record in the area.
- Click Save rules. The matching count updates to show how many records the job will use.
- Under 2 Review and run, check the summary (one document is created per record), then click Run this job.
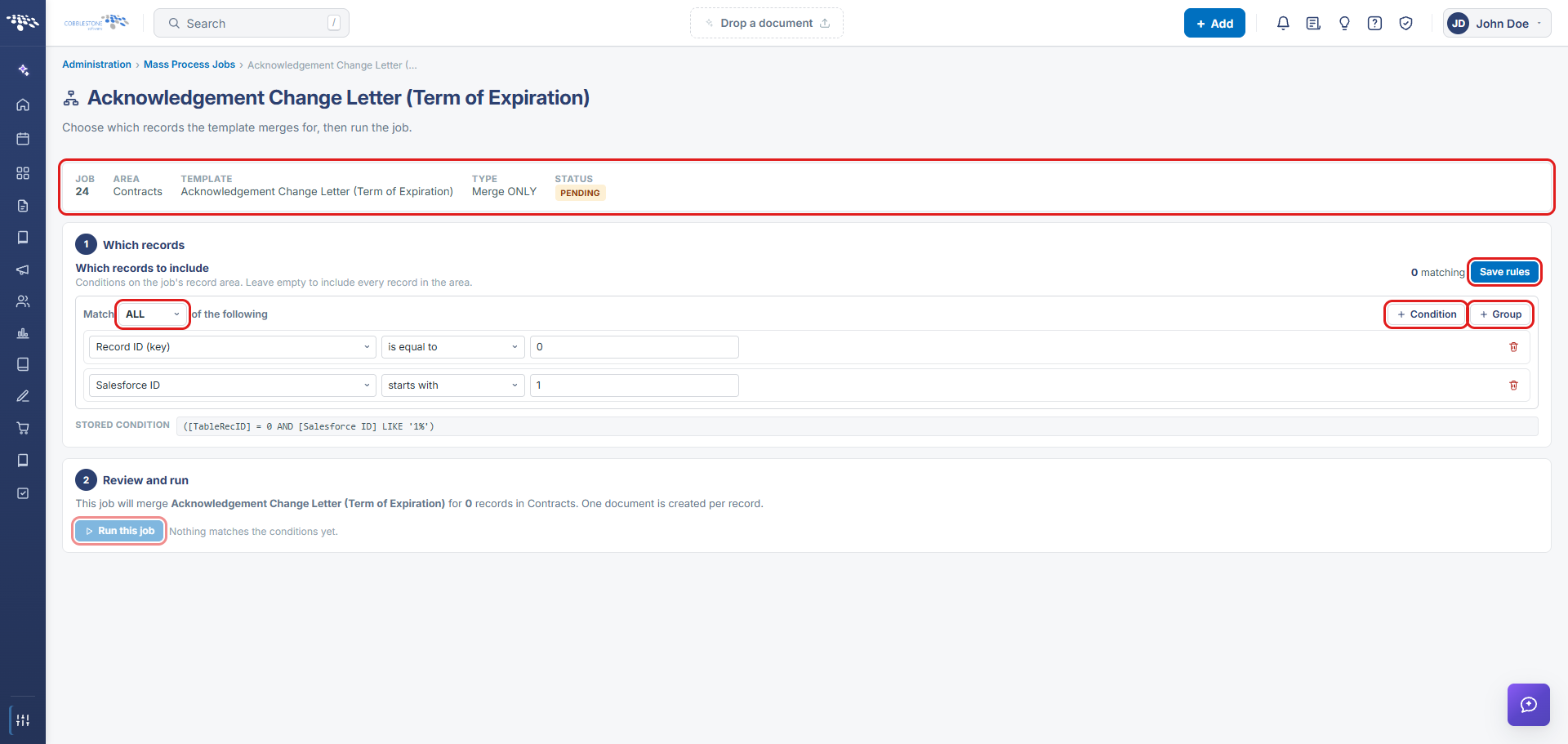
Note: Run this job stays unavailable until at least one record matches the conditions. For a Merge & Sign job, the signing participants are also chosen during setup.
5. Reviewing Merged Documents and Their Signatures
5a. Finding a Merged Document
- Navigate to Administration → Merged Documents (see Section 3).
- Narrow the list with the All record types drop-down or the Search box.
- Click Open on the document's row. Click the Open the source template icon to view the template the document came from.
5b. Checking Signature Status
- On the merged document page, check the badges next to the title. SIGNATURE PROCESS RUNNING means the document is out for signature.
- While a signature process is running, the document is locked: “This document is out for signature right now, so it can't be changed.”
- Click Signature fields to work with where participants sign on the document.
- Click Signatures to expand the section.
- Review Signing groups: each group, its order, its participants, and where it came from. Groups are editable until the process starts. Use Add group to add one before then.
- Check the progress line, for example ACTIVE · 0 of 1 signed. If it is your turn to sign, click Sign now.
- Click Open the process console to see the process's comments and full history.
6. Quick Reference Summary
| Task | How to Complete It |
|---|---|
| Open the document toolbox | Administration → search merge → Mass Process Jobs or Merged Documents. |
| Create a Merge & Sign job | Mass Process Jobs → area tab → + Add mass process job → Template → Job type: Merge & Sign → Create and continue setup. |
| Choose records and run a job | Job row → Setup → + Condition / + Group → Save rules → Run this job. |
| Find a generated document | Merged Documents → filter or Search → Open. |
| Check signing progress | Merged document → Signatures section. |
| Place signature fields | Merged document → Signature fields. |
| See comments and full history | Signatures section → Open the process console. |