COBBLESTONE SOFTWARE
Contract Insight — User Guide
IntelliApprove Process from Document Toolbox
Module: Document Collaboration Gateway › IntelliApprove › IntelliApprove Process from Document Toolbox
Note: Each procedure in this guide begins at the Contract Insight homepage, so any section can be followed on its own. Custom fields are configurable, so the exact field list on a contract category record may vary between environments.
1. Overview
Besides the record-level Actions menu, an IntelliApprove process can be started directly from a document's Document tools (the document toolbox). Open the record's Attachments & Templates tab, click the Document tools icon on the file you want approved, and choose IntelliApprove under Signatures & approvals. The Send a document for approval window opens with that document already selected. After you add approvers and click Start process, the process appears on Negotiation Processes as an Approvals Process and is managed from the same console as any other approval (Status, Groups and participants, Files, Pause / End process / Finalize).
2. Key Elements
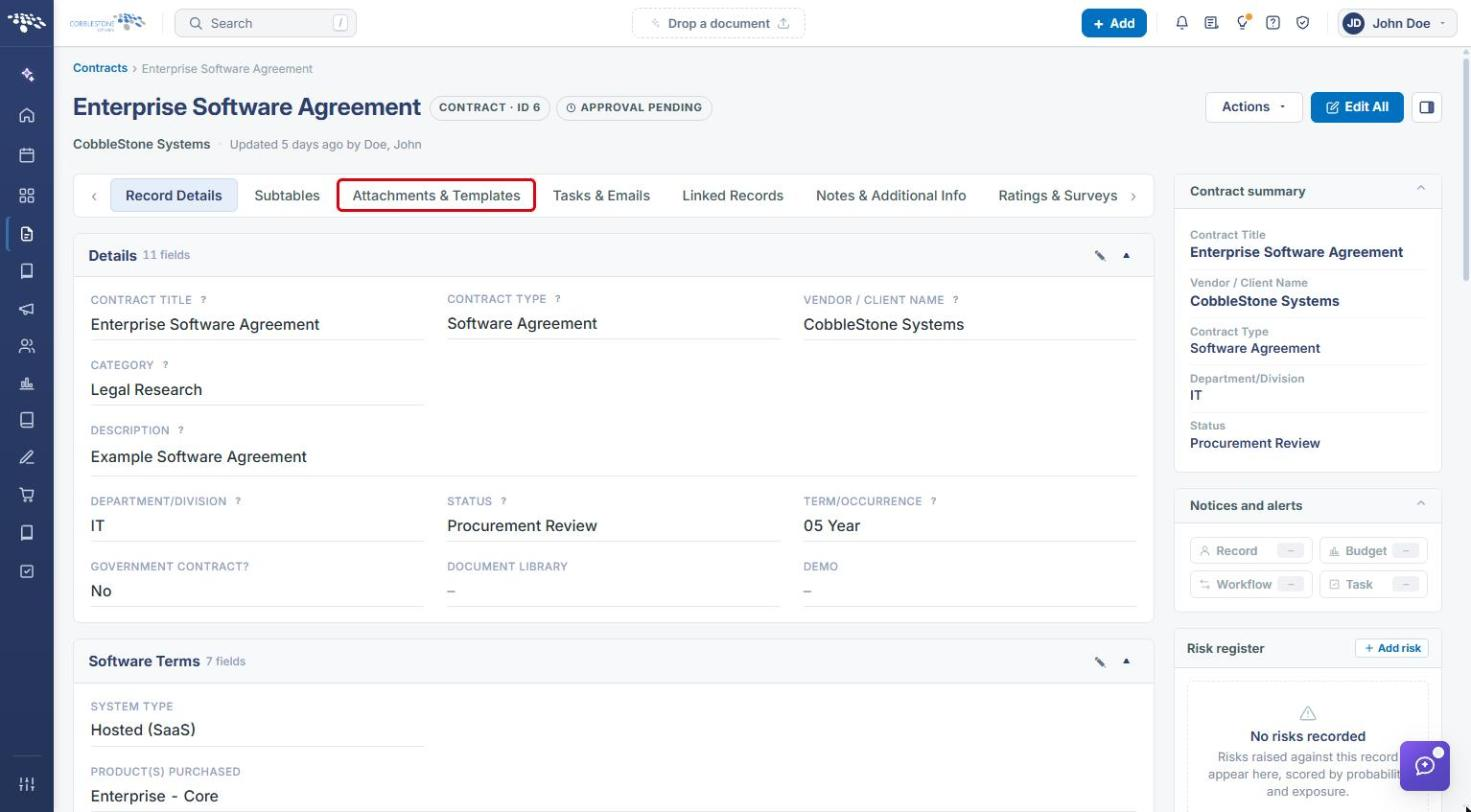
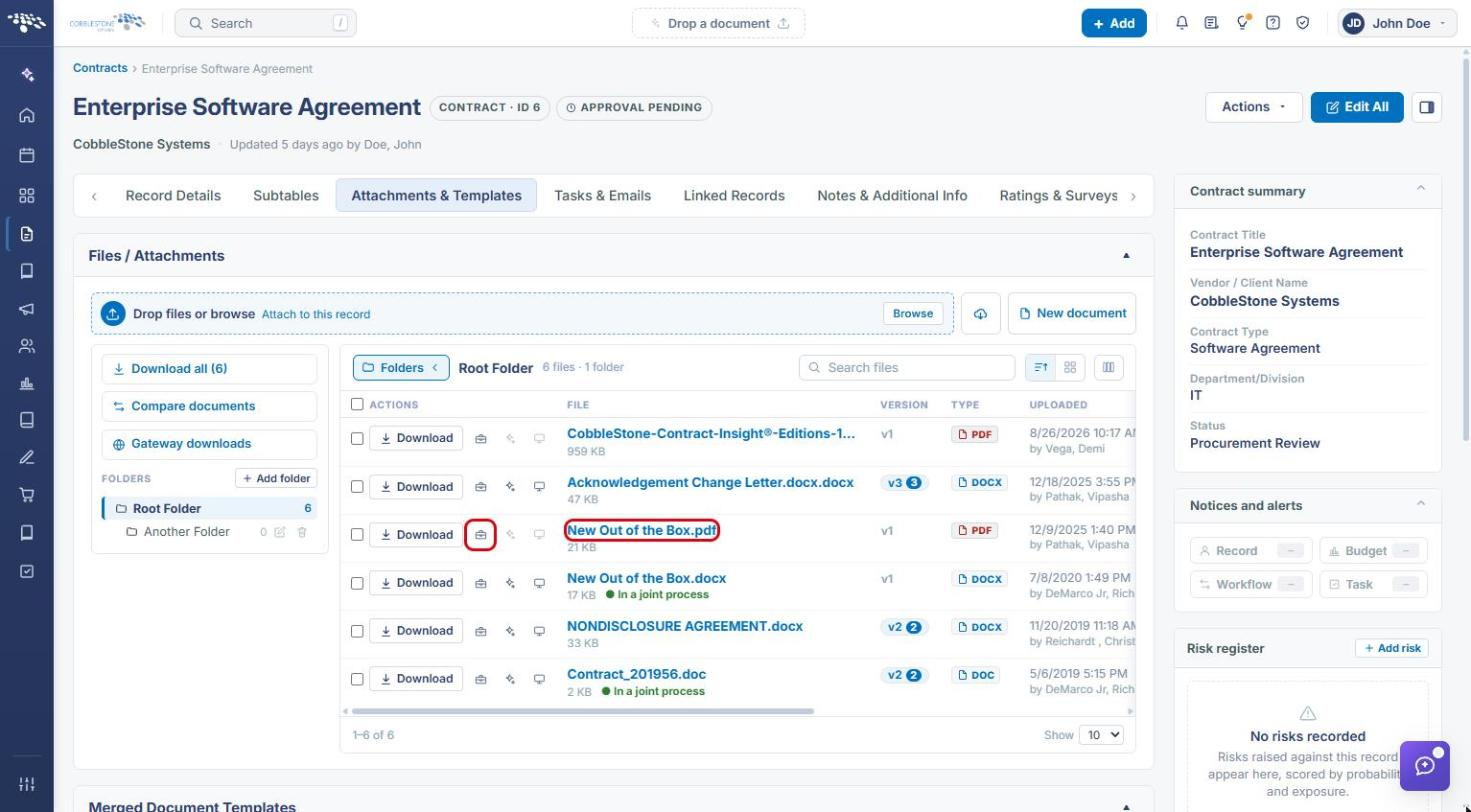
- Attachments & Templates tab: lists the record's Files / Attachments, with row actions for Download, Document tools (briefcase icon), Edit with VISDOM and Collaborative edit.
- Document tools window: shows the file's check-out status, Preview, Download and Delete, a Find a tool search, and tool groups — Signatures & approvals (eSign, IntelliApprove, IntelliSign, IntelliSign Now), Edit & collaborate, Review & compare, Copies & conversions and Organise.
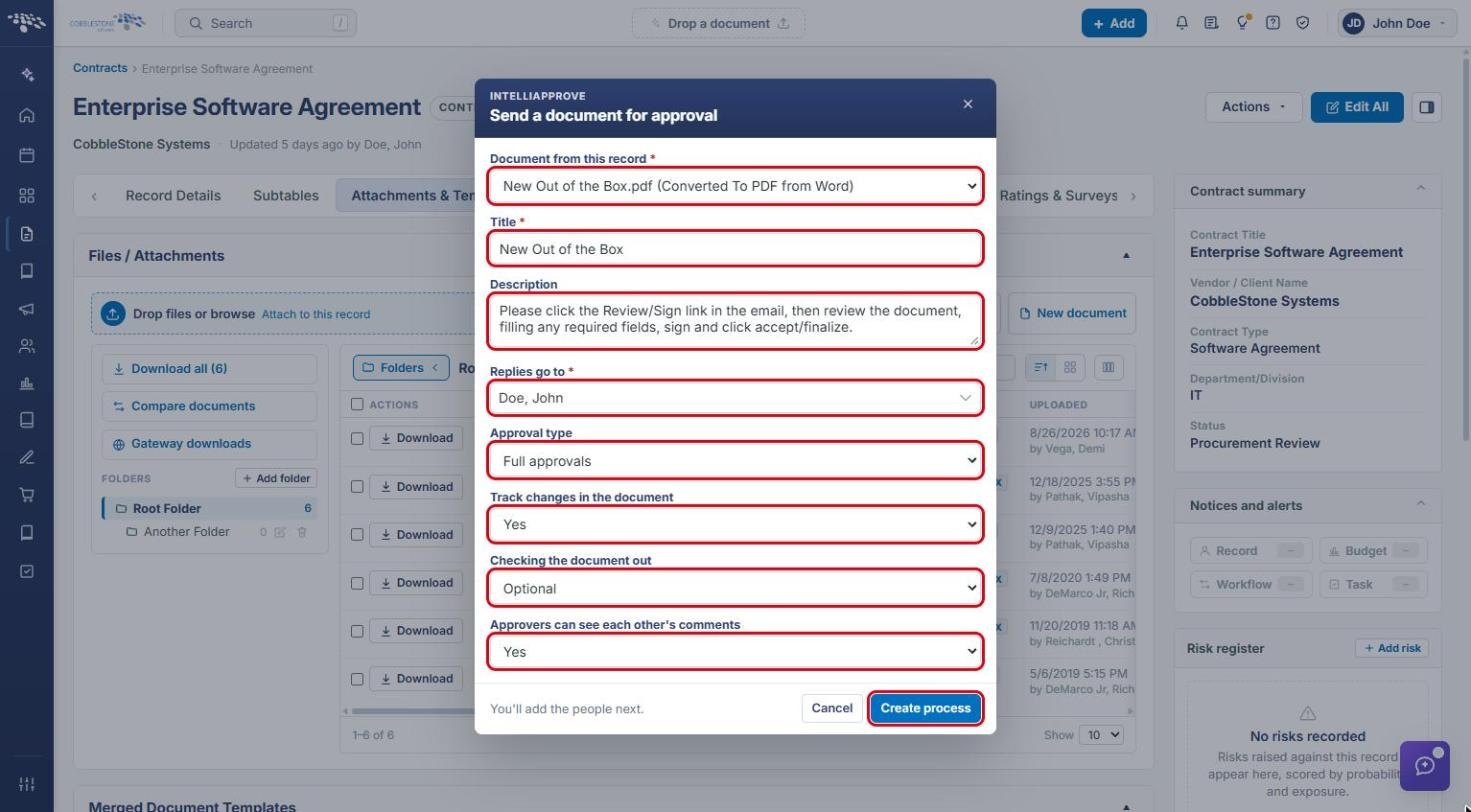
- Send a document for approval window: Document from this record, Title, Description, Replies go to, Approval type, Track changes in the document, Checking the document out, and Approvers can see each other's comments.
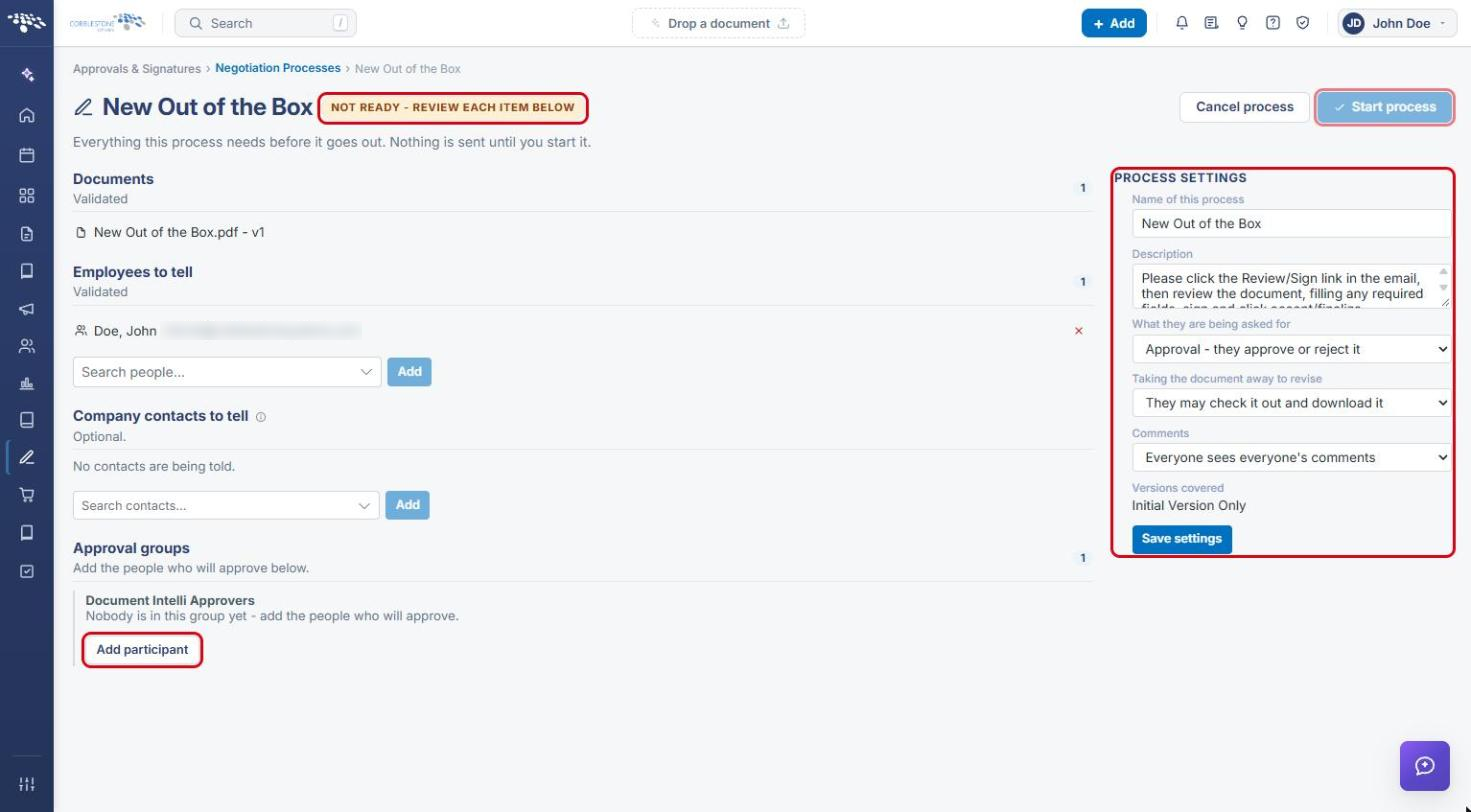
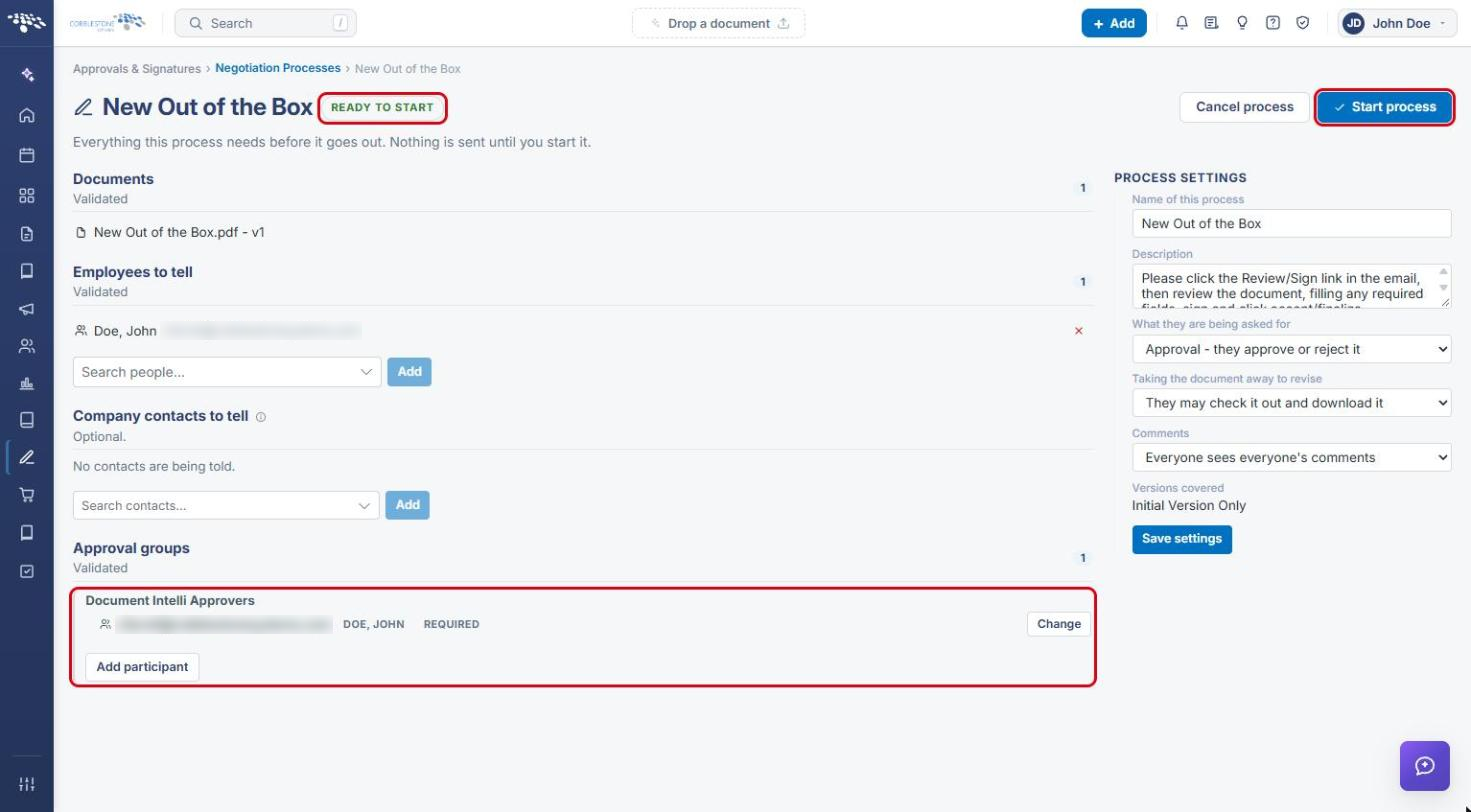
- Process setup page: shows Not ready until an approver is added, then Ready to start. Lists Documents, Employees to tell, Company contacts to tell and Approval groups, with Process Settings on the right.
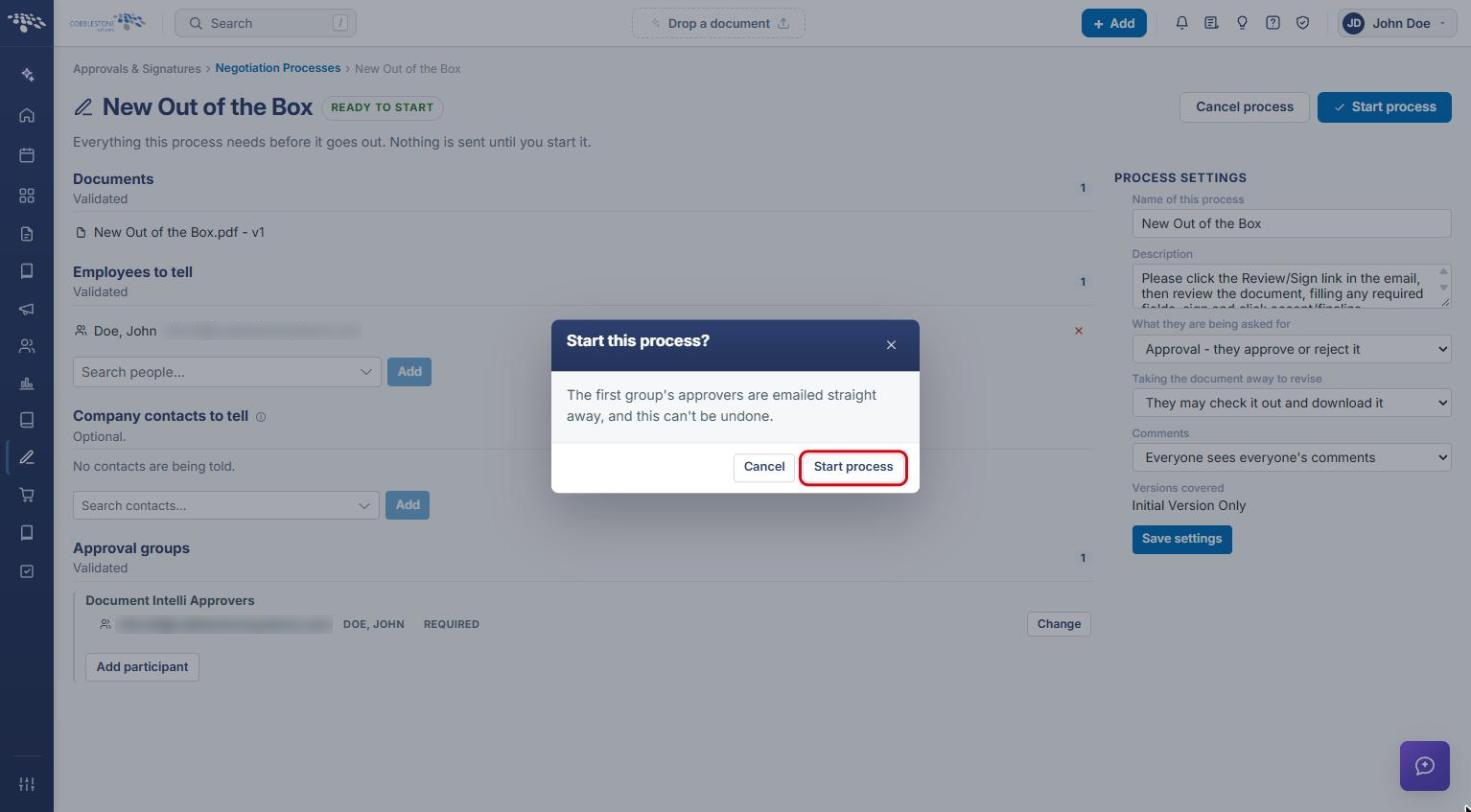
- Start process: emails the first approval group straight away. This cannot be undone.
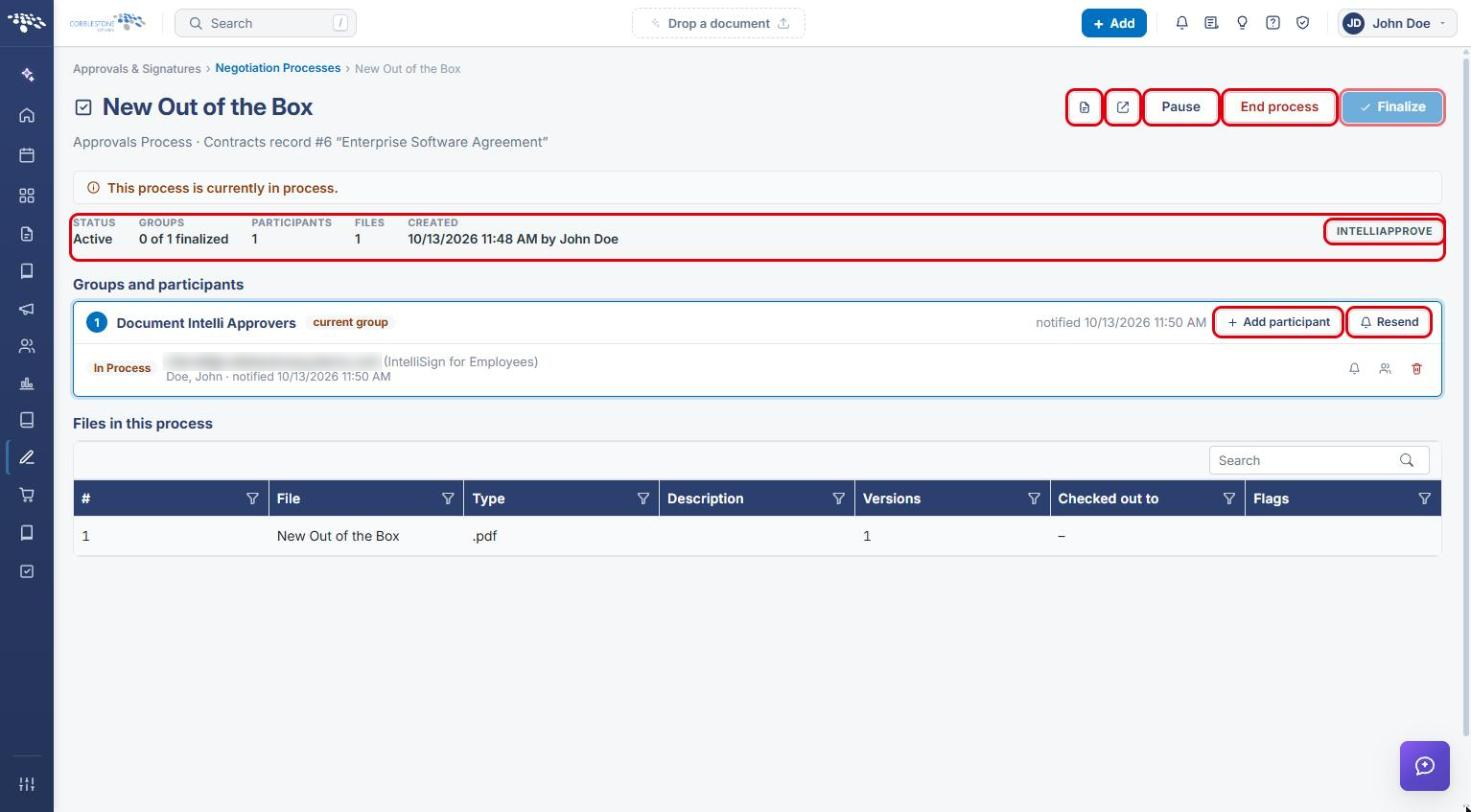
- Process console: Status, Groups, Participants, Files and Created details with an IntelliApprove tag, plus Add participant, Resend, Pause, End process and Finalize.
3. Navigating to the Record
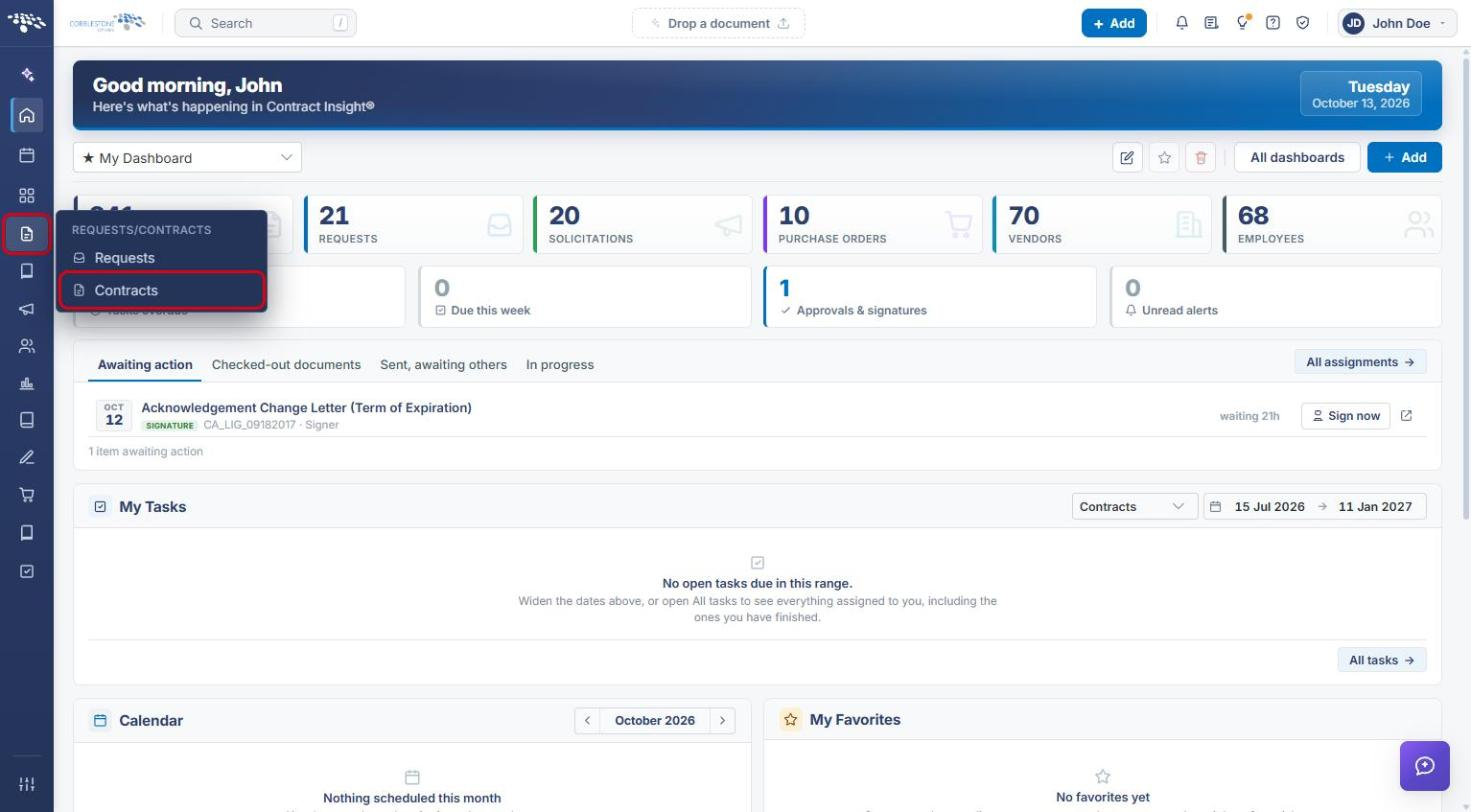
- From the Contract Insight homepage, click the Requests/Contracts icon in the left navigation menu and select Contracts.
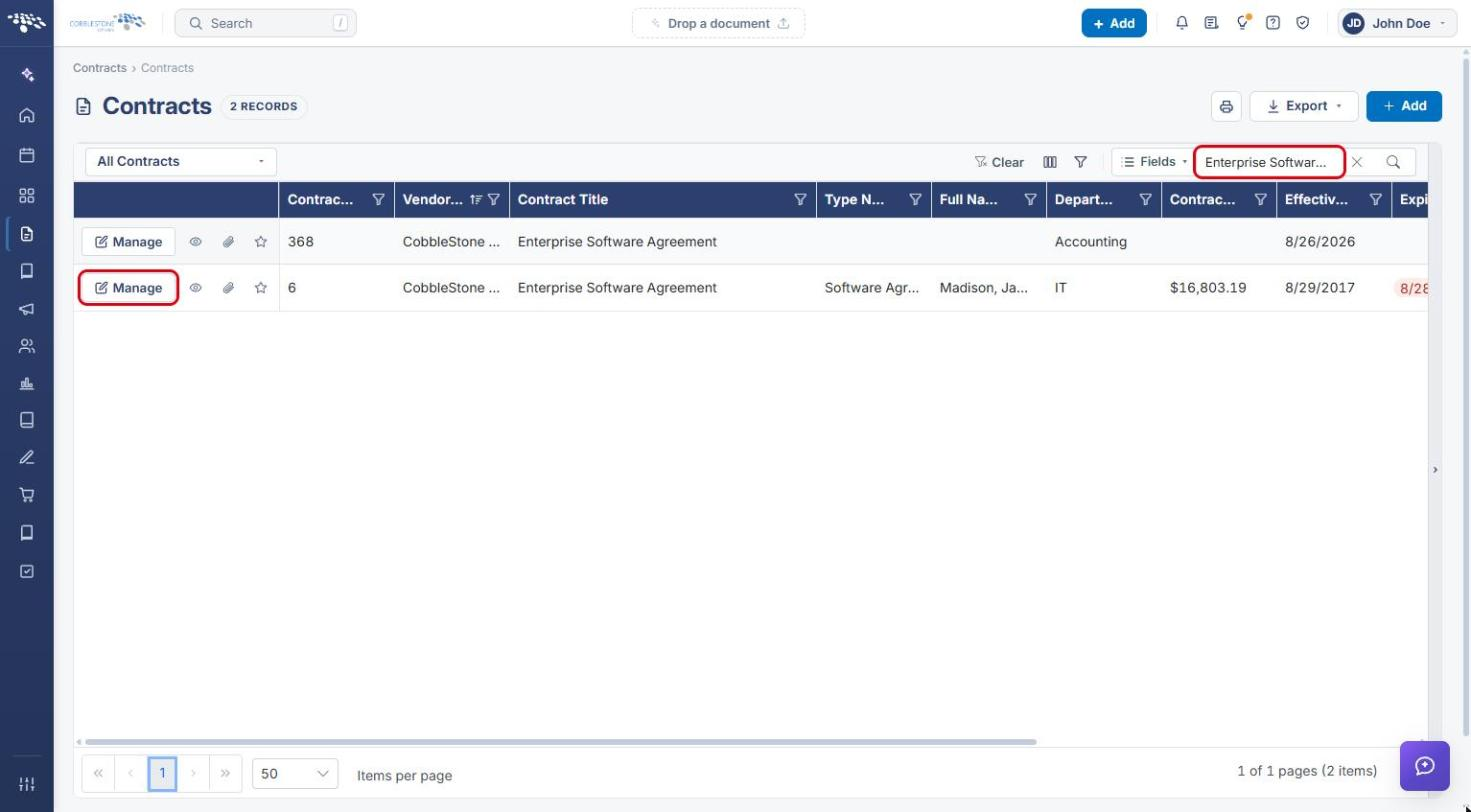
- Use Search to find the contract that holds the document, then click Manage on its row.
4. Opening IntelliApprove from Document Tools
4a. Opening the Document Tools
- On the record, click the Attachments & Templates tab.
- In Files / Attachments, locate the document to be approved and click its Document tools icon (briefcase) in the Actions column.
4b. Selecting IntelliApprove
- In the Document tools window, find the Signatures & approvals group (or type in Find a tool).
- Click IntelliApprove.
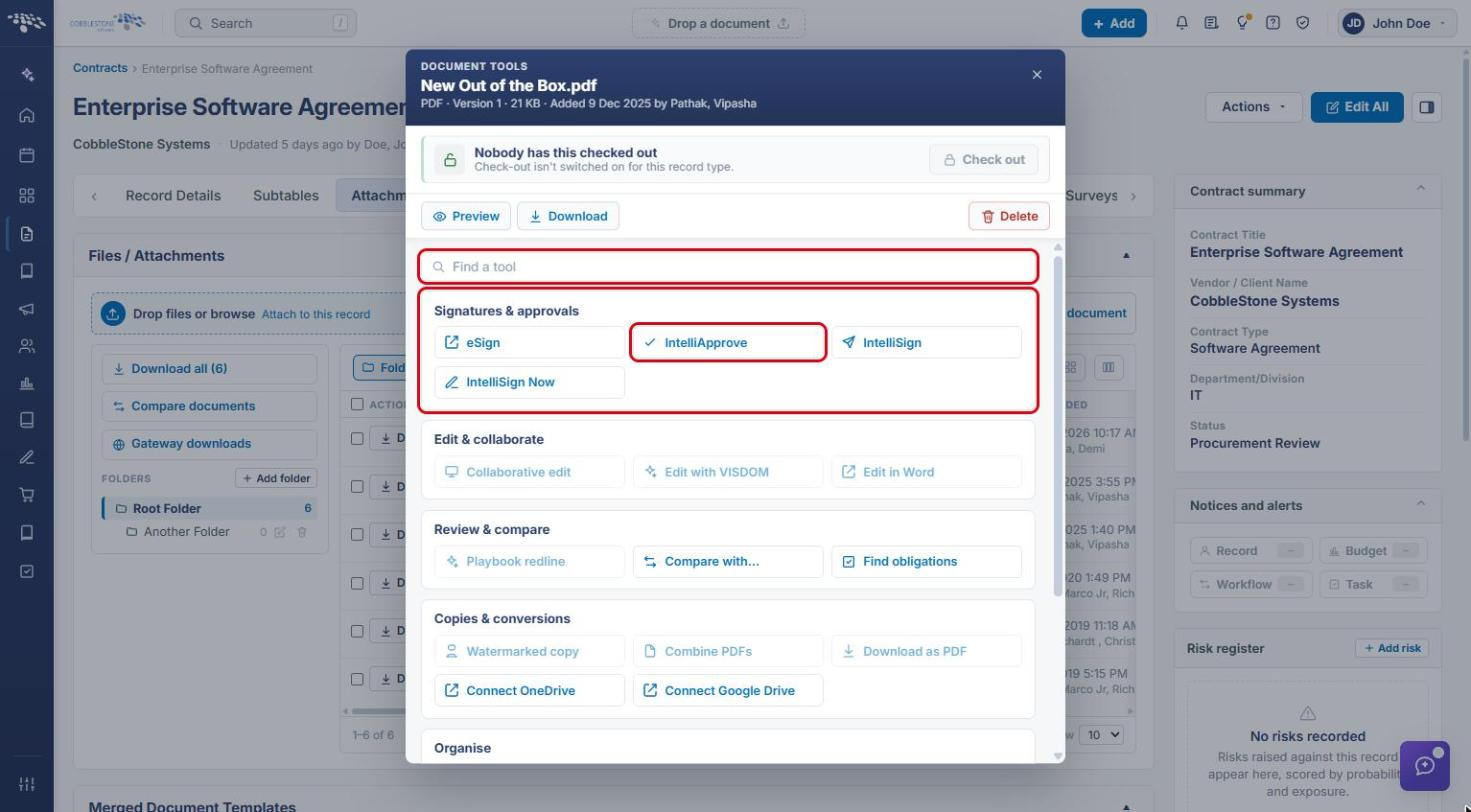
Note: Tools that don't apply to the selected file type are greyed out. For example, Collaborative edit and Edit in Word are unavailable for PDFs.
5. Creating the Approval Process
- In the Send a document for approval window, confirm the Document from this record (it is preselected from the toolbox). The Title and Description fill in automatically and can be edited.
- Confirm who Replies go to.
- Set the approval options:
- Approval type: Full approvals or Acknowledge only.
- Track changes in the document: Yes or No.
- Checking the document out: Optional or Required before editing.
- Approvers can see each other's comments: Yes or No.
- Click Create process. You'll add the people next — nothing is sent yet.
6. Setting Up the Process
6a. Reviewing the Process Setup Page
The setup page lists everything the process needs before it goes out. A Not ready – review each item below badge is shown and Start process stays disabled until at least one approver is added.
- Review the Documents and Employees to tell sections. Use Search people… or Search contacts… to notify anyone else.
- In Process Settings, confirm the name and description, then adjust if needed:
- What they are being asked for: Approval (they approve or reject it) or Acknowledgement only (they confirm they have seen it).
- Taking the document away to revise: They review it in place, or They may check it out and download it.
- Comments: Each person sees only their own, or Everyone sees everyone's comments.
- Click Save settings if you changed anything.
6b. Adding Approvers
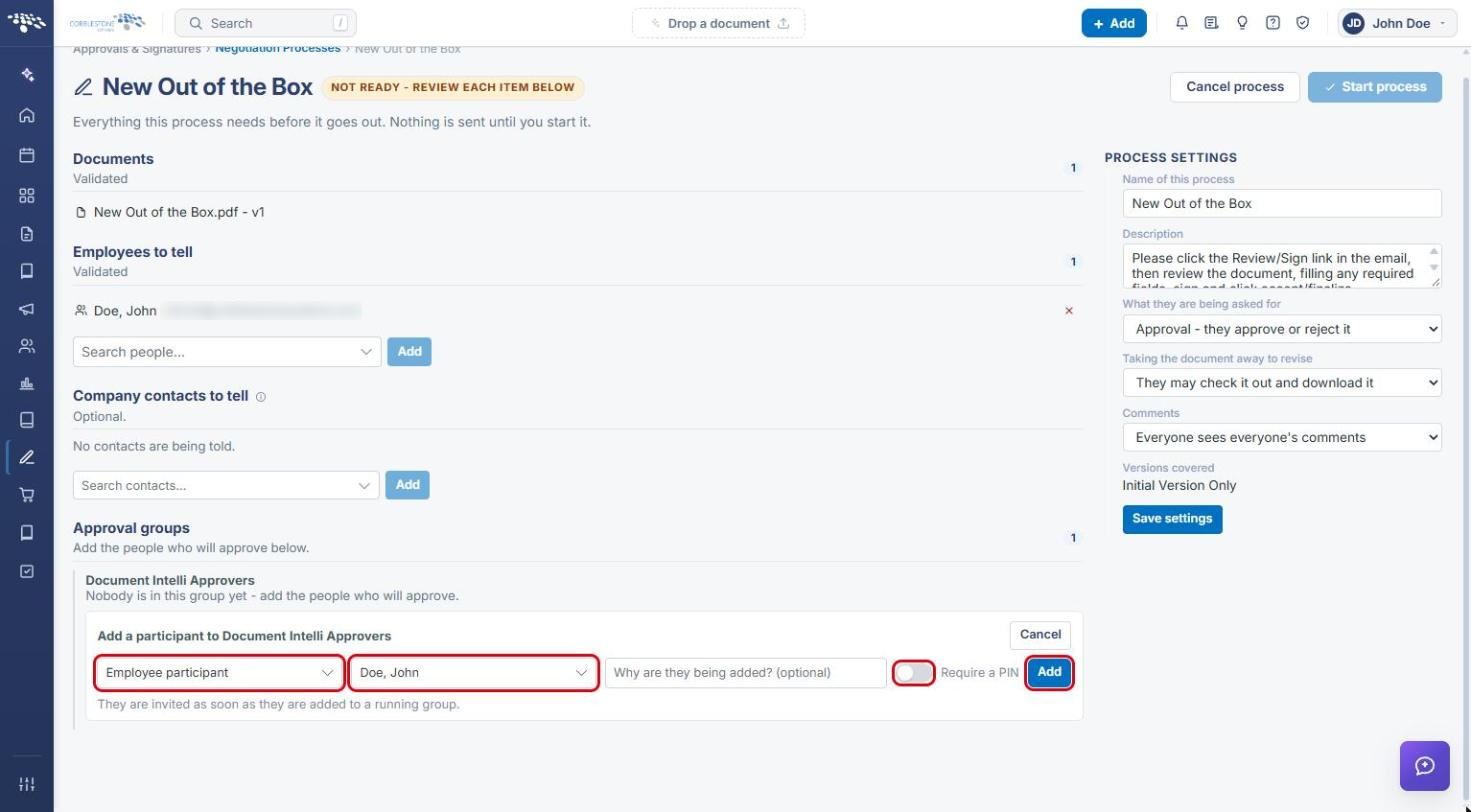
- Under Approval groups, click Add participant in the group (for example, Document Intelli Approvers).
- Choose the participant type: External participant, Employee participant or Company contact participant.
- Select or enter the person (for an external participant, enter their full name and e-mail address). Optionally add a reason and turn on Require a PIN.
- Click Add. Repeat for each approver.
- The approver is listed under the group, the section shows Validated, and the badge changes to Ready to start.
7. Starting the Process
- Click Start process.
- In the Start this process? window, click Start process. The first group's approvers are emailed straight away, and this can't be undone.
- The process console opens. Review the status details (Status, Groups, Participants, Files, Created) and the IntelliApprove tag. From here you can:
- Use Add participant or Resend on an approval group.
- Use the header icons to open the record or open the process on the portal.
- Click Pause or End process to intervene, or Finalize once approvals are complete.
8. Tracking the Process
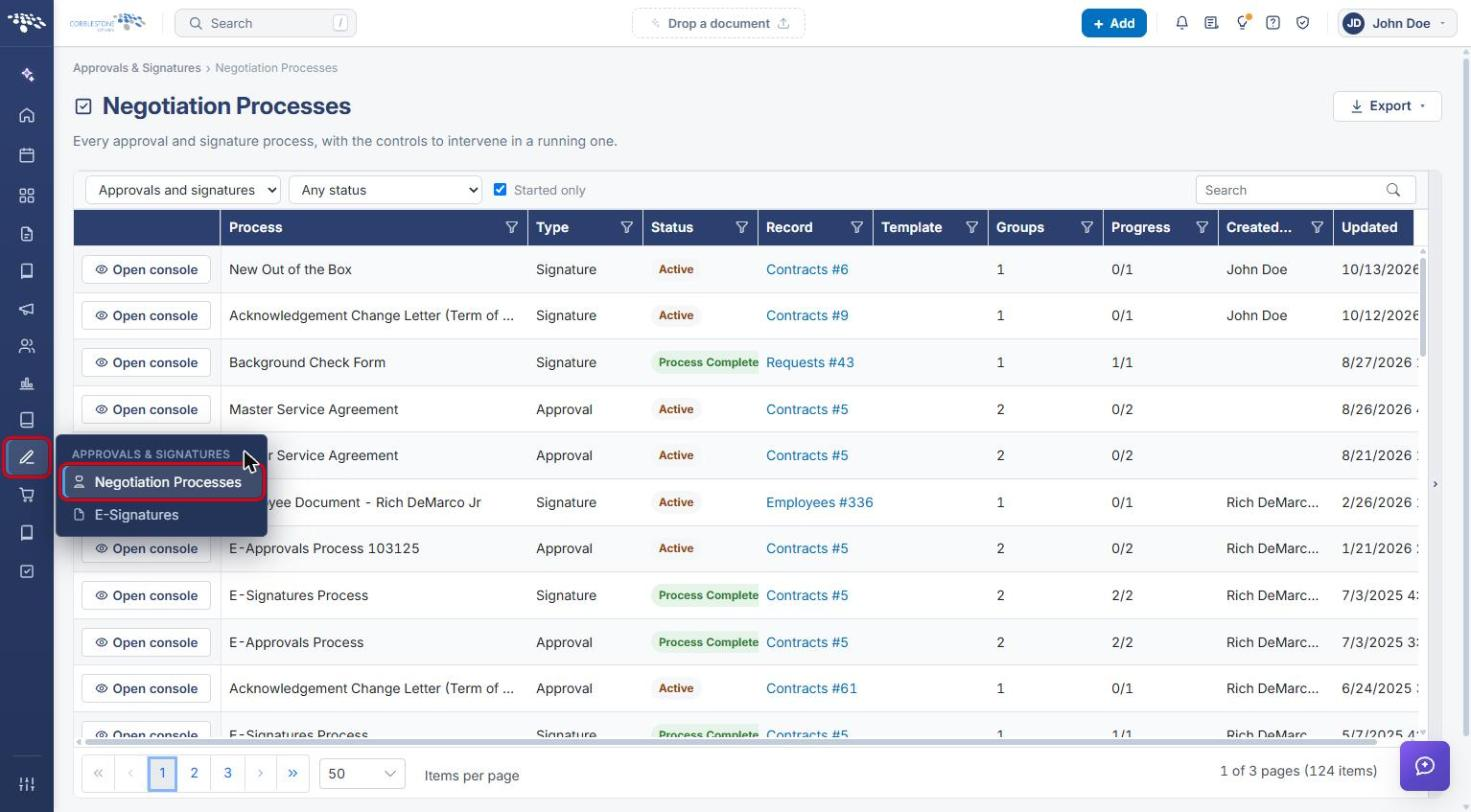
- From the Contract Insight homepage, click the Approvals & Signatures icon in the left navigation menu and select Negotiation Processes.
- Filter by Approvals only if needed, then click Open console on the process row.
Note: To generate and route documents for many records at once, use Administration → Mass Process Jobs; documents generated from templates can be reviewed under Administration → Merged Documents.
9. Quick Reference Summary
| Task | How to Complete It |
|---|---|
| Open the record | Requests/Contracts → Contracts → search → Manage. |
| Open the document toolbox | Attachments & Templates tab → Document tools icon on the file's row. |
| Start IntelliApprove | Document tools → Signatures & approvals → IntelliApprove. |
| Create the process | Confirm document, Title, Replies go to and approval options → Create process. |
| Set process options | Process Settings → What they are being asked for, Taking the document away to revise, Comments → Save settings. |
| Add an approver | Approval groups → Add participant → choose type and person → Add. |
| Send for approval | Start process → confirm Start process. |
| Track or manage the process | Approvals & Signatures → Negotiation Processes → Open console (Pause, End process, Finalize, Resend). |