COBBLESTONE SOFTWARE
Contract Insight — User Guide
IntelliApprove Process from Document Toolbox
Module: Document Collaboration Gateway › IntelliApprove › IntelliApprove Process from Document Toolbox
Note: Each procedure in this guide begins at the Contract Insight homepage, so any section can be followed on its own. Custom fields are configurable, so the exact field list on a contract category record may vary between environments.
1. Overview
Beyond the record-level Actions menu, IntelliApprove can also be started from within a document's own toolbox. Each file on a record's Attachments & Templates tab has a Document tools button that opens the Document Tools panel, where IntelliApprove is listed under Signatures & approvals. Starting from the document toolbox opens the Send a document for approval dialog with that document already selected.
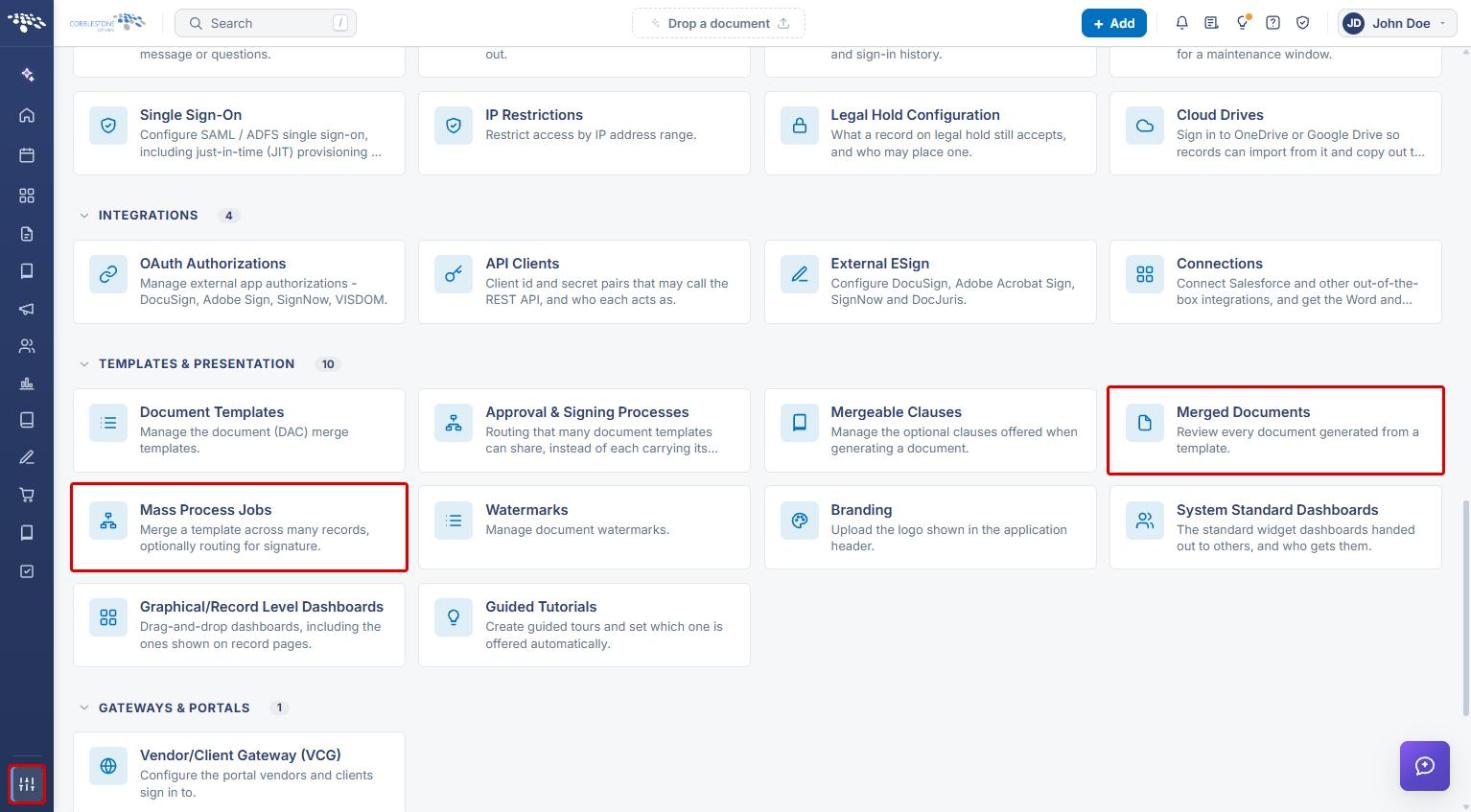
The document toolbox is the same document-authoring surface referenced by Administration's Mass Process Jobs (“Merge a template across many records, optionally routing for signature”) and Merged Documents review screen.
2. Key Elements
- Attachments & Templates tab → Document tools → IntelliApprove starts an IntelliApprove process for that specific document.
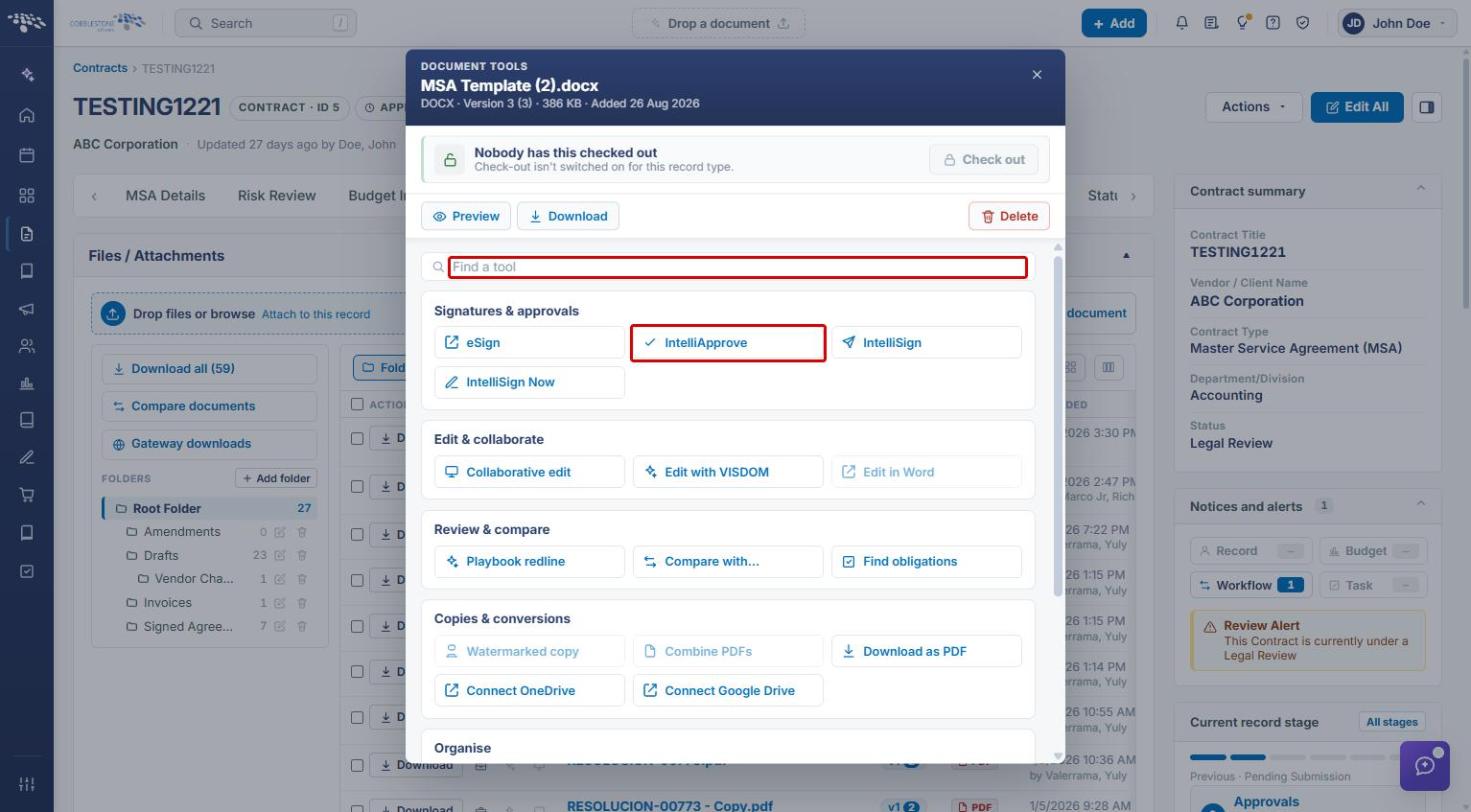
- The Document Tools panel groups tools into Signatures & approvals (eSign, IntelliApprove, IntelliSign, IntelliSign Now), Edit & collaborate, Review & compare, Copies & conversions, and Organise. Use Find a tool to search for a tool by name.
- The Send a document for approval dialog opens with the document, title, and description pre-filled. You add the people after the process is created.
- Administration → Mass Process Jobs merges a template across many records, optionally routing for signature.
- Administration → Merged Documents reviews every document generated from a template.
3. Opening the Document Toolbox
- From the Contract Insight homepage, click the Requests/Contracts icon in the left navigation bar and select Contracts.
- Click Manage on the record that holds the document to be approved.
- Click the Attachments & Templates tab.
- In the Files / Attachments list, locate the document. Use Search files or the folder list to narrow the list if needed.
- Click the Document tools (toolbox) icon in that document's Actions column.
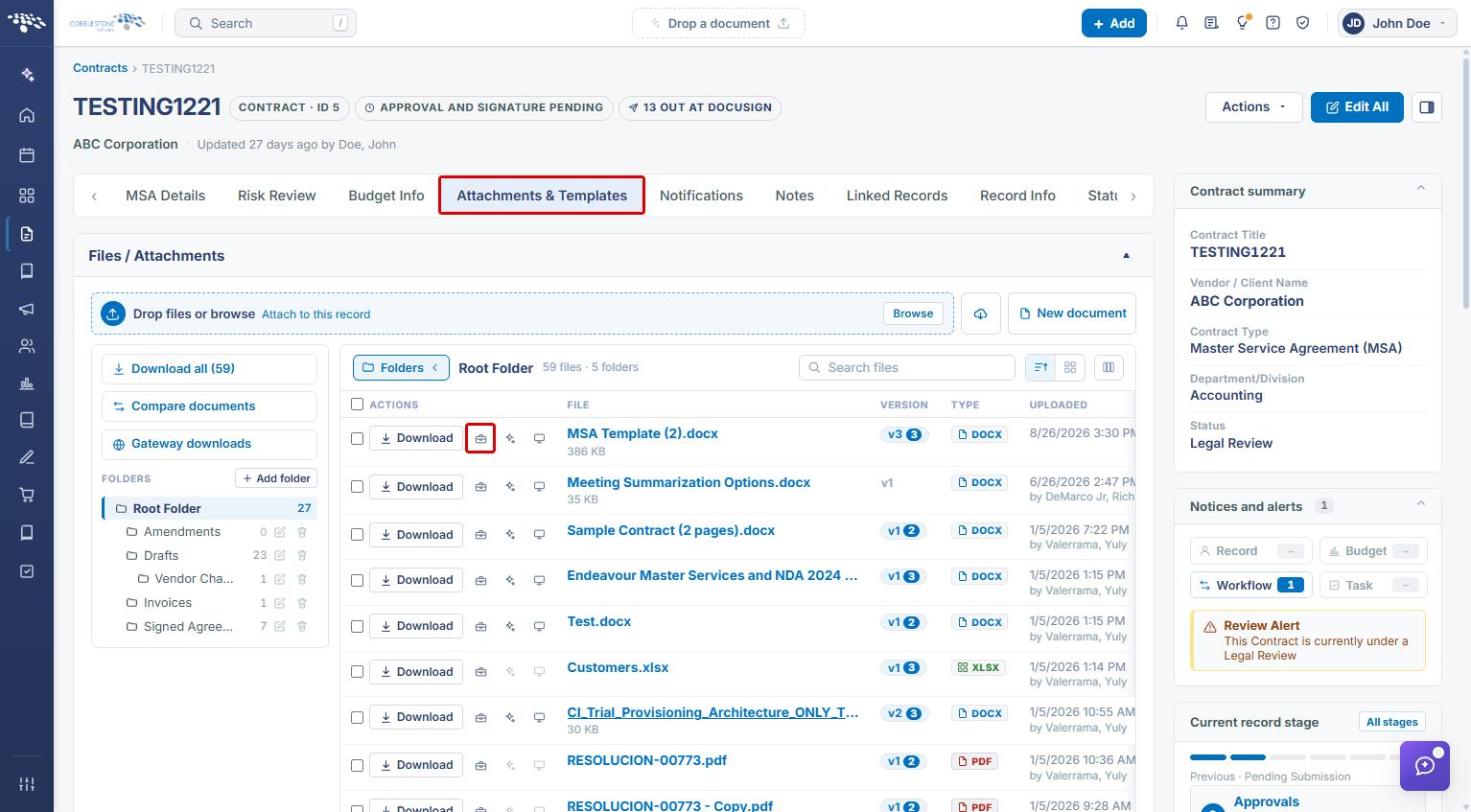
Note: For steps 1–2 with screenshots, see IntelliApprove Overview, Section 3.
4. Starting IntelliApprove from the Document Toolbox
- The Document Tools panel opens, showing the document's name, type, version, and size.
- Under Signatures & approvals, click IntelliApprove. (You can also type “IntelliApprove” in the Find a tool box.)
5. Completing the Send a Document for Approval Dialog
The Send a document for approval dialog opens with the selected document already chosen and the Title and Description pre-filled.
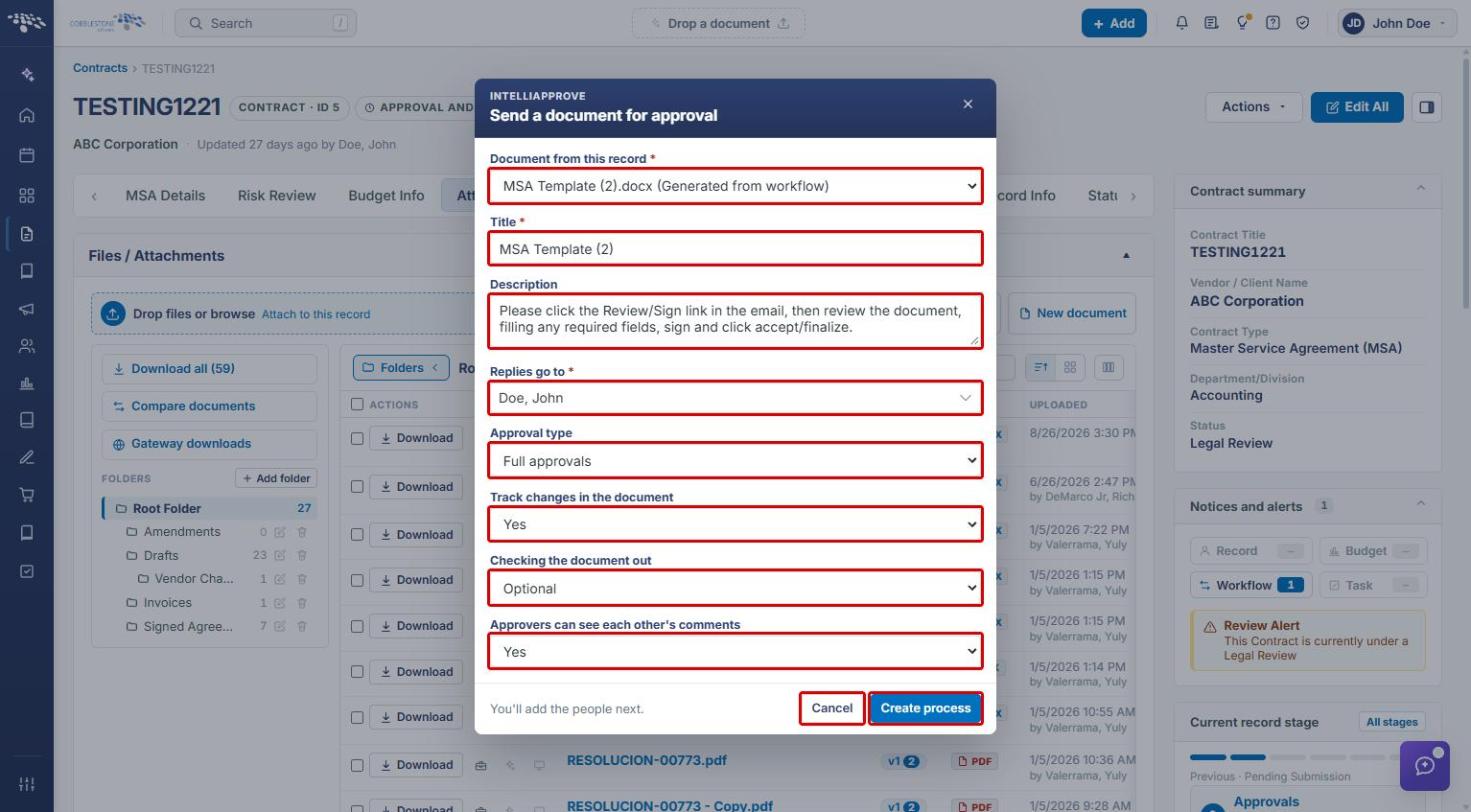
- Document from this record (required): confirm the document selected from the toolbox, or choose another document attached to the record.
- Title (required): defaults to the document name. Edit it if needed; this becomes the process name.
- Description (optional): pre-filled with default instructions for participants. Edit as needed.
- Replies go to (required): the employee who receives replies. This defaults to the current user.
- Approval type: Full approvals or Acknowledge only.
- Track changes in the document: Yes or No.
- Checking the document out: Optional or Required before editing.
- Approvers can see each other's comments: Yes or No.
- Click Create process. (Click Cancel to close the dialog without creating a process.)
6. Completing the Process Setup
After you click Create process, the process console opens so you can add the people. Nothing is sent until you click Start process.
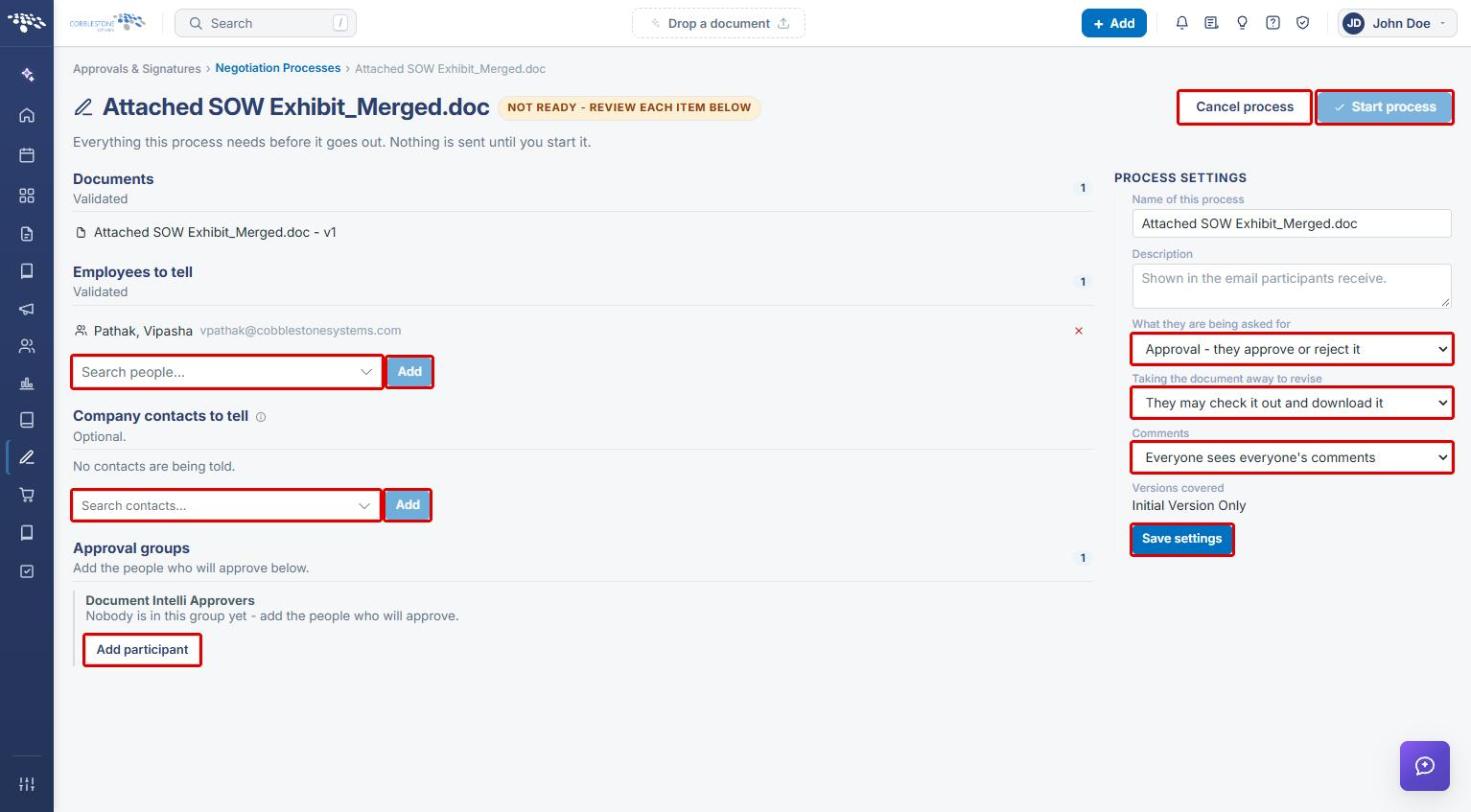
- Employees to tell and Company contacts to tell: search for people and click Add to notify them.
- Approval groups: click Add participant to add the people who will approve.
- Under Process Settings, review What they are being asked for, Taking the document away to revise, and Comments, then click Save settings.
- Click Start process to send the document for approval, or Cancel process to discard it.
Once started, the process console shows an INTELLIAPPROVE badge. For details on setup options and managing a running process, see IntelliApprove Overview, Sections 7 and 8.
7. Related Administration Tools
Administrators can find the template-merge tools referenced above in Administration.
- Click the Application settings icon at the bottom of the left navigation bar.
- Scroll to Templates & Presentation.
- Click Mass Process Jobs to merge a template across many records (optionally routing for signature), or Merged Documents to review every document generated from a template.
8. Related Articles
- IntelliApprove Overview
- IntelliSign Process from Document Toolbox