COBBLESTONE SOFTWARE
Contract Insight — User Guide
Employees
Configuration Group: Employees
Note: Each procedure in this guide begins at the Contract Insight homepage, so any section can be followed on its own. Some settings in this group depend on Optional Add-On Modules, so the exact list on any one system may vary.
1. Overview
The Employees configuration group holds the settings that control how employee records and employee task alerts behave across Contract Insight. It defines how the employee list is presented, the account lockout rules applied to employee logins, what appears in employee task email alerts and how often those alerts are sent, and how often survey notification links are checked and distributed.
Employees contains 18 settings, organized under five subsection headings in the settings panel: EMPLOYEES, FILTERING, GENERAL, TASKS, and TIMERS.
As with every configuration group, each setting is presented as a single row containing:
- The name of the application setting
- A description of what the setting does
- An editing control holding the current value — a toggle, a text box, a dropdown, or an Edit content button for rich-text settings
- A “Last changed” line recording when the setting was last modified and by whom
Because the Employees group is maintained from the Administration area, only Application Administrators — or other users specifically granted the appropriate permission — can view and change these values.
2. Accessing the Employees Configuration Group
The Employees settings are reached through Application Settings. To open them:
- From the Contract Insight homepage, click Administration at the bottom of the left navigation menu.
- On the Administration page, under Configuration & Fields, select Application Settings.
- In the CATEGORIES rail on the left, click Employees. The category is highlighted, and the count beside it shows the number of settings it contains.
- The settings panel on the right is headed Employees with its setting count, and lists the settings under the EMPLOYEES, FILTERING, GENERAL, TASKS, and TIMERS subsection headings.
A specific setting can also be reached without browsing the category, by typing part of its name or description into the Search box at the top of the Application Settings screen.
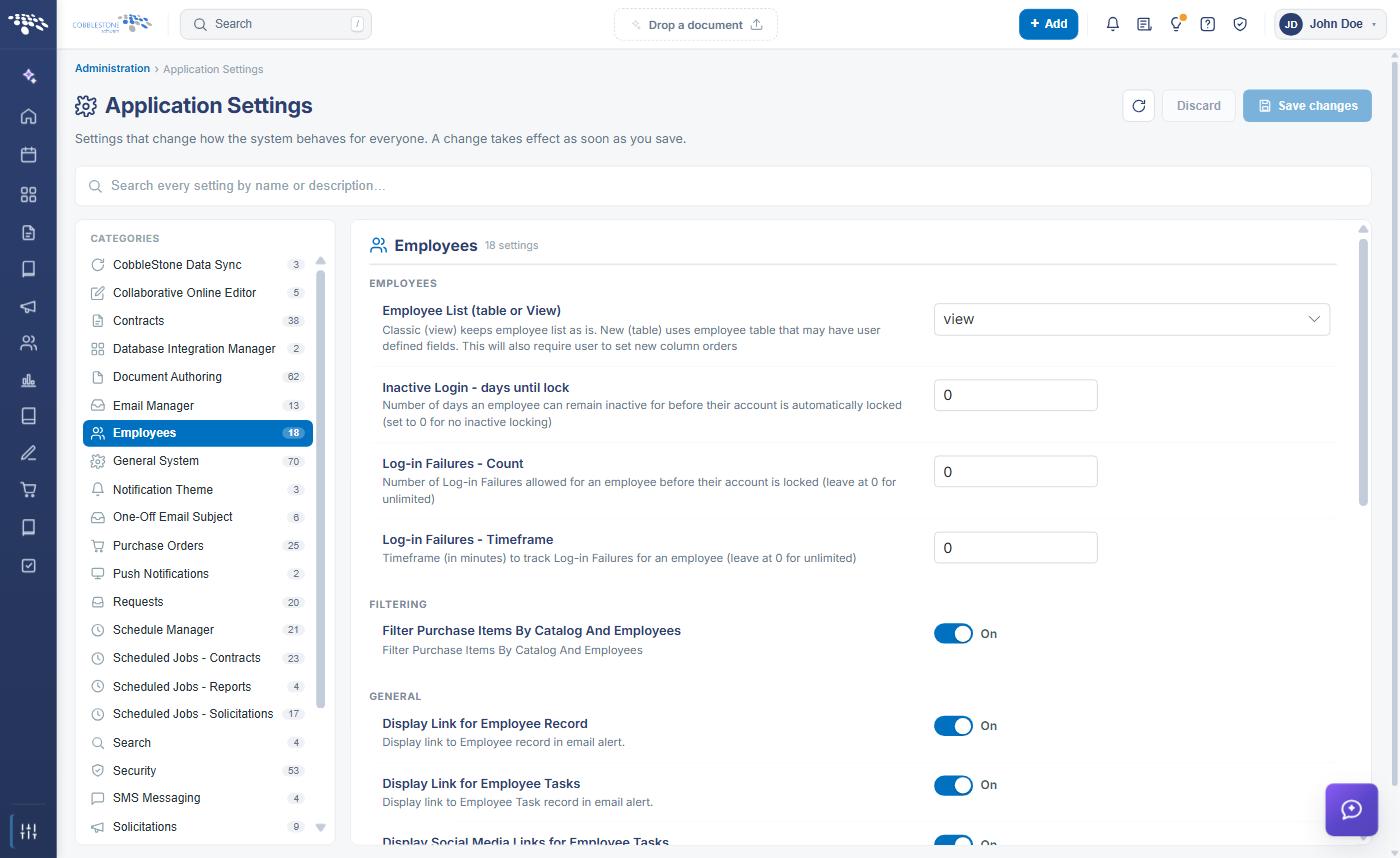
3. EMPLOYEES Settings
The EMPLOYEES subsection controls how the employee list is presented and the account lockout rules applied to employee logins.
The EMPLOYEES settings are:
- Employee List (table or View) — Determines how the employee list is rendered. Classic (view) keeps the employee list as is; New (table) uses the employee table, which may include user-defined fields, and requires the user to set new column orders. Selected from a dropdown.
- Inactive Login - days until lock — The number of days an employee can remain inactive before their account is automatically locked. Set to 0 for no inactive locking. Entered in a text box.
- Log-in Failures - Count — The number of log-in failures allowed for an employee before their account is locked. Leave at 0 for unlimited. Entered in a text box.
- Log-in Failures - Timeframe — The timeframe, in minutes, over which log-in failures are tracked for an employee. Leave at 0 for unlimited. Entered in a text box.
Note: The two Log-in Failures settings work together: an account is locked once the Count of failed attempts is reached within the Timeframe being tracked. Setting either value to 0 removes that limit.
4. FILTERING Settings
The FILTERING subsection contains a single setting:
- Filter Purchase Items By Catalog And Employees — Restricts the purchase items an employee can select to those in the catalogs assigned to them. This is a toggle, set to On or Off.
Note: This setting applies to organizations that have purchased the Purchase Order Optional Add-On Module. Where the module is not licensed, the setting has no effect.
5. GENERAL Settings
The GENERAL subsection controls which links are included in employee email alerts.
The GENERAL settings are:
- Display Link for Employee Record — Displays a link to the employee record in the email alert. This is a toggle, set to On or Off.
- Display Link for Employee Tasks — Displays a link to the employee task record in the email alert. This is a toggle, set to On or Off.
- Display Social Media Links for Employee Tasks — Displays social media links for employee tasks in the email alert. This is a toggle, set to On or Off.
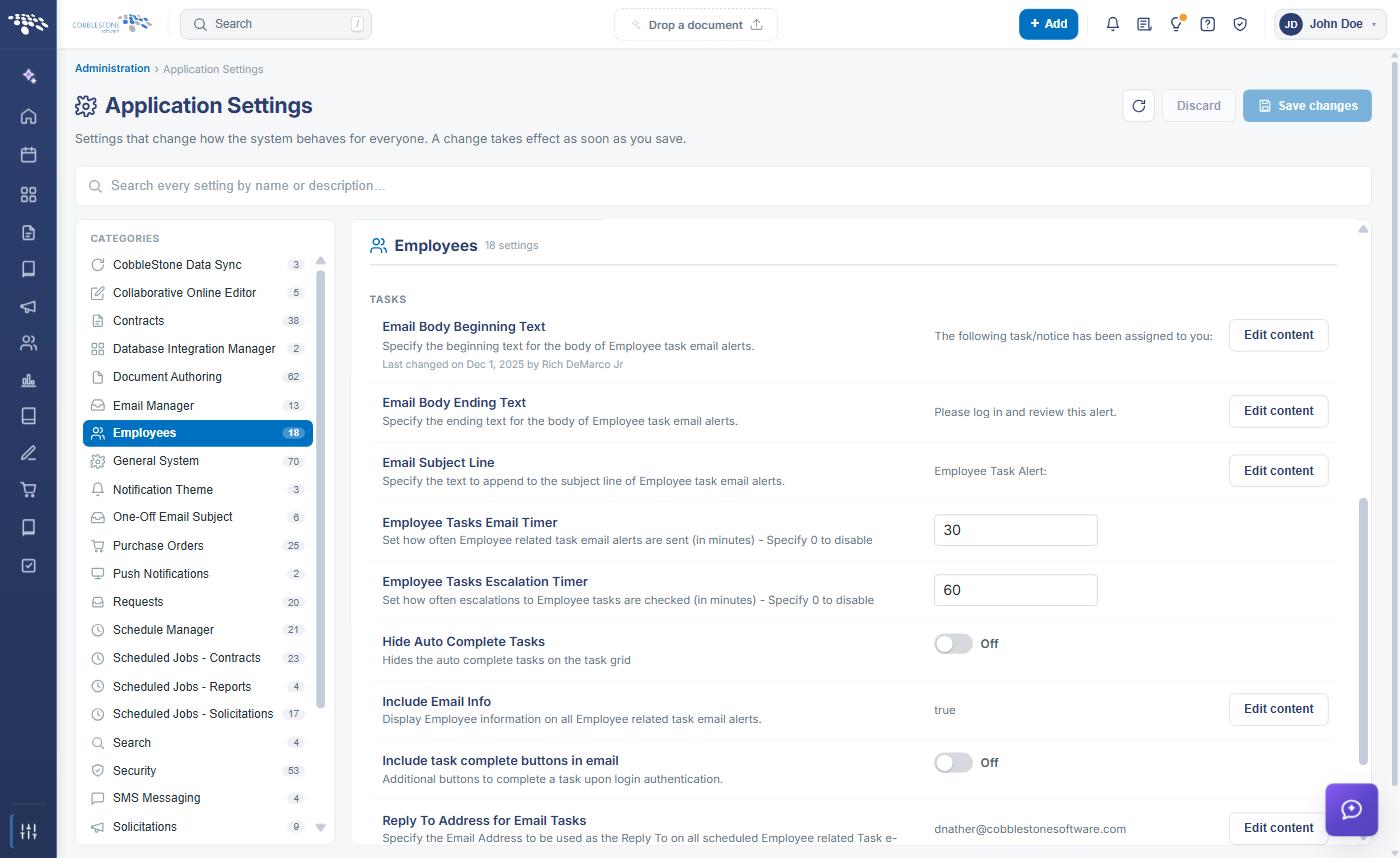
6. TASKS Settings
The TASKS subsection controls the content and timing of employee task email alerts, and how tasks are presented on the task grid.
The TASKS settings are:
- Email Body Beginning Text — The beginning text for the body of employee task email alerts. Edited through the rich-text editor using Edit content.
- Email Body Ending Text — The ending text for the body of employee task email alerts. Edited through the rich-text editor using Edit content.
- Email Subject Line — The text appended to the subject line of employee task email alerts. Edited through the rich-text editor using Edit content.
- Employee Tasks Email Timer — How often employee-related task email alerts are sent, in minutes. Specify 0 to disable. Entered in a text box.
- Employee Tasks Escalation Timer — How often escalations to employee tasks are checked, in minutes. Specify 0 to disable. Entered in a text box.
- Hide Auto Complete Tasks — Hides auto-complete tasks on the task grid. This is a toggle, set to On or Off.
- Include Email Info — Displays employee information on all employee-related task email alerts. Edited through the rich-text editor using Edit content.
- Include task complete buttons in email — Adds buttons to the email that complete a task upon login authentication. This is a toggle, set to On or Off.
- Reply To Address for Email Tasks — The email address used as the Reply To on all scheduled employee-related task email alerts. Edited through the rich-text editor using Edit content.
The Email Body Beginning Text, Email Body Ending Text, and Email Subject Line settings together compose the employee task alert message — the subject line text is appended to the alert subject, and the beginning and ending text wrap the task details in the body of the message. Each displays a short preview of its current content beside the Edit content button.
7. TIMERS Settings
The TIMERS subsection contains a single setting:
- Survey Notifications Timer — How often survey notifications are checked in order to send out survey email links. Entered in a text box.
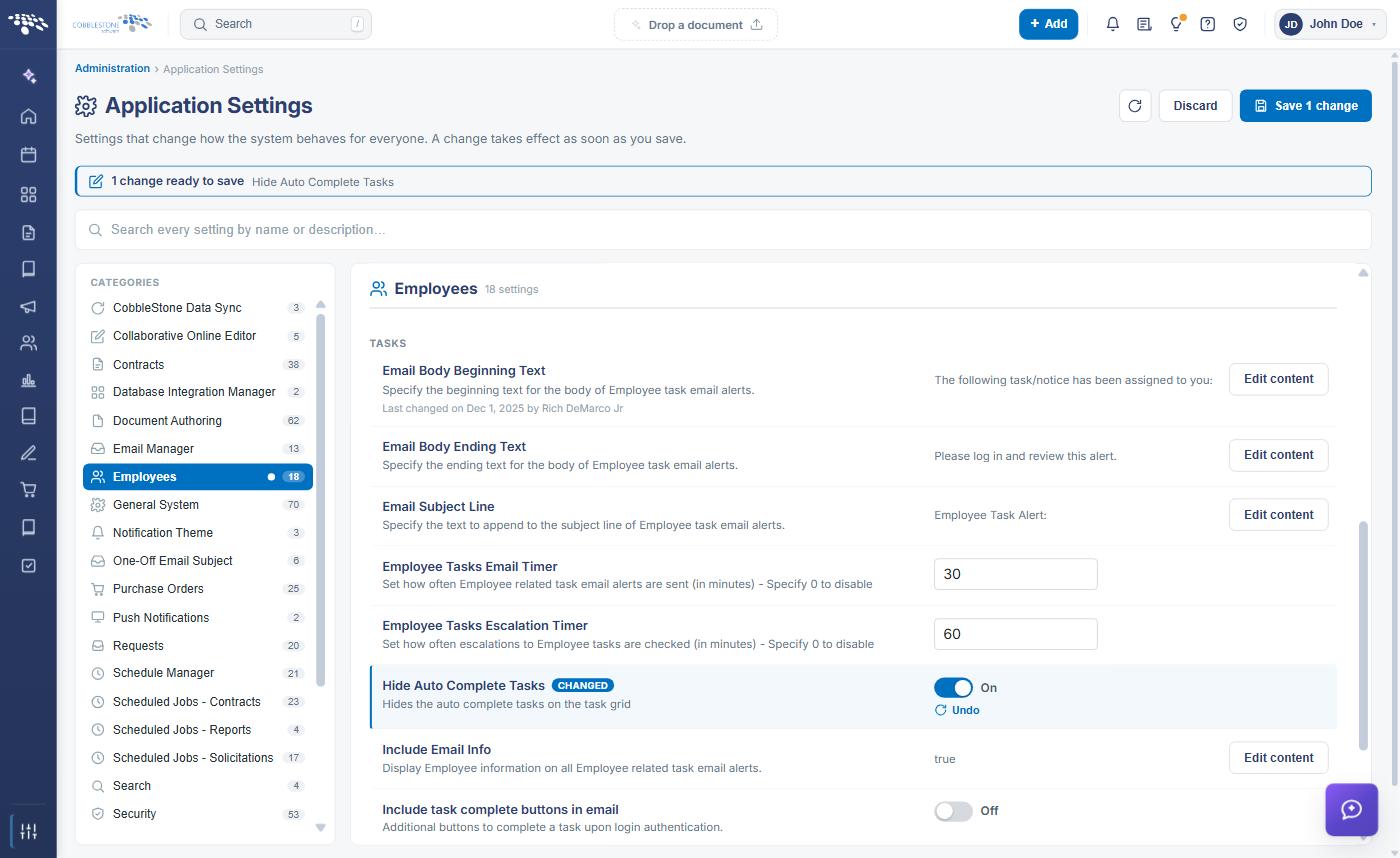
8. Modifying an Employees Setting
Function: Changes the value of an Employees setting for the entire system.
Steps:
- From the Contract Insight homepage, click Administration at the bottom of the left navigation menu. On the Administration page, under Configuration & Fields, select Application Settings, then click Employees in the CATEGORIES rail.
- Locate the setting by name under its subsection heading, and read its description to confirm what the value controls.
- Change the value using the control on the right of the setting row — a toggle, a text box for numeric values such as the timers and lockout counts, or the Employee List (table or View) dropdown.
- The setting is marked with a CHANGED badge, an Undo link appears beneath it, a dot appears beside Employees in the CATEGORIES rail, and a banner at the top of the screen reports how many changes are ready to save.
- Click Save changes in the upper right to commit the change, or Discard to put every changed setting back to its saved value. Undo on the setting row reverts that one setting only.
Caution: The lockout and timer settings affect every employee in the system. A low Log-in Failures - Count can lock users out unexpectedly, and setting a timer to 0 stops the related alerts from being sent at all, so confirm the intended behavior before saving.
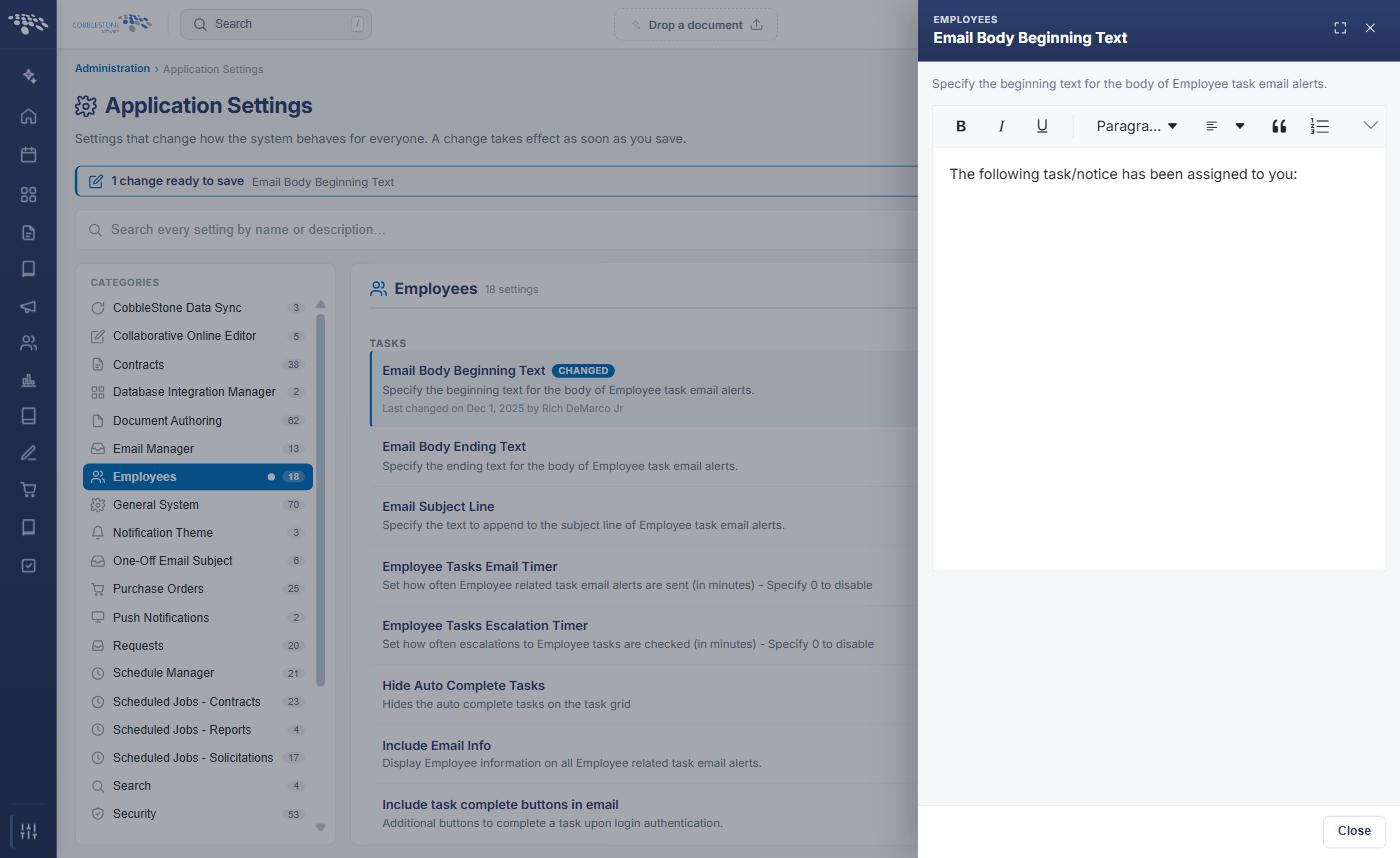
9. Editing Task Email Text
The task email text settings store message content rather than a simple value, and are edited in a rich-text, Word-like HTML editor.
Steps:
- From the Contract Insight homepage, click Administration at the bottom of the left navigation menu. On the Administration page, under Configuration & Fields, select Application Settings, then click Employees in the CATEGORIES rail.
- Under TASKS, locate the setting you want to change — Email Body Beginning Text, Email Body Ending Text, Email Subject Line, Include Email Info, or Reply To Address for Email Tasks.
- Click Edit content on the setting row.
- A drawer slides out from the right, headed EMPLOYEES and the setting name, with the setting’s description beneath it and the current content loaded into the editor.
- Edit the content using the editor toolbar, then click Close to return to the settings list.
- Click Save changes in the upper right of the Application Settings screen to commit the new content, or Undo on the setting row to put it back to the saved content.
The rich-text editor toolbar provides:
- Bold (Ctrl+B), Italic (Ctrl+I), and Underline (Ctrl+U)
- A Paragraph format dropdown for paragraph and heading styles
- Blockquote, Numbered List (Ctrl+Shift+O), and Bulleted List (Ctrl+Alt+O)
- Insert Hyperlink (Ctrl+K) and Insert Image (Ctrl+Shift+I)
- Code View (Ctrl+Shift+H) for editing the underlying HTML directly
- Undo (Ctrl+Z) and Redo (Ctrl+Y)
- An overflow control at the end of the toolbar that reveals the remaining tools when the drawer is narrow
- A widen icon and a close icon in the drawer header, to expand the drawer to full width or close it
10. Quick Reference Summary
Task | How to Complete It |
Open the group | Homepage → Administration → Configuration & Fields → Application Settings → Employees. |
Change the employee list style | Employee List (table or View) dropdown — view for Classic, table for New — then Save changes. |
Lock inactive accounts | Set the number of days in Inactive Login - days until lock (0 disables), then Save changes. |
Set login lockout rules | Log-in Failures - Count and Log-in Failures - Timeframe (0 for unlimited), then Save changes. |
Filter purchase items | Filter Purchase Items By Catalog And Employees toggle under FILTERING, then Save changes. |
Add links to alerts | Display Link for Employee Record, Display Link for Employee Tasks, and Display Social Media Links toggles. |
Change task alert wording | Edit content on Email Body Beginning Text, Email Body Ending Text, or Email Subject Line, then Save changes. |
Set task alert frequency | Employee Tasks Email Timer and Employee Tasks Escalation Timer, in minutes (0 disables). |
Set the alert reply address | Edit content on Reply To Address for Email Tasks, then Save changes. |
Set survey link frequency | Survey Notifications Timer under TIMERS, then Save changes. |
Undo a change | Undo on the setting row, or Discard in the upper right, before saving. |