COBBLESTONE SOFTWARE
Contract Insight — User Guide
Manage Schedulers
Scheduled Jobs: Managing the Schedulers and Their Jobs
Note: Each procedure in this guide begins at the Contract Insight homepage, so any section can be followed on its own. The jobs listed on this screen depend on the modules and integrations licensed for the environment, so the exact list may vary between systems.
1. Overview
The Scheduled Jobs screen is where the system’s background work is managed. As the screen itself states, it shows “The work the system runs on a timer, and how often each job runs.” From here an administrator can see when each job last ran and when it is next due, change how often a job runs, run a job immediately, review a job’s run history, and turn a whole scheduler off or on.
Jobs are grouped under the scheduler that runs them. Each scheduler is presented as a collapsible section with its own status badge, a count of how many of its jobs are scheduled, a Turn off button, and a grid of its jobs.
There are two schedulers:
- E-Mail Alerts Scheduler — the jobs that send alert and notification email, covering contracts, solicitations, purchase orders, requests, vendors/customers, employees, reports, surveys, signing reminders, workflow email alerts, and iCal notifications
- Data Integration Scheduler — the jobs that move and maintain data, covering SQL jobs, bulk data imports, e-signature document imports, document generation, the data aggregator, VISDOM services, search engine indexing, the D&B monitor, and the system health check
Because Scheduled Jobs is maintained from the Administration area, only Application Administrators — or other users specifically granted the appropriate permission — can reach this screen and change what it controls.
Caution: Turning a scheduler off stops every job beneath it, so alerts and integrations for the whole system stop until it is turned back on. Change one job or scheduler at a time and confirm the result before making the next change.
2. Accessing the Scheduled Jobs Screen
- From the Contract Insight homepage, click Administration at the bottom of the left navigation menu.
- On the Administration page, under Automation & Data, select Scheduled Jobs.
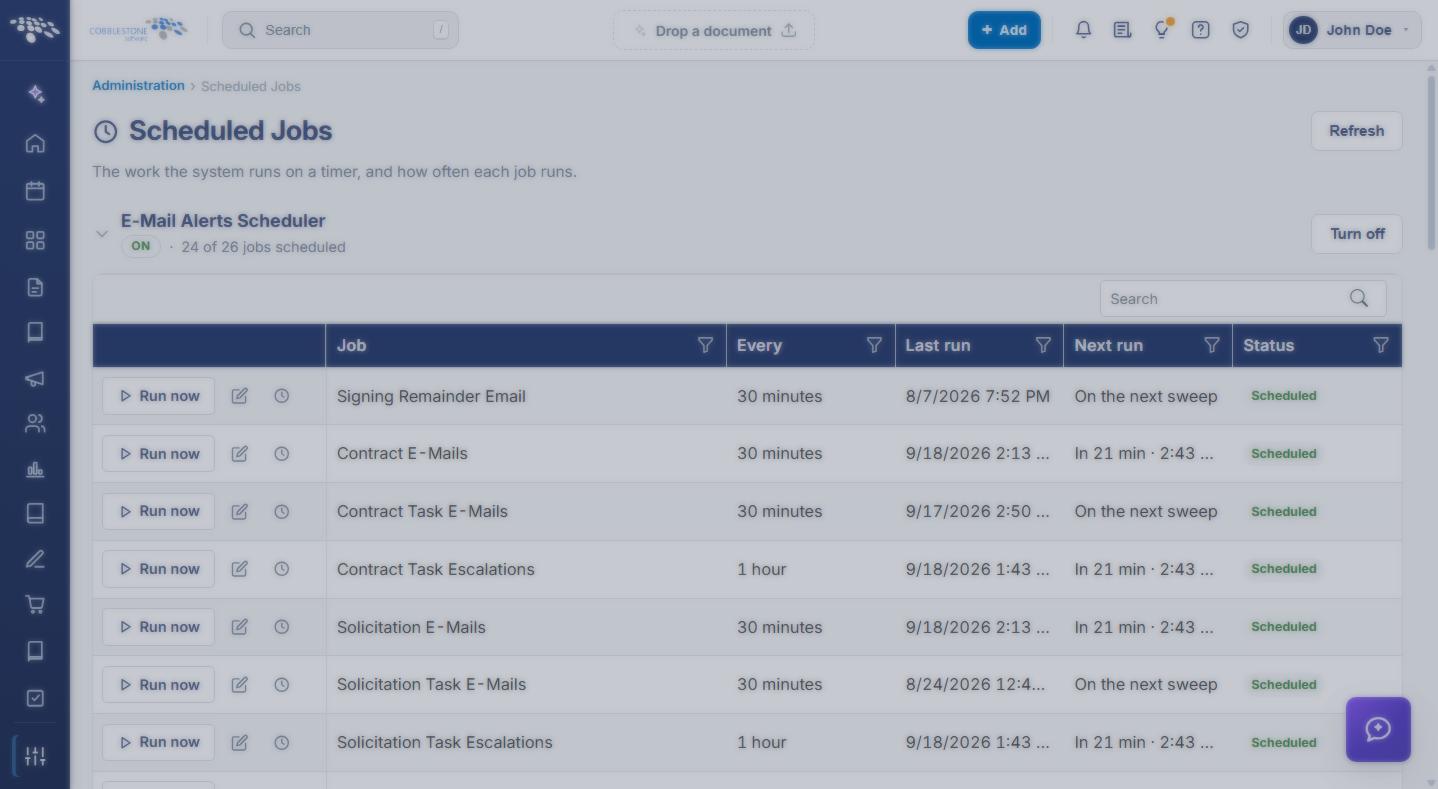
- The Scheduled Jobs screen opens, headed by the breadcrumb Administration › Scheduled Jobs, with each scheduler listed in its own section.
The Scheduled Jobs screen includes the following elements:
- A page title of Scheduled Jobs with the subtitle “The work the system runs on a timer, and how often each job runs.”
- A Refresh button in the upper right that reloads the current state of every job
- A collapse chevron beside each scheduler name, to hide or show that scheduler’s job grid
- An ON or OFF badge beside each scheduler name, followed by a count in the form “19 of 24 jobs scheduled”
- A Turn off button to the right of each scheduler heading (reading Turn on where the scheduler is already off)
- A Search box above each job grid, to filter that scheduler’s jobs by keyword
- A sortable, filterable grid with Job, Every, Last run, Next run, and Status columns, each with its own filter icon
- Per-row Run now, Change how often it runs (pencil icon), and History (clock icon) action buttons
3. Reading the Job Grid
Each row in a scheduler’s grid describes one job:
- Job — the name of the job, for example Contract E-Mails or Search Engine Indexing and Caching
- Every — how often the job is set to run, shown in minutes, hours, or days
- Last run — the date and time the job last ran
- Next run — when the job is next due, shown either as a countdown and time (for example “In 15 min · 4:08 PM”), as On the next sweep, or as an em dash where the job is not scheduled in this way
- Status — the current state of the job (see Section 4)
The count beside each scheduler name summarizes the grid — the number of jobs actively scheduled out of the total number of jobs in that scheduler.
4. Job Statuses
The Status column reports how each job is currently being handled:
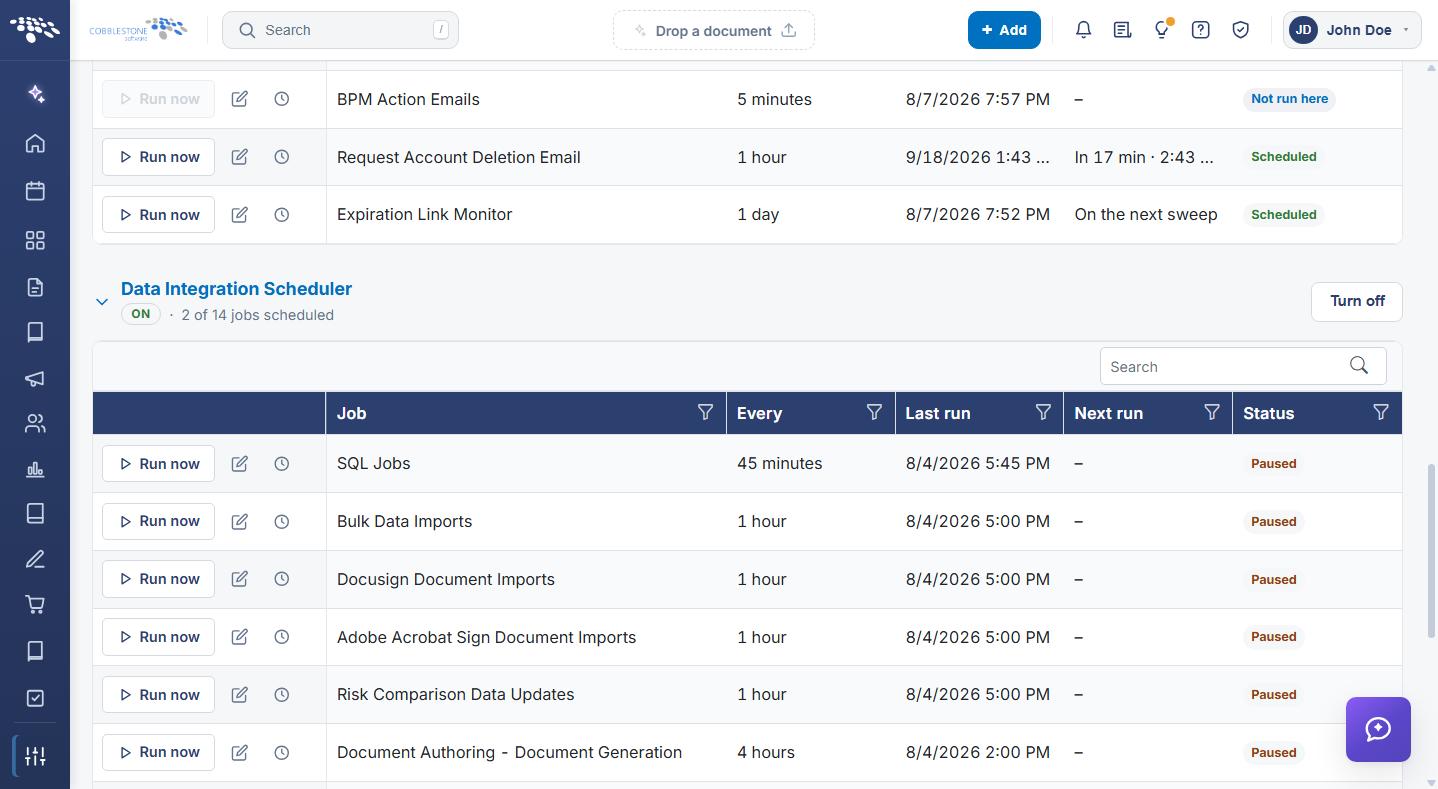
- Scheduled — the job is running on its timer, and the Next run column shows when it is next due
- Paused — the job is not running on a schedule; this is the state of a job whose interval has been set to 0
- Runs in Classic — the job is executed by the classic scheduler rather than from this screen. Its interval can still be changed and its history reviewed, but Run now is unavailable and no Next run time is shown
5. Changing How Often a Job Runs
Function: Changes the interval at which a single scheduled job runs.
Steps:
- From the Contract Insight homepage, click Administration at the bottom of the left navigation menu. On the Administration page, under Automation & Data, select Scheduled Jobs.
- Locate the job in its scheduler’s grid, using the Search box or a column filter if needed.
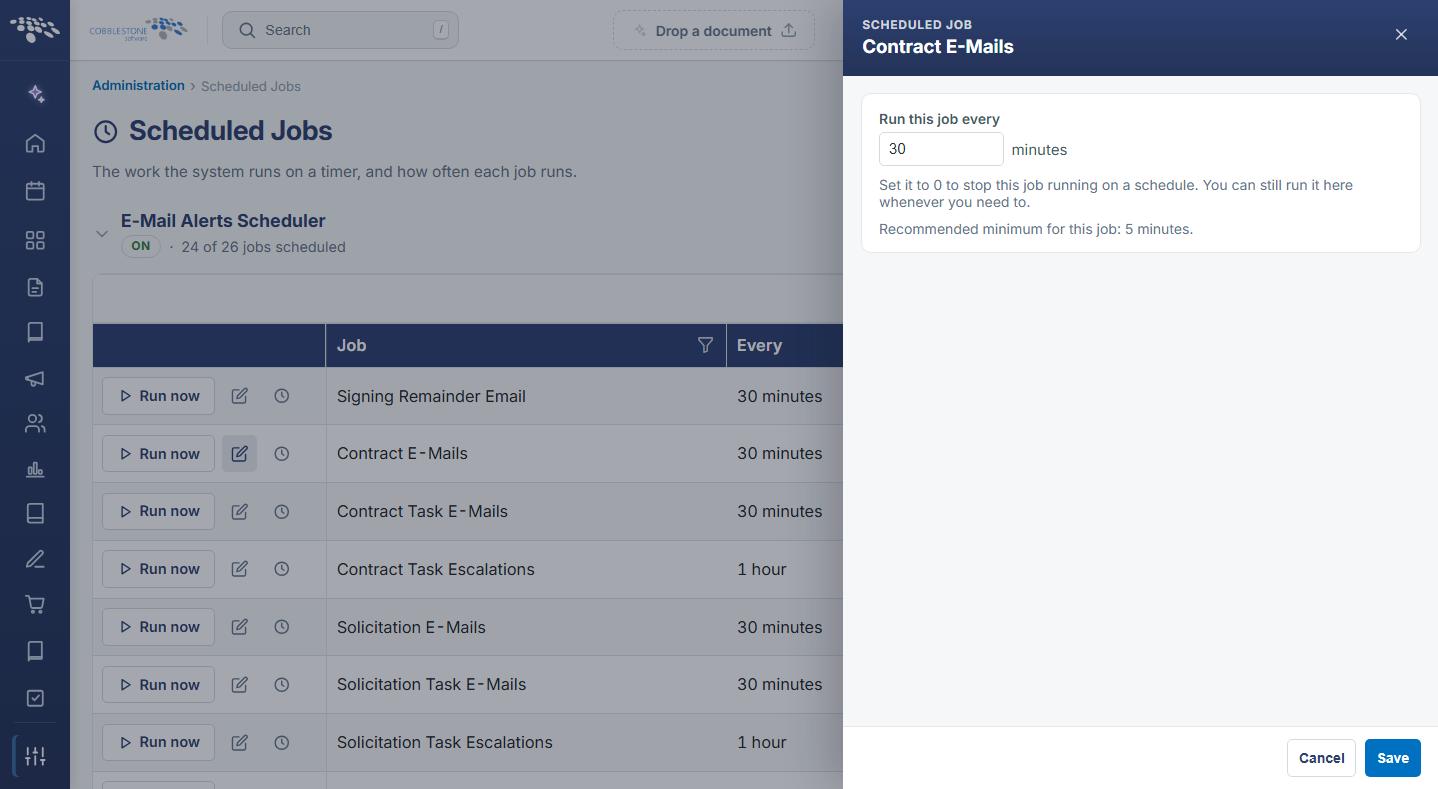
- Click the Change how often it runs (pencil) icon on the job’s row.
- A drawer slides out from the right, headed SCHEDULED JOB and the job name, containing a Run this job every field measured in minutes.
- Enter the new interval. The drawer states the recommended minimum for that particular job, and notes that setting the value to 0 stops the job running on a schedule while still allowing it to be run manually from this screen.
- Click Save to commit the new interval, or Cancel to close the drawer without changing it.
Note: Each job carries its own recommended minimum interval. Setting an interval below it, or setting many jobs to run very frequently, places avoidable load on the system — so keep to the recommended minimum unless there is a specific reason not to.
6. Running a Job Immediately
Function: Runs a single job at once, outside its normal schedule.
Steps:
- From the Contract Insight homepage, click Administration at the bottom of the left navigation menu. On the Administration page, under Automation & Data, select Scheduled Jobs.
- Locate the job in its scheduler’s grid.
- Click Run now on the job’s row.
- Click Refresh in the upper right to update the Last run and Next run values, then review the outcome in the job’s History as described in Section 7.
Running a job manually does not change its interval, and a job whose interval is set to 0 can still be run this way. Run now is unavailable on jobs whose status is Runs in Classic.
7. Reviewing a Job’s History
Function: Shows the recorded activity for a single job, so its outcomes can be confirmed.
Steps:
- From the Contract Insight homepage, click Administration at the bottom of the left navigation menu. On the Administration page, under Automation & Data, select Scheduled Jobs.
- Locate the job in its scheduler’s grid.
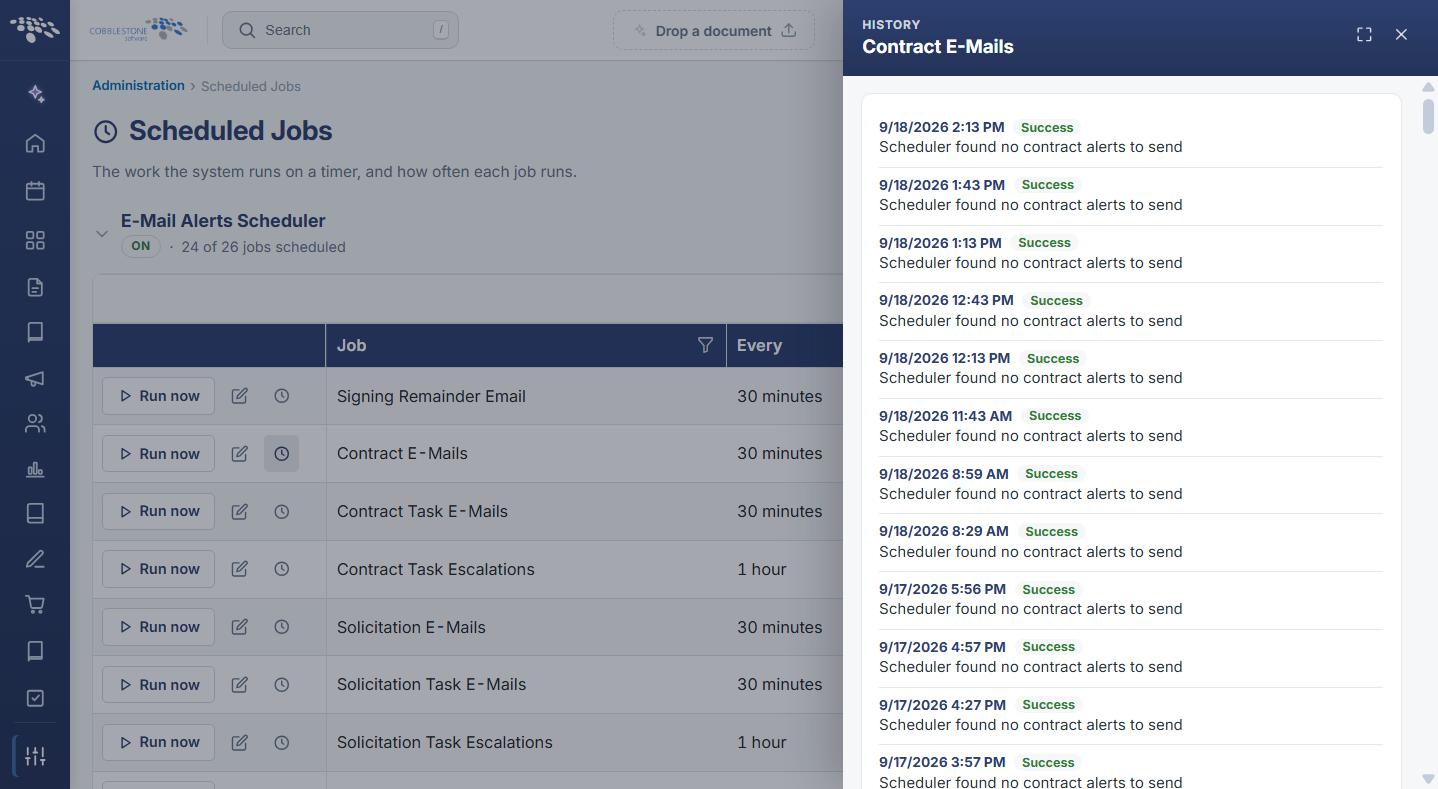
- Click the History (clock) icon on the job’s row.
- A drawer slides out from the right, headed HISTORY and the job name, listing each recorded run with its date and time, its outcome status — for example Success — and a short message describing what the run did.
- Use the widen icon in the drawer header to expand the drawer to full width, and the close icon to close it.
A job that has not yet run reads “This job has no recorded activity yet.” in place of the list.
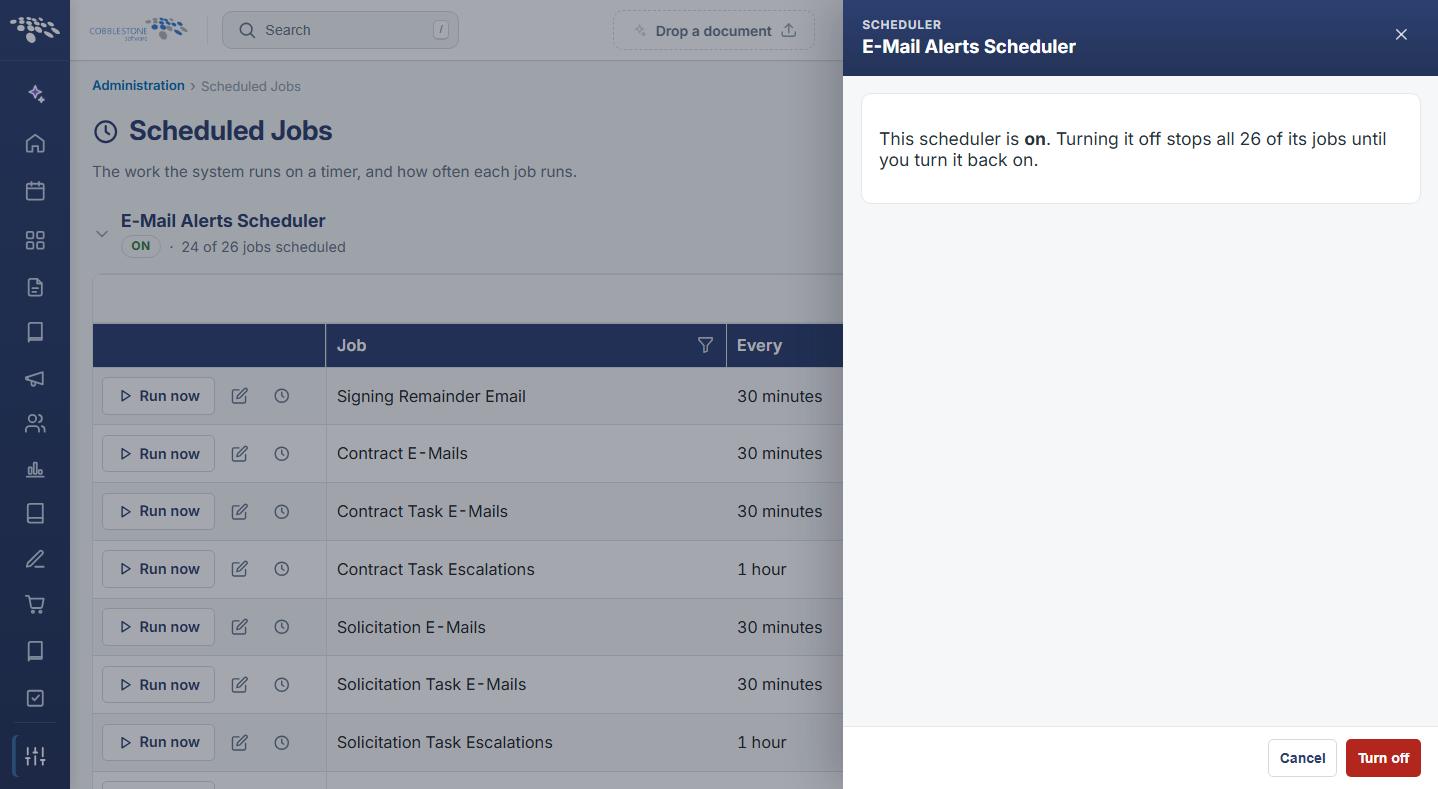
8. Turning a Scheduler Off and On
Function: Stops or starts every job belonging to one scheduler.
Steps:
- From the Contract Insight homepage, click Administration at the bottom of the left navigation menu. On the Administration page, under Automation & Data, select Scheduled Jobs.
- Locate the scheduler heading — E-Mail Alerts Scheduler or Data Integration Scheduler — and check its ON or OFF badge and job count.
- Click Turn off to the right of the scheduler heading to stop every job beneath it. Where the scheduler is already off, the button reads Turn on and starts them again.
- Click Refresh in the upper right to confirm the badge and job count have changed.
Caution: Turning off the E-Mail Alerts Scheduler stops all alert and notification email for the whole system, and turning off the Data Integration Scheduler stops imports, document generation, indexing, and the health check. Use these only for a deliberate maintenance window, and turn the scheduler back on afterwards.
9. Related Scheduler Settings
The intervals shown on this screen are the same values held in Application Settings, so a job’s frequency can be changed from either place.
The related configuration groups are:
- Schedule Manager — the system-wide timers, including the two Scheduler Manager timers that drive email and integration jobs, the e-signature document import timers, and the system health check timer
- Scheduled Jobs - Contracts, Scheduled Jobs - Reports, and Scheduled Jobs - Solicitations — the alert and job schedules specific to those record types
- Employees and Requests — the task email and escalation timers for those record types
Those groups are reached from the Administration page under Configuration & Fields, by selecting Application Settings and choosing the group in the CATEGORIES rail.
10. Quick Reference Summary
Task | How to Complete It |
Open the screen | Homepage → Administration → Automation & Data → Scheduled Jobs. |
Find a job | Search box above the scheduler grid, or a column filter icon. |
See when a job next runs | The Next run column — a countdown and time, On the next sweep, or an em dash. |
Change a job interval | Pencil icon on the row → enter minutes in Run this job every → Save. |
Stop one job | Set its interval to 0; the status becomes Paused and it can still be run manually. |
Run a job at once | Run now on the row, then Refresh to update Last run and Next run. |
Check what a job did | Clock icon on the row for HISTORY — each run with its status and message. |
Stop every email job | Turn off beside E-Mail Alerts Scheduler; turn it back on afterwards. |
Stop every data job | Turn off beside Data Integration Scheduler; turn it back on afterwards. |
Tidy the view | Collapse chevron beside a scheduler name to hide its grid. |
Reload current state | Refresh in the upper right of the page. |
Change intervals in settings | Application Settings → Schedule Manager and the Scheduled Jobs categories. |