COBBLESTONE SOFTWARE
Contract Insight — User Guide
Import Template for Items
Module: Purchase Orders › Catalog Management › Import Template for Items
Note: Each procedure in this guide begins at the Contract Insight homepage, so any section can be followed on its own. Custom fields are configurable, so the exact field list on a contract category record may vary between environments.
1. Overview
Item-level data (the Item Catalog) is imported the same way as any other record type: from Administration → Data Import, an administrator creates a template with Catalog Items as the target table (stored as tblItems), maps its fields on the Map fields screen, and then downloads, populates, uploads and processes the CSV. There is no separate, item-specific import screen; Catalog Items is one of the many target tables offered alongside Contracts, Purchase Orders and the rest. For general details, see Create New Import/Update Template, Downloading and Populating Import/Update Templates, and Uploading and Processing Import/Update Templates.
2. Key Elements
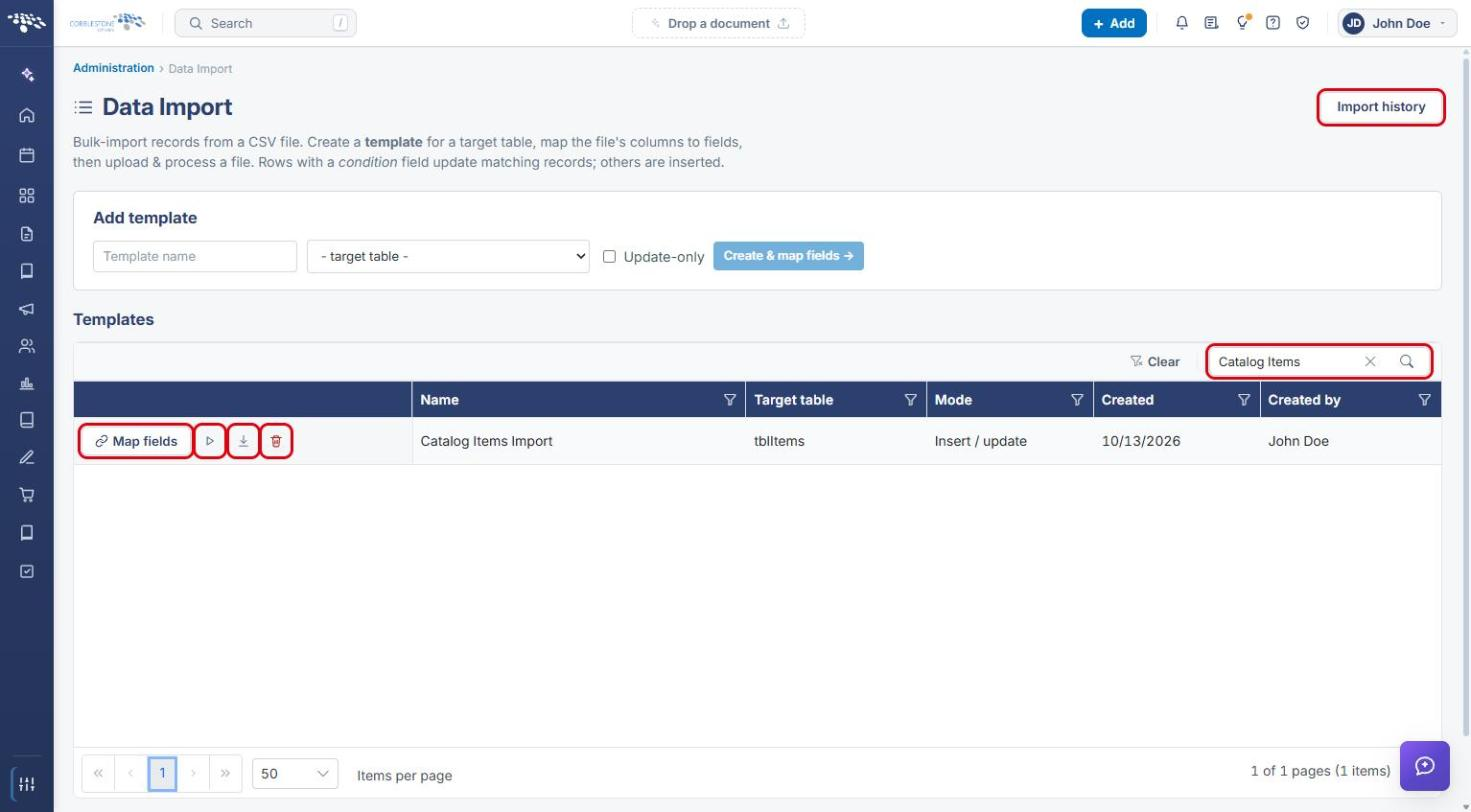
- Administration → Data Import: lists every import template, with row actions to Map fields, Run import, Download blank CSV and Delete template, plus Import history.
- Add template: enter a Template name, choose Catalog Items from the — target table — dropdown, optionally tick Update-only, then click Create & map fields.
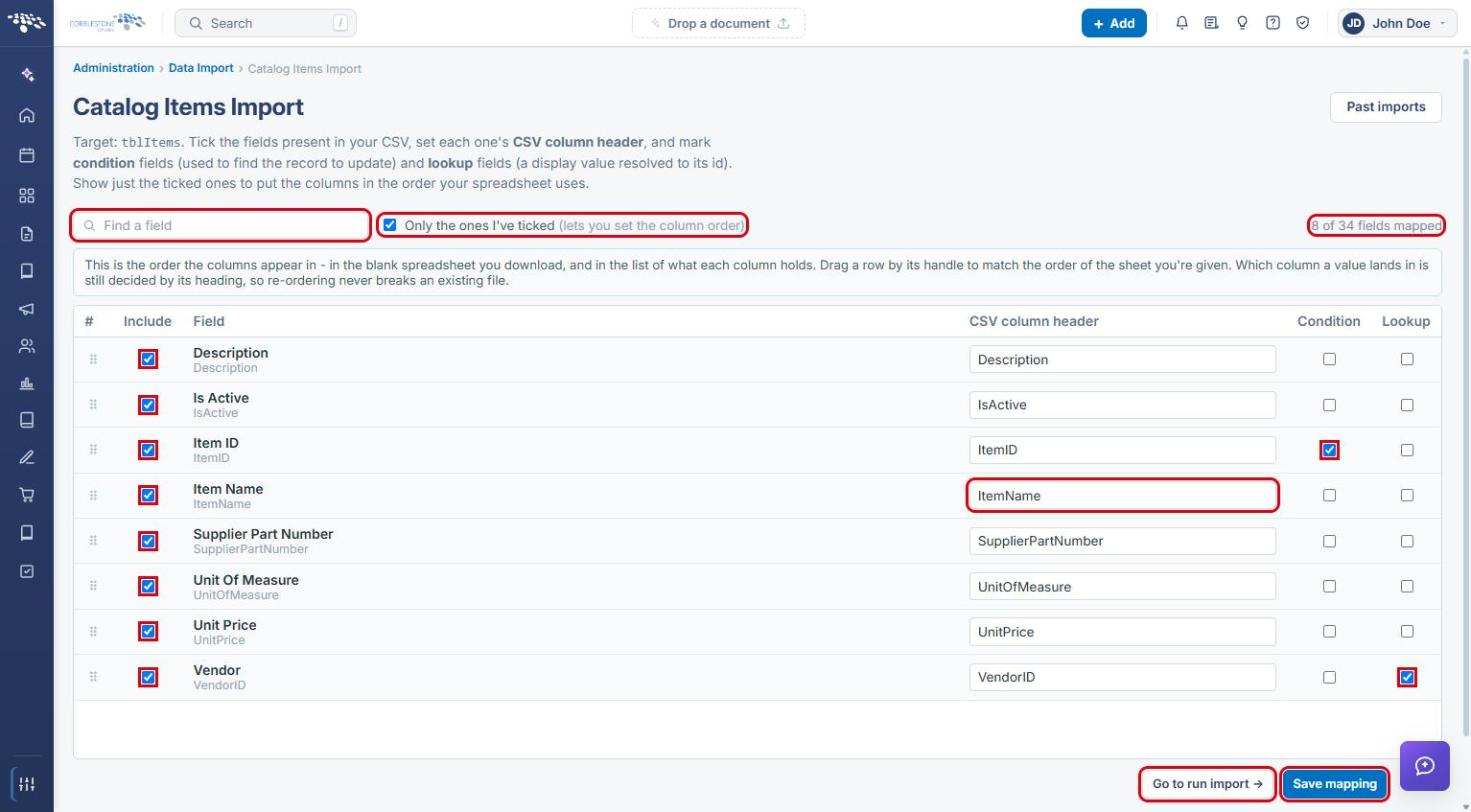
- Map fields screen: tick Include for each item field in your CSV, set its CSV column header, and mark Condition fields (used to find the record to update) and Lookup fields (a display value resolved to its ID).
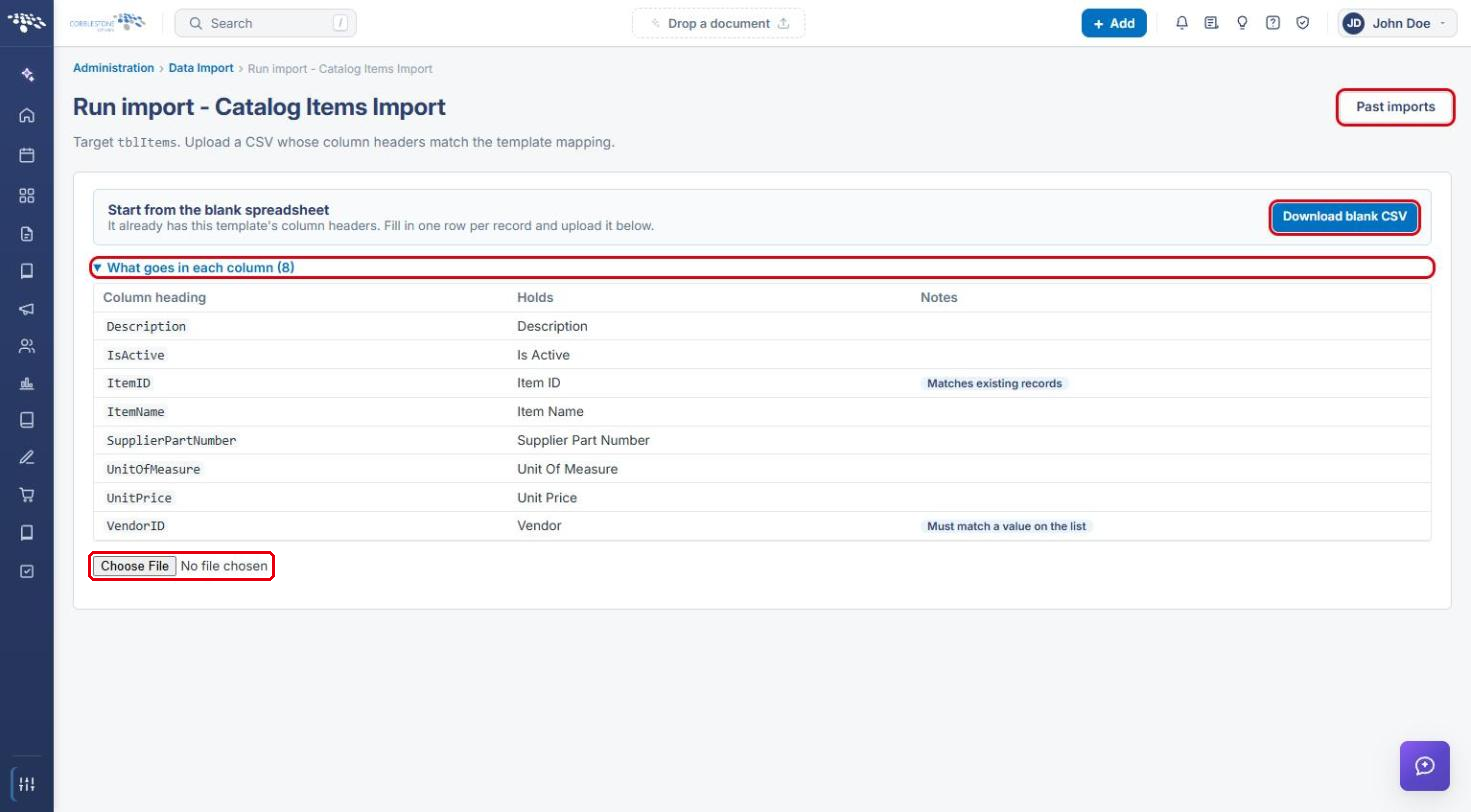
- Run import screen: Download blank CSV (pre-filled with the template's headers), What goes in each column, and Choose File to upload the populated CSV.
- Rows that match a Condition field update the existing item; all other rows are inserted as new catalog items (unless the template is Update-only).
3. Navigating to Data Import
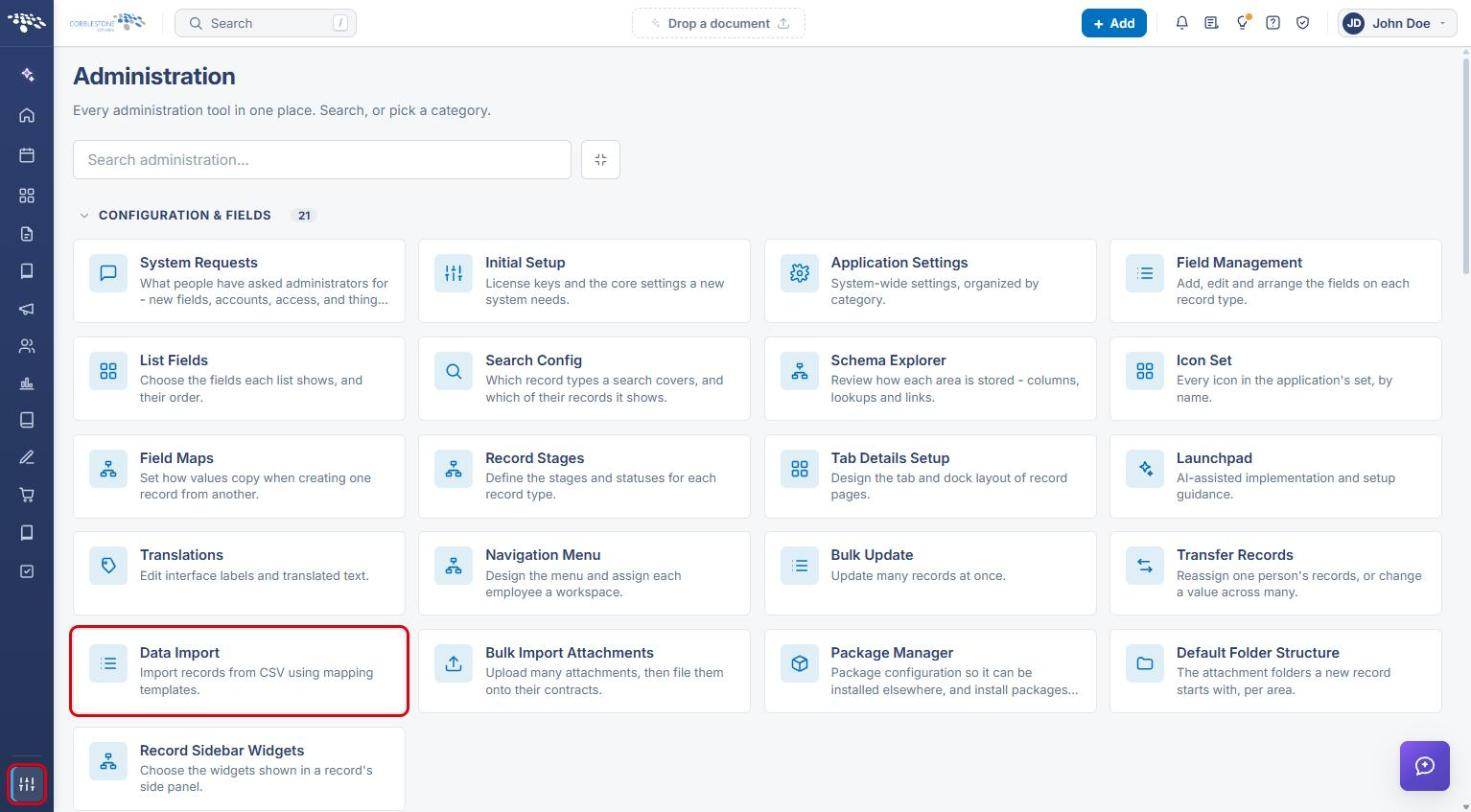
- From the Contract Insight homepage, click the Administration icon at the bottom of the left navigation menu.
- Under Configuration & Fields, click Data Import.
4. Creating the Catalog Items Template
- In the Add template section, enter a Template name (for example, Catalog Items Import).
- From the — target table — dropdown, select Catalog Items.
- Leave Update-only unticked to insert new items and update existing ones, or tick it to only update items that already exist.
- Click Create & map fields.
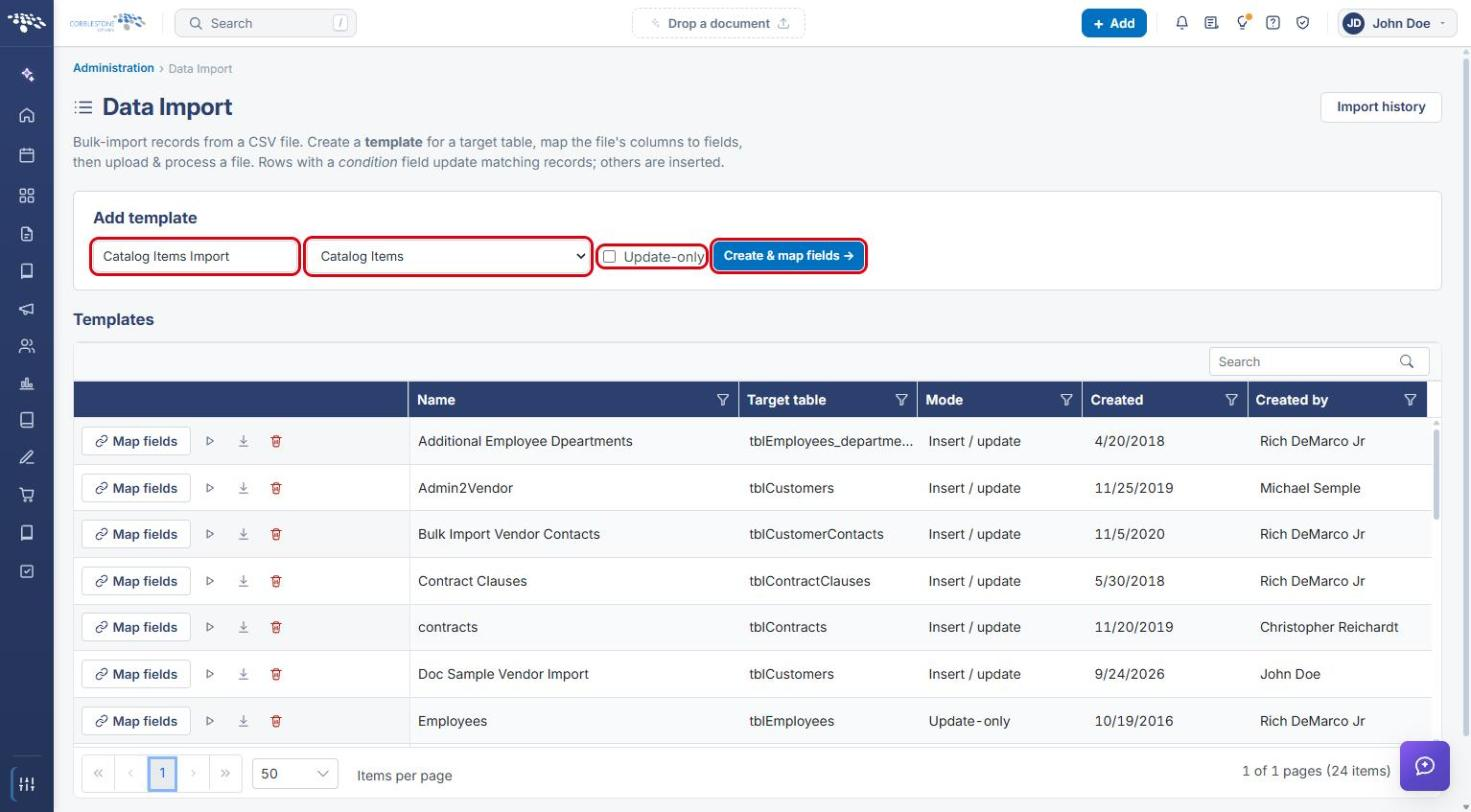
Note: Choose Catalog Items, not Catalog. The Catalog table holds catalog headers, while Catalog Items holds the individual items.
5. Mapping the Item Fields
- Use Find a field to locate each item field you plan to import (for example, Item ID, Item Name, Description, Unit Price, Unit Of Measure, Supplier Part Number, Vendor and Is Active).
- Tick Include for each field. The counter (for example, 8 of 34 fields mapped) updates as you go.
- Review or edit the CSV column header for each field. This is the heading the CSV must use.
- Tick Condition on the field used to match existing items (for example, Item ID), so that matching rows update rather than duplicate.
- Tick Lookup on fields entered by display value rather than ID (for example, Vendor).
- Optionally tick Only the ones I've ticked and drag rows by their handle to set the column order used in the blank spreadsheet.
- Click Save mapping, then Go to run import.
6. Downloading, Populating and Uploading the CSV
- On the Run import screen, click Download blank CSV. The file already contains the template's column headers.
- Expand What goes in each column to check what each heading holds. Notes such as Matches existing records (Condition) and Must match a value on the list (Lookup) show how each value is used.
- Fill in one row per catalog item and save the file as CSV.
- Click Choose File, select the populated CSV, and follow the on-screen prompts to process it.
- Click Past imports to review the results of previous runs of this template.
7. Managing the Template
Once created, the template appears in the Templates list on the Data Import page. Search for it by name, then use its row actions:
- Map fields: change the included fields, headers, Condition or Lookup settings.
- Run import (play icon): open the Run import screen to upload another CSV.
- Download blank CSV (download icon): get a fresh blank spreadsheet with the current headers.
- Delete template (trash icon): remove the template.
Click Import history to see past imports across all templates.
8. Quick Reference Summary
| Task | How to Complete It |
|---|---|
| Open Data Import | Administration → Configuration & Fields → Data Import. |
| Create an item template | Add template → Template name → target table Catalog Items → Create & map fields. |
| Map item fields | Tick Include, set CSV column header, mark Condition / Lookup → Save mapping. |
| Get the blank spreadsheet | Go to run import → Download blank CSV (or the download icon on the template row). |
| Upload and process | Run import → Choose File → select the populated CSV → process. |
| Review results | Past imports (template) or Import history (all templates). |