1. Getting Started
What You'll See First
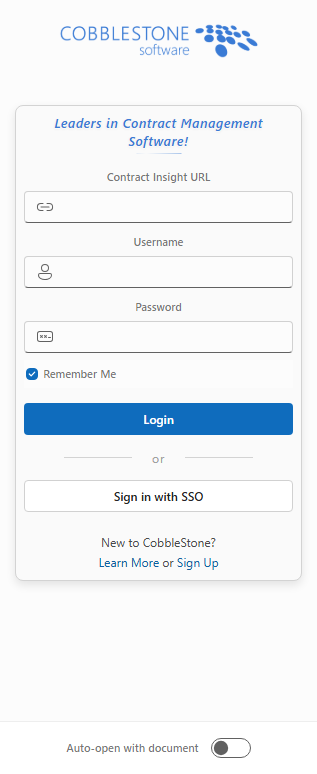
When you open the add-in for the first time, you'll see the login screen:
Initial Setup Steps
Step 1: Enter Your Contract Insight URL
- Enter your organization's Contract Insight URL (e.g., https://companyname.cobblestone.software/Core/)
- The system will automatically validate and normalize the URL format
Step 2: Choose Your Login Method
- Username & Password: Standard login with your CI credentials
- SSO: Single Sign-On through your organization's identity provider
Step 3: Configure Preferences
- ✅ Remember Me: Saves your URL and username for future sessions
- ✅ Auto-open with document: Automatically opens the add-in when you open this Word document
What Happens During Login
- System validates your CI server version compatibility
- Authenticates your credentials
- Establishes secure connection to your contract database
- Prepares the add-in interface for contract management
Need Help?
- Check with your IT administrator for your Contract Insight URL
- Contact support if you're having SSO authentication issues
2. Navigation and Interface
Header and Navigation System
The CobbleStone® add-in provides a comprehensive navigation system designed to help you quickly access all features and stay informed about document analysis results. The interface consists of a main header with multiple navigation elements and a hamburger menu for organized feature access.

Header Components:
- Hamburger Menu - Main navigation to all features
- AI Notifications - Bot icon with analysis alerts
- Document Hints - Lightbulb icon showing contextual suggestions
- Help Menu - Question mark icon for support resources
- Profile Menu - User account and logout options
Main Navigation Menu
Accessing the Navigation Menu
Click the hamburger menu icon (☰) in the top-left corner to open the main navigation drawer:
- Organized Sections - Features grouped by category
- Icon Indicators - Visual icons for each feature
- License Status - Locked features show when modules aren't licensed
- Active Tab Highlighting - Current tab is visually emphasized
Feature Categories and Organization
The navigation menu organizes features into logical groups:
Records Section:
- Contracts - Search and manage contract records
- Companies - Find and view company information
- Solicitations - Access solicitation records (requires license)
- Purchase Orders - Manage purchase orders (requires license)
- Requests - Handle request records
- Employees - Search employee directory
Clauses Section:
- Clause Library - Access standardized clause database
- Swap Clauses - AI-powered clause replacement
- Found Clauses - AI document analysis results
VISDOM Tools✨ Section:
- Sentiment - Document sentiment analysis (Visdom+ license required)
- High Risk Findings - Risk detection and analysis (Visdom+ license required)
- Multi-Document Analysis - Compare multiple documents
Document Tools Section:
- Linked Record - Manage document-record connections
- Term Explorer - Analyze document terminology
- Document History - Track document activities
Document Hints System
Contextual Document Suggestions
The lightbulb icon (💡) provides contextual hints based on your document content:
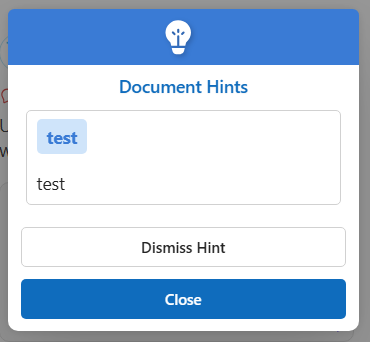
How Document Hints Work:
- Content Analysis - System analyzes document text in real-time
- Pattern Recognition - Identifies opportunities for improvement
- Contextual Suggestions - Provides relevant recommendations
- Visual Indicator - Orange dot appears when hints are available
Accessing and Managing Hints
Manual Hint Check:
- Click the lightbulb icon to manually check for hints
- System analyzes current document content
- Returns suggestions based on detected patterns
Help and Support Menu
The question mark icon (❓) provides access to help resources and support:
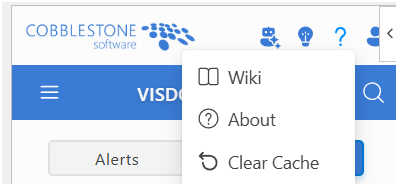
Wiki Documentation:
- Links to this page
About Information:
- Version Details - Current add-in version number
- System Information - Office application and environment details
- Diagnostic Data - Useful for troubleshooting issues
Clear Cache Function:
- Reset User Preferences - Clear all saved settings and preferences
- Confirmation Dialog - Prevents accidental clearing
- Complete Reset - Returns interface to default state
- Performance Tool - Can resolve interface issues
Profile and User Management
Profile Menu Access
The person icon (👤) provides user account information and logout options:
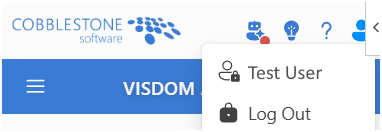
Profile Menu Options:
- User Name Display - Shows your display name from Contract Insight
- Employee Details - Link to your employee record
- Log Out - Securely sign out of the add-in
User Account Features
Employee Details:
- Direct Link - Opens your employee record in Contract Insight
- New Window - Opens in separate browser tab
Logout Process:
- Secure Logout - Properly clears authentication tokens
- Data Protection - Removes local session data
- Return to Login - Redirects to login screen
- Session Management - Ensures proper security protocols
Troubleshooting Navigation Issues
Common Navigation Problems:
- Missing Features - Check license requirements and Office application
- Notifications Not Updating - Ensure stable internet connection
- Menu Not Loading - Try clearing cache or refreshing add-in
- Features Grayed Out - Verify module licensing and permissions
Resolution Steps:
- Check Application - Ensure you're in the correct Office app
- Verify Licensing - Contact administrator about missing modules
- Clear Cache - Use help menu clear cache option
- Refresh Add-in - Close and reopen task pane if needed
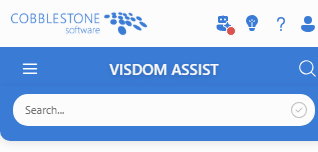
3. VISDOM Assist
VISDOM Assist provides three powerful AI-driven tools to help you analyze, review, and improve your legal documents. Each tool serves a different purpose and works together to provide comprehensive document intelligence.
Overview of VISDOM Tools
VISDOM Alerts
VISDOM Alerts continuously monitor your document while you work and alerts you to critical issues as they appear.
Best for:
- Catching critical problems immediately while editing
- Staying aware of high-risk clauses as you write
- Quick identification of missing essential information
- Real-time terminology consistency checking
How it works: Runs automatic scans in the background based on priority levels you select.
VISDOM Alerts - Priority Levels Explained
VISDOM Alerts uses three priority levels to help you focus on the most important issues first:
🔴 Critical Priority
When to enable: Always recommended for any contract review.
What it catches:
- Unlimited liability exposure - No caps on financial responsibility
- One-sided indemnification - You bear all risks while other party bears none
- Auto-renewal traps - Difficult to exit contracts with automatic renewals
- Unilateral change rights - Other party can change terms without your consent
- Critical privacy failures - Major data protection violations
- Missing essential information - Incomplete party details, signatures, or key terms
Impact: These issues could result in significant financial loss, legal exposure, or being trapped in unfavorable agreements.
🟡 Warning Priority
When to enable: Recommended for most contract reviews, especially important agreements.
What it catches:
- Inconsistent terminology - Terms used differently throughout document
- Dispute resolution issues - Unfavorable litigation or arbitration terms
- IP ownership problems - Unclear intellectual property rights
- Termination complexities - Complicated exit procedures
Impact: These issues could cause confusion, disputes, or unexpected obligations, but are generally manageable with proper attention.
🔵 Info Priority
When to enable: Useful for comprehensive reviews or when you want maximum insight.
What it catches:
- Key dates summary - Important deadlines and contract milestones
- Financial overview - Summary of all payment amounts and fees
- Termination procedures - How to properly exit the contract
- Impact: These are informational summaries to help you understand and track important contract details.
VISDOM Chat
What it does: Provides an interactive conversational AI that can answer questions, analyze selections, and help with document tasks.
Best for:
- Asking specific questions about your document
- Getting explanations of complex clauses
- Translating, summarizing, or rewriting selected text
- Interactive problem-solving and document analysis
- Getting quick suggestions for improvements
How it works: You chat with the AI, select text for analysis, and get immediate responses and suggestions.
VISDOM Review
What it does: Performs a thorough, structured analysis of your entire document across multiple risk categories.
Best for:
- Complete contract review before signing
- Systematic identification of all potential issues
- Detailed analysis across 12+ risk categories
- Creating a comprehensive action plan for improvements
- Final quality assurance review
How it works: Runs a complete document scan and presents findings organized by category or paragraph location.
Tips for Maximum Effectiveness
VISDOM Alerts Tips:
- Start with Critical priority only, add others as needed
- Don't dismiss alerts too quickly - review the details first
- Use the "Review Details" to see specific problematic text
- Alerts run automatically - no need to refresh manually
VISDOM Chat Tips:
- Select specific text before asking questions for better context
- Use the prompt library for common analysis tasks
- Save frequently used questions as custom prompts
- Try the quick actions (Translate, Summarize, Rewrite) on selected text
VISDOM Review Tips:
- Allow time for the full analysis - complex documents take a few minutes
- Use Paragraph View to work through the document systematically
- Use Category View to focus on specific types of risks
- Mark items complete as you address them to track progress
- Reviews are automatically saved and can be resumed later
Troubleshooting
If Alerts aren't appearing:
- Check that you've enabled at least one priority level (red, yellow, or blue badges)
- Alerts run automatically every 1-3 minutes - wait for the next scan
- Try closing and reopening the document if issues persist
If Chat isn't responding:
- Check your internet connection
- Try shorter, more specific questions
- Ensure you have text selected if asking about specific clauses
If Review is taking too long:
- Large documents (50+ pages) may take 3-5 minutes
- The review continues in the background - you can work on other tasks
- You can cancel and restart if needed
If suggestions aren't working:
- Make sure you have the latest version of the add-in
- Try refreshing the browser tab if using Word Online
- Check that you have sufficient permissions to edit the document
Getting Help
- If you encounter issues or need additional assistance:
- Check this user guide for common solutions
- Try restarting the add-in (close and reopen the task pane)
- Contact your system administrator for technical support
- Provide specific error messages or screenshots when reporting issues
4. Records Management and Views
Records Management Overview
The CobbleStone add-in provides comprehensive record management capabilities across all major Contract Insight data types. Each record type tab displays an interactive grid with advanced filtering, view selection, and action buttons for creating, updating, and managing records.

Main Components:
- View Selector - Choose from predefined views with smart filtering
- Search and Filter - Real-time search across all visible columns
- Records Grid - Interactive table with sorting and column management
- Action Buttons - Create, update, and perform record-specific actions
- Record Count Display - Shows total and filtered record counts
Available Record Types
The add-in supports all major Contract Insight data types:
Core Record Types:
- 📄 Contracts - Contract agreements and documents
- 🏢 Companies - Vendors, customers, and business partners
- 📧 Solicitations - Bids, RFPs, and procurement opportunities (requires license)
- 📋 Requests - Contract requests and approval workflows
- 🧾 Purchase Orders - Purchase order management (requires license)
- 👥 Employees - Employee directory and contact information
View Selector and Smart Views
Understanding Views
Views are pre-configured filters that show specific subsets of records based on business logic:
View Categories:
- 📂 Ungrouped - Basic "All Records" views
- 👤 Personal - User-specific filtered views
Default View Selection
Each record type can have a default view that loads automatically:
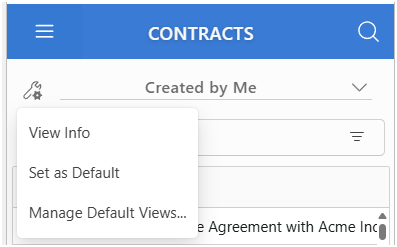
Setting Default Views:
- View Dropdown - Select your preferred view
- Star Icon - Click to set as default (appears when view is selected)
- Visual Confirmation - Filled star indicates current default
- Persistent Settings - Defaults remembered across sessions
View Types
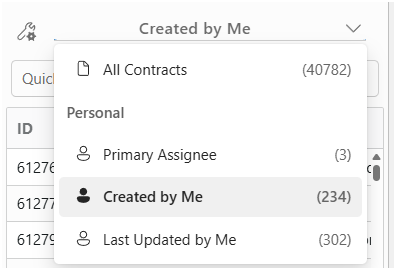
Ungrouped Views:
- All [Record Type] - Every record in the system without filtering
Personal Views:
- Primary Assignee - Records where you're the primary contact
- Created by Me - Records you created
- Last Updated by Me - Records you recently modified
Records Grid Interface
Grid Features
The records grid provides a powerful interface for viewing and managing data:
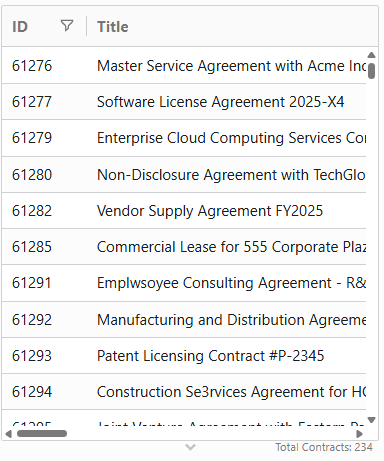
Grid Capabilities:
- Column Sorting - Click headers to sort by any field
- Column Filtering - Filter individual columns
- Column Resizing - Drag column borders to adjust widths
- Row Selection - Click rows to select records for actions
- Quick Search - Global search across all visible columns
Filter Controls
Global Filter:
- Real-time Search - Results filter as you type
- Multi-column Search - Searches across all visible columns
- Clear Button - X icon to clear search quickly
- Case Insensitive - Finds matches regardless of capitalization
Action Buttons and Record Operations
Standard Action Buttons
Every record type includes standardized action buttons for common operations:
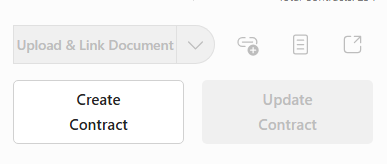
Universal Actions:
- Create [Record Type] - Add new records
- Update [Record Type] - Modify selected records
- View Details - Open detailed record view
- Open in Contract Insight - Launch record in main application
Application-Specific Actions
- 📎 Upload & Link Document - Link current document to record
- 📄 Insert Record Link - Add clickable record link to document
- 📤 Upload Document Only - Upload without linking
- 🔗 Link Document Only - Link without uploading
Permission-Based Access Control
All actions respect Contract Insight security permissions:
Permission Validation:
- Create - Must have "Add" rights for record type
- Update - Must have "Edit" rights for specific record
- View - Must have "View" rights for record details
- Upload - Must have "Edit" rights to attach files
Data Loading and Performance
Progressive Loading
Loading Process:
- Total Count First - Shows total records immediately
- Progressive Display - Records appear as they load
- Progress Indicator - Shows loading status and count
- Background Processing - Grid remains responsive during loading
Record Count Display
Count Examples:
- "Total Contracts: 1,250" - All records loaded
- "Showing 75 of 1,250 Contracts" - Filtered results
- "Loading Contracts..." - During data retrieval
- "No Contracts Found" - When filters return no results
5. Viewing Individual Records
Record Detail View Overview
When you select a record from any grid or search result, the CobbleStone® add-in provides a comprehensive detail view that displays all record information in an organized, easy-to-read format. This view adapts based on the record type and your permissions.
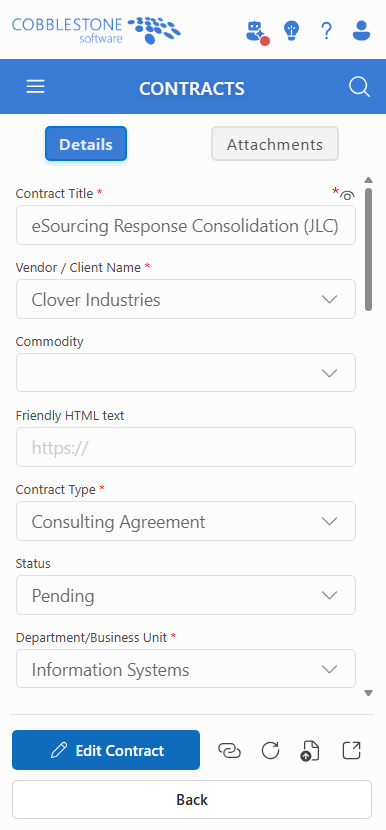
Main Components:
- Record Header - Title, ID, and key identifying information
- Information Sections - Organized display of all record fields
- Edit Mode Toggle - Switch between view and edit modes
- Navigation Options - Return to previous view or close detail
Record Information Display
Adaptive Display by Record Type
The detail view automatically adjusts to show relevant information for each record type:
Contract Records:
- Contract Title and unique ID
- Contract Type and Status
- Vendor/Customer information
- Key dates (start, end, renewal)
- Contract amount and terms
Company Records:
- Company name and account number
- Company type (Vendor/Customer)
- Contact information and address
- Trade names and DUNS number
Solicitation Records:
- Solicitation name and type
- Buying company and status
- Important dates (open, close, questions due)
- Amount and description
Purchase Order Records:
- PO ID and confirmation number
- Vendor information and status
- Total amount and payment terms
- Ship-to information
Request Records:
- Request title and type
- Contact information and vendor
- Amount and account number
- Important status dates
Employee Records:
- Employee name and title
- Department and email
- License type and status
View and Edit Modes
View Mode (Default)
The default view mode provides read-only access to record information:
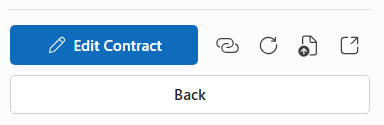
View Mode Features:
- Read-only Display - All field information visible but not editable
- Clean Layout - Organized sections for easy information scanning
- Edit Button - Switch to edit mode (when permissions allow)
- Navigation Controls - Return to previous view or close
Edit Mode
When you have edit permissions, you can switch to edit mode:
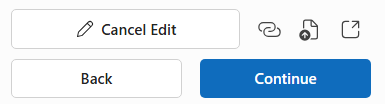
Edit Mode Features:
- Editable Fields - Form controls for modifying record data
- Save/Cancel Buttons - Commit or discard changes
- Field Validation - Real-time validation of data entry
- Permission-Based Access - Only fields you can modify are enabled
Switching Between Modes:
- Edit Button - Click to enter edit mode (appears when you have edit permissions)
- Save Button - Commits changes and returns to view mode
- Cancel Button - Discards changes and returns to view mode
Available Actions
Standard Record Actions
Edit Record:
- Available when you have edit permissions for the record
- Switch to edit mode to modify field values
- Changes are immediately synchronized to Contract Insight
View in Contract Insight:
- Opens the complete record in the Contract Insight web application
- Launches in a new browser window/tab
- Provides access to full record functionality
Permission-Based Access Control
Permission Levels
The interface adapts based on your Contract Insight permissions:
View Permission:
- See record details and information
- Access read-only data
- Navigate between records
Edit Permission:
- Modify record information
- Update field values
- Save changes to database
No Permission:
- Shows "Permission Denied" message
- Limited functionality available
- Contact administrator for access
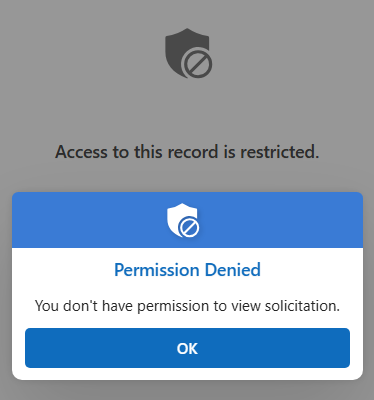
Permission Denied Display
When you don't have access to view a record:
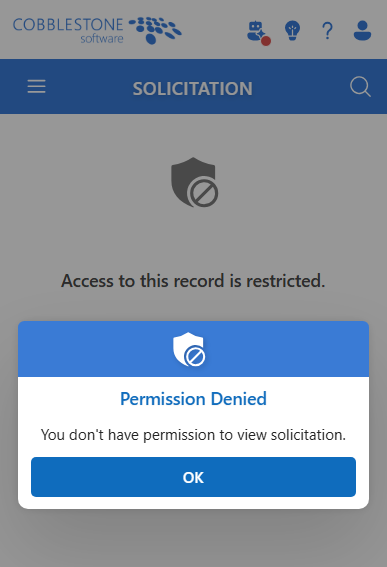
Access Denied Interface:
- Shield Icon - Visual indicator of restricted access
- Clear Message - "Access to this record is restricted"
- Dialog Explanation - Details about the permission requirement
- Navigation Options - Return to previous location
Navigation and Context
Record Context
The detail view maintains context about how you accessed the record:
Navigation Context:
- From Grid - Back button returns to the record grid
- From Search - Close button returns to search results
- From Global Search - Returns to appropriate record type tab
Troubleshooting Record Views
Common Issues
Record Not Loading:
Possible Causes:
- Insufficient permissions for the record
- Record deleted or archived
- Network connectivity issues
- Database connection problems
Solutions:
- Verify you have view permissions
- Check if record still exists
- Refresh the add-in
- Contact administrator if persistent
Missing Information:
Possible Causes:
- Field-level security restrictions
- Data not populated in source system
- Display configuration issues
Solutions:
- Check field permissions with administrator
- Verify data exists in Contract Insight web app
- Try refreshing the record view
Actions Not Available:
Possible Causes:
- Insufficient permissions for actions
- Missing module licenses
- Record in wrong status for action
Solutions:
- Contact administrator about permissions
- Verify module licensing
- Check record status requirements
6. Document Linking and Management
What is Record Linking?
Record linking connects your Word document to a specific record in your Contract Insight database. This connection enables advanced features like AI analysis, document management, automated workflows, and version control.
Benefits of Linking:
- AI Analysis Features - Access to Found Clauses, Sentiment Analysis, High Risk Findings
- Workflow Integration - IntelliSign and IntelliApprove directly from Word
- Version Management - Track document changes and history
- Context Awareness - System understands document's business context
The Linking Process
When You First Open a Document
The add-in automatically checks if your document is already linked to a record. You'll see one of two scenarios:
Scenario A: No Linked Record Found
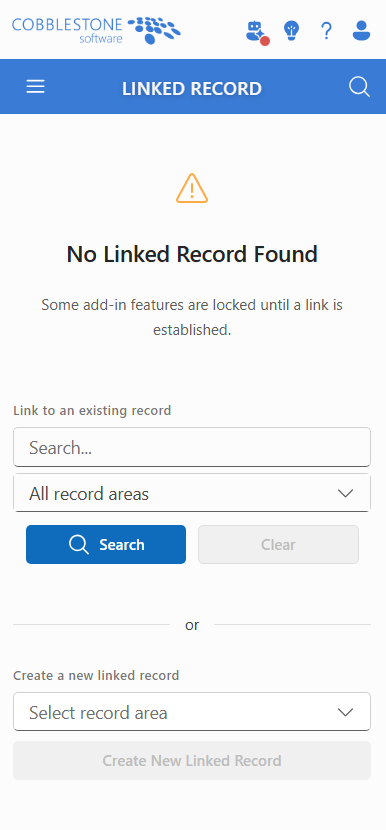
Shows "No linked record" message
Displays options to link to existing record or create new
AI features are limited until linking is established
Scenario B: Existing Link Found
- Shows connected record information
- All features immediately available
- Displays record details and available actions
How to Link to an Existing Record
Step 1: Search for Your Record
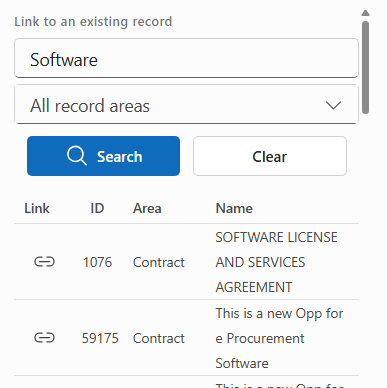
Search Options:
- Record name or title
- Record ID number
- Client/vendor name
- Contract type or status
Step 2: Select Record Type (Optional)
Record Type Filtering:
- Use dropdown to filter by record type
- Choose from: Contracts, Companies, Solicitations, etc.
- Narrows search results for faster finding
Step 3: Choose Your Record
Selection Process:
- Browse through search results
- Review record details to confirm correct match
- Click on the record you want to link
Step 4: Confirm the Link
Link Confirmation:
- Click "Link" button next to your desired record
- System saves the connection to your document
- Record details appear in the Linked Record tab
- AI analysis features become available
Create a New Linked Record
If you're working with a brand new record:
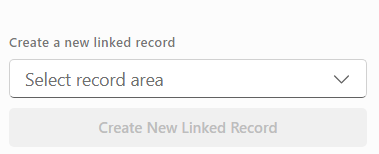
Step 1: Select Record Type
- Choose from "Create a new linked record" dropdown
- Select appropriate record type (Contract, Company, etc.)
Step 2: Click Create
- Click "Create New Linked [Record Type]"
- Fill out the required information
- The new record will be automatically linked to your document
What Happens After Linking
Once linked, you'll have access to Enhanced Features:
- Record editing and updates
- AI document analysis features
- Document version management
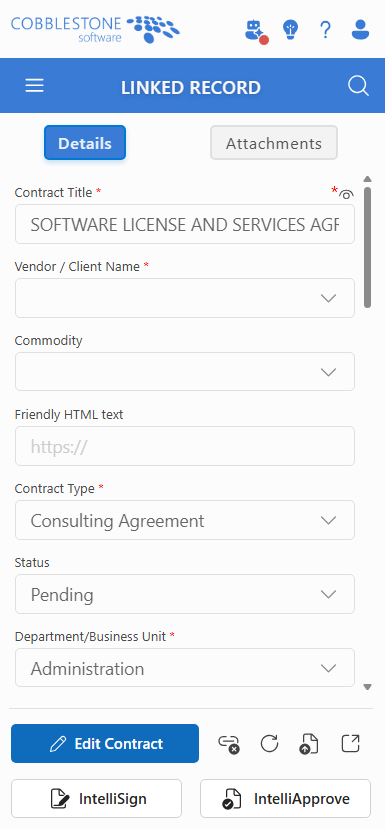
Working with Linked Records
Your Linked Record Dashboard
Once you've linked a record, the interface transforms into a comprehensive management dashboard:
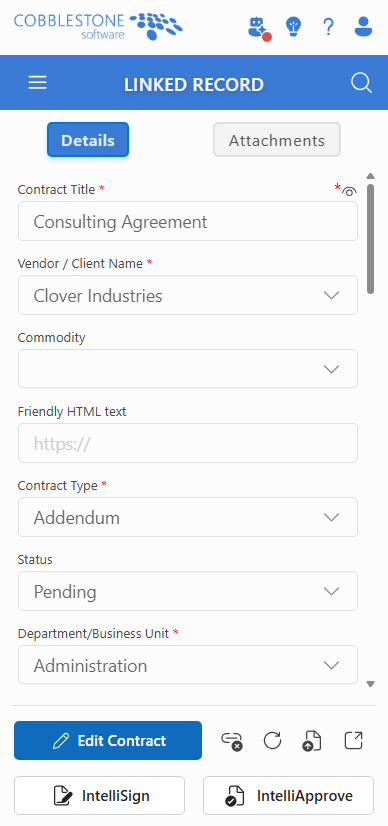
Main Features:
- Record Details - Key information display with edit capabilities
- Workflow Buttons - IntelliSign and IntelliApprove actions
- Link Management - Remove or change connections
- Permission Controls - Access-based feature availability
Record Information Display in Linked Mode
The linked record view shows the same information as the standard record view, but with additional workflow capabilities:
Enhanced Display Features:
- All Standard Fields - Same record information as view mode
- Document Context - System knows this record relates to current document
- Real-time Updates - Changes sync immediately to Contract Insight
Managing Your Link
Link Management Options
Remove Link:

- Click "Remove Link" button to disconnect
- This won't delete the record, just removes the connection
- You can re-link to the same or different record later
Change Link:
Process:
- Remove current link first
- Follow the linking process to connect to different record
- Connect to a different record of any supported type
- All workflow actions transfer to new linked record
Link Persistence
How Links Are Saved:
- Links are saved with your document
- Opening the document later automatically restores the connection
- Links persist across document sessions
- Document can be shared with link intact (permissions permitting)
Activity Logging
The system automatically logs your document activities for view on the Document History Tab:
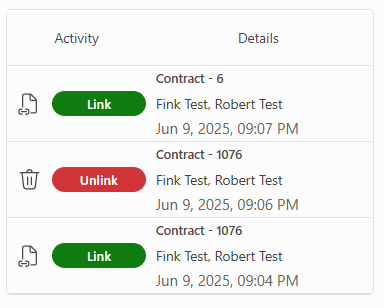
Tracked Activities:
- Link Changes - When records are linked/unlinked
- Document Updates - When linked documents are modified
Permission-Based Features for Linked Records
Access Control
The interface adapts based on your Contract Insight permissions for the linked record:
View Permission:
- See record details and linked information
- Use IntelliSign/IntelliApprove (if licensed)
- Access read-only data
Edit Permission:
- Modify record information
- Update field values
- Save changes to database
No Permission:
- Shows "Permission Denied" message
- Limited functionality available
- Contact administrator for access
Troubleshooting Linked Records
Common Issues
"Permission Denied" Messages:
Solutions:
- Contact administrator to request access to specific record types
- Verify you have rights to the individual record
- Check if your user group has required permissions for that entity type
Missing Action Buttons:
Possible Causes:
- IntelliSign/IntelliApprove not visible: Module license may not be available
- Buttons disabled: Check record permissions or document state
- Gray/locked buttons: Contact administrator about module licensing
Record Not Loading:
Solutions:
- Ensure you have view permissions for that record type
- Check your network connection to Contract Insight
- Verify the record still exists in the database
Link Not Saving:
Solutions:
- Ensure you have appropriate permissions on the record
- Check your network connection
- Try unlinking and re-linking the document
- Verify the record type is supported for linking
7. Creating New Records
Multi-Step Record Creation Process
Creating new records in Contract Insight follows a streamlined 3-step process that adapts based on the record type you're creating:
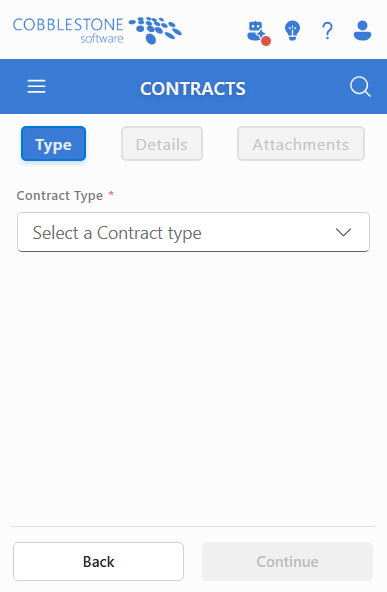
The 3 Steps:
- Type Selection - Choose specific record subtype (where applicable)
- Details - Fill in record information
- Attachments - Add files and link documents
Starting the Creation Process
From Any Tab Interface
- Navigate to the appropriate tab (Contracts, Companies, etc.)
- Click the "Create New [Record Type]" button
- The creation wizard opens
From Linking Context
When linking a document to a new record:
- Select "Create a new linked record" from the dropdown
- Choose the record type you want to create
- Follow the same 3-step process
Step 1: Record Type Selection
For Contracts, Companies, Requests, and Solicitations
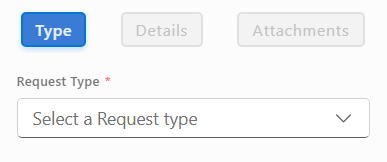
Features:
- Dropdown Menu - Lists all available subtypes
- Type Descriptions - Explains each contract/solicitation type
- Required Selection - Must choose before proceeding
Examples:
- Contracts: Service Agreement, Purchase Agreement, NDA, etc.
- Solicitations: RFP, RFQ, ITB, etc.
For Other Record Types
Purchase Orders skip this step and go directly to details, Employee creation is disabled via add-in.
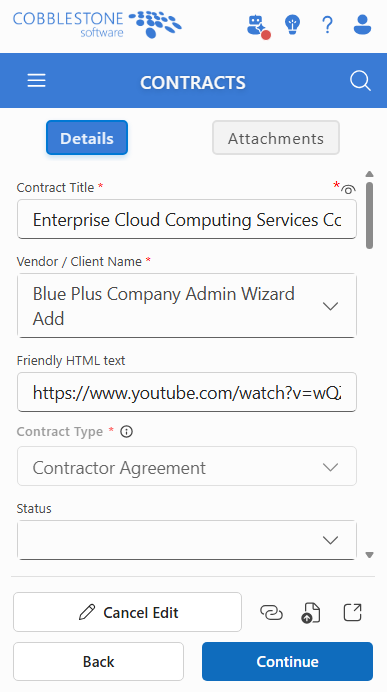
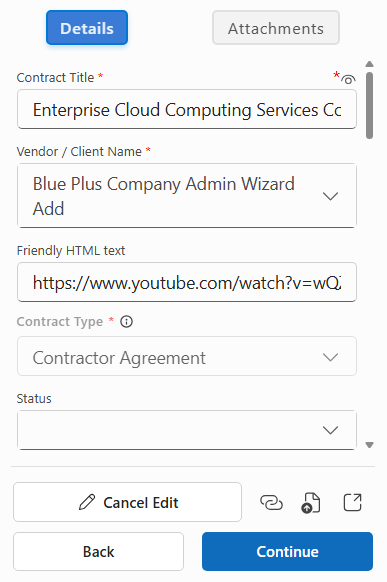
Step 2: Record Details
Form Interface
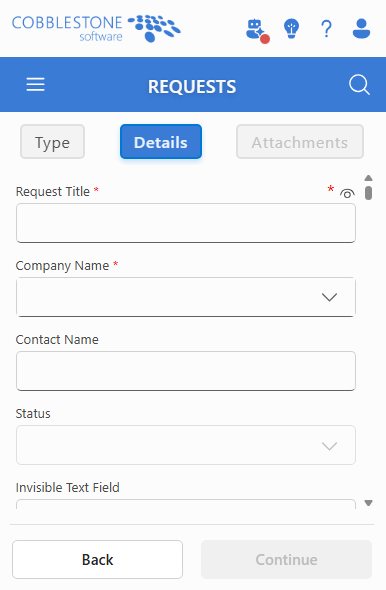
Key Features:
- Required Fields - Marked with red asterisk (*)
- Field Visibility Toggle - Show/hide optional fields
- Smart Dropdowns - Auto-populate from Contract Insight
- Validation - Real-time error checking
Smart Features
Field Visibility Control:
- Click the eye icon to toggle between required-only and all fields
- Helps focus on essential information first
- Can expand to see all available options
Dynamic Dropdowns:
- Options load from your Contract Insight database
- Filtered based on your permissions
- Updated in real-time as you type
Validation:
- Required fields highlighted in red if empty
- Format validation for dates, numbers, emails
- Cannot proceed until all required fields are completed
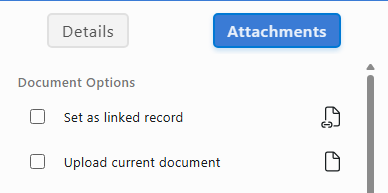
Step 3: Attachments
Document and File Management
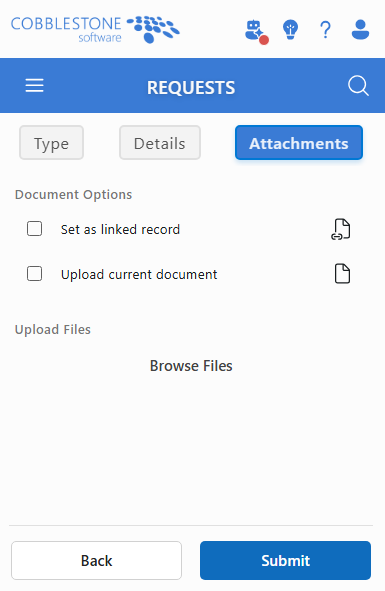
Options Available:
- Document Copy Include current document
- File Uploads - Browse and select files
- Link to Record - Connect document to new record
Document Linking Options
Include Document Copy:
- ✅ Checked: Uploads current Word document to Contract Insight
- ❌ Unchecked: Document stays separate
Link to Record:
- ✅ Checked: Creates permanent link between document and record
- ❌ Unchecked: Just uploads without linking
Common Combinations:
- ✅ Include Copy + ✅ Link = Upload document AND create permanent link
- ✅ Include Copy + ❌ Link = Upload document but don't link
- ❌ Include Copy + ✅ Link = Link document without uploading copy
- ❌ Include Copy + ❌ Link = No document interaction
File Upload Field
- Click "Browse Files" button
- Select multiple files from your computer
- File List shows selected files with sizes
- Remove Button to deselect files
Completion and Results
Success Confirmation
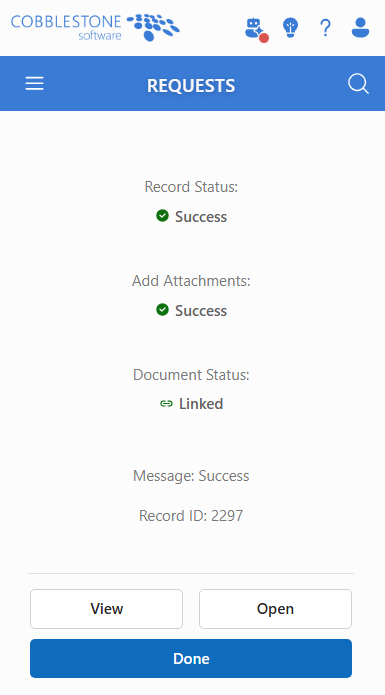
What You'll See:
- Record Created - Confirmation with new record ID
- Attachment Status - Upload results for files
- Link Status - Document linking confirmation
- Action Options - What to do next
Available Actions After Creation
View Record:
- Click "View Record" to see the new record details
- Switch to detail view with full record information
- Begin editing or updating immediately
Done:
- Return to the main interface
- Record is saved and available in Contract Insight
- Can be found through search or record lists
Linked Document Benefits: If you linked the document to the new record:
- Document automatically opens with record context
- All add-in features become available
- Record details populate in the interface
Error Handling and Troubleshooting
Common Creation Issues
"Required Fields Missing":
- Check for red asterisk (*) fields
- Ensure all required dropdowns have selections
- Verify date formats are correct
"Upload Failed":
- Check file sizes (typically 10MB limit per file)
- Verify file types are supported
- Ensure stable internet connection
"Permission Denied":
- Contact administrator for record creation rights
- Verify you have access to the specific record type
- Check if licensing is required for certain modules
"Type Selection Required":
- For contracts/solicitations, must select subtype
- Choose appropriate type before proceeding
- Contact administrator if needed types are missing
8. Editing and Managing Records
Edit Mode Overview
Editing existing records follows a 2-step process that provides comprehensive update capabilities while maintaining data integrity:
The 2 Steps:
- Details - Modify record information
- Attachments - Add files and manage documents
Entering Edit Mode
Permission Check Process
- Click the "Edit" button on any record
- System automatically checks your permissions for that specific record
- If authorized, edit mode activates
- If denied, shows permission dialog with contact information
What Changes in Edit Mode
Interface Updates:
- Form Fields become editable
- Save/Cancel Buttons appear
- Field Visibility Toggle shows required vs. all fields
- Attachments Tab becomes available (if permissions allow)
Step 1: Editing Record Details
Smart Form Features
Field Visibility Control:
Eye Icon Toggle:
- 👁️ Open Eye: Shows all available fields
- 👁️ Closed Eye: Shows only required fields (marked with *)
- Purpose: Focus on essential vs. comprehensive data entry
Change Tracking:
- System automatically tracks which fields you modify
- Only changed fields are sent to the database
- Red asterisk (*) indicates required fields that cannot be empty
- Real-time validation prevents saving incomplete data
Dynamic Dropdowns:
- Options populate from your Contract Insight database
- Type-ahead search available in dropdown fields
- Multi-select capabilities where applicable
- New options load when you click in dropdown fields
Field Types and Validation
Text Fields:
- Character limits enforced automatically
- Rich text areas for descriptions and notes
- Auto-formatting for phone numbers, ZIP codes
Dropdown Selections:
- Single and multi-select options
- Filtered based on record type and your permissions
- Clear Selection option available
Date Fields:
- Date picker with calendar interface
- Validation prevents impossible dates
- Automatic format conversion
Numeric Fields:
- Currency formatting where applicable
- Decimal precision validation
- Range checking for valid values
Save Validation Process
Before allowing saves, the system checks:
- Required Fields: All mandatory fields must have values
- Data Format: Dates, numbers, emails properly formatted
- Business Rules: Validates against Contract Insight rules
- Permission Check: Confirms you can modify this record
Step 2: Attachments Management
Document Operations
Available Options:
- Include Document Copy - Upload current Word document
- Link to Record - Create permanent document-record connection
- Both Options - Upload AND link for full integration
Checkbox Combinations:
- ✅ Include Copy + ✅ Link = Upload document AND create permanent link
- ✅ Include Copy + ❌ Link = Upload document but don't link
- ❌ Include Copy + ✅ Link = Link document without uploading copy
- ❌ Include Copy + ❌ Link = No document operations
File Upload Field

Available in all versions:
- "Browse Files" button opens file selector
- Multiple File Selection supported
- File Preview shows selected files
- Remove Files before uploading
Existing Attachments Display
Below the upload options, you'll see:
- Current Attachments already uploaded to this record
- Download Links to access existing files
- File Type Icons for easy identification
Save Process
- Validation Check: Ensures all requirements met
- Record Update: Sends only changed fields to database
- File Processing: Uploads selected attachments
- Document Operations: Handles Word document linking/uploading
- Confirmation: Shows success status with details
Advanced Features
Bulk Operations
- Select Multiple Attachments: Choose several files at once
- Clear All Selections: Reset attachment choices
- Progress Tracking: Monitor multiple file uploads
Document Linking Benefits
When you link a Word document to a record:
- Permanent Association: Document "remembers" the record
- Auto-Population: Record details appear when document opens
- Feature Access: Enables IntelliSign, IntelliApprove, and AI features
Permission-Based Features
View-Only Mode:
- Can see all record details
- Cannot modify any information
- Attachments are read-only
Edit Mode:
- Complete access to all editable fields
- Full attachment management capabilities
- Access to advanced features like linking
Error Handling and Troubleshooting
Common Edit Issues
"Permission Denied" on Edit:
- Contact administrator for record-specific permissions
- Check if record is locked by another user
- Verify your user group has edit rights for this record type
"Required Fields Missing":
- Look for red asterisk (*) indicators
- Use eye icon to show all fields
- Ensure dropdowns have valid selections
"Save Failed" Errors:
- Check internet connection
- Verify all required fields are completed
- Try refreshing the record and editing again
File Upload Problems:
- Check file size limits (typically 10MB per file)
- Verify file types are supported
- Ensure stable network connection
Recovery Options
Unsaved Changes:
- Cancel button discards all modifications
- Back button allows review before discarding
- Changes are lost if you navigate away without saving
Network Issues:
- Retry failed uploads automatically
- Refresh button reloads current record data
- Save attempts continue until successful
Permission Changes:
- If permissions change during editing, system will notify
- Save may be disabled if rights are revoked
- Read-only mode may activate automatically
9. Searching and Finding Records
Accessing the Search Function
The search feature is accessed through the main interface header:
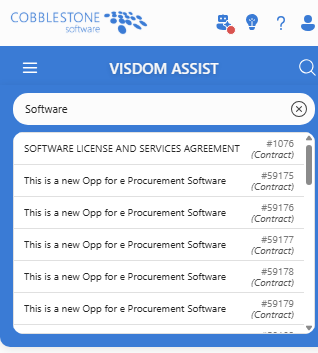
How to Access:
- Search Icon in the header bar (magnifying glass)
- Click to open the search interface
- Mini search results appear directly in the header area
Header Search Interface
Search Input Components
Key Elements:
- Search Input Field - Enter your search terms
- Search/Clear Button - Execute search or clear results
- All record areas - Search across all record types
License-Based Filtering:
- Options appear based on your Contract Insight licensing
- Missing modules won't show in the dropdown
- Contact administrator if expected types are missing
Search Input Field
Features:
- Placeholder Text - Shows what you're searching (e.g., "Search Contracts...")
- Real-time Input - No need to press Enter, just type
- Minimum Length - Requires at least 2 characters
- Search Button - Click to execute search
- Clear Button - Appears after search to reset results
Mini Search Results
Compact Display Format
When you search from the header, results appear in a compact, space-efficient format:
Display Features:
- Scrollable List - Handles multiple results efficiently
- Record Names - Primary display text
- Record Details - ID and type shown below name
- Click to Select - Entire row is clickable
Result Information Layout
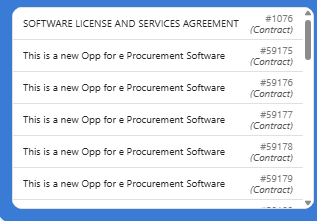
For "All Record Areas" Searches:
Contract Management Agreement
#12345 (Contract)
Visual Indicators
- Normal Row - White/light background
- Selected Row - Highlighted background color
- Hover Effect - Subtle background change on mouse-over
Information Hierarchy:
- Record Name - Large, bold text
- Record ID - Smaller text with # prefix
- Record Type - Italic text in parentheses (for multi-type searches)
Search Behavior and Features
Search Button:
- Search Icon - Executes search when clicked
- Clear Icon - Appears after search to reset results
- Button State - Changes based on whether you've searched
Search Logic
What Gets Searched:
- Record Names/Titles - Primary search field
- Record IDs - Exact ID number matching
- Partial Matching - Finds records containing your search terms
Search Examples:
- "12345" → Finds records with ID 12345
- "Contract" → Finds all records with "Contract" in the name
- "CobbleStone" → Finds records containing "CobbleStone"
- "Serv" → Finds "Service Agreement", "Server Contract", etc.
Benefits:
- Find related records across different types
- Discover connections (vendors with contracts)
- Single search across your entire database
Using Search Results
Record Selection
Click to Select:
- Click anywhere in a result row to select it
- Selected record gets highlighted background
- Selection enables actions in the interface
What Happens After Selection:
- Detail View - Record information populates the interface
- Edit Access - Can modify record details (with permissions)
Search Performance and Limits
Result Limitations
Per-Type Limits:
- All Areas Search - Up to 10 results per record type
- Total Display - Limited to prevent interface slowdown
Performance Optimization:
- Search results load quickly for common queries
- Complex searches may take slightly longer
- Network connection affects search speed
Search Requirements
Minimum Input:
- 2 Characters - Must enter at least 2 characters
- Valid Characters - Letters, numbers, spaces, common punctuation
- Trim Whitespace - Leading/trailing spaces ignored
Troubleshooting Header Search
"No Results Found"
Common Causes:
- Spelling - Check search term spelling
- Licensing - Module may not be available
Solutions:
- Try broader search terms
- Check different record types in dropdown
- Use partial words instead of complete phrases
Search Not Working
Troubleshooting Steps:
- Check Connection - Ensure internet connectivity
- Reload Interface - Refresh the add-in
- Clear Search - Use clear button and try again
- Contact Support - If problem persists
Unexpected Results
Why You Might See Unexpected Records:
- Partial Matching - Search finds substrings in record names
- ID Matching - Numbers might match record IDs
- Cross-Type Results - "All areas" search shows multiple types
Refining Your Search:
- Use more specific terms
- Include more context in search terms
- Use exact record IDs when known
Performance Issues
If Search Is Slow:
- Check Network - Slow internet affects search speed
- Shorter Terms - Very long search terms may be slower
- Contact IT - Server or network issues
10. Using the Clause Library
Clause Library Overview
The Clause Library provides a comprehensive database of standardized contract clauses that can be searched, managed, and inserted into your documents. This feature helps ensure consistency and completeness in your contract language.
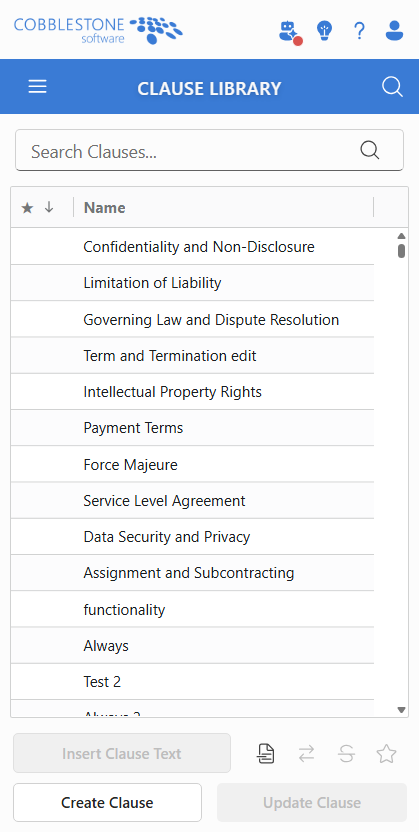
Main Components:
- Clause Grid - Searchable list of available clauses
- Action Buttons - Tools for inserting and managing clauses
- Favorites System - Star/pin frequently used clauses
- Permission-Based Features - Create and edit capabilities
Browsing and Searching Clauses
Clause Grid Display
The main interface shows all available clauses in a searchable grid format:
Grid Features:
- Clause Names - Descriptive titles for each clause
- Search/Filter Capabilities - Find specific clauses quickly
- Scrollable List - Handles large clause libraries efficiently
Finding Specific Clauses
Search Methods:
- By Name: Search clause titles and descriptions
- By Keywords: Find clauses containing specific terms
- Favorites First: View your starred clauses at the top
Selection Process:
- Click on any clause in the grid to select it
- Selected clause displays over the grid
- Clause text becomes available for preview and insertion
- Action buttons become enabled for the selected clause
Favorites System
Starring Frequently Used Clauses
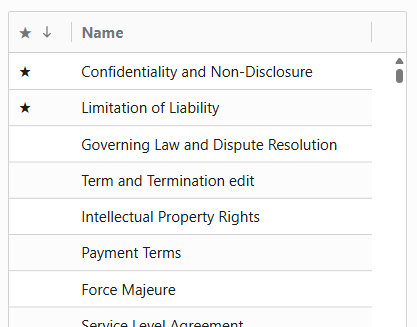
Star Button Functionality:
- Empty Star ⭐ - Click to add clause to favorites
- Filled Star ★ - Clause is favorited, click to remove
- Disabled State - No clause selected
- Persistent Storage - Favorites remembered across sessions
Managing Your Favorites
Adding to Favorites:
- Select a clause from the grid
- Click the Star button in the action area
- Star fills in to indicate favorite status
- Clause will appear prominently in future searches
Removing from Favorites:
- Select a favorited clause (shows filled star)
- Click the Star button to remove from favorites
- Star becomes empty outline
- Clause returns to normal grid position
Benefits of Favorites:
- Quick Access - Find your most-used clauses faster
- Consistency - Use the same proven language repeatedly
- Efficiency - Reduce time searching for common clauses
Inserting Clauses into Documents
Basic Clause Insertion

To Insert:
- Select a clause from the grid
- Click "Insert Clause Text" button
- Clause text gets inserted at current cursor position
- If Text is selected, clause overwrites it
Advanced Word-Only Features
Replace Selected Text
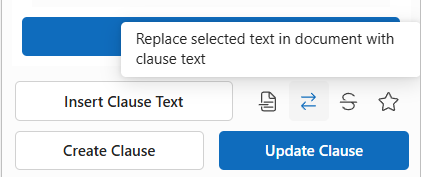
Replace Function:
- Select text in your Word document that needs improvement
- Choose replacement clause from the library
- Click Replace button (swap icon)
- Selected text gets replaced with the clause text
Create Clauses from Document Text
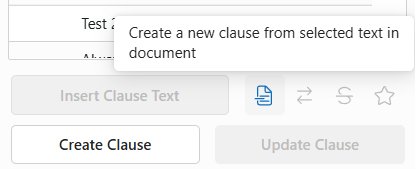
Creating New Clauses:
- Select well-written text in your document
- Click Extract button (document extract icon)
- Create Clause dialog opens with selected text
- Add to library for future use
Redline Comparison Feature
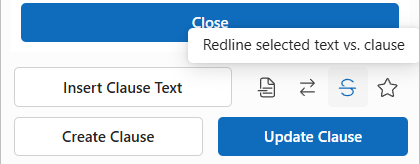
Redline Process:
- Select text in your document
- Choose comparison clause from library
- Click Redline button (strikethrough icon)
- Redline comparison inserts at cursor showing differences
Redline Display:
- Deleted Text - Strikethrough formatting
- Added Text - Underlined or highlighted
- Track Changes - Integrates with Word's revision system
- Visual Comparison - Clear before/after analysis
Creating New Clauses
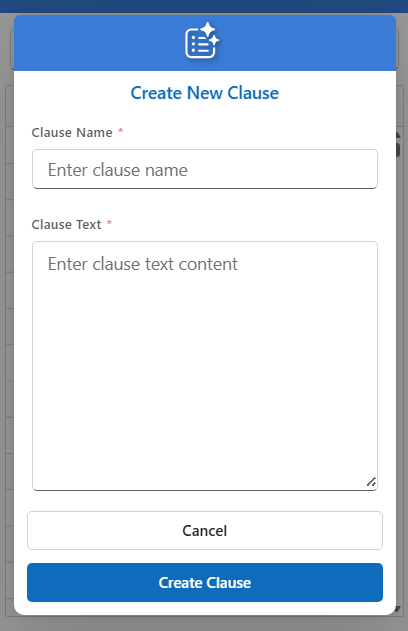
Creation Process:
- Click "Create Clause" button
- Fill in clause details in the dialog:
- Clause name/title
- Clause category
- Full clause text
- Usage notes (optional)
- Save to add to the library
Permission Requirements:
- Requires "Manage Contract Clauses" security group
- Contact administrator if Create button is disabled
- Permission error dialog explains requirements
Updating Existing Clauses
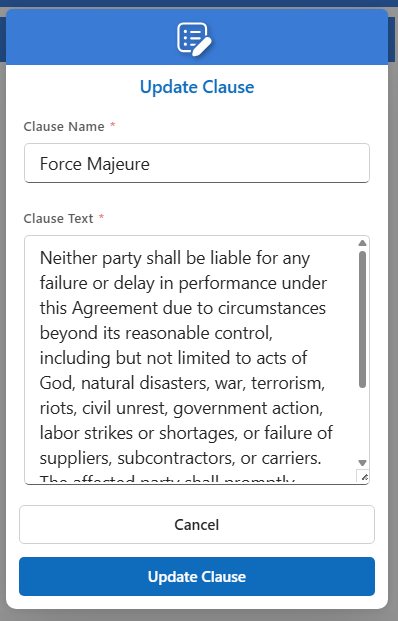
Update Process:
1. Select existing clause from grid
2. Click "Update Clause" button
3. Modify clause details in dialog
4. Save changes to update library
What Can Be Updated:
- Clause Text - Improve or correct language
- Clause Name - Better descriptive titles
Permission-Based Access
View-Only Users:
- Can browse and search all clauses
- Can insert clauses into documents
- Can use favorites system
- Cannot create or modify clauses
Manage Clauses Permission:
- All view-only capabilities
- Can create new clauses
- Can update existing clauses
Troubleshooting Clause Library Issues
Common Problems
"No Text Selected" Error:
- Cause: Trying to use replace or redline without selecting document text
- Solution: Select text in your document first, then use the feature
"Permission Denied" for Create/Update:
- Cause: Don't have "Manage Contract Clauses" security group
- Solution: Contact administrator to request permission
Clauses Not Loading:
- Cause: Network connectivity or server issues
- Solution: Check internet connection, refresh the add-in
Insert Function Not Working:
- Cause: No clause selected or cursor not positioned in document
- Solution: Select a clause first and position cursor where you want text
Performance Optimization
For Large Clause Libraries:
- Use search instead of scrolling through all clauses
- Organize favorites for quick access to common clauses
- Clear browser cache if interface becomes slow
- Contact IT if persistent performance issues
Data Synchronization
Favorites Not Saving:
- Browser storage may be full or restricted
- Incognito/private browsing may not persist data
- Solution: Use regular browser windows and clear cache if needed
Clause Updates Not Appearing:
- Cache issues may show old clause text
- Solution: Refresh the add-in or clear cache
- Network delays may require waiting and refreshing
11. Found Clauses - AI Document Analysis
Found Clauses Overview
The Found Clauses feature uses VISDOM AI to automatically analyze your document and identify important clauses, legal provisions, and contract terms. This powerful tool helps you understand what's in your document and manage clause-level content effectively.

Main Components:
- Analysis Status - Shows document analysis progress
- Taxonomy Selector - Choose analysis type (Common Clauses, custom taxonomies)
- View Mode Toggle - Switch between Active and Dismissed items
- Clause Results - Expandable list of found clauses
- Action Buttons - Add to library, training data, navigate to text
Getting Started with Document Analysis
Automatic Analysis
When you first open the Found Clauses tab:
What Happens:
- Document Scan - AI reads and analyzes your document text
- Clause Detection - Identifies legal provisions and important terms
- Categorization - Groups clauses by type and importance
- Results Display - Shows found clauses in organized format
Analysis Availability
System Requirements:
- VISDOM Integration - Requires Contract Insight to be authenticated with VISDOM Services
- Document Text - Document must contain readable text
- Network Connection - Stable internet for AI processing
If Analysis Unavailable:
- Shows "Visdom document analysis is unavailable" message
- Refresh Button - Try to reconnect to analysis service
- Contact administrator if problem persists
Taxonomy Selection
Analysis Types Available
The taxonomy dropdown controls what type of analysis is performed:
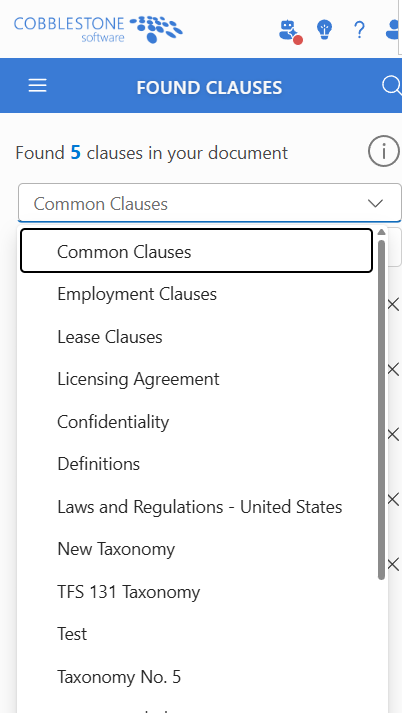
Options Include:
- Common Clauses - Standard contract provisions (default)
- Risk Analysis - High-risk terms and problematic language
- Compliance - Regulatory and legal compliance terms
- Custom Taxonomies - Organization-specific analysis categories
Switching Analysis Types
Common Clauses (Default):
- Automatically runs when tab opens
- Finds standard contract provisions
- Best for general document review
Custom Taxonomies:
- Select from dropdown to change analysis focus
- Automatic Re-analysis - Changing taxonomy triggers new analysis
- Results replace previous analysis
Understanding Clause Results
Accordion Display Format
Found clauses appear in an expandable accordion layout:
Each Clause Shows:
- Category Name - Type of clause found (e.g., "Liability Clause")
- Action Buttons - Navigate, dismiss, restore options
- Expandable Content - Full clause text and details
Clause Information Details
Header Information:
- Clause Category - VISDOM-determined clause type
- Navigation Button - Jump to clause location in document
- Dismiss Button - Remove clause from active list
Expanded Content:
- Full Clause Text - Complete text of the identified clause
- Show More/Less - For long clauses, expand or collapse text
- Action Buttons - Add to library or training data
Text Truncation and Expansion
For lengthy clauses:
Smart Text Display:
- First 200 characters shown by default
- "Show more" button reveals full text
- "Show less" button collapses back to summary
- Helps manage interface space while preserving access to complete content
Navigation and Document Integration
View in Document Feature
Navigation Process:
- Click navigation button (magnifying glass icon) on any clause
- Document scrolls to the exact location of the clause
- Text highlighting shows the specific clause content
- Return to add-in to continue analysis
Navigation Benefits:
- Precise Location - Jumps directly to clause text
- Context Understanding - See clause within document flow
- Quick Reference - Easy back-and-forth between analysis and document
- Verification - Confirm AI found the right content
Clause Management System
Active vs. Dismissed Views

Toggle Button Functions:
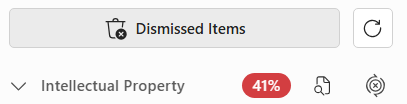
- "Active Items" - Shows all currently relevant clauses
- "Dismissed Items" - Shows clauses you've dismissed
- Click to switch between views
Dismissing Irrelevant Clauses
Why Dismiss Clauses:
- Remove false positives from AI analysis
- Focus on truly relevant clauses
- Clean up the analysis results
- Customize results to your needs
How to Dismiss:
- Click dismiss button (X icon) on any clause
- Clause disappears from active list
- Stored persistently - Dismissals remembered for this document
- Switch to "Dismissed Items" view to see dismissed clauses
Restoring Dismissed Clauses
From Dismissed Items View:
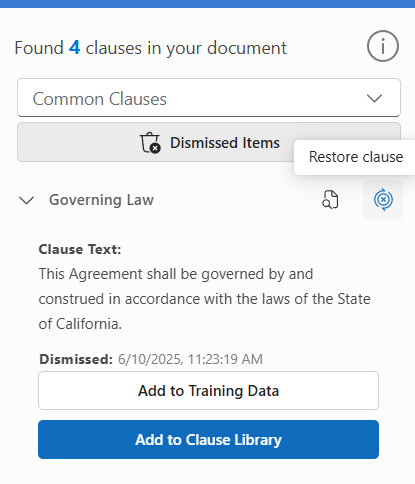
Restoration Process:
- Switch to "Dismissed Items" view
- Find the clause you want to restore
- Click restore button (circular arrow icon)
- Clause returns to active items list
Dismissed Item Information:
- Shows dismissal date and time
- Maintains all original clause information
- Can be restored at any time
- Dismissals are document-specific
Adding Clauses to Your Library
Add to Clause Library
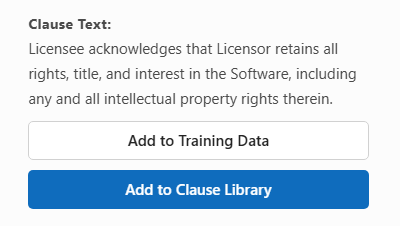
Process:
- Expand clause in the accordion
- Click "Add to Clause Library" button
- Dialog opens with clause details pre-populated
- Customize name, category, and text as needed
- Save to add to your organization's clause library
Library Benefits:
- Reuse good clauses found in documents
- Standardize language across contracts
- Share with team - Everyone can access added clauses
- Build repository of proven contract language
Add to Training Data
Training Data Purpose:
- Improve VISDOM accuracy for future analysis
- Customize recognition for your organization's language
- Enhance taxonomy performance over time
Training Process:
- Click "Add to Training Data" button
- Select taxonomy this clause should train
- Confirm clause categorization
- Submit to improve AI learning
Advanced Features
Custom Taxonomy Analysis
When Available:
- Admin-configured - Custom taxonomies set up by administrators
- Organization-specific - Tailored to your industry or needs
- Specialized Analysis - Focus on specific legal areas or risks
Using Custom Taxonomies:
- Select from dropdown - Choose your custom taxonomy
- Automatic re-analysis - AI processes document with new focus
- Different results - May find different types of clauses
- Specialized categories - Clause types specific to your taxonomy
Persistent State Management
What Gets Remembered:
- Dismissed clauses - Per document, permanently stored
- Expanded states - Which clauses you've opened
- Analysis results - Cached for quick return to tab
- View preferences - Active vs. dismissed view selection
Cross-Session Persistence:
- Dismissals survive - Document reopening preserves dismissals
- User-specific - Your dismissals don't affect other users
- Document-linked - Each document has separate dismissal history
Troubleshooting Found Clauses
No Clauses Found
Possible Causes:
- Document too short - Insufficient text for analysis
- No relevant content - Document doesn't contain typical contract language
- Analysis still running - May need more time for complex documents
- Network issues - Connection problems with AI service
Solutions:
- Wait for completion - Complex documents take longer
- Check document content - Ensure it contains contract-like text
- Try different taxonomy - Different analysis types may find different content
- Refresh analysis - Use refresh button to retry
Incorrect Clause Identification
When AI Gets It Wrong:
- False positives - Text identified as clauses that aren't
- Missed clauses - Important clauses not found
- Wrong categories - Clauses categorized incorrectly
Correction Actions:
- Dismiss false positives - Remove incorrect identifications
- Add to training data - Help AI learn correct categorization
- Try different taxonomy - Different analysis focus may be more accurate
- Provide feedback - Use training features to improve future results
Performance Issues
Slow Analysis:
- Large documents - Take longer to process
- Network speed - Affects AI service communication
- Server load - Analysis service may be busy
Optimization:
- Stable internet - Ensure good connection
- Document size - Consider splitting very large documents
- Patience - Allow adequate time for thorough analysis
Analysis Service Unavailable
Error Messages:
- "VISDOM document analysis is unavailable"
- Connection timeout errors
- Analysis failing to start
Recovery Steps:
- Check internet connection
- Try refresh button multiple times
- Wait and retry - Service may be temporarily down
- Contact administrator - May be configuration or licensing issue
12. Swap Clauses - Clause Replacement and Improvement
Swap Clauses Overview
The Swap Clauses feature uses AI to analyze your document and identify clauses that could be improved by replacing them with standardized system clauses. This powerful tool helps upgrade contract language to current standards and ensures consistency across your organization.

Main Components:
- Tab Header - Shows count of clauses needing replacement
- Filter Controls - Match percentage sliders and view toggles
- Active/Dismissed Toggle - Switch between current and dismissed items
- Clause Accordion - Expandable list showing clause comparisons
- Action Buttons - Replace, redline, and comparison tools
Understanding Swap Clause Analysis
How Swap Clauses Works
When you open the Swap Clauses tab:
VISDOM Analysis Process:
- Document Scan - VISDOM reads through your document text
- Clause Identification - Finds existing clauses in your document
- System Matching - Compares found clauses to standardized system clauses
- Percentage Scoring - Calculates how closely they match (similarity score)
- Replacement Suggestions - Recommends system clauses as improvements
Match Percentage Scoring
Understanding the Percentages:
- High Match (80-95%) - Very similar clauses, minor improvements possible
- Medium Match (50-79%) - Moderate differences, potential for enhancement
- Low Match (10-49%) - Significant differences, major improvements available
Badge Colors:
- Blue (Informative) - 80%+ match, minor improvements
- Orange (Warning) - 50-79% match, moderate improvements
- Red (Danger) - Below 50% match, significant improvements needed
Filtering and Display Controls
Match Percentage Sliders
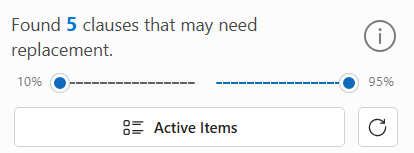
Dual Slider System:
- Minimum Threshold - Left slider sets lowest match percentage to show
- Maximum Threshold - Right slider sets highest match percentage to show
- Dynamic Filtering - Results update as you move sliders
- Percentage Display - Shows current threshold values
Common Filter Scenarios:
- 10%-95% (Default): Shows all suggested replacements
- 80%-95%: Focus on minor improvements only
- 10%-50%: Show only clauses needing major improvements
- 50%-80%: Medium-priority replacement opportunities
View Mode Toggle
Active Items vs. Dismissed Items:
- Active Items - Current swap clause suggestions
- Dismissed Items - Previously dismissed suggestions
- Toggle Button - Click to switch between views
- Item Counts - Shows how many items in each view
Working with Clause Suggestions
Accordion Display Format
Each swap clause suggestion appears in an expandable accordion:
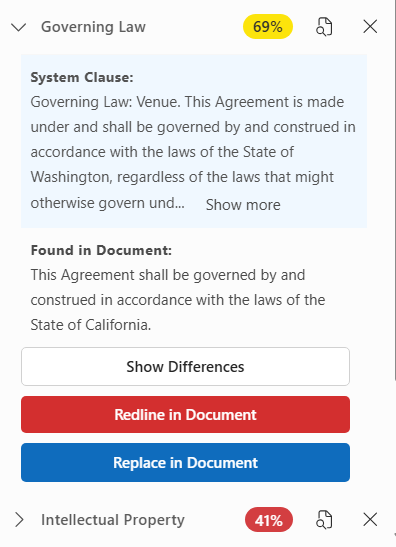
Header Information:
- Clause Type - Category of clause (e.g., "Liability Clause")
- Match Badge - Percentage score with color coding
- Navigate Button - Jump to clause location in document
- Dismiss Button - Remove from active suggestions
Expanded Clause Comparison
When you expand a clause suggestion:
Content Display:
- System Clause - Recommended standardized language
- Found in Document - Current clause text from your document
- Show More/Less - For lengthy clauses, expand or collapse text
- Action Buttons - Tools for replacing or comparing clauses
Text Truncation:
- Long clauses (over 200 characters) show truncated with "Show more" button
- Full text revealed when expanded
- Show less button collapses back to summary view
Clause Comparison and Analysis
Show Differences Feature

Redline Comparison Process:
- Click "Show Differences" button
- Popup dialog opens with side-by-side comparison
- Redline formatting shows:
- Strikethrough text - Content being removed
- Underlined text - Content being added
- Color coding - Visual distinction between changes
When to Use Show Differences:
- Before replacing - See exactly what will change
- Legal review - Understand impact of proposed changes
- Training purposes - Learn differences between old and new language
- Decision making - Determine if replacement is beneficial
Replacing Clauses
Replace in Document Process

Replacement Steps:
- Review comparison - Understand what will change
- Click "Replace in Document" button
- VISDOM locates clause - Finds exact text in your document
- Text replacement - Substitutes system clause for original
- Auto-dismiss - Suggestion removed from active list
Clause Location Technology
How the System Finds Clauses:
Primary Method - Paragraph ID:
- Uses unique identifiers for precise location
- Most reliable method for exact placement
Secondary Method - Paragraph Index:
- Uses paragraph position numbers
- Backup when IDs aren't available
Fallback Method - Text Search:
- Searches for matching text content
- Handles cases where structure has changed
Smart Search Features:
- Full text search - Looks for complete clause text first
- Chunk searching - If full text fails, searches key portions
- Fuzzy matching - Handles minor text variations
Error Handling
When Replacement Fails:
Common Error Messages:
- "Could not find clause in document" - Text may have been modified
- "Error replacing clause" - Technical issue during replacement
- Connection or permission errors
Recovery Options:
- Manual replacement - Copy system clause text and replace manually
- Use redline feature - Insert comparison and make changes manually
- Refresh analysis - Re-run analysis if document has changed
- Check document - Ensure clause hasn't been deleted or heavily modified
Managing Suggestions
Dismissing Irrelevant Suggestions

When to Dismiss:
- False positives - AI incorrectly identified clause for replacement
- Intentional language - Your clause is purposely different
- Not applicable - System clause doesn't fit your context
- Already reviewed - Decided not to make changes
Dismissal Process:
- Click dismiss button (X icon) on clause header
- Suggestion disappears from active list
- Stored persistently - Dismissal remembered for this document
- Switch to "Dismissed Items" to see dismissed suggestions
Restoring Dismissed Suggestions
From Dismissed Items View:
Restoration Process:
- Switch to "Dismissed Items" view using toggle
- Find dismissed suggestion you want to restore
- Click restore button (circular arrow icon)
- Suggestion returns to active items list
Dismissed Item Information:
- Shows dismissal timestamp
- Maintains all original comparison data
- Can be restored at any time
- Dismissals are document-specific
Advanced Features and Best Practices
Strategic Use of Filters
Quality-Focused Workflow:
- Start with 80%-95% range - Quick wins, minor improvements
- Review and replace high-confidence suggestions
- Move to 50%-80% range - Medium-impact changes
- Evaluate business value vs. effort for each change
- End with 10%-50% range - Major improvements requiring careful review
Risk-Based Filtering:
High-Risk Documents: Focus on 80%-95% (safer changes)
Standard Contracts: Use 50%-95% (balanced approach)
Template Development: Review 10%-95% (comprehensive improvement)
Integration with Document Workflow
Before Making Changes:
- Legal review - Have counsel approve significant clause changes
- Business impact - Consider how changes affect contract terms
- Stakeholder approval - Get necessary approvals before replacement
- Version control - Save original version before making changes
After Replacement:
- Document review - Read through replaced clauses in context
- Formatting check - Ensure consistent document appearance
- Cross-reference - Verify clause changes don't conflict with other provisions
- Final approval - Get necessary sign-offs on modified document
Quality Assurance Process
Recommended Review Workflow:
- Show Differences for each potential replacement
- Redline in Document for complex changes
- Legal review of proposed modifications
- Business review of impact on contract terms
- Replace in Document after approvals
- Final document review for consistency and accuracy
Troubleshooting Swap Clauses
No Suggestions Found
Possible Causes:
- Document already optimized - Clauses are already using standard language
- Non-contract content - Document doesn't contain typical contract clauses
- Analysis still processing - Large documents take time
- Network issues - Connection problems with AI service
Solutions:
- Check document content - Ensure it contains contract language
- Adjust filters - Try 10%-95% range to see all possibilities
- Refresh analysis - Use refresh button to retry
- Wait for completion - Allow time for thorough analysis
Inaccurate Suggestions
When AI Gets It Wrong:
- Inappropriate replacements - System clause doesn't fit context
- Over-aggressive matching - Low-quality suggestions
- Missing context - AI doesn't understand specific business needs
Correction Actions:
- Dismiss inappropriate suggestions - Remove false positives
- Use higher thresholds - Focus on 70%+ matches for better quality
- Review in context - Always check how system clause fits document flow
- Legal review - Have counsel evaluate AI suggestions
Replacement Failures
Technical Issues:
- Text not found - Original clause may have been modified
- Permission errors - Document may be protected or read-only
- Network problems - Connection issues during replacement
Resolution Steps:
- Check document status - Ensure it's editable
- Refresh document - Reload and try again
- Manual replacement - Copy system clause and replace manually
- Contact support - If technical issues persist
Performance Optimization
For Large Documents:
- Expect longer analysis - Complex documents take more time
- Stable connection - Ensure reliable internet during analysis
- Progressive replacement - Replace clauses in batches, not all at once
- Regular saves - Save document frequently during replacement process
13. Multi-Document Analysis
Multi-Document Analysis Overview
Multi-Document Analysis allows you to compare your current document with additional uploaded files to identify similarities and differences in clause content. This powerful feature helps ensure consistency across contracts and identify potential issues or improvements.
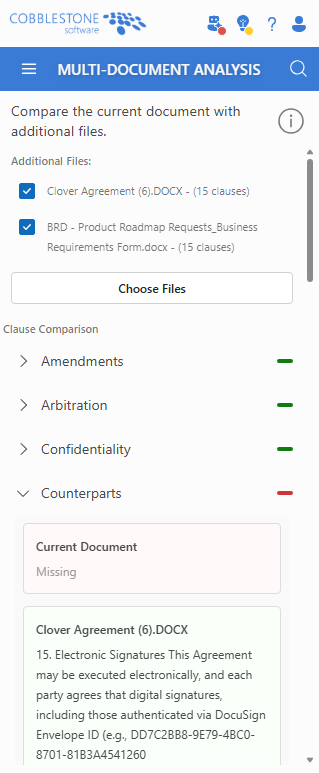
Main Components:
- Tab Header - Information about the feature and instructions
- File Upload Section - Add additional documents for comparison
- Document Selection - Include/exclude uploaded files from analysis
- Clause Comparison Results - Accordion view showing clause differences
- Badge System - Visual indicators for clause status across documents
Getting Started with Multi-Document Analysis
Supported File Types
The system supports two types of file uploads:
Supported Formats:
- Plain Text Files (.txt) - Direct text extraction
- Word Documents (.docx) - Text extraction using advanced parsing
- Multiple Files - Upload several documents simultaneously
- File Size Limits - Check with administrator for size restrictions
Initial Setup Process
When you first open the Multi-Document Analysis tab:
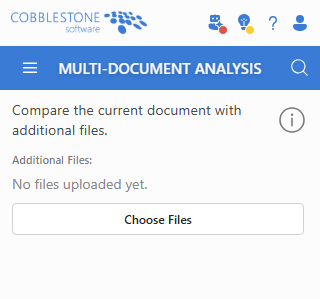
Automatic Process:
- Current Document Analysis - AI analyzes your open document for clauses
- Ready State - Interface shows "No files uploaded yet" until you add documents
- Upload Preparation - System ready to accept additional files for comparison
Uploading Documents for Comparison
File Upload Process
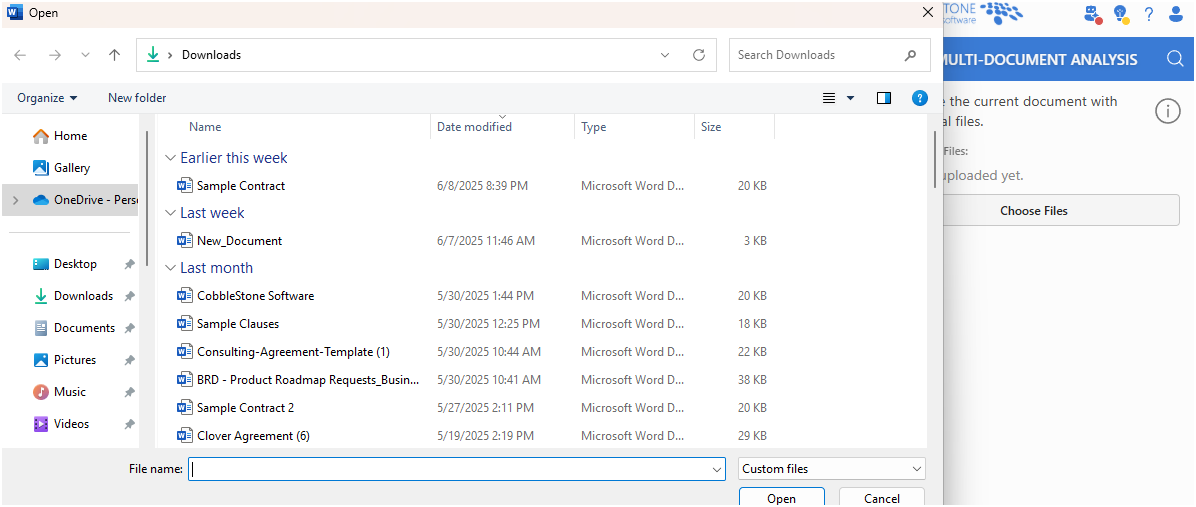
Upload Steps:
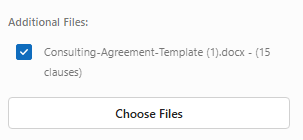
- Click "Choose Files" button
- Select multiple files using file browser (.txt or .docx)
- Analysis starts automatically - AI extracts text and identifies clauses
- Progress indicator shows "Analyzing..." during processing
- Checkbox list appears with uploaded documents
Upload Analysis Results
Each uploaded document shows:
Document Information Display:
- File Name - Original filename of uploaded document
- Clause Count - Number of clauses found (e.g., "- (15 clauses)")
- Checkbox - Include/exclude from comparison
- Auto-Include - New uploads are included by default
Analysis Process:
- Text Extraction - System reads document content
- VISDOM Clause Detection - Identifies legal provisions and important clauses
- Categorization - Groups clauses by type for comparison
- Error Handling - Unsupported files show appropriate messages
Managing Document Selection
Document Inclusion Controls
Selection Features:
- Current Document - Always included when clauses are available
- Uploaded Documents - Individual checkboxes for each file
- Dynamic Updates - Comparison updates when selections change
- Minimum Requirement - Need at least 2 documents for comparison
Document Status Indicators
Checkbox States:
- ✅ Checked - Document included in comparison
- ❌ Unchecked - Document excluded from comparison
- Auto-checking - New uploads automatically included
Document Information:
- Contract_Template.docx - (23 clauses) ✅
- Vendor_Agreement.txt - (18 clauses) ✅
- Service_Contract.docx - (0 clauses) ❌
Understanding Comparison Results
Automatic Comparison Execution
When Comparison Runs:
- File Upload - Automatically after new files are analyzed
- Selection Changes - When documents are included/excluded
- Current Document Updates - When current document analysis changes
- Real-time Updates - No manual "Compare" button needed
Accordion Results Display
Results appear in an expandable accordion format:
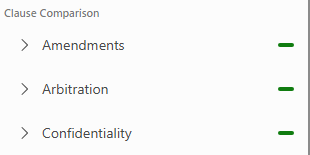
Accordion Structure:
- Header - Clause name and status badge
- Expandable Content - Detailed comparison of clause text across documents
- Color-coded Cards - Visual indicators for each document's clause status
- Similarity Scores - Percentage match between clause versions
Badge System and Status Indicators
Understanding Badge Colors
Each clause category shows a colored badge indicating overall status:

Badge Colors:
- 🟢 Green (Success) - Clause present in all documents and matches exactly
- 🟡 Yellow (Warning) - Clause present but differences detected between versions
- 🔴 Red (Danger) - Clause missing from at least one document
Badge Determination Logic
Green Badge Criteria:
- Clause exists in all selected documents
- Text content matches exactly (or 99%+ similarity)
- Consistent language across all documents
Yellow Badge Criteria:
- Clause exists in all documents
- Text differences detected between versions
- Similarity score below 99% but above threshold
Red Badge Criteria:
- Clause missing from one or more documents
- Indicates potential gaps in contract coverage
Detailed Clause Comparison
Expandable Clause Details
When you expand a clause in the accordion:
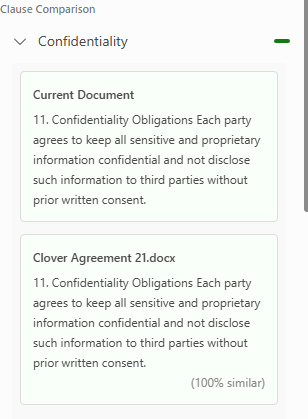
Information Displayed:
- Document Cards - One card per document showing clause content
- Color-coded Backgrounds - Visual indication of clause status
- Similarity Scores - Percentage match compared to reference document
- Diff Highlighting - Visual markup showing specific differences
Document Card Colors
Card Background Colors:
- Light Green (#f9fff9) - Clause matches reference perfectly
- Light Yellow (#fffbe6) - Clause present but differences detected
- Light Red (#fff9f9) - Clause missing from this document
Text Comparison Features
Diff Highlighting:
- Green Background - Text added in this version
- Red Background + Strikethrough - Text removed from reference
- Normal Text - Text that matches reference
- Similarity Percentage - Numeric score (e.g., "87% similar")
Show More/Less Functionality
For lengthy clauses:
- Truncation - First 200 characters shown by default
- "Show more" button - Reveals complete clause text
- "Show less" button - Collapses back to summary view
- Per-document control - Expand/collapse individual document cards
Advanced Analysis Features
Similarity Scoring Algorithm
The system uses sophisticated algorithms to determine clause similarity:
Jaccard Index Calculation:
- Text Normalization - Removes punctuation, standardizes spacing
- Word Tokenization - Breaks text into individual words
- Set Comparison - Calculates word overlap between clauses
- Percentage Score - Intersection ÷ Union of word sets
Similarity Thresholds:
- 99-100% - Essentially identical (green status)
- 95-98% - Very similar with minor differences
- 80-94% - Similar with notable differences
- Below 80% - Significant differences (yellow warning)
Reference Document Logic
Reference Selection:
- First Document with Text - Used as comparison baseline
- Consistent Comparison - All other documents compared to reference
- Difference Highlighting - Shows changes relative to reference version
Practical Use Cases
Contract Template Validation
Scenario: Ensure all contracts use consistent clause language
Process:
- Upload multiple contracts of the same type
- Review yellow and red badges for inconsistencies
- Identify clauses that need standardization
- Update templates based on findings
Vendor Agreement Comparison
Scenario: Compare agreements with different vendors
Process:
- Upload agreements from multiple vendors
- Identify missing clauses (red badges)
- Review different terms (yellow badges)
- Negotiate consistent terms across vendors
Contract Evolution Tracking
Scenario: Track how contract language has changed over time
Process:
- Upload different versions of the same contract
- Review similarity scores to see extent of changes
- Use diff highlighting to identify specific modifications
- Ensure important clauses haven't been lost
Error Handling and Limitations
Unsupported File Types
Error Messages:
- "[Unsupported file type: only .txt and .docx supported]"
- "[Failed to extract text from Word document]"
Resolution:
- Convert files to supported formats (.txt or .docx)
- Save as plain text from original application
- Check file corruption if extraction fails
Analysis Failures
When Analysis Fails:
- Network issues - Connection problems with AI service
- File corruption - Damaged or unreadable files
- Service unavailable - Visdom analysis service offline
Recovery Options:
- Retry upload - Try uploading files again
- Check network - Ensure stable internet connection
- Refresh analysis - Use refresh button on tab
- Contact support - If persistent issues occur
No Clauses Found
Possible Causes:
- Non-contract content - Document doesn't contain legal language
- Unsupported format - Text extraction failed
- Short documents - Insufficient text for clause detection
Solutions:
- Verify content - Ensure documents contain contract language
- Check extraction - Verify text was properly extracted
- Try different files - Use documents with clear legal provisions
Performance Considerations
Upload Optimization
File Size Management:
- Smaller files process faster
- Multiple small files better than few large files
- Text files process faster than Word documents
Batch Processing:
- Upload in batches if processing many files
- Monitor progress - Wait for analysis completion before adding more
- Network stability - Ensure consistent internet connection
Comparison Efficiency
Document Selection Strategy:
- Uncheck irrelevant files - Exclude documents that don't add value
- Focus on similar types - Compare like documents for better results
- Limit total documents - Too many may slow interface
14. Sentiment Analysis (Visdom+ Only)
Sentiment Analysis Overview
Sentiment Analysis is an advanced VISDOM AI feature that utilizes VISDOM+ to analyze your document to identify positive, neutral, and negative language patterns by party or contract section. This powerful tool helps you understand the emotional tone and potential negotiation stance reflected in contract language.
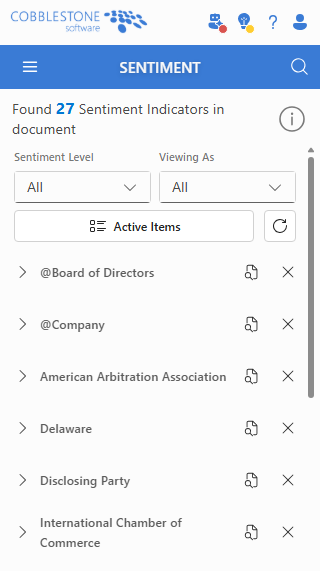
Main Components:
- Tab Header - Shows count of sentiment indicators found
- Filter Controls - Sentiment level and party selection dropdowns
- View Mode Toggle - Switch between Active and Dismissed items
- Accordion Results - Expandable cards showing sentiment findings
- Badge System - Color-coded sentiment indicators
License Requirements
Visdom+ License Required
Sentiment Analysis is a premium feature that requires specific licensing:
License Check:
- VISDOM+ Component - Must be licensed and available
- License Detection - System automatically checks availability
- Error Message - "Sentiment analysis requires VISDOM+ license" if not available
If You Don't Have Access:
- Contact Administrator - Request VISDOM+ licensing
- Check License Status - Verify with Contract Insight administrator
- Alternative Features - Use Found Clauses or other analysis tools
Understanding Sentiment Analysis
What Gets Analyzed
VISDOM+ examines your document for:
Sentiment Indicators:
- Positive Language - Favorable terms, cooperative language, beneficial clauses
- Neutral Language - Standard contract provisions, balanced terms
- Negative Language - Restrictive terms, penalties, unfavorable conditions
Party-Based Analysis:
- Specific Parties - Language favoring or disfavoring particular parties
- Contractual Relationships - How terms affect different parties
- Negotiation Positions - Strong vs. weak positioning in clauses
Automatic Analysis Process
When you open the Sentiment tab:

Processing Steps:
- Document Scan - AI reads through all document text
- Party Identification - Recognizes contract parties and roles
- Language Analysis - Evaluates tone and sentiment of provisions
- Categorization - Groups findings by sentiment type and party
- Results Display - Shows findings in organized accordion format
Filter Controls and Navigation
Sentiment Level Filtering
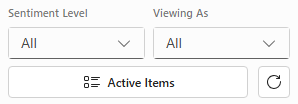
Filter Options:
- All - Shows all sentiment indicators (default)
- Positive - Only favorable/beneficial language
- Neutral - Balanced or standard contract language
- Negative - Restrictive or unfavorable language
Dynamic Filtering:
- Real-time Updates - Results filter immediately when selection changes
- Count Updates - Header shows count of visible items
- Combined Filters - Works with party filtering for precise results
Party-Based Filtering
Viewing Options:
- All - Shows sentiment for all parties (default)
- Specific Parties - Individual party names detected in document
- Dynamic List - Party options populate based on document analysis
Party Detection:
- Automatic Recognition - AI identifies contract parties from document text
- Role-Based Analysis - Understands different party positions
- Multi-Party Support - Handles complex contracts with multiple parties
Sentiment Results Display
Badge System and Color Coding
Each sentiment finding shows a colored badge indicating the type:

Badge Colors:
- 🟢 Green (Success) - Positive/Favorable sentiment
- 🔵 Blue (Informative) - Neutral sentiment
- 🔴 Red (Danger) - Negative/Unfavorable sentiment
Accordion Card Format
Results appear in expandable cards showing detailed information:
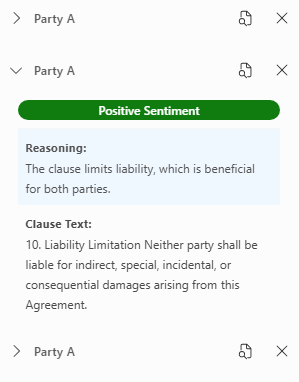
Card Header:
- Party Name - Which party the sentiment relates to
- Navigation Button - Jump to location in document
- Dismiss Button - Remove from active results
Expanded Content:
- Sentiment Badge - Color-coded sentiment indicator
- Reasoning Section - AI explanation of why this sentiment was identified
- Clause Text - Full text of the clause containing the sentiment
Text Display Features
Smart Text Truncation:
- First 200 characters shown by default for long clauses
- "Show more" button reveals complete clause text
- "Show less" button collapses back to summary
- Per-card control - Expand/collapse individual findings
Understanding Sentiment Findings
Reasoning Analysis
Each sentiment finding includes AI reasoning explaining the classification:
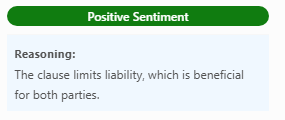
Reasoning Examples:
- Positive: "This clause provides favorable termination rights to the customer with minimal restrictions"
- Neutral: "Standard force majeure clause with balanced provisions for both parties"
- Negative: "This liability limitation heavily favors the vendor while exposing the customer to significant risk"
Context and Party Impact
Understanding Results:
- Party-Specific - Sentiment is analyzed from each party's perspective
- Clause Context - Considers how language affects contractual relationships
- Business Impact - Identifies provisions that may affect negotiation or risk
Navigation and Document Integration
View in Document Feature

Navigation Process:
- Click navigation button (magnifying glass icon) on any sentiment finding
- Document scrolls to exact location of the sentiment-bearing clause
- Text highlighting shows the specific clause content
- Context understanding - See sentiment within document flow
Navigation Benefits:
- Precise Location - Jumps directly to relevant clause
- Full Context - Understand sentiment within surrounding content
- Verification - Confirm AI correctly identified sentiment
- Quick Reference - Easy switching between analysis and document
Managing Sentiment Results
Active vs. Dismissed Views

Toggle Functions:
- "Active Items" - Current sentiment findings (default view)
- "Dismissed Items" - Previously dismissed findings
- Item Counts - Shows number of findings in each view
Dismissing Irrelevant Findings
When to Dismiss:
- False Positives - AI incorrectly identified neutral language as sentiment-laden
- Expected Language - Standard provisions that don't require attention
- Already Addressed - Provisions you've already reviewed or negotiated
- Out of Scope - Sentiment not relevant to your current analysis goals
Dismissal Process:
- Click dismiss button (X icon) on any sentiment finding
- Finding disappears from active view
- Persistent storage - Dismissal remembered for this document
- Switch to "Dismissed Items" to see dismissed findings
Restoring Dismissed Findings
From Dismissed Items View:

Restoration Process:
- Switch to "Dismissed Items" view using toggle button
- Find dismissed sentiment you want to restore
- Click restore button (circular arrow icon)
- Finding returns to active items list
Practical Applications
Contract Negotiation Preparation
Use Case: Preparing for contract negotiations
Workflow:
- Run sentiment analysis on proposed contract
- Filter by "Negative" to identify unfavorable terms
- Review reasoning to understand AI's assessment
- Prepare negotiation points for identified issues
- Filter by parties to see imbalanced provisions
Risk Assessment
Use Case: Evaluating contract risk exposure
Workflow:
- Review negative sentiment findings first
- Analyze party-specific disadvantageous language
- Navigate to clauses for detailed review
- Document risk areas for legal review
- Cross-reference with high-risk findings from other tabs
Contract Quality Review
Use Case: Improving contract language quality
Workflow:
- Identify imbalanced sentiment across parties
- Review neutral findings for improvement opportunities
- Compare positive examples for best practices
- Standardize language based on sentiment patterns
- Build templates incorporating balanced sentiment
Advanced Features
Multi-Party Analysis
For complex contracts with multiple parties:
Party Relationship Analysis:
- Individual Party Views - Filter to see sentiment from each party's perspective
- Comparative Analysis - Switch between parties to identify imbalances
- Relationship Dynamics - Understand how language affects different relationships
Combined Filter Analysis
Strategic Filtering Combinations:
- Negative + Specific Party = Risk areas for that party
- Positive + All Parties = Generally favorable provisions
- Neutral + Filter Review = Standard language to potentially improve
Troubleshooting Sentiment Analysis
No Results Found
Possible Causes:
- Document lacks sentiment - Very neutral, technical language
- Analysis still processing - Complex documents take time
- Service unavailable - Network or VISDOM+ service issues
- Insufficient content - Document too short for meaningful analysis
Solutions:
- Wait for completion - Allow analysis to finish
- Check document content - Ensure it contains evaluative language
- Refresh analysis - Use refresh button to retry
- Verify service status - Check VISDOM+ availability
Inaccurate Sentiment Classification
When AI Gets It Wrong:
- Context misunderstanding - AI misses business context
- Industry-specific language - Specialized terms misinterpreted
- Complex provisions - Multi-faceted clauses with mixed sentiment
Correction Actions:
- Dismiss false positives - Remove incorrect classifications
- Focus on high-confidence results - Start with clear sentiment indicators
- Manual review - Verify AI findings with human analysis
- Document patterns - Note common misclassifications for feedback
Performance Issues
Slow Analysis:
- Large documents - Take longer to process
- Complex language - Nuanced provisions require more analysis time
- Network connectivity - Affects AI service communication
Optimization:
- Stable internet - Ensure consistent connection
- Document preparation - Clean, well-formatted documents analyze better
- Patience - Allow adequate time for thorough sentiment analysis
Service Availability
Error Messages:
- "Sentiment analysis requires VISDOM+ license"
- "Visdom services are unavailable"
- "Visdom document analysis is unavailable"
Recovery Steps:
- Check licensing - Verify VISDOM+ is properly licensed
- Refresh analysis - Use refresh button multiple times
- Network check - Ensure stable internet connection
- Contact administrator - May be configuration or service issue
15. High Risk Findings (Visdom+ Only)
High Risk Findings Overview
High Risk Findings is a feature that utilizes VISDOM+ to analyze your document to identify non-standard language, uncommon clauses, and high-risk elements that could pose legal or business risks. This premium tool helps you proactively identify potential issues before they become problems.

Main Components:
- Tab Header - Shows count of high risk findings identified
- Risk Type Filter - Filter by specific types of risk findings
- View Mode Toggle - Switch between Active and Dismissed items
- Accordion Results - Expandable cards showing detailed risk analysis
- High Risk Badges - Red danger indicators for all findings
License Requirements
VISDOM+ License Required
High Risk Findings is a premium feature that requires specific licensing.
License Check:
- VISDOM+ Component - Must be licensed and available
- Automatic Detection - System checks license availability
- Error Message - "High risk analysis requires VISDOM+ license" if not licensed
If You Don't Have Access:
- Contact Administrator - Request Visdom+ licensing
- Verify License Status - Check with Contract Insight administrator
- Alternative Analysis - Use Found Clauses or Sentiment Analysis tools
Understanding Risk Analysis Types
What Gets Analyzed
The AI system examines your document for several categories of risk:
Risk Categories:
- Non-Standard Language - Unusual or irregular contract language
- Uncommon Clauses - Rare or specialized provisions
- Combined Risks - Clauses that are both non-standard AND uncommon
Risk Classification Logic
Non-Standard Language:
- Language that deviates from typical contract provisions
- Unusual terminology or phrasing
- Potentially confusing or ambiguous language
Uncommon Clauses:
- Rarely seen provisions in standard contracts
- Specialized terms specific to certain industries
- Experimental or innovative contract language
Combined Risk:
- Clauses flagged for both non-standard language AND uncommon content
- Highest risk category requiring careful review
Automatic Analysis Process
When you open the High Risk Findings tab:

Processing Steps:
- Document Scan - AI reads through all document text
- Language Comparison - Compares against standard contract language database
- Clause Evaluation - Identifies unusual or risky provisions
- Risk Categorization - Classifies findings by risk type
- Results Display - Shows findings with detailed reasoning
Filter Controls and Navigation
Risk Type Filtering
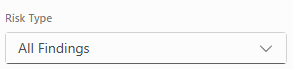
Filter Options:
- All Findings - Shows all risk categories (default)
- Contains Non Standard Language - Only non-standard language findings
- Uncommon Clause - Only uncommon clause findings
- Dynamic Counts - Shows number of findings in each category
Filter Examples:
- All Findings (12) - Shows all 12 risk findings
- Contains Non Standard Language (5) - Shows 5 non-standard language findings
- Uncommon Clause (8) - Shows 8 uncommon clause findings
- Combined Category (1) - Finding flagged for both risks
View Mode Toggle

Toggle Functions:
- "Active Items" - Current risk findings requiring attention
- "Dismissed Items" - Previously dismissed findings
- Item Counts - Number of findings in each view
- Quick Switch - One-click toggle between views
Risk Findings Display
Accordion Card Format
Each risk finding appears in an expandable accordion card:
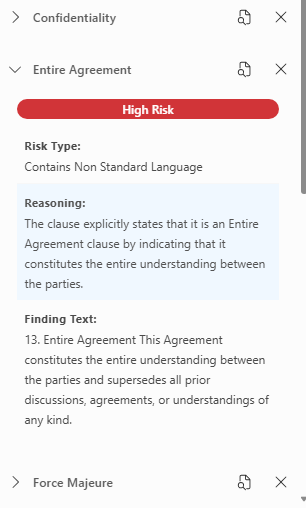
Card Header:
- Category Name - Type of clause or provision (e.g., "Liability Clause")
- Navigation Button - Jump to finding location in document
- Dismiss Button - Remove from active findings list
Card Badge:
- Red "High Risk" Badge - All findings marked as high risk
- Danger Color - Visual emphasis on risk level
- Full Width - Prominent display for attention
Expanded Card Content
When you expand a risk finding:
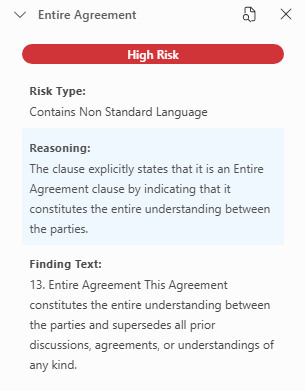
Detailed Information:
- Risk Type - Specific classification of the risk
- Reasoning Section - AI explanation of why this is flagged as risky
- Finding Text - Complete clause text that triggered the risk flag
- Show More/Less - Text expansion for lengthy content
Risk Type Classification Display
Risk Type Examples:
- "Contains Non Standard Language" - For unusual language patterns
- "Uncommon Clause" - For rarely seen provisions
- "Contains Non Standard Language & Uncommon Clause" - For combined risks
AI Reasoning Analysis
Each finding includes detailed AI reasoning explaining the risk classification:
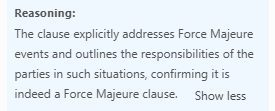
Reasoning Examples:
- Non-Standard: "This clause uses unusual termination language that deviates from standard industry practices"
- Uncommon: "This provision is rarely found in typical commercial contracts and may create enforcement issues"
- Combined: "This clause contains both non-standard language and uncommon provisions that significantly increase legal risk"
Document Navigation

Navigation Process:
- Click navigation button (magnifying glass icon) on any finding
- Document scrolls to exact location of the risky clause
- Text highlighting shows the specific problematic content
- Context review - See risk finding within document flow
Navigation Benefits:
- Precise Location - Jumps directly to problematic clause
- Context Understanding - View risk within surrounding content
- Verification - Confirm AI correctly identified risky language
- Quick Reference - Easy switching between analysis and document
Managing Risk Findings
Dismissing Findings
When to Dismiss:
- False Positives - AI incorrectly flagged standard language as risky
- Intentional Language - Specialized terms appropriate for your industry
- Acceptable Risk - Risk identified but acceptable for business reasons
- Already Addressed - Risk reviewed and mitigated elsewhere
Dismissal Process:
- Click dismiss button (X icon) on any risk finding
- Finding disappears from active view
- Persistent Storage - Dismissal remembered for this document
- Switch to "Dismissed Items" to see dismissed findings
Restoring Dismissed Findings
From Dismissed Items View:

Restoration Process:
- Switch to "Dismissed Items" view using toggle button
- Find dismissed risk finding you want to restore
- Click restore button (circular arrow icon)
- Finding returns to active items list
- Dismissal timestamp shows when originally dismissed
Practical Risk Management Applications
Contract Review Workflow
Use Case: Comprehensive contract risk assessment
Workflow:
- Run high risk analysis on contract under review
- Review all findings to understand potential risks
- Filter by risk type to focus on specific categories
- Navigate to clauses for detailed examination
- Consult legal counsel on significant risk findings
- Negotiate or modify problematic language
Template Quality Assurance
Use Case: Improving standard contract templates
Workflow:
- Analyze existing templates for risk patterns
- Identify common risk findings across multiple templates
- Review AI reasoning to understand why language is flagged
- Standardize language to reduce risk indicators
- Create cleaner templates with fewer risk findings
Due Diligence Process
Use Case: Contract acquisition or review process
Workflow:
- Batch analyze multiple contracts for risk assessment
- Prioritize review based on high risk findings count
- Focus legal resources on contracts with most risk findings
- Document risk patterns for stakeholder reporting
- Make informed decisions based on risk analysis
Advanced Analysis Features
Combined Risk Analysis
For findings flagged with multiple risk types:
Understanding Combined Risks:
- Higher Priority - Deserve immediate attention
- Compounded Issues - Multiple risk factors in single clause
- Review Priority - Address these findings first
Risk Pattern Recognition
Identifying Patterns:
- Common Language Issues - Recurring non-standard language across documents
- Frequent Uncommon Clauses - Unusual provisions appearing regularly
- Industry-Specific Risks - Risk patterns specific to your business sector
Integration with Legal Review Process
Workflow Integration
Before Legal Review:
- Run risk analysis to identify potential issues
- Filter and prioritize based on risk types
- Prepare questions about flagged provisions
- Document risk areas for focused legal discussion
During Legal Review:
- Navigate to flagged clauses during review sessions
- Discuss AI reasoning with legal counsel
- Evaluate risk tolerance for each finding
- Make informed decisions about language modifications
After Legal Review:
- Dismiss acceptable risks that legal counsel approved
- Track modification decisions for similar future contracts
- Update templates based on risk analysis insights
- Document best practices for risk management
Troubleshooting High Risk Findings
No Findings Found
Possible Causes:
- Low-risk document - Document contains only standard language
- Analysis still processing - Complex documents take time
- Service unavailable - VISDOM+ service connection issues
- Insufficient content - Document too short for meaningful analysis
Solutions:
- Wait for completion - Allow analysis to finish processing
- Check document content - Ensure it contains substantive contract language
- Refresh analysis - Use refresh button to retry
- Verify service status - Check VISDOM+ service availability
Excessive False Positives
When AI Over-Flags:
- Industry-specific language - Specialized terms flagged as non-standard
- Organization standards - Internal language patterns flagged as unusual
- Regional variations - Local legal language flagged as uncommon
Management Strategies:
- Dismiss inappropriate findings - Remove false positives systematically
- Pattern recognition - Note common false positive types
- Legal consultation - Verify AI findings with counsel
- Feedback documentation - Track patterns for potential system improvements
Performance Issues
Slow Analysis:
- Large documents - Complex contracts take longer to analyze
- Network connectivity - Affects AI service communication
- Service load - Analysis service may be busy
Optimization:
- Stable internet connection - Ensure consistent connectivity
- Document preparation - Clean, well-formatted documents analyze better
- Patience - Allow adequate time for thorough risk analysis
Service Availability
Error Messages:
- "High risk analysis requires VISDOM+ license"
- "Visdom services are unavailable"
- "Visdom document analysis is unavailable"
Recovery Steps:
- Check licensing - Verify Visdom+ is properly licensed
- Refresh analysis - Use refresh button multiple times
- Network diagnostics - Check internet connection stability
- Administrator contact - May be configuration or service issue
16. Terms Explorer
Terms Explorer Overview
Terms Explorer is a feature that analyzes your document to identify and categorize important terms, definitions, and key concepts. This tool helps you understand the terminology used in your contract and ensures consistency in language usage throughout the document.
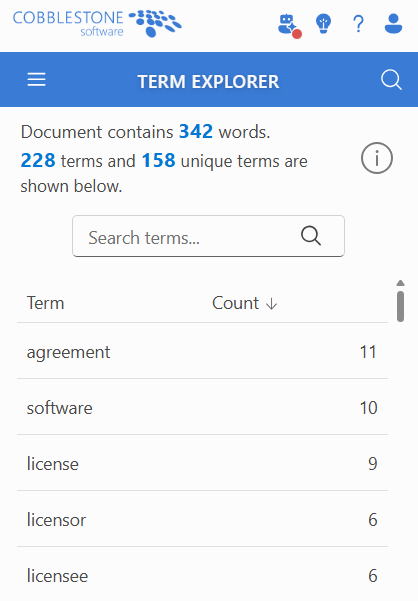
Main Components:
- Tab Header - Shows count of terms identified in document
- Term Categories - Filter by different types of terms (definitions, key terms, etc.)
- Search and Filter - Find specific terms or categories
- Terms List - Organized display of identified terms
- Definition Display - Shows term definitions and context
Understanding Term Analysis
What Gets Analyzed
The Terms Explorer examines your document for various types of important terminology:
Term Categories:
- Defined Terms - Terms explicitly defined in the document
- Key Business Terms - Important business concepts and terminology
- Legal Terms - Legal concepts and provisions
- Technical Terms - Industry-specific or technical terminology
- Financial Terms - Monetary and financial concepts
Automatic Analysis Process
When you open the Terms Explorer tab:
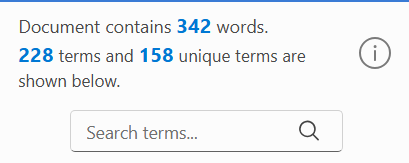
Processing Steps:
- Document Scan - System reads through all document text
- Term Identification - Identifies important terms and concepts
Terms Display and Organization
Term Entry Format
Each term entry displays comprehensive information:

Term Information:
- Term Name - The identified term or phrase
- Usage Count - Number of times term appears
- Navigate Button - Jump to first occurrence in document
Navigation and Document Integration
Navigate to Term Usage
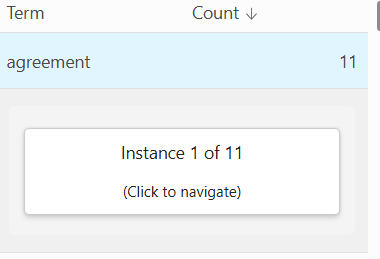
Navigation Process:
- Click navigation button on any term entry
- Document scrolls to first occurrence of the term
- Text highlighting shows the term in context
- Multiple occurrences - Navigate through all uses of the term
Term Usage Context
Understanding Term Context:
- Definition Location - Where term is first defined
- Primary Usage - Main context where term appears
- Usage Frequency - How often term is referenced
Search and Filter Features
Term Search

Search Capabilities:
- Text Search - Find terms by name or partial text
- Real-time Results - Results update as you type
- Case Insensitive - Finds terms regardless of capitalization
Practical Applications
Contract Review and Analysis
Use Case: Comprehensive contract terminology review
Workflow:
- Review all defined terms - Ensure definitions are complete and clear
- Check for missing definitions - Identify terms that should be defined
- Verify consistency - Ensure terms are used consistently throughout
- Navigate to usage - Review how terms are used in context
- Document improvements - Note areas where definitions need clarification
Contract Negotiation Preparation
Use Case: Preparing for contract negotiations
Workflow:
- Identify key business terms - Focus on commercially important terminology
- Review financial terms - Understand monetary and payment concepts
- Analyze party definitions - Ensure clear understanding of roles
- Check legal terms - Verify understanding of legal concepts
- Prepare questions - Identify terms needing clarification
Template Development
Use Case: Creating standardized contract templates
Workflow:
- Extract common terms - Identify frequently used terminology
- Standardize definitions - Create consistent definition language
- Build glossary - Develop standard term definitions
- Check completeness - Ensure all important terms are defined
- Template integration - Include standard terms in new templates
Troubleshooting Terms Explorer
No Terms Found
Possible Causes:
- Non-contract content - Document doesn't contain typical contract terminology
- Very short document - Insufficient text for meaningful term analysis
- Unusual format - Document structure prevents term identification
- Analysis still processing - Complex documents take time
Solutions:
- Verify document content - Ensure it contains contract-like language
- Check document length - Very short documents may not have identifiable terms
- Wait for completion - Allow analysis to finish processing
- Refresh analysis - Try reloading the terms analysis
Performance Issues
Slow Analysis:
- Large documents - Complex contracts take longer to analyze
- Network connectivity - Affects analysis service communication
- Complex terminology - Documents with specialized language take more time
Optimization:
- Stable internet connection - Ensure consistent connectivity
- Document preparation - Well-formatted documents analyze better
- Reasonable expectations - Allow adequate time for thorough analysis
17. Document History
Document History Overview
Document History provides a comprehensive record of document activities and actions performed through the CobbleStone add-in. This feature helps you track document interactions with Contract Insight records, maintain an audit trail, and understand the document's lifecycle.
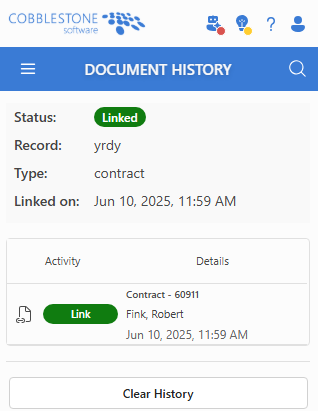
Main Components:
- Document Status Card - Shows current linking status and record information
- Activity Table - Chronological list of document actions
- Action Icons - Visual indicators for different activity types
- Clear History Button - Option to remove all history entries
Document Status Information
Linked Document Display
When your document is linked to a Contract Insight record:
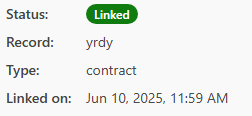
Status Information:
- Status Badge - Green "Linked" indicator
- Record Details - Name/title of linked record
- Record Type - Contract, Company, Purchase Order, etc.
- Link Date - When the document was originally linked
Unlinked Document Display
When your document is not linked to any record:
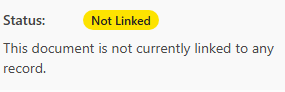
Status Information:
- Status Badge - Yellow "Not Linked" warning
- Explanation - "This document is not currently linked to any record"
- Action Prompt - Encourages user to link document for full functionality
Activity Tracking and Display
Activity Types and Icons
The system tracks various document activities with specific icons and colors:
Activity Categories:
- 📄 Link - Document linked to a record (Green badge)
- 🗑️ Unlink - Document unlinked from a record (Red badge)
- 📤 Upload - Document uploaded to Contract Insight (Blue badge)
- 📤 Upload & Link - Document uploaded and linked (Brand badge)
Table Structure
History entries are displayed in a two-column table format:
Column Layout:
- Activity Column - Shows action icon and colored badge
- Details Column - Record information, user, and timestamp
Entry Details Format
Each history entry contains comprehensive information:
Entry Information:
- Record Title/ID - Name or ID number of the related record
- User Attribution - Who performed the action
- Timestamp - Exact date and time (formatted as "Mon DD, YYYY HH:MM AM/PM")
- Visual Hierarchy - Record title prominent, details below
Understanding Activity History
Link Activities
Document Linking:
- When Recorded: Document is connected to a Contract Insight record
- Information Captured: Record title, user who linked, exact timestamp
- Visual Indicator: Green "link" badge with document link icon
Document Unlinking:
- When Recorded: Document connection to record is removed
- Information Captured: Which record was unlinked, user, timestamp
- Visual Indicator: Red "unlink" badge with delete icon
Upload Activities
Standard Upload:
- When Recorded: Document file uploaded to Contract Insight
- Information Captured: Target record, user, upload timestamp
- Visual Indicator: Blue "upload" badge with upload arrow icon
Upload & Link:
- When Recorded: Document uploaded and linked in single action
- Information Captured: Record details, user, timestamp
- Visual Indicator: Brand-colored "upload & link" badge
History Management Features
Chronological Organization
History entries are automatically organized by recency:
Display Order:
- Most Recent First - Latest activities appear at the top
- Automatic Sorting - No manual organization required
- Complete Timeline - All activities since first add-in use
Clear History Function

Clear History Process:
- Button Location - Appears at bottom when history exists
- Confirmation - System confirms before clearing
- Complete Removal - All history entries removed
- No Recovery - Cleared history cannot be restored
When to Clear History:
- Privacy Concerns - Remove activity traces
- Fresh Start - Clean slate for document tracking
- Testing Purposes - Clear test activities
- Performance - Reduce stored data (rarely necessary)
Empty State Display
No History Available
When no document activities have been recorded:
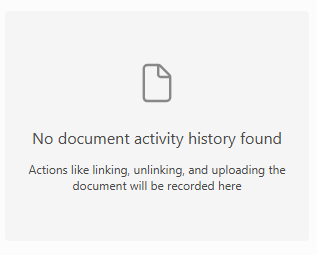
Empty State Features:
- Document Icon - Visual indicator for empty state
- Explanatory Text - "No document activity history found"
- Guidance Message - Explains what actions will be recorded
- User Education - Helps users understand the feature
Technical Implementation Details
Data Storage
Local Storage:
- Browser-based - History stored in browser local storage
- Document-specific - Each document has separate history
- User-specific - History tied to individual user sessions
- Persistent - Survives browser sessions until cleared
Data Format
Each history entry contains:
{
action: "link" | "unlink" | "upload" | "upload & link",
recordId: "12345",
recordTitle: "Contract Name",
user: "username",
timestamp: "2024-01-15T10:30:00Z"
}
Integration with Other Features
Document Context Integration
Relationship to Linking:
- Automatic Recording - Link/unlink actions automatically create history entries
- Status Consistency - Status card reflects most recent linking activity
- Cross-Reference - History explains current document state
Troubleshooting Document History
Missing History Entries
Possible Causes:
- Browser Issues - Local storage problems or corruption
- Session Problems - Activities performed in different browser sessions
- Add-in Reinstallation - History cleared during reinstall
- Manual Clearing - History intentionally cleared previously
Solutions:
- Check Browser Storage - Ensure local storage is enabled
- Consistent Browser Use - Use same browser/profile for activities
- Document Current Activity - Note activities for manual tracking if needed
Incorrect Timestamps
Common Issues:
- Time Zone Differences - Timestamps may show in different time zones
- System Clock - Based on local computer time settings
- Date Format - May vary based on browser locale settings
Resolution:
- Verify System Time - Check computer clock settings
- Browser Settings - Check browser locale and time zone settings
- Consistent Environment - Use same computer/browser for consistency
Performance Issues
Large History Collections:
- Slow Loading - Many entries may slow interface
- Storage Limits - Browser storage has limits
- Memory Usage - Large histories use more memory
Optimization:
- Clear History Periodically - Remove old entries when appropriate
- Monitor Performance - Watch for interface slowdowns
- Browser Maintenance - Clear browser cache if needed
18. Troubleshooting and Support
Getting Help and Support
Built-in Support Resources
The CobbleStone add-in provides multiple ways to get help and support:
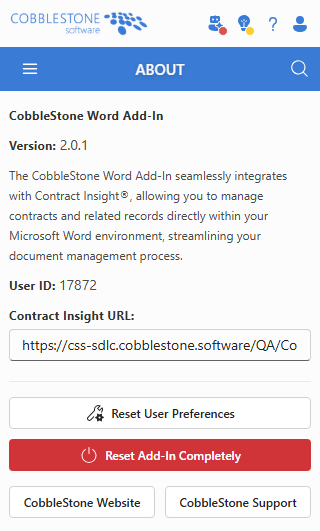
Info Tab Resources:
- Add-in Information - Version details and system information
- CobbleStone Website - Direct link to product information
- CobbleStone Support - Direct link to support portal
- Reset Options - Tools for resolving persistent issues
Support Portal Access
Direct access to CobbleStone's support system:
CobbleStone Support Portal:
- URL: https://CobbleStone.bolddesk.com/
- Access Method: Click "CobbleStone Support" button in Info tab
- Features: Ticket submission, knowledge base, community support
- Response Time: Varies by support plan
System Information and Diagnostics
Add-in Version Information
Located in the Info tab for diagnostic purposes:
Diagnostic Information:
- Version Number: Current add-in version (e.g., 2.0.1)
- Office Application: Automatically detects Word, Outlook, or Excel
- User ID: Your Contract Insight employee ID
- Contract Insight URL: Server connection information
Common Issues and Solutions
Authentication and Login Problems
Login Failures:
Symptoms:
- Unable to log into Contract Insight
- "Invalid credentials" error messages
- Authentication timeouts
Solutions:
- Verify Credentials - Check username and password
- Check URL - Ensure Contract Insight URL is correct
- Network Connection - Verify internet connectivity
- Contact Administrator - May be account or server issues
Session Expiration:
Symptoms:
- Suddenly logged out during use
- "Session expired" messages
- Features stop working unexpectedly
Solutions:
- Re-login - Use login process to re-authenticate
- Check Network - Ensure stable internet connection
- Extend Session - Contact admin about session timeout settings
Feature Access Issues
Missing Features or Tabs:
Symptoms:
- Expected tabs don't appear
- Features are disabled or grayed out
- "License required" messages
Solutions:
- Check Licensing - Verify Contract Insight modules are licensed
- User Permissions - Ensure proper security group membership
- Contact Administrator - May need license or permission updates
VISDOM+ Features Unavailable:
Affected Features:
- Sentiment Analysis
- High Risk Findings
- Advanced AI analysis features
Solutions:
- License Check - Verify VISDOM+ component is licensed
- Service Status - Check if VISDOM service is running
- Network Access - Ensure connection to VISDOM services
- Administrator Contact - May need licensing or configuration
Performance and Loading Issues
Slow Loading:
Symptoms:
- Add-in takes long time to load
- Features respond slowly
- Timeout errors
Solutions:
- Network Speed - Check internet connection quality
- Browser Cache - Clear browser cache and cookies
- Document Size - Large documents may process slower
- Server Load - May be temporary server congestion
Analysis Features Not Working:
Symptoms:
- Document analysis doesn't start
- "Analysis unavailable" messages
- Features stuck in loading state
Solutions:
- Refresh Analysis - Use refresh buttons on tabs
- Document Content - Ensure document contains analyzable text
- Service Status - Check if analysis services are available
- Network Issues - Verify stable internet connection
Data and Settings Management
Reset User Preferences
For resolving preference-related issues:

When to Use:
- Tab layouts are corrupted
- Saved settings causing problems
- Want to return to default configuration
- Interface behavior is unexpected
Process:
- Click "Reset User Preferences" in Info tab
- Confirm action in dialog box
- System resets all saved preferences
- Confirmation message shows result
What Gets Reset:
- Default tab views and layouts
- Saved filter preferences
- Display settings and options
- User interface customizations
Complete Add-in Reset
For severe issues requiring complete reset:

When to Use:
- Persistent login issues
- Corrupted local data
- Multiple features not working
- Need to start completely fresh
Process:
- Click "Reset Add-In Completely" (red button)
- Confirm action - this is irreversible
- All data cleared - localStorage completely emptied
- Automatic logout - redirected to login screen
What Gets Cleared:
- All stored authentication data
- User preferences and settings
- Document history
- Dismissed items lists
- Cached analysis results
Document-Specific Issues
Document Analysis Problems
No Analysis Results:
Possible Causes:
- Document contains no analyzable text
- Analysis services unavailable
- Network connectivity issues
- Document format not supported
Troubleshooting:
- Check Document Content - Ensure it contains text
- Refresh Analysis - Use refresh button on affected tabs
- Try Different Document - Test with known working document
- Check Network - Verify internet connection
Incorrect Analysis Results:
Symptoms:
- AI finds wrong or irrelevant content
- Missing obvious clauses or issues
- Unexpected categorization
Solutions:
- Dismiss False Positives - Use dismiss functionality
- Try Different Analysis - Change taxonomy or filters
- Manual Verification - Always verify AI results
- Document Quality - Ensure clean, well-formatted text
Navigation and Integration Issues
Navigate to Document Not Working:
Symptoms:
- Navigation buttons don't work
- Document doesn't scroll to content
- Can't find referenced text
Solutions:
- Check Document State - Ensure document is still open
- Refresh Document - Close and reopen if needed
- Text Changes - Content may have been modified
- Browser Issues - Try refreshing the add-in
Network and Connectivity Issues
Connection Problems
General Connectivity:
Symptoms:
- "Connection failed" error messages
- Features time out or don't load
- Intermittent functionality
Diagnostics:
- Internet Connection - Verify general internet access
- Contract Insight Access - Try accessing CI directly in browser
- Firewall Settings - Check corporate firewall rules
- VPN Issues - Try with/without VPN connection
API Service Issues:
Symptoms:
- Specific features fail while others work
- "Service unavailable" messages
- Partial functionality
Solutions:
- Check Service Status - Contact administrator about service health
- Retry Later - May be temporary service issues
- Network Routing - May be routing issues to specific services
- Configuration Check - Verify service URLs are correct
Browser and Office Compatibility
Browser-Specific Issues
Supported Browsers:
Recommended Browsers:
- Microsoft Edge (latest)
- Google Chrome (latest)
- Mozilla Firefox (latest)
- Safari (latest) - Mac only
Browser Issues:
- Cache Problems - Clear browser cache and cookies
- Extension Conflicts - Disable other browser extensions
- Privacy Settings - Allow cookies and local storage
- JavaScript - Ensure JavaScript is enabled
Office Version Compatibility
Supported Office Versions:
Office 365/Microsoft 365:
- Latest updates recommended
- Web versions supported
- Desktop versions supported
Older Office Versions:
- May have limited functionality
- Some features may not be available
- Update recommended for best experience
Advanced Troubleshooting
Local Storage Issues
Storage Problems:
Symptoms:
- Settings don't persist between sessions
- Frequent re-authentication required
- Missing dismissed items or preferences
Solutions:
- Check Browser Storage - Ensure local storage is enabled
- Storage Limits - Clear other website data if storage is full
- Privacy Mode - Don't use incognito/private browsing
- Browser Settings - Allow local storage for the add-in domain
Performance Optimization
Improving Add-in Performance:
Optimization Steps:
- Close Unused Tabs - Reduce browser memory usage
- Restart Browser - Clear memory and reset connections
- Update Browser - Ensure latest version for best performance
- Check System Resources - Ensure adequate memory and CPU
Getting Additional Help
When to Contact Support
Contact CobbleStone Support When:
- Multiple troubleshooting steps have failed
- System-wide issues affecting multiple users
- License or configuration questions
- Feature requests or enhancement suggestions
Information to Provide
For Faster Support Resolution:
Diagnostic Information:
- Add-in Version - From Info tab
- Office Application - Word, Outlook, Excel version
- Browser Information - Type and version
- Error Messages - Exact text of any error messages
- Steps to Reproduce - What actions led to the issue
- Screenshots - Visual documentation of the problem
Self-Service Resources
Additional Resources:
- CobbleStone Website - Product documentation and updates
- User Manuals - Comprehensive feature documentation
- Training Materials - Video tutorials and guides
- Community Forums - User community discussions and tips
Opening A Document into Word From Contract Insight:
To use Word to edit your document from Contract Insight instead of Contract Insight's document editor, first make sure your One Drive is connected. Navigate from the Main Menu > My > Cloud Drives.
.png)
You can then add your OneDrive account to your user profile.
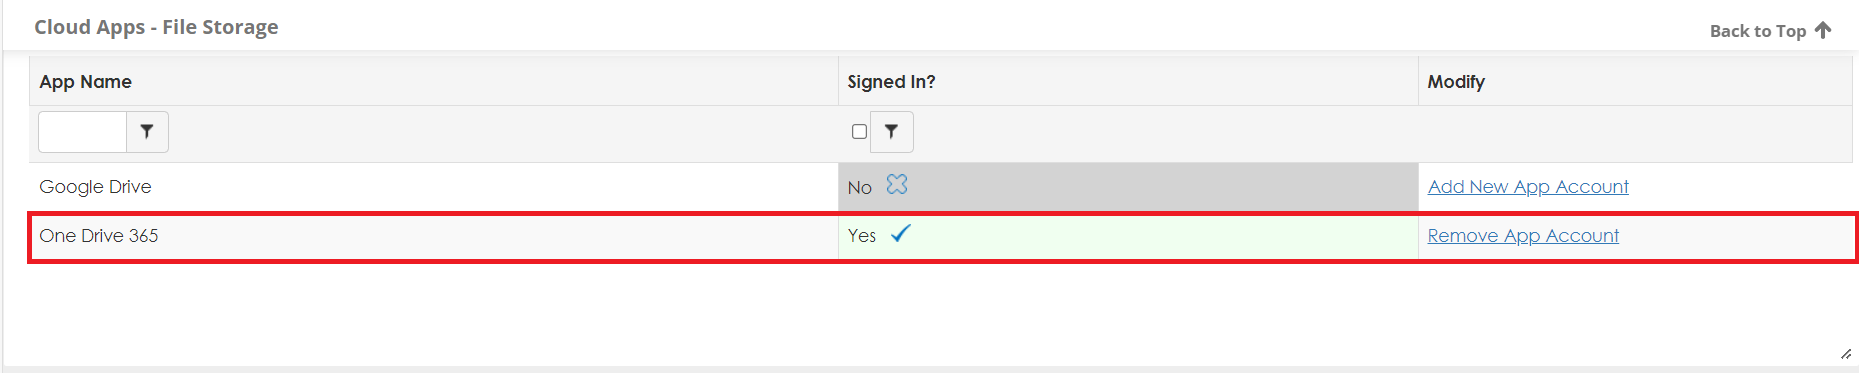
To open a file into Word, you would click on the Document Toolbox Icon next to the file you wish to edit.

Then click the Edit in Word link.
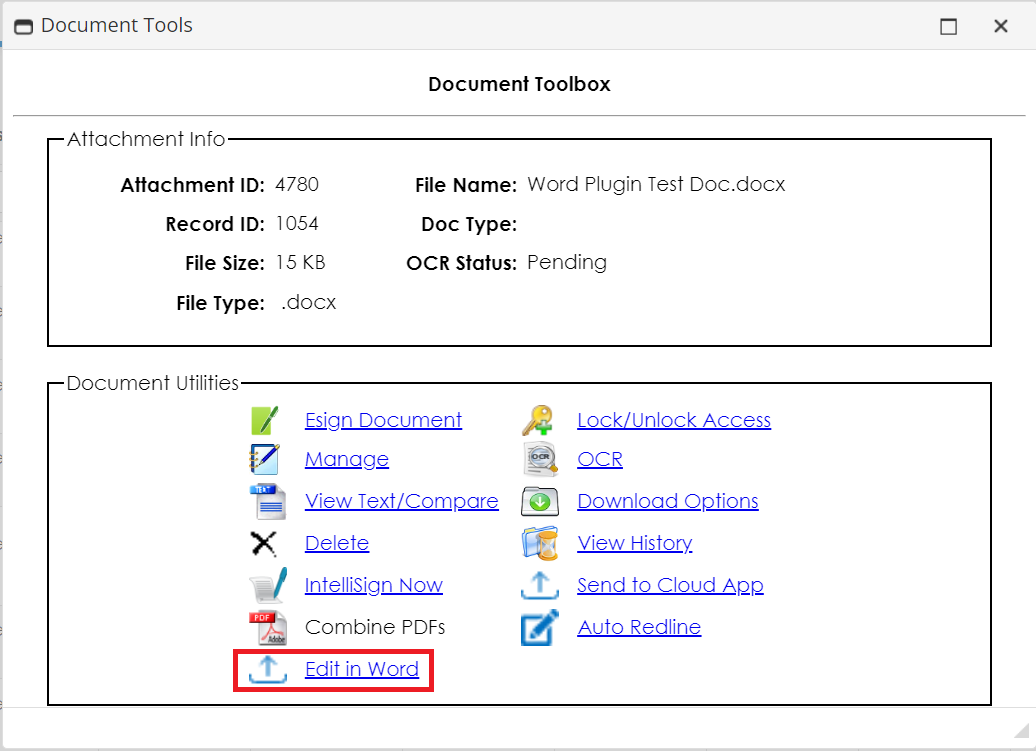
A popup will appear to let you know that the document will open in a new tab.
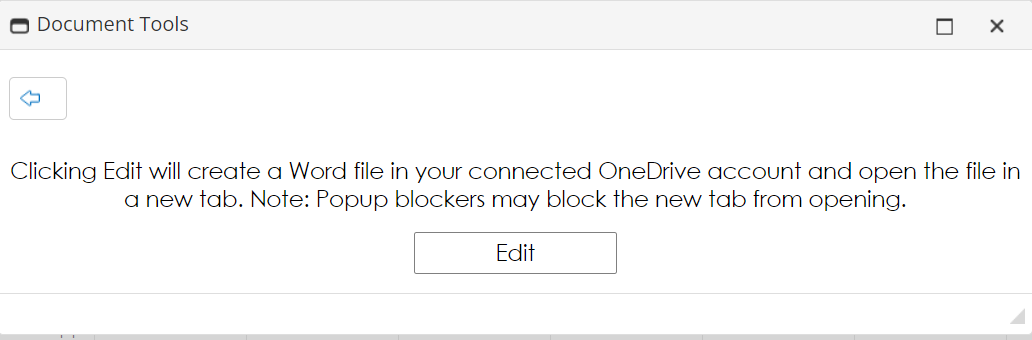
After clicking Edit, a new tab will open with your document as YourDocumentName_Number.