User-Defined Tables
Stand Alone Tables vs. Custom Subtables
System Administrators can define their own tables in addition to the tables provided out-of-the-box. Administrators can create either a Subtable (a table which will exist on one of the primary record types like Contracts or Requests), or a Stand Alone Table (a table that exists on it's own but can be referenced by any record type, similar to the out-of-the-box Departments table).
Stand Alone Tables
Account Maintenance: Custom Stand Alone Table
To create a Stand Alone Table, log in as an Application Administrator.
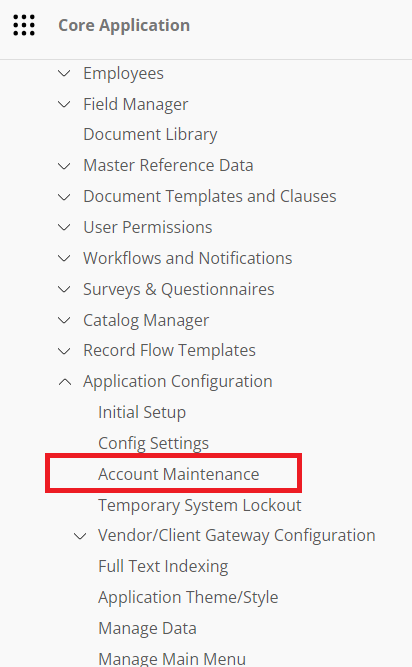
Select Account Maintenance from the Manage/Setup menu.
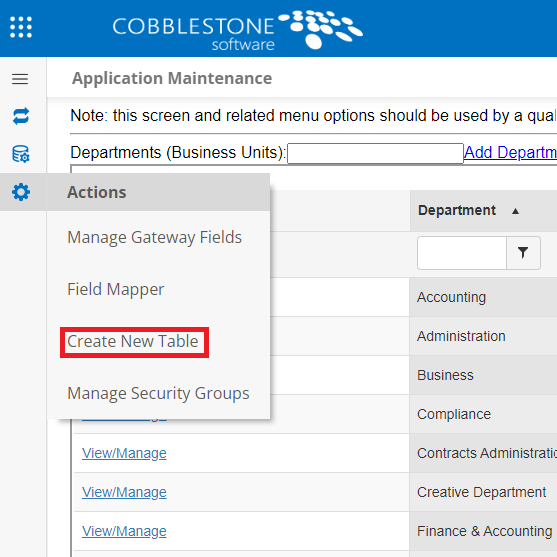
Select Create New Table from the side menu.

The Create New Table screen displays. Select Stand Alone Table from the drop down box seen below:

Enter a name for your table, then click Create Table
 After creating a Stand Alone Table, the following message will appear:
A main menu link will be automatically added under the Manage/Setup section (a refresh or logging out and logging back in may be required to see the link display after creation). To add fields to your Stand Alone Table follow the instructions in the Managing and Editing Fields article.
Custom Subtables
Account Maintenance: Custom Subgrids/Subtables
Contract Insight Enterprise enables application administrators the ability to add custom Subtables to numerous tables and record types within Contract Insight. This enables users to add and track Subtable items in a column and row format. For example, let’s imagine that your organization tracks contracts for Construction Contractors. For each Construction Contract record, your organization requires a contract record with a Subtable for the Insurance Coverage related to the contract. By adding a custom Subtable, the system can both track the contract and track the related items (in this case, insurance coverage) to the contract.
Add a Custom Subtable: To add (define) a Subtable (or new grid on a record screen), log in as an Application Administrator.
Select Account Maintenance from the Manage/Setup menu..png)
Select Create New Table on the side menu
.png)
The Create New Table screen displays. Select the primary table from the drop down box seen below (this associates/links the new Subtable to the table selected)..png)
Next, enter the new Subtable name and select Create Table.
.png)
Once the Subtable is created, the system will display a message indicating Table has been created.
To learn how to add fields to your new Subtable, see the Create User-Defined/Custom Fields Wiki page.
Setting Rules
Rules/Conditions can be set for subtables so they only appear when relevant.
Click Set Conditions.
A pop-up window for condition expressions displays.
.png)
Using the arrow at the bottom of the field list, find the table and field around which to construct the condition(s).
Adding Bulk Records to Subtables
Adding template for subtables - is a feature which allows users to create base template for sub table records and then use that template to add records for that particular sub table.
In the Field Manager a new side menu added as Manage Bulk Add Template..png) After clicking on the above link following screen displays. This screen has two functionalities, Add Template and Edit Template.
After clicking on the above link following screen displays. This screen has two functionalities, Add Template and Edit Template..png) While adding new template first select subtable area from the drop down. Then add template name, select template status, by default it is Active. Click Add Button. This will
While adding new template first select subtable area from the drop down. Then add template name, select template status, by default it is Active. Click Add Button. This will
show all the fields from that table in a grid. Note: Hyperlink and Slider fields are not supported in grid view and will not be able to add/display as expected.
.png)
To add new record, click on Add new record button. It will add a new row to grid, where user can fill all the information. Like wise user can add multiple rows to template and once done click on Save changes button. The template will get saved.
.png)
User can edit the template by clicking on Edit Template tab.
First the user must select the table, then available templates will be shown in below drop down.
Once the user selects the template which he wants to edit, the grid will be shown with records..png)
Here a user can modify existing records by clicking on the grid cell. User can add new records to the to the template, delete any record and can change the status of the template. And then by clicking on Save changes button, all changes will get saved..png)
Using template to add records to sub tables –
If for sub table any template is available, then for that sub table Add Bulk button will be displayed. On clicking on Bulk Add button a pop-up window will open, where user can select the available template and can add those records to sub table.
.png)
Pop-up window:.png)
User can add, edit records and save the all the records to the subtables.
Once records get added to the subtable it will show in the grid.
