CobbleStone® University Certification Program - Unit 5
Risk Analysis
Bulk Text Extraction and File Migration Tool
Bulk Text Extraction and File Migration Tool
Challenge: Many of CobbleStone®’s customers have numerous legal and contract documents that may or may not have been cataloged well or entered into a database to be tracked and searched. The task of extracting data fields, text, and clauses may be an arduous one. In many cases, help streamlining the data extraction process is required. Typical data that are requested to be extracted include but are not limited to: customer/vendor (counterparty) name, address, city state, zip, contract effective date, contract expiration, title, and contract owner (legal professional) name. For more advanced projects, extraction of clauses and terms may pose a challenge. Image if many files are in a folder system or network file system. It may be difficult to locate a contract document and/or analyse the data from the spreadsheet (data) to the actual contract document/file.
CobbleStone® offers a combination of services and software tools to help with the extraction of metadata and clause text from files and bulk importing the files and metadata to Contract Insight. These tools in include, Bulk File Migration Tool, Bulk Text Extraction, Data Import Tools for metadata import and update, and Batch Contract Entry.
In this section, we will cover the Bulk File uploader tool (available via professional services from CobbleStone®) and the Bulk Text Extraction tool (available within the Contract Insight Enterprise Software application).
A typical bulk extraction process includes the following activities:
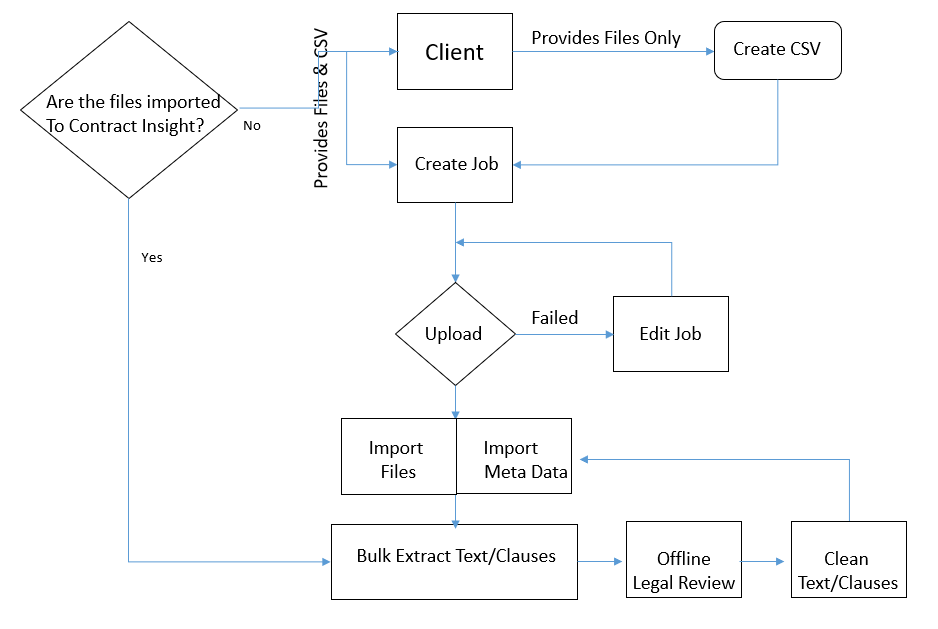
Bulk File Importer Tool. The Bulk File Importer was designed to CobbleStone® personal via professional services the ability to bulk upload files to a client's Contract Insight Enterprise Software SaaS database without requiring direct access to the database server. The bulk file importer process is discussed separately in this documentation wiki.
Bulk Text and Clause Extraction
The steps below focus on the extract text and clauses from contract documents after the files have been imported to Contract Insight Enterprise. This process requires the Enterprise Edition, text-based files imported to the Contract repository, good quality text in the documentation, administrative access, and having the OCR tool enabled.
1. Log into the system as a System Admin User.
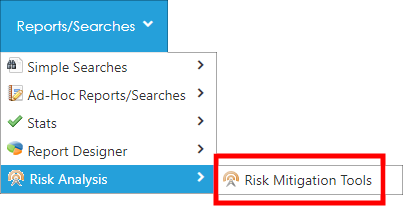
2. Navigate to Report/Searches - Risk Analysis - Risk Mitigation Tools.
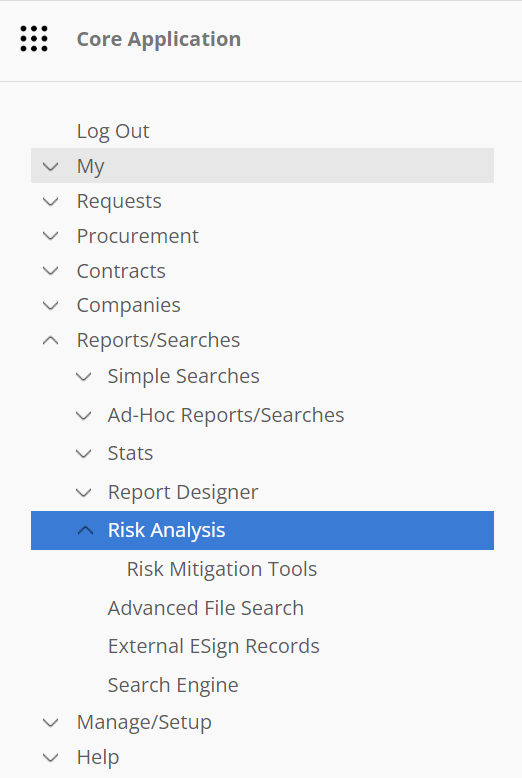
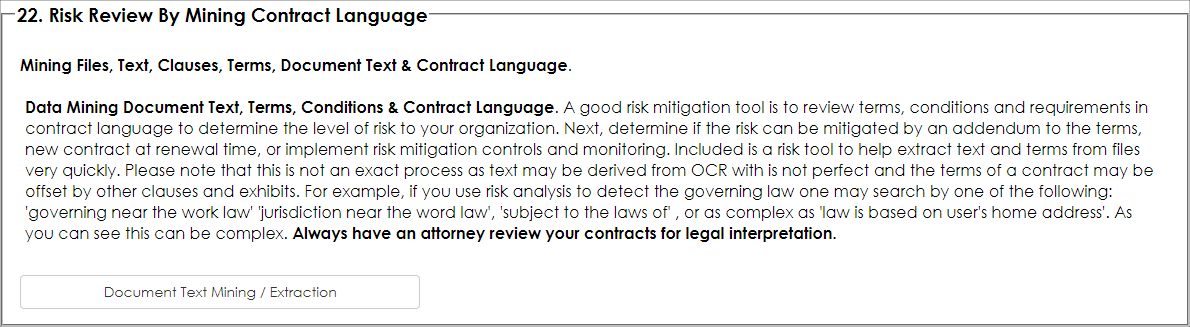
3. Select the Risk Review with Mining Contract Language option. This is used to perform bulk text extraction from text-based documents.
4. The Text Extraction Tools screen appears as seen below. Select the Parent Object. In this case we are extracting text from files on the Contract records area, so we selected Contract Details.
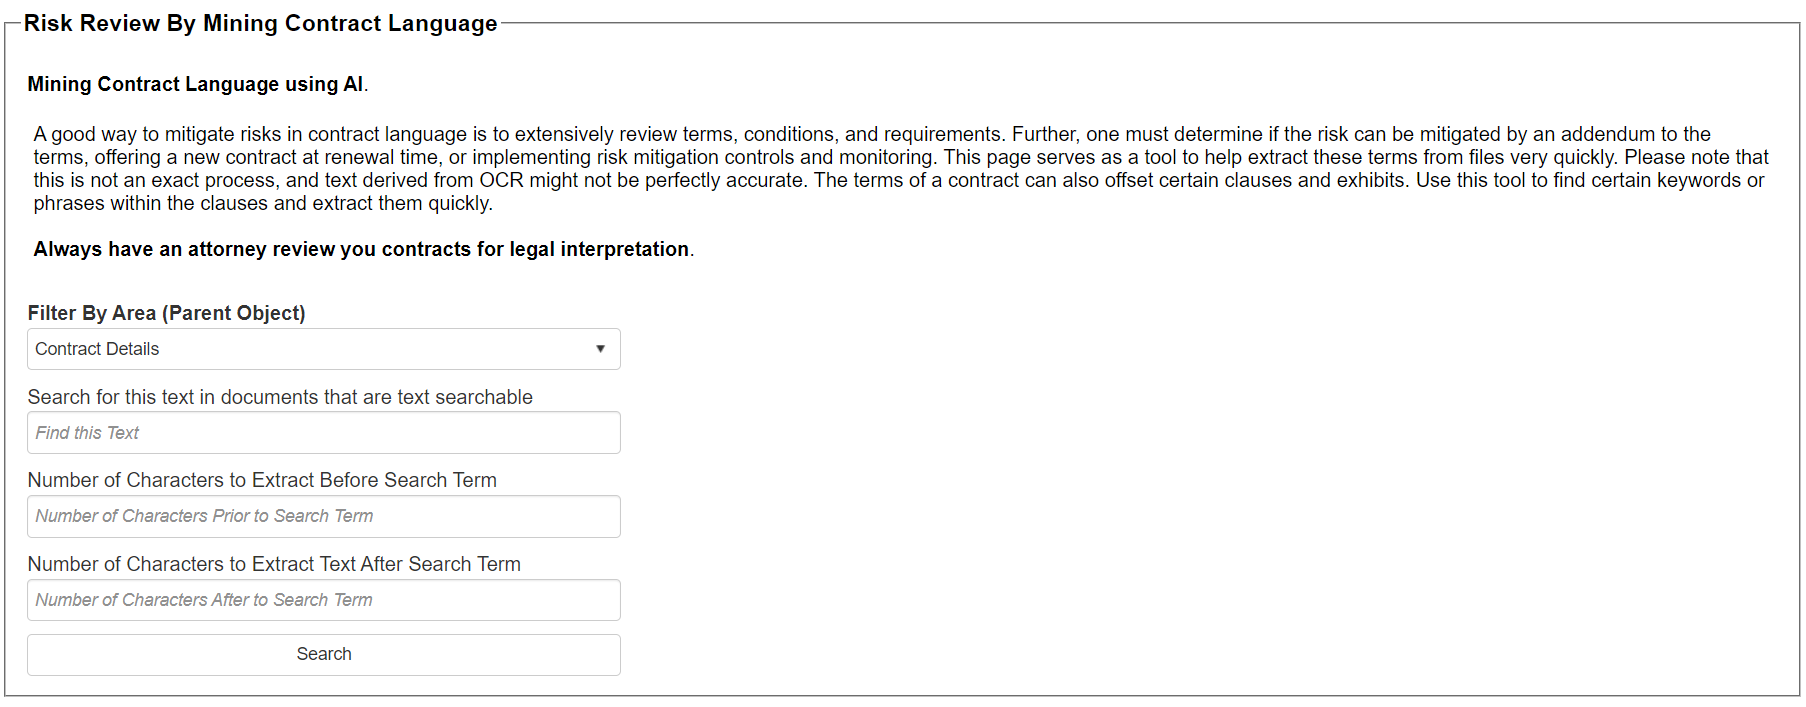
5. Tell the engine what text or phrases you are searching for and how many characters to extract from the left of the found text to the right of the fond text or phrase. In this example ware are searching for governing law, jurisdiction, subject to the laws of, and law is based as our search text-phrase seen below. Separate the search terms-phrases with the pipe character (|). Generally, 3-5 search terms is the recommended amount at one time while using the text mining tool.
We entered 100 for the number of characters to extract before the found term and 200 characters for the number characters to extract after the found term (if the term or phrase is found).
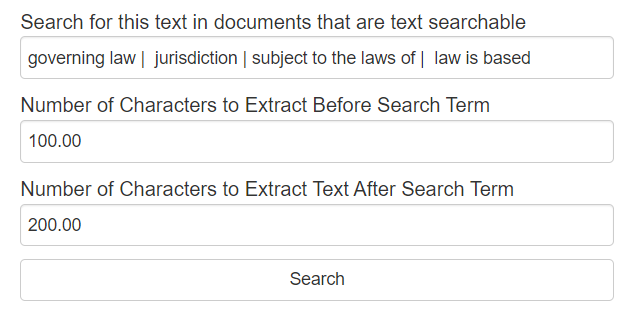
6. Click Search.
The system attempts to search the files attached to contract records that have text in the document.
Note: it is important that the files uploaded are text based or have been OCRed to a good quality as text recognition, OCR, and search is not exact. Characters, scanned images, orientations, spacing, font, quality, line separators, and other factors may impact results.
The engine looks at each text document, searched text if text is found, search each page, try to match the search terms or phrases, try to extract the text, and output a column for each text/phrase searched and the results of what was found. If the text extracted is too limiting, broaden the search terms and phrases and search again as typically several passes may be needed.
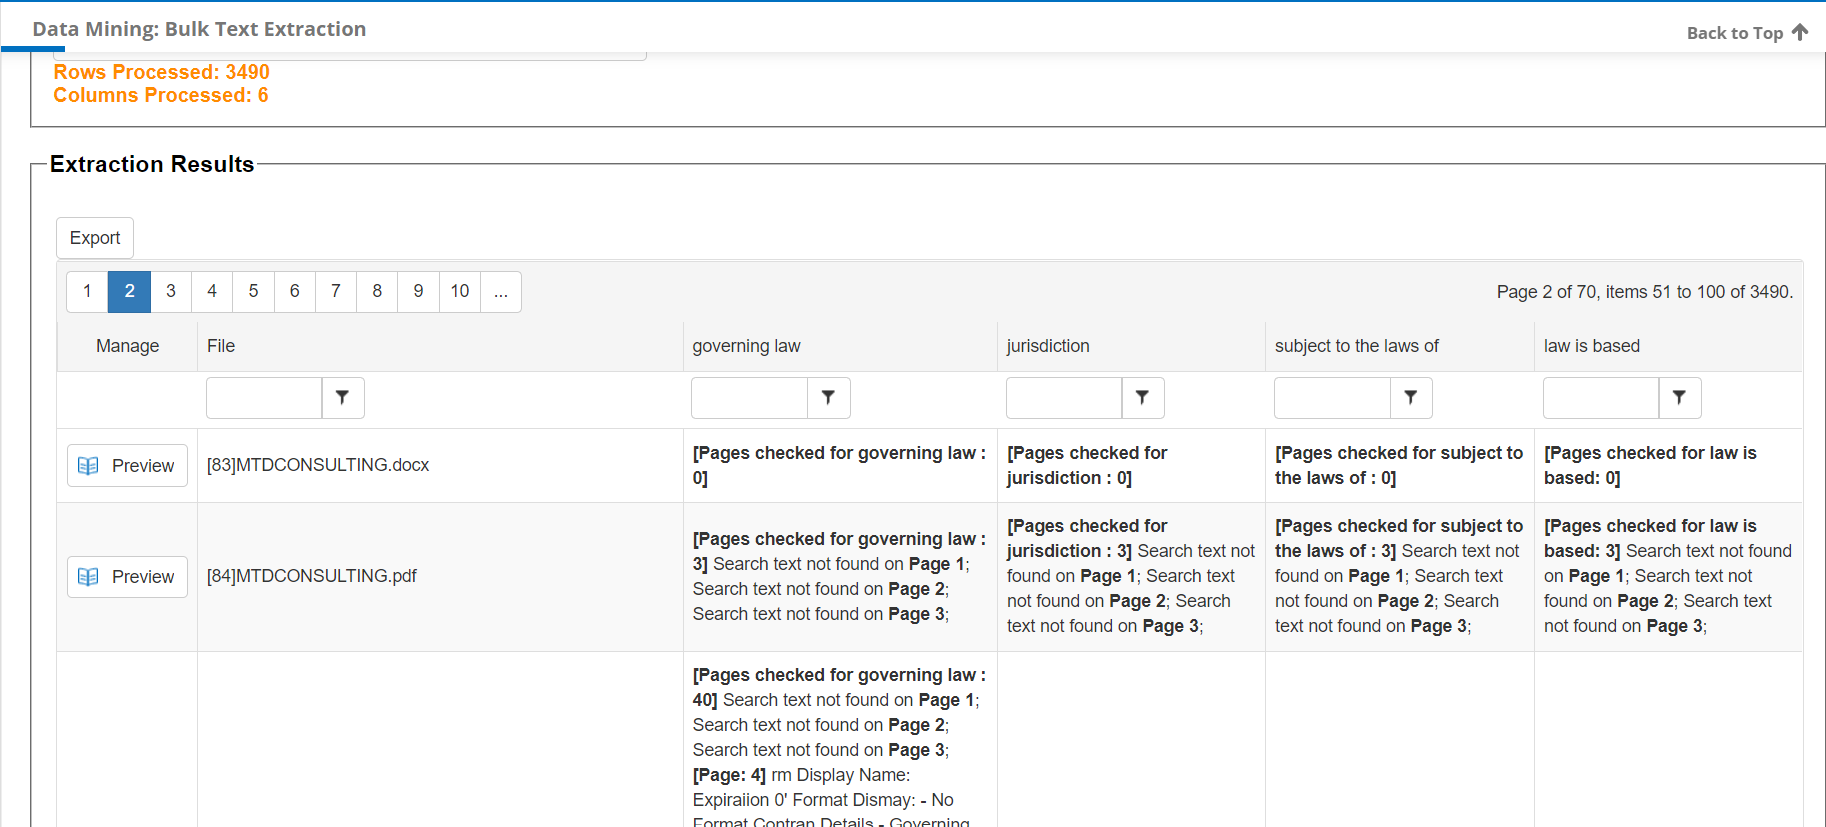
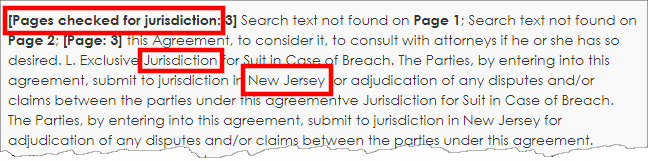
The engine attempts to identify the pages search, if text is found and results. If no text is found, this is indicator to manually review the document as the engine or document did not find text. This is helpful as the legal review team can easily review and determine what the laws may be applicable for this example.
Note: not all results are perfect; an attorney should be retained to perform legal review of legal documents
Optionally, the user may export the results to Excel. This is useful to clean up the extracted text, send it for legal review, and potentially be used to re-import the data back into Contract Insight.
Below are some sample rows where the bulk extract engine did not have access to the searchable text. Some causes may be the file is an image document and text not searchable, the OCR engine could not OCR, the document is of poor quality or orientation, the files are locked, the files are password protected, the file is corrupted, etc. Each situation is unique and will require legal review by an attorney.

Summary
Data mining and bulk extraction of document text, terms, conditions, and contract language may be useful as good risk review tool. Be aware that this process is not perfect and to use an attorney and your best judgement for each process.
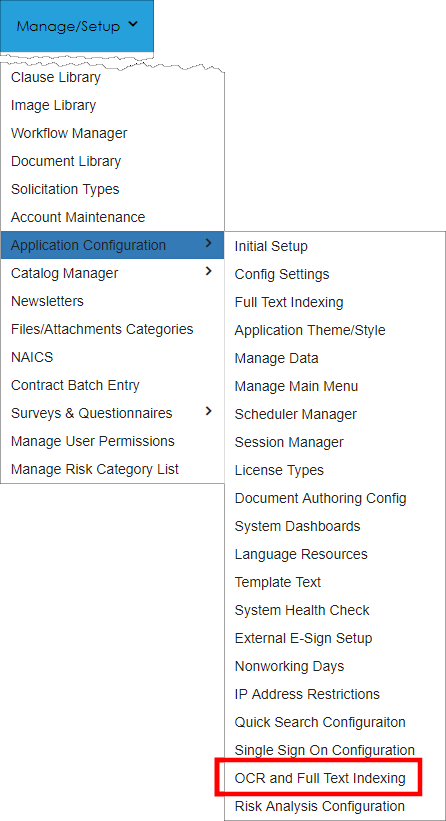
Enable to the OCR Scheduler
Ensure the OCR engine is enabled. To help with text recognition and as required, ensure the OCR engine is enabled and running via the Application Configuration - OCR and Full Text Indexing engine menu item. Check with your CobbleStone® representative for more information.
To learn more about Text Mining, watch the following video.
Risk Mapper and Profiler
Risk Mapper & Profiler
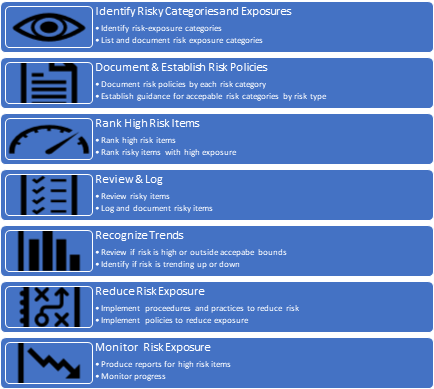
The CobbleStone® Risk Assessment feature set provides a risk rating engine that enables your organization to define risk categories for exposures to your organization. These exposure and risk levels can be entered on each Contract, Vendor/Customer, Sourcing, or Purchase Order record and enables your team to assess the amount of risk for each exposure category and define the probability (or likelihood) the risk may occur. Overtime, and as your organization rates each high-risk item on contracts, vendors, purchases, and/or sourcing records, your organization can quickly identify high risk items that are outside acceptable range of risk. This provides a standards-based method to identify risk and re-evaluate the outlying risks on these records. Some of the notable goals of risk management enable organizations to:
- Identify significant risk categories (items) from an organization’s operations;
- Establish organization wide risk acceptance policies and guidance by risk category;
- Rank and identify high level of risk to the organization with a high probably the risk may negatively impact the organization;
- Review and log risk events by quantifying the risk and logging the risk (typically on high risk contracts, vendors/customers, purchases);
- Recognize trends with risk and implement practices to routine review risk;
- Implement strategies and techniques or practices to reduce the risk exposure or reduce the probability or likelihood the risk will occur;
- Monitor risk, reduce the risk, and/or avoid the risk
The CobbleStone® Software Risk Mapper and Risk Profiler tool enables authorized contract managers, procurement specialists, and risk managers (any authorized users) to track risk for each contract record (or vendor/customer, sourcing, or purchase order records) and easily summarize, plot, and identify high risk items. It gives legal, procurement and risk managers a simple yet advanced tool to identify and reduce risk items that fall outside an acceptable boundary as established by a specific organizations policies and rules. As a rule of thumb, always seek legal and professional advice for any risk related to contracts.
For this documentation, we will be entering and monitoring risk for contract records. The steps to enter and monitor risk for sourcing, vendor/customer, and purchase order records are similar.
Enter Risk Rating for Each Exposure
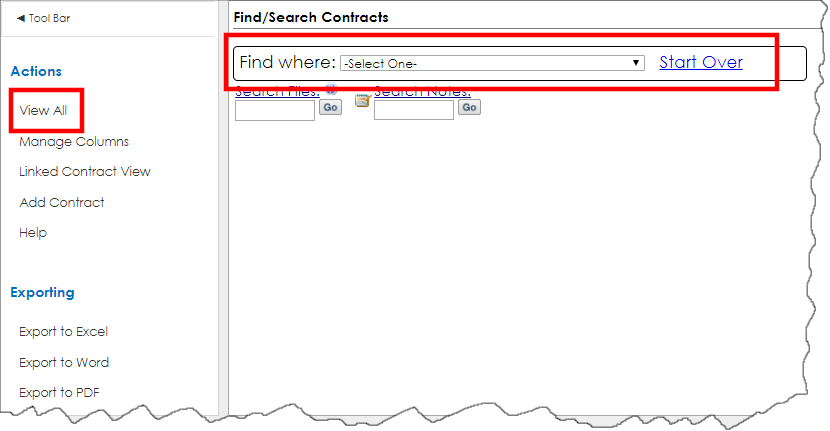
1. To enter a risk rating on a contract, log in as an authorized system admin user and navigate to Contracts - Find/Search Contracts.

2. Search the available contracts.
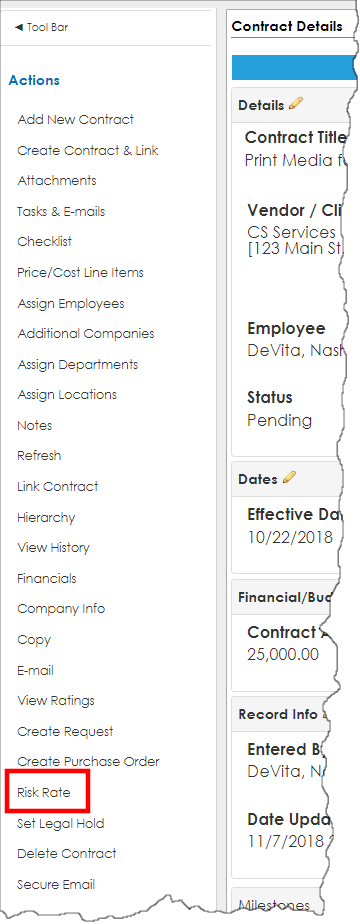
3. Click View for the desired record to open its Contract Details screen.

4. The Contract Details screen appears. Scroll down and, on the side menu, click Risk Rate.
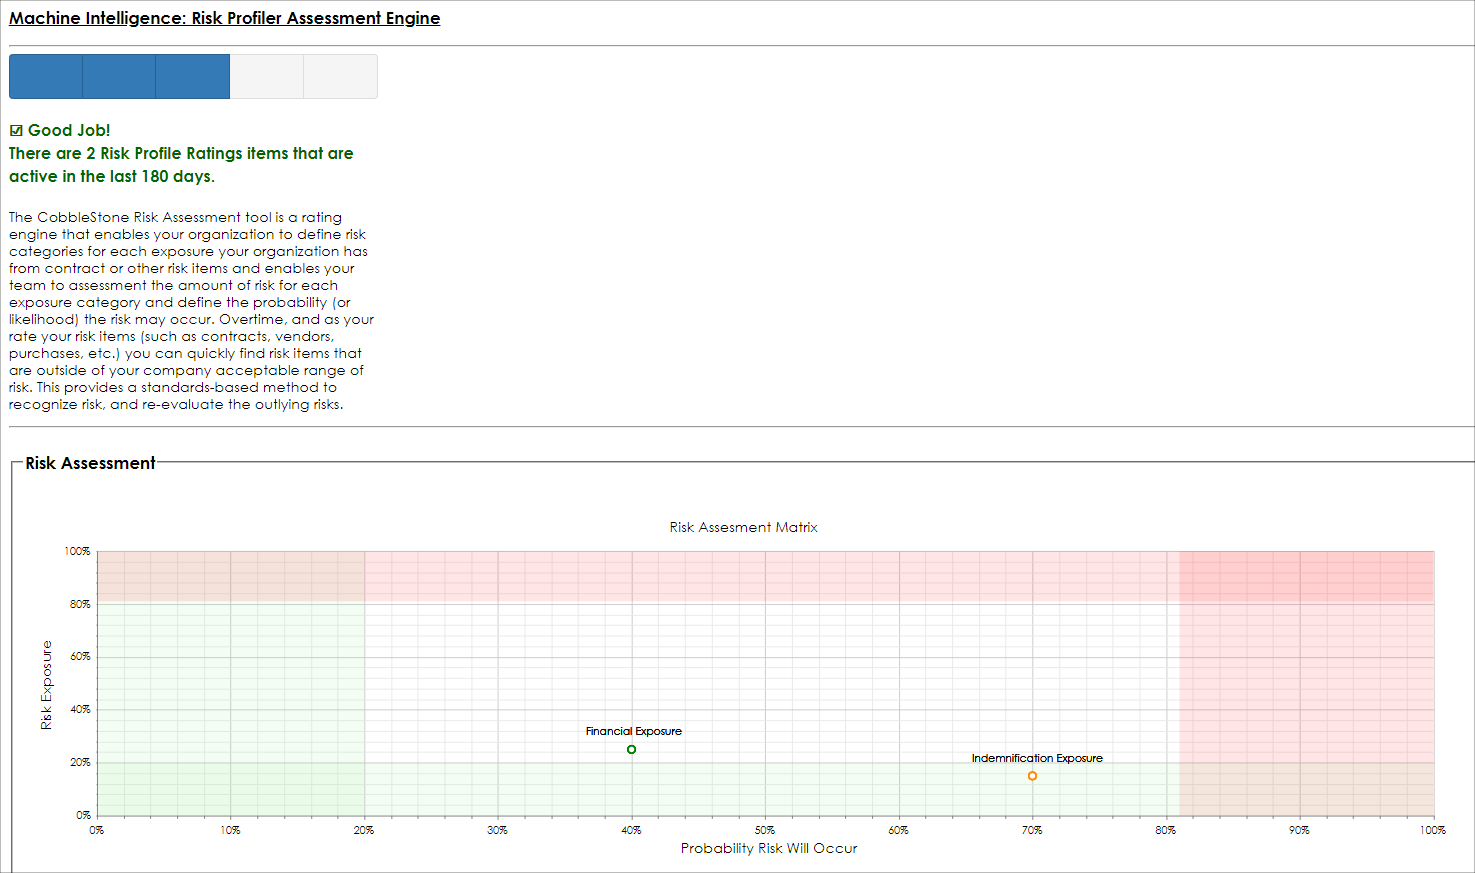
5. The Risk Assessment Risk Mapper screen appears for this record showing defined ratings for this record.
6. A progress indicator denotes how many risk ratings were entered in the last 180 days. If prior risk items were entered, the Risk Matrix mapper appears.
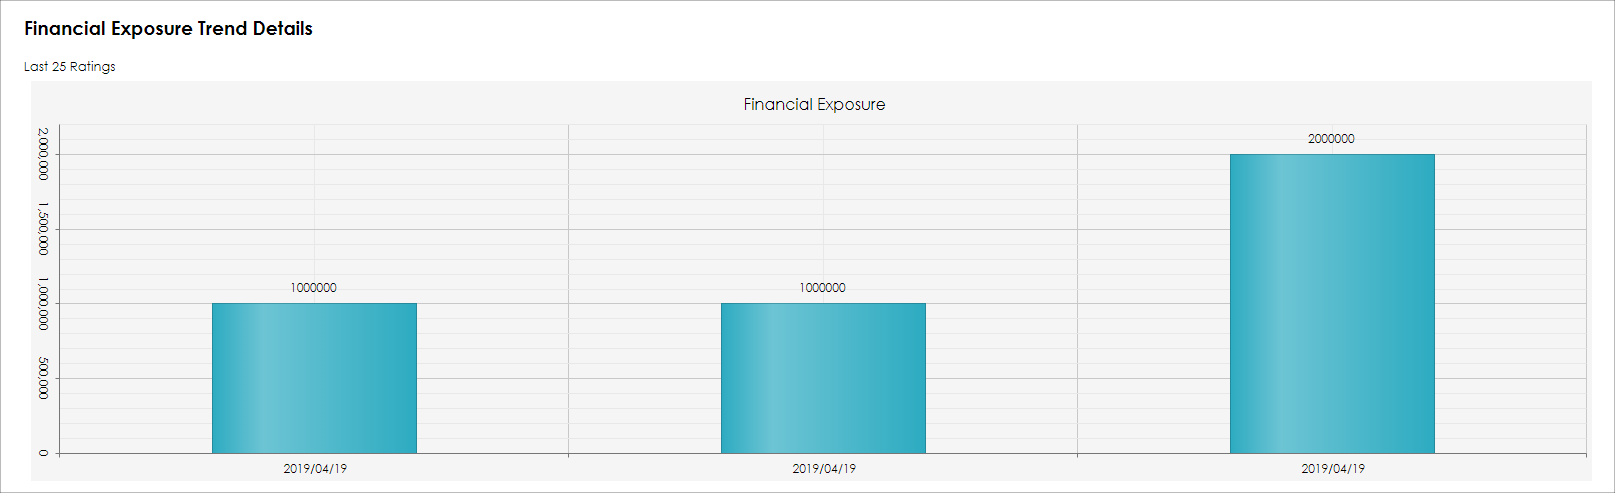
Bar graphs and trends show for prior rating items for this record.
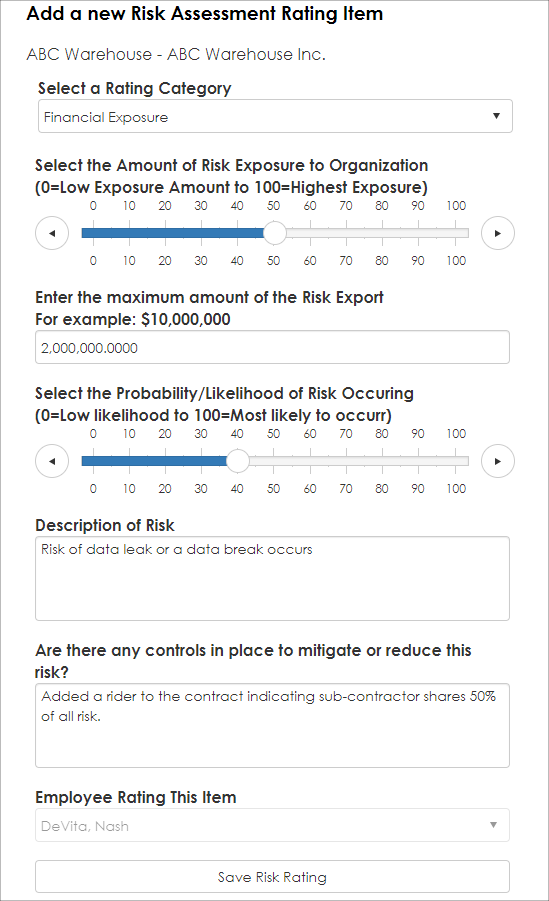
7. To enter a new Risk Rating item, select The Rating Category (to manage Risk Rating Category Items, use the Risk Rating Category List item screen described later in this document).
8. Select the Exposure Level based on a percentage. For example, if for a specified Risk Item, the organization can accept $5,000,000 in exposure, and the contract has $2,500,000 in exposure for the rated category, select 50%. If the highest exposure allowable for this risk category is $10,000,000 and the contract has $10,000,000 actual exposure, select 100% (tip: using percentages helps with comparison with risk categories and is standard method for risk probably rating).
9. Enter the actual quantitative value for risk exposure. In this example, we entered 1,000,000. Then, select the probability this exposure may happen. In this example, we select 15% indicating there is a 15% chance (likelihood) this will occur).
10. Enter a description of the risk to help later with identifying the risk.
11. Enter any controls or mitigation procedures that have been/can be performed to reduce this risk.
12. Click Save Risk Rating.
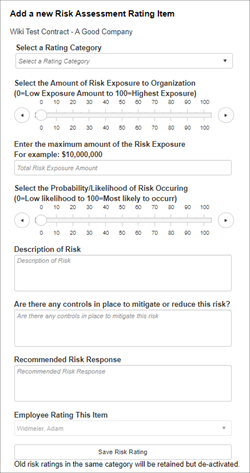
When completing a risk rating, be sure to fill out the Rating Category, Risk Exposure, and Probability/Likelihood of Occurrence, as well as any other applicable fields.
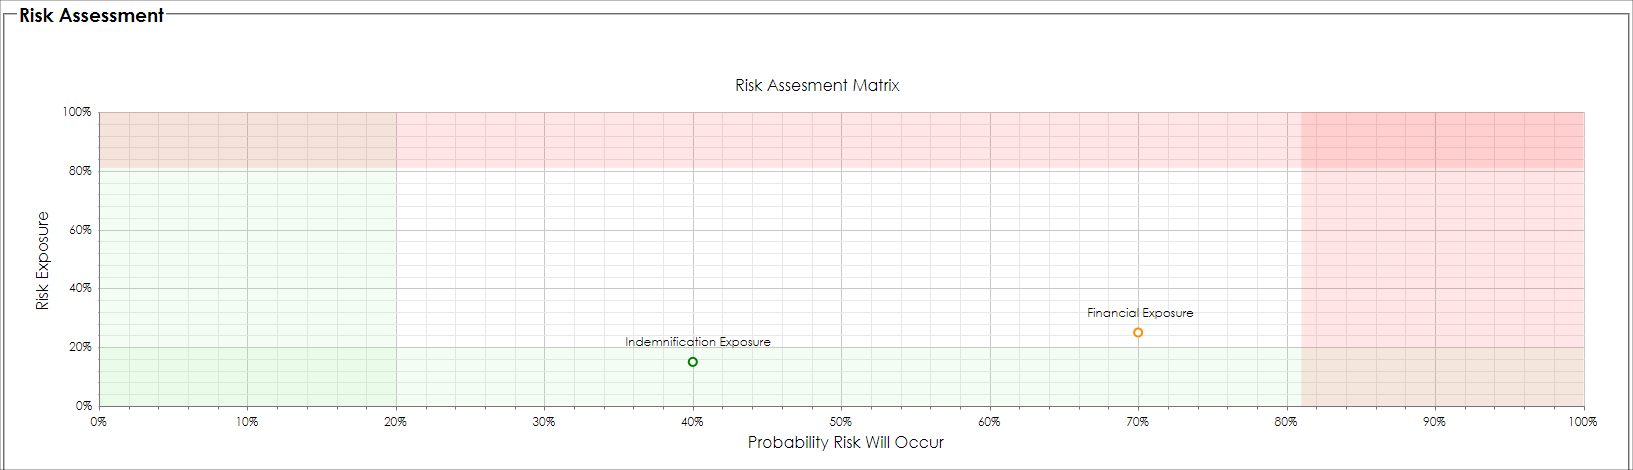
The newly entered Risk Rating Item is saved and shown on the bar graph. If there are prior entries for the same Risk Rating Item, the bar graph shows a trend. In the example below, the Indemnification Exposure risk exposure is trending downward.
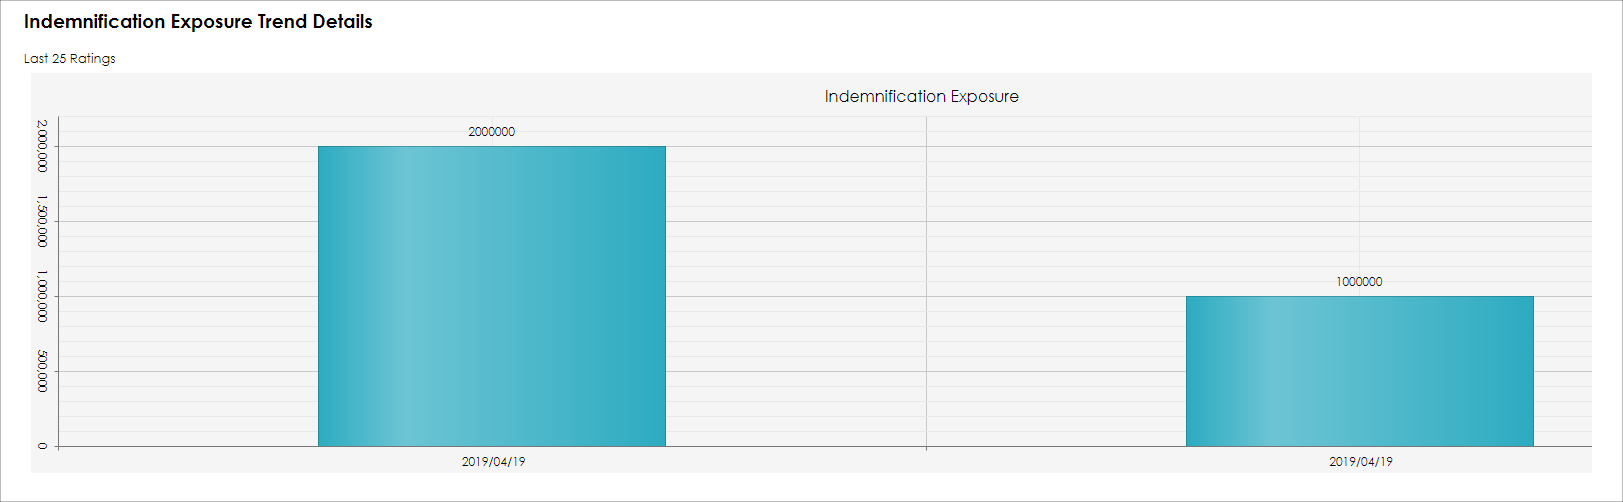
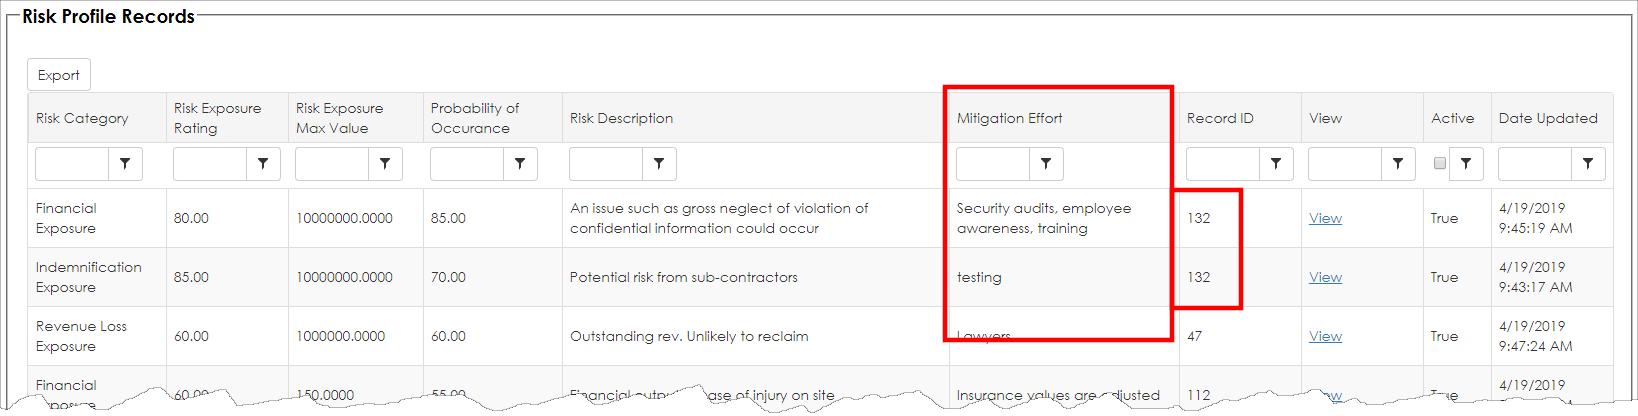
In addition, a detail grid of the prior Risk Items entered are shown on the Risk Profile Records details.

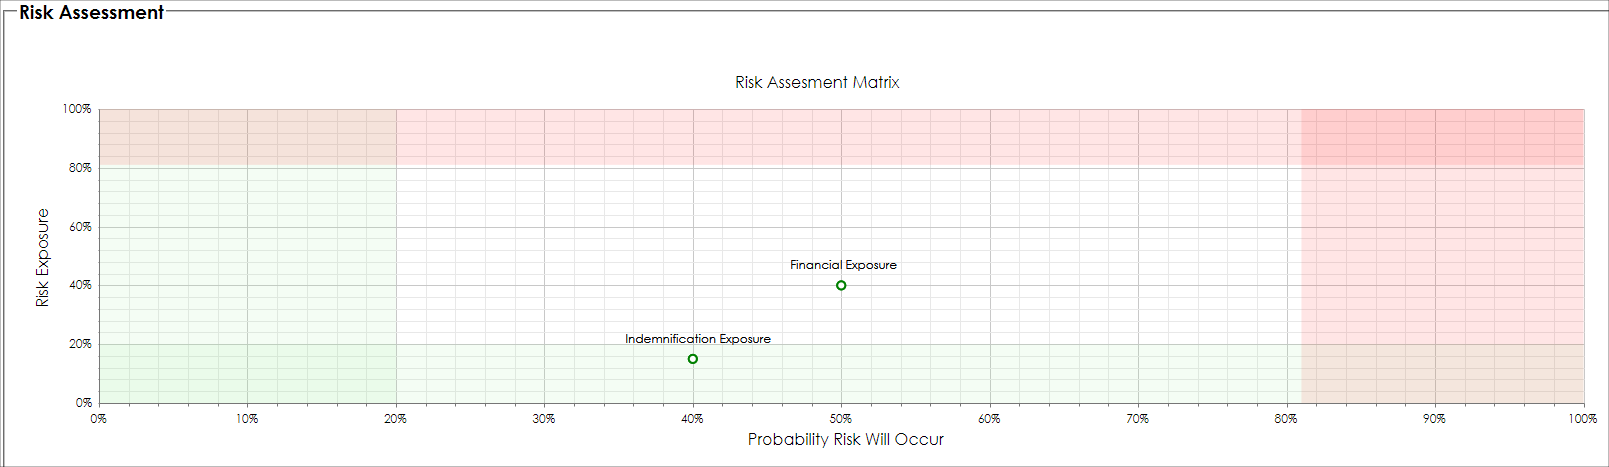
Moreover, a summarized Risk Mapper plot (matrix) is displayed showing the most recent risk items, plotted on a standard risk map (sample seen below). We can quickly identify rated items that are risky (they are plotted in the upper-right hand area).
To watch more about Risk Ratings, watch the video below.
Monitoring Risk
The CobbleStone® Software Risk Mapper and Risk Profile tool includes a handy feature to help monitor high risk records from a holistic view. This tool provides risk managers [authorized users] the ability to view high risk exposures that fall outside the acceptable bounds for the last 1,000 rated items ordered by the higher risk items (higher risk items are determined by the Risk Probability Percentage multiplied by the Risk-Exposure-Level).
1. To view the Risk Mapper Profile tool as an overall view, navigate to Reports/Searches - Risk Analysis - Risk Mitigation Tools.
2. The Risk Mitigation Tool screen displays.
3. Scroll down and locate the Risk Assessment Profiler Mapper option (the item number may change based on the version of CobbleStone® utilized).
4. Click Use the Risk Assessment Profiler Tool to view the Risk Mapper Matrix.

5. The Risk Profile Map displays. Select the Area (Parent Object) on which to filter. For this example, we selected the Contract Details object.
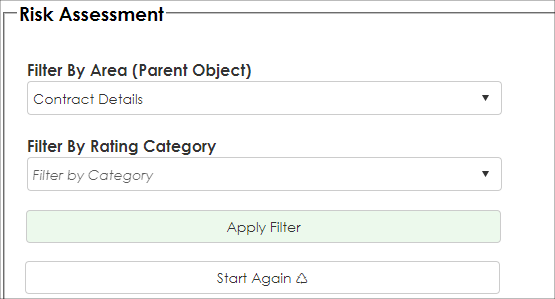
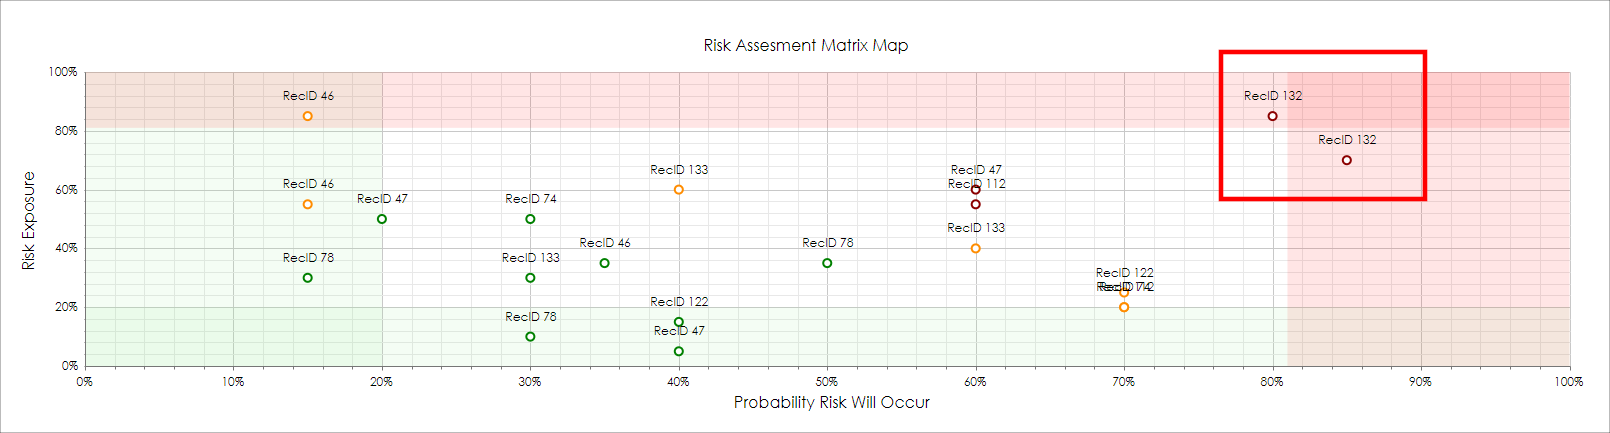
6. Click Apply Filter. The Risk Assessment Matrix Map displays. In our example below, we see two Risk Rating items that are at the upper right of the map plot (towards the red section seen below). We should review these items to see if we can reduce risk. The Risk Map Plot shows that both rated items are on Record ID 132 (in this case, it is a Contract Record ID). By scrolling down lower on the page, we can see the details for this record and view the contract details for these Risk Items.
7. Click View for the record to review.
8. Next, it is up to the Risk Manager on how to reduce risk. Some typical risk reduction. If each of the Risk Items that are rated are documented properly, the Risk Manager can review the risk reduction recommendations that the entered previously in the Mitigation Effort column.
Below are additional items that typically can reduce contract risk (but is not a complete list as each risk situation varies):
- the contract can be re-negotiated
- an amendment can be made to reduce risk
- insurance can be purchased to offsite liability
- the risk can be transferred to a third-party
- carve-outs may be an option
- contract cancellation
- security controls or audits can be implemented
- legal advice can be sought
No matter the method of reducing risk, as always, seek legal advice from an attorney.
Routinely re-rate the risk items on the record. In this case, we will re-rate as we amended our subcontract:
Our financial exposure is now in the white area and shows as acceptable.
Configuring Risk Mapper Category Items
1. To configure risk mapper category items, log into the system as a system administrator.
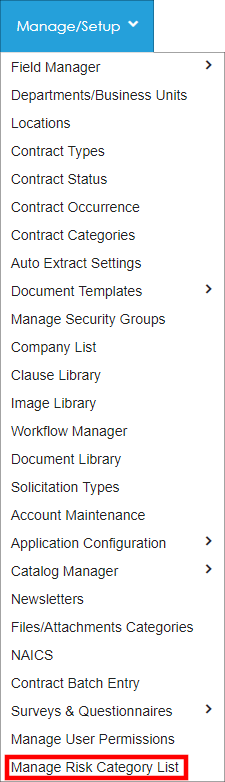
2. Navigate to Manage/Setup - Application Configuration - Risk Mapper Category List (the menu item may be named differently).
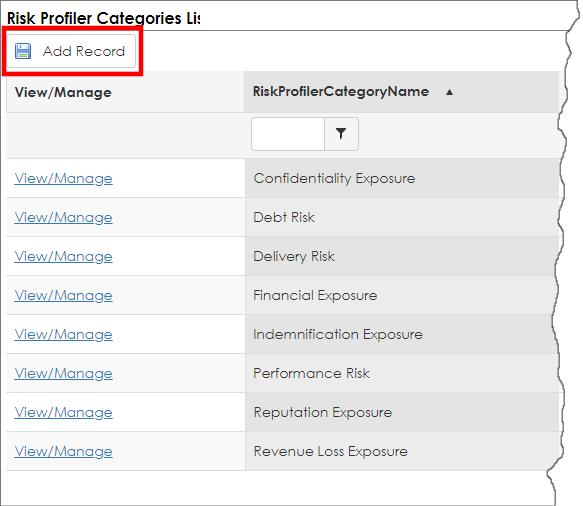
3. The Risk Mapper Category List displays. To add a new Risk Category, click Add Record.
4. The Risk Category Add Screen displays. Enter the Risk Category Name, set the Is Active field to true by selecting the checkbox, and set the Parent Record to include [Parent Object]. In this example, we are configuring a Risk Category for the Contract Records parent object.
5. Click Save & Continue.

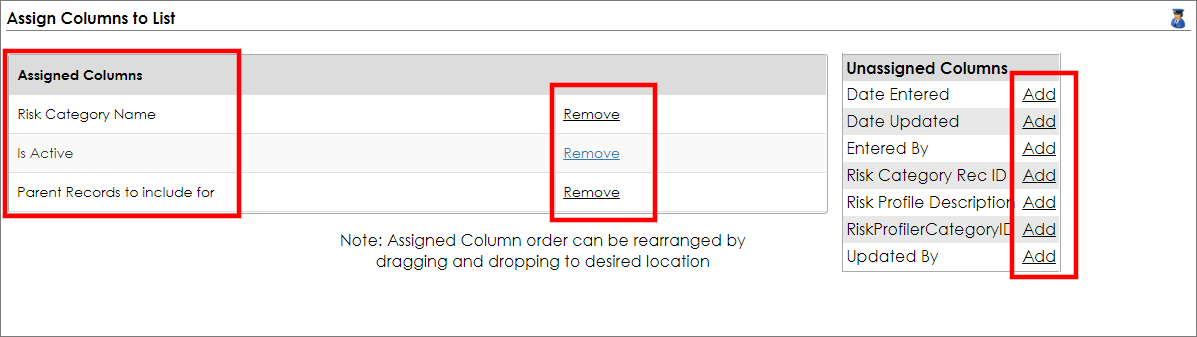
6. To manage the columns that appear for this configuration list, click Manage Columns.

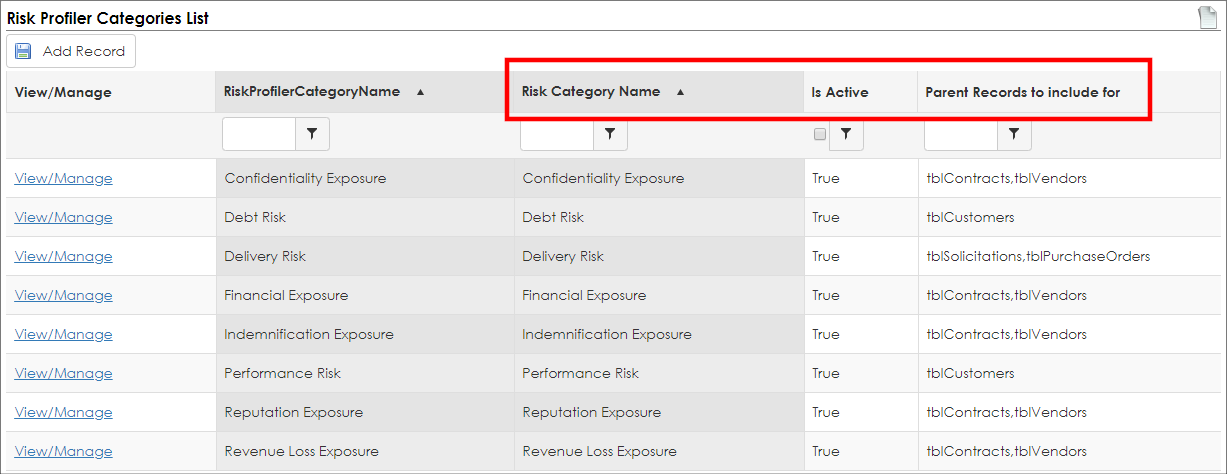
For our example, the following field columns were assigned: Risk Category Name, Is Active, Parents Records to include.
7.Click Back to List on the side menu.
To learn more about the Contracts Risk Mapper, please watch the following video.