CobbleStone® University Certification Program - Unit 1
Department/Business Units Management
Master Reference Data Management: Department/Division
Contract Insight supports the ability to assign Departments/Business Units to your contracts and to your employees. Departments are used for organizing records and to set permissions for Users. Only Application Administrators may manage Departments (or other authorized users).
To Add a Department/Division
1. Select Departments/Business Units from the Manage/Setup top navigation menu item.

2. This will open the List Manager screen, listing all of the departments/divisions already in your Contract Insight application.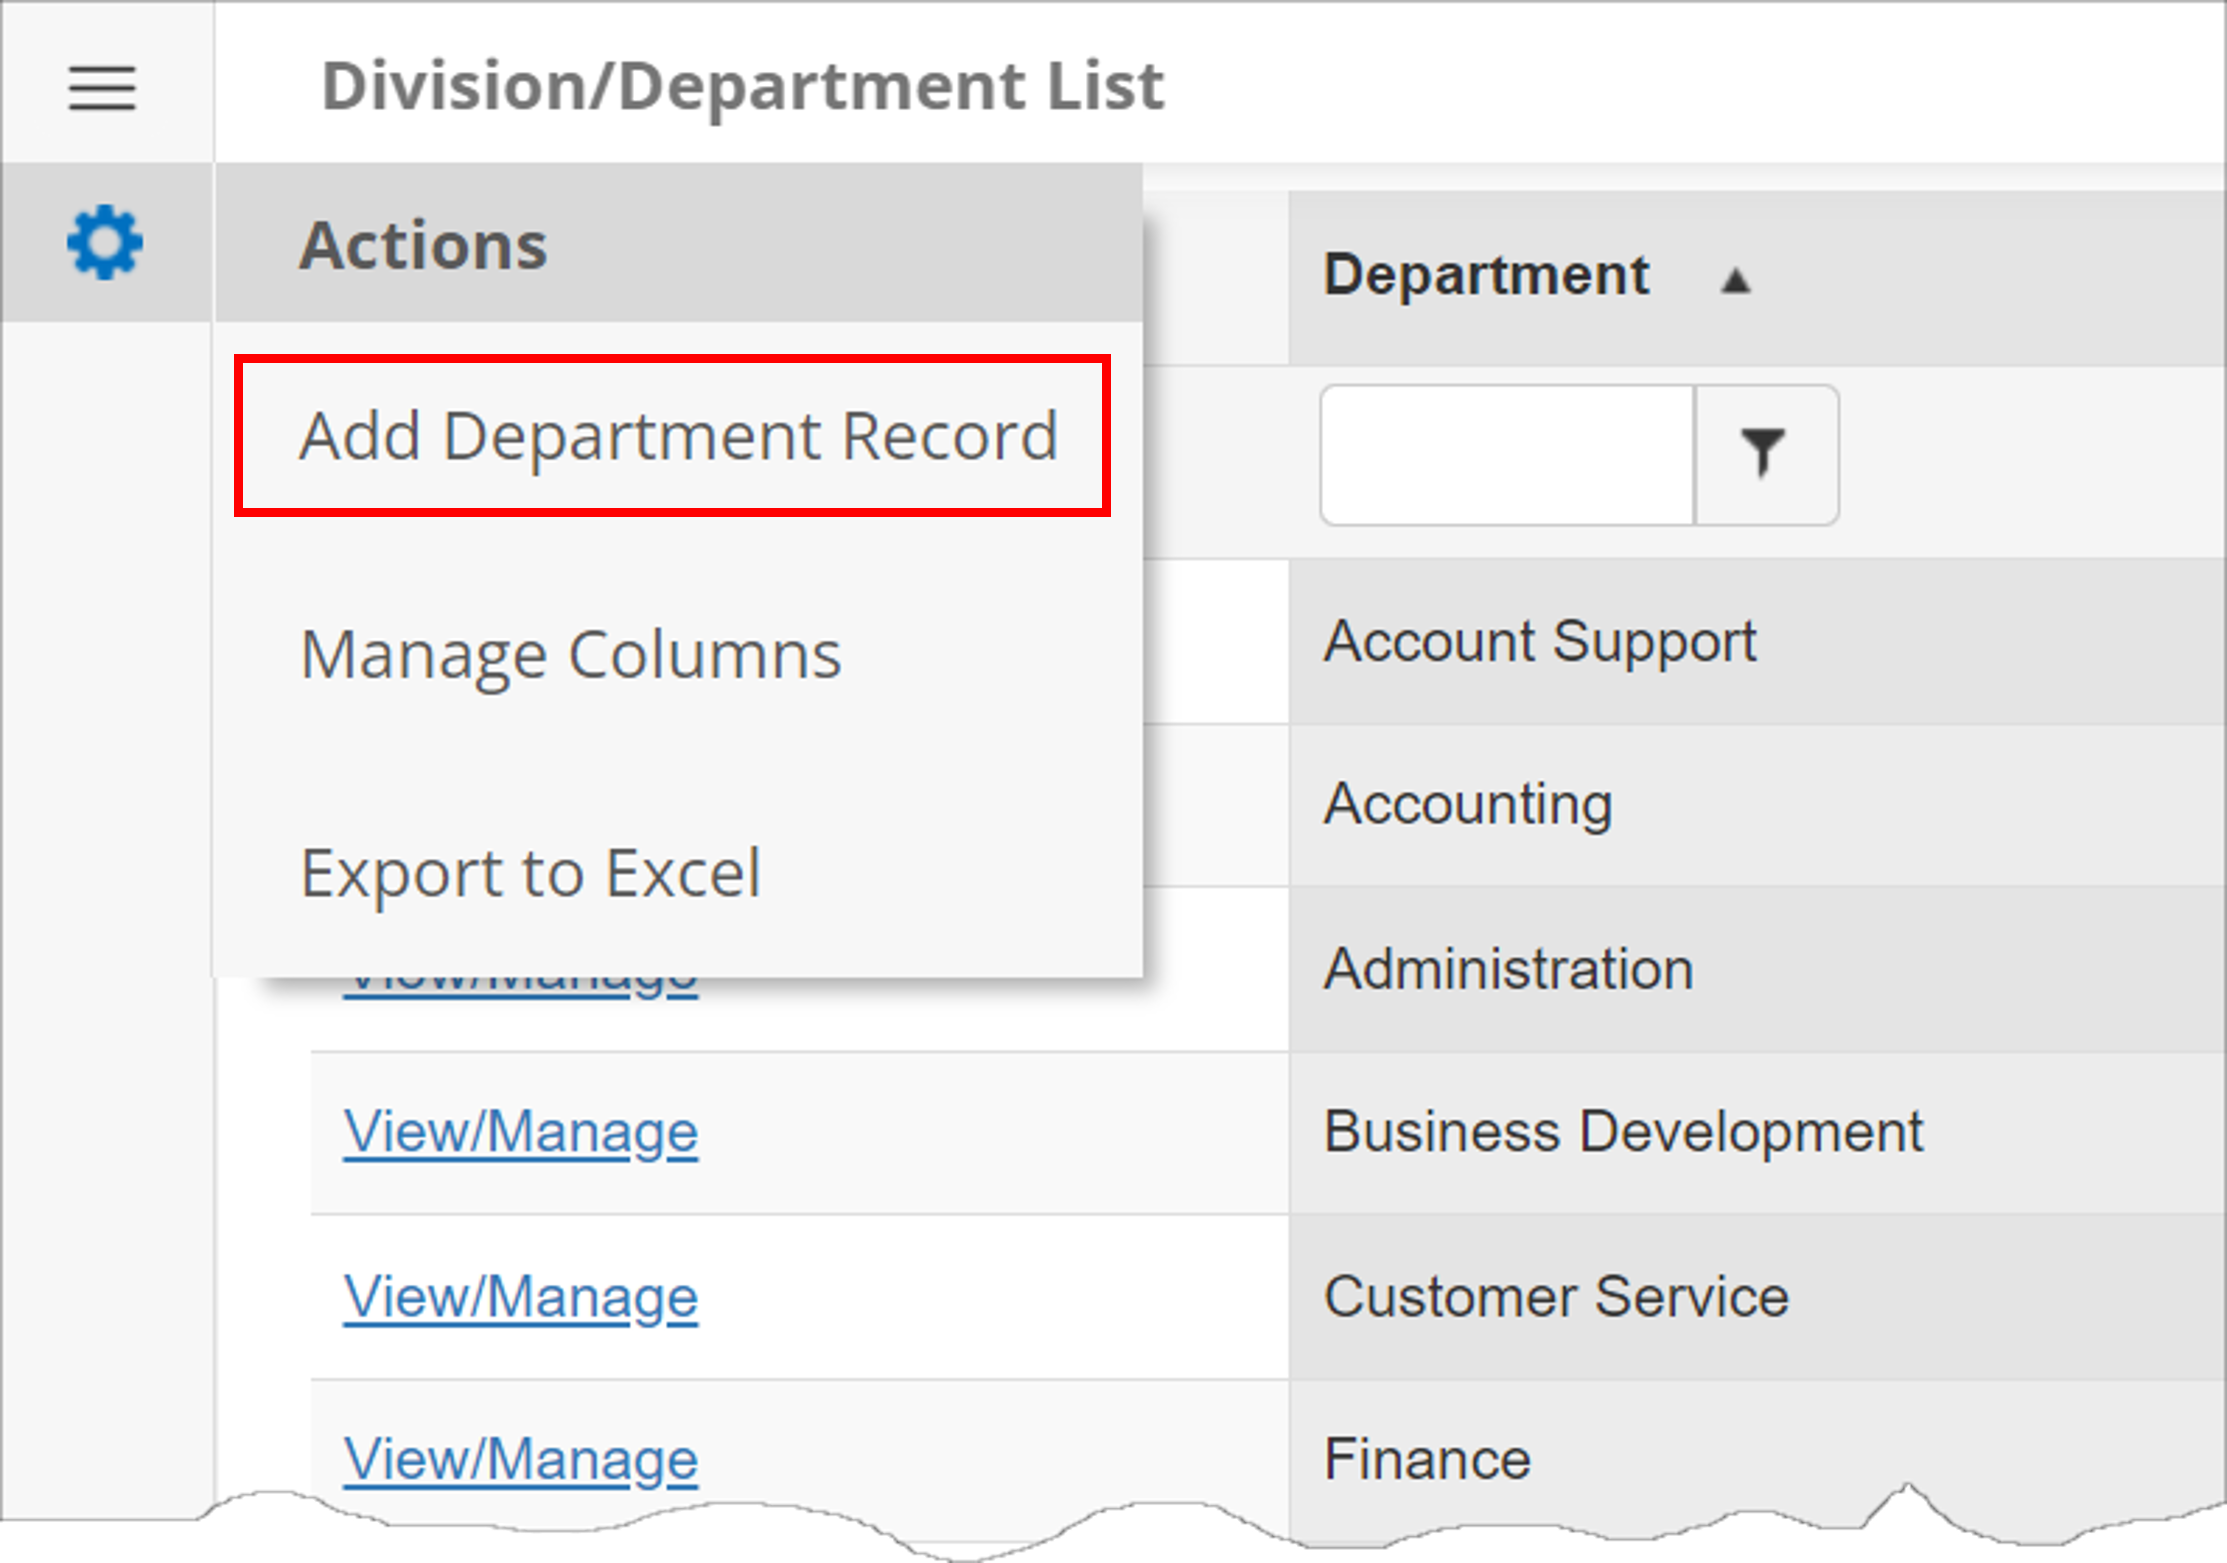
3. Click Add Department Record on the side menu.
4. Enter the name of the new department/division and click Save.
To Edit/View a Department/Business Unit
1. Click View for the department/division line item you would like to view/edit.
2. This will open the Departments/Business Unit Configuration screen.
3. To edit the name of the department/division, click the Pencil Icon for the Department Name line item.
4. Edit the text for the name of the department and click Save Changes.
To Delete a Department/Division
Note: Prior to deleting a department/division, make sure it is not being used by any contract records.
1. Go to the Departments/Business Unit screen for the line item you would like to delete.
2. Click the Delete on the side menu.
3. Confirm the deletion.
Manage Columns Button:
Note: The Manage Columns button allows users to view additional columns of information available for the table selected.
1. Click Manage Columns on the side menu.
2. On the next screen, select the field you want to add under the Unassigned Columns List, and click Add next to the field to add your selection to the left-hand column.

3. Once added, click Back to List on the side menu. The column added displays.
To learn more about Departments/Divisions, watch the following video.
Employee/User Management
Employee/User Management: Adding an Employee/User
To add new employees / users you must have administrative permissions.
Note: An employee becomes a user when the employee entered is assigned a username and password, given the appropriate permissions, and the ActiveYN option is set to Yes.
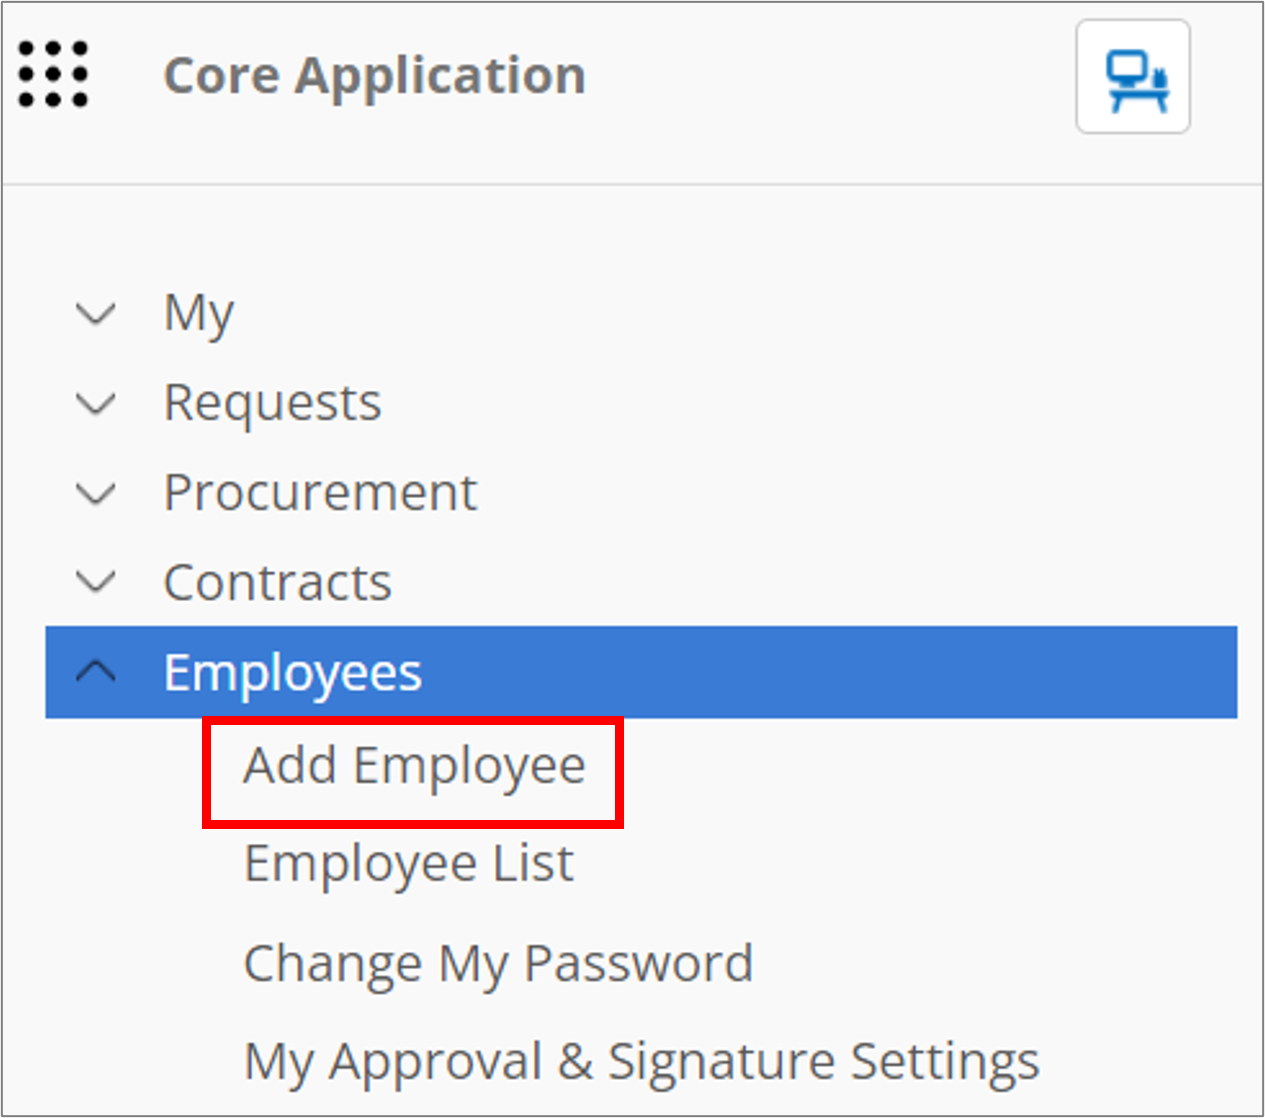
To add a new user, select Add Employee from the Employees menu:
The Add Employee: Select License Type screen opens.
From the Add Employee for License Type drop down menu, select the License Type to which the new user will be assigned. When the license type is chosen, the specific license type’s information (number of sessions allowed, etc.) are displayed in the information box below.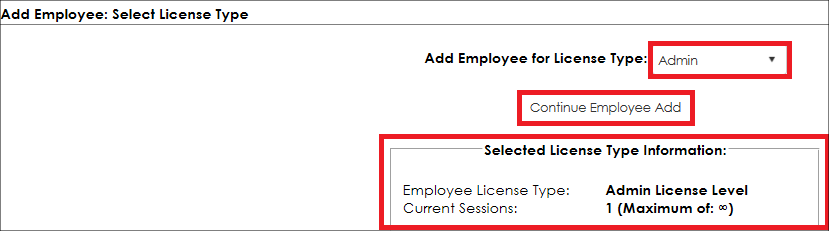
Click the Continue Employee Add button to open the Add Employee screen.
Enter the new employee/user information. Click Continue to save the information..png)
The Active User option must be selected as Yes in order for the employee to login. Inactive users will not be able to log in.
The Regional Setting field on the Add Employee screen allows System Administrators to specify a user's localization. This specification is usually used by multinational organizations with Employees/users outside of the United States. By specifying a user's Regional Setting, it will set the date/time format to the region selected for that user when he/she logs into the Contract Insight application and counts non-working days that have been assigned to that region. For more information on non-working days, please see Workflow Management.
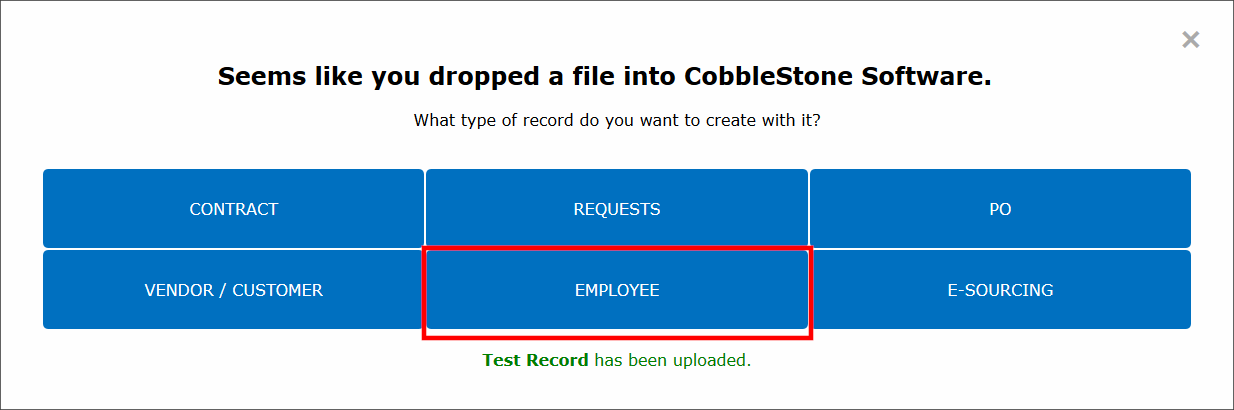
You are also able to add an employee record from a file on any page with the Top Menu's Drop Files Here area by dragging and dropping a file on the screen.

You will then be prompted to choose what record type to create from the file. For an employee/user you will want to click the Employee button.
Afterwards you will be brought to a screen to review the file and enter all record metadata as necessary.
To learn more about adding Employees/Users, please watch the following video.
Add a Vendor/Company
Adding a Vendor/Company
In order to add a company/vendor to Contract Insight, please note that you must have the appropriate permissions.
To Add a Company
1. Navigate to Companies > Add Company.
Note: An alternative method of adding a new vendor/company record is to go to navigate to Companies > Company List. On the Vendor & Customer List screen, click Add Company on the side menu.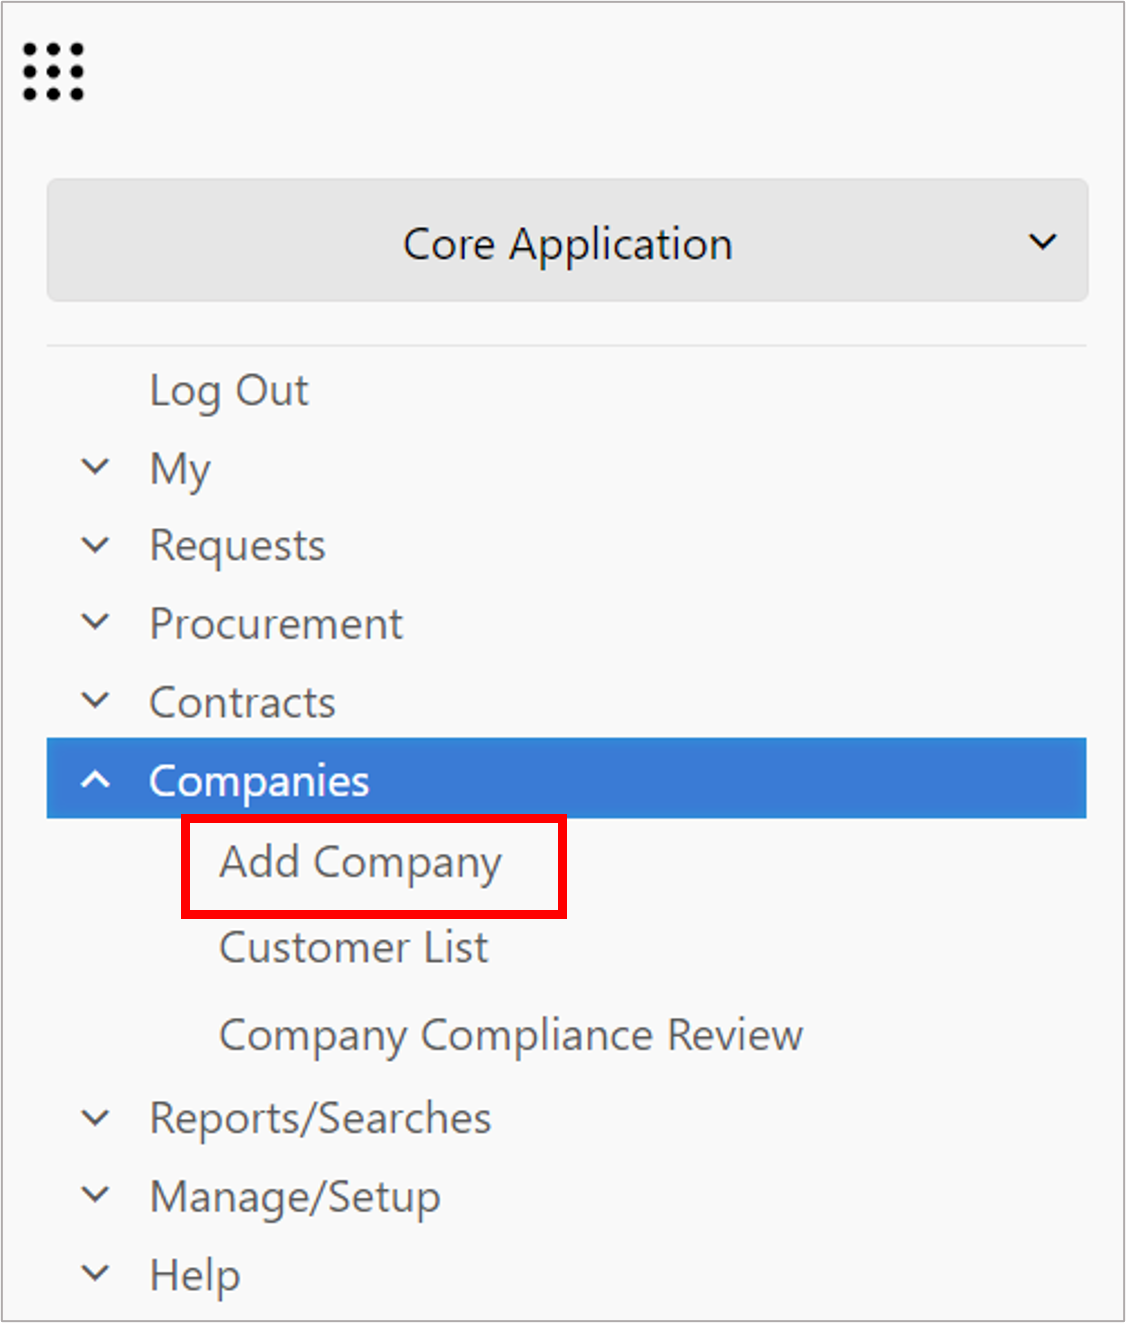
2. The Add Company screen displays.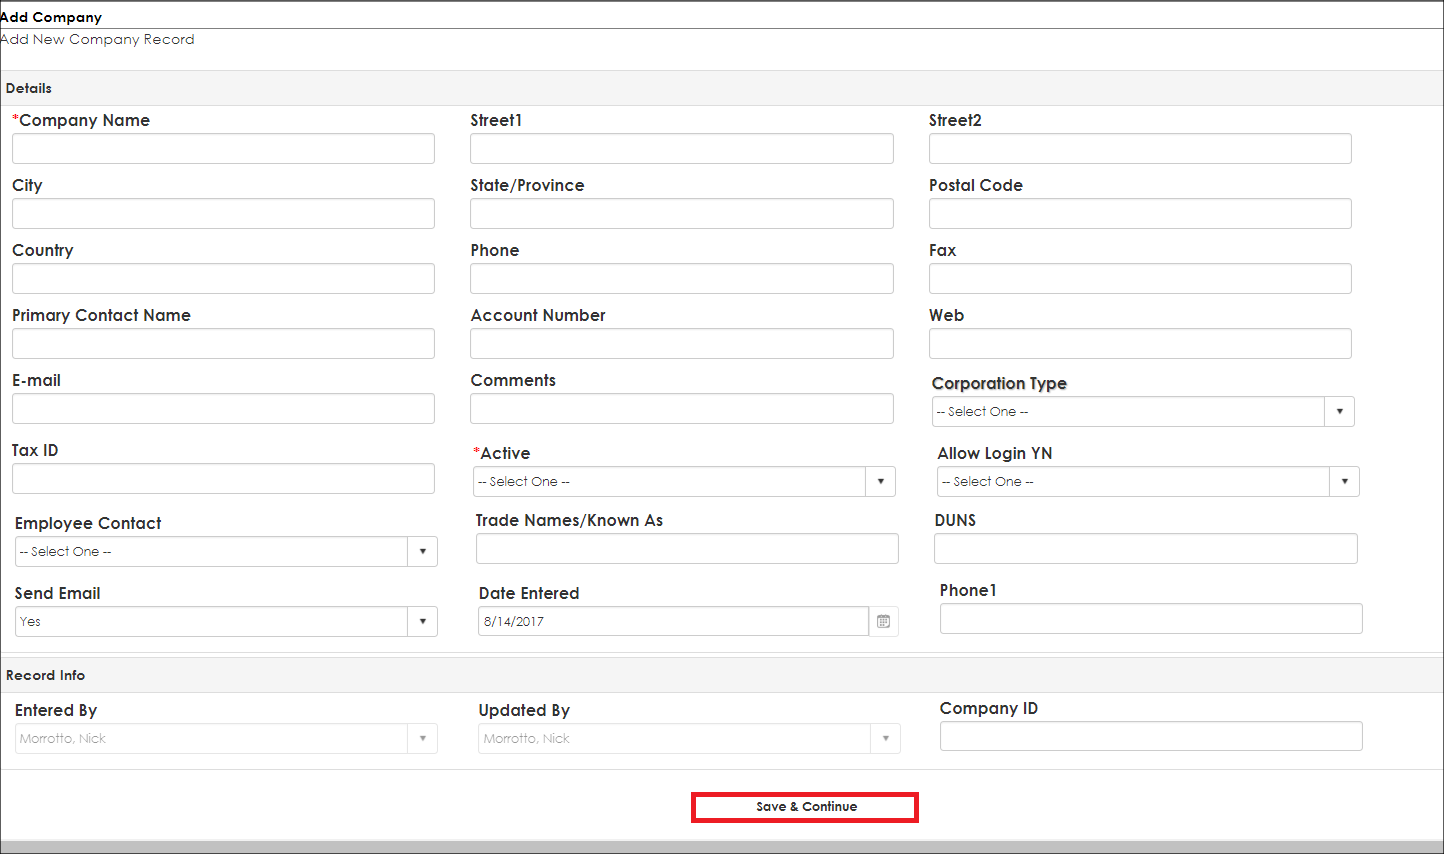
3. Complete the Add Company form. Be sure to enter all necessary information and required fields (marked with a red asterisk) and click Continue. Out of the box, the required fields while creating a new counterparty are the counterparty Name and IsActive.
Note: The Active drop-down field on the Add Company and Company Details screens denotes whether or not a Vendor/Customer is shown in the drop down list on the Contract Add screen.
4. The new Vendor/Company's Company Details screen displays..png)
You are also able to add a company record from a file on any screen with the grey Drag and Drop box in the side menu by dragging and dropping a file onto the page.

Then you will be prompted to choose what kind of record you want to create. For a vendor/customer you will want to click the Vendor/Customer button.
.png)
Afterwards you have the ability to review the file and can fill out all metadata for the record.
To learn more about Counterparties, watch the following video.
Record Type Management
Master Reference Data Management: Contract Type
Contract Types are used to classify records into types for tracking, contract creation, and field management purposes. For example, types of contracts may be Contractor Agreement, Confidentiality Agreement, Software Agreement, Land Lease, etc. Different types of Counterparties, Requests, and Solicitation Records may be created. The system can house as many or as few contract types as desired.
To Add a Record Type
1. Select Record Types from the Manage/Setup top navigation menu item.
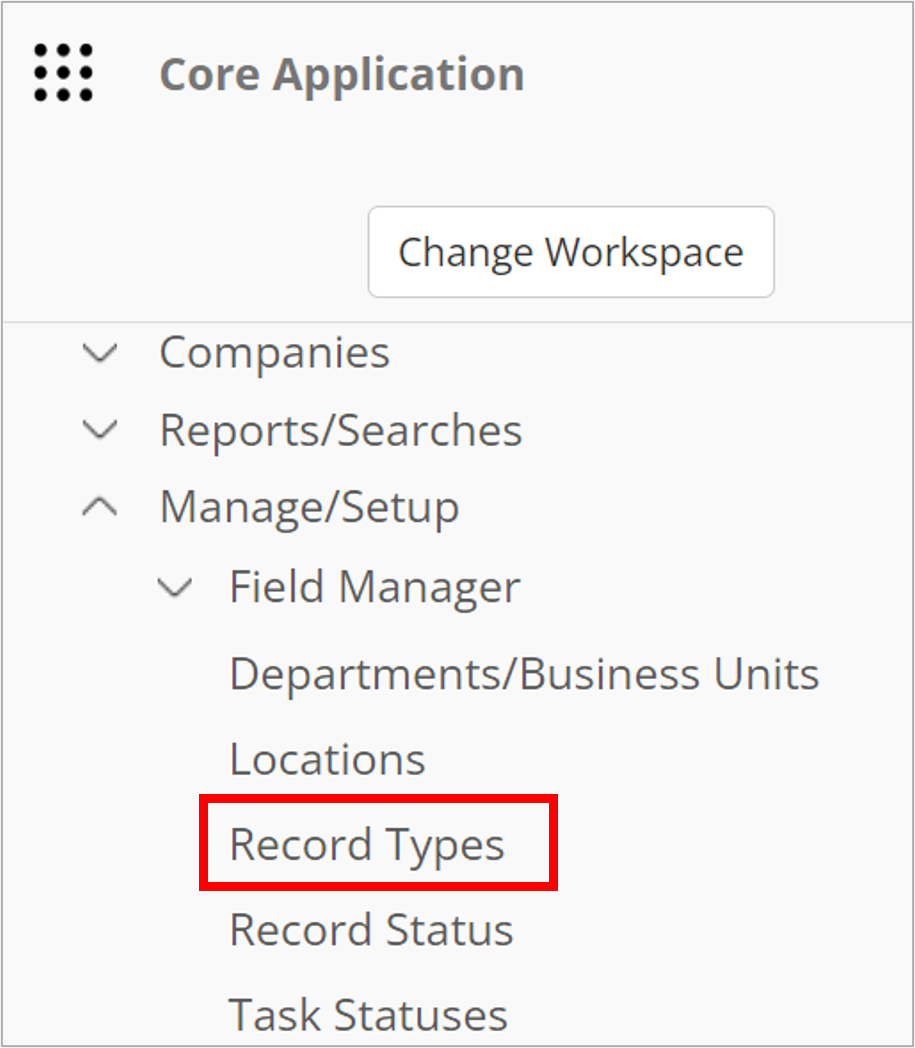
2. This will open the List Manager screen listing all of the contract types already in Contract Insight.
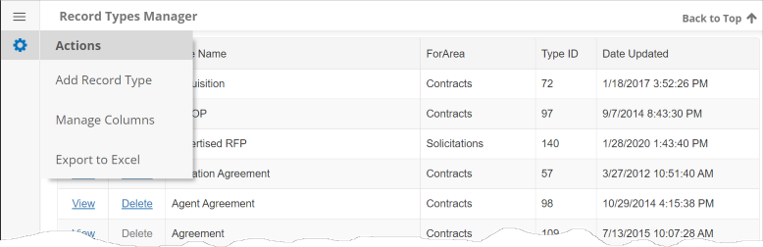
3. Click Add Record Type on the side menu.
4. Enter the name of the new contract type and click Save.
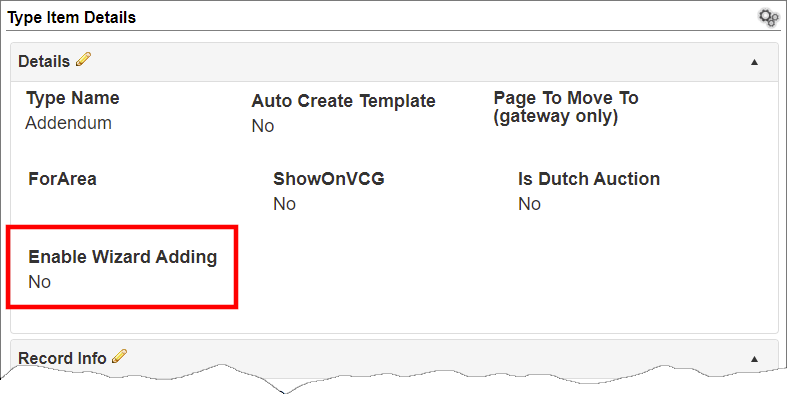
Wizard-Based Types
Record type add-screens can be designated on the type's Details page. Wizard-based add screens take users through the add screen one field group at a time before submission.
Set Enable Wizard Adding to Yes to use wizard-based add screens for the type.
To View/Edit a Record Type
1. Click View for the contract type line item you would like to view/edit.
2. The Record Type Configuration screen displays.
3. To edit the name of the contract type, click the Pencil Icon for the Type Name line item.
4. Edit the text for the name of the type and click Save Changes.
To Delete a Record Type
Note: Prior to deleting a record type, make sure it is not being used by any contract records.
1. Go to the Record Type Configuration screen for the line item to be deleted.
2. Click Delete in the side menu.
3. Confirm the deletion.
Manage Columns Button
Note: The Manage Columns button will allow users to view additional columns of information available for the table selected.
1. Click Manage Columns on the side menu.
2. On the next screen select the field you would like to view as a column. Click Add next to the desired field to move to the left-hand column.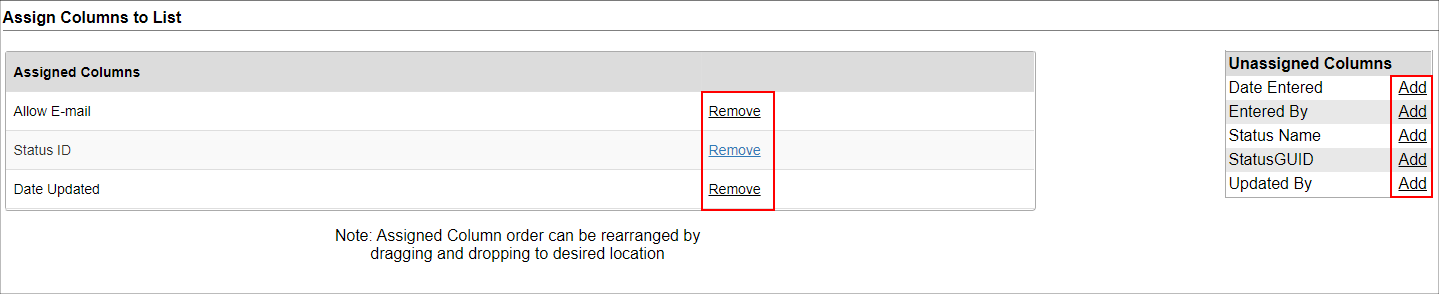
3. Once added, click Back to List on the side menu. The column just added displays.
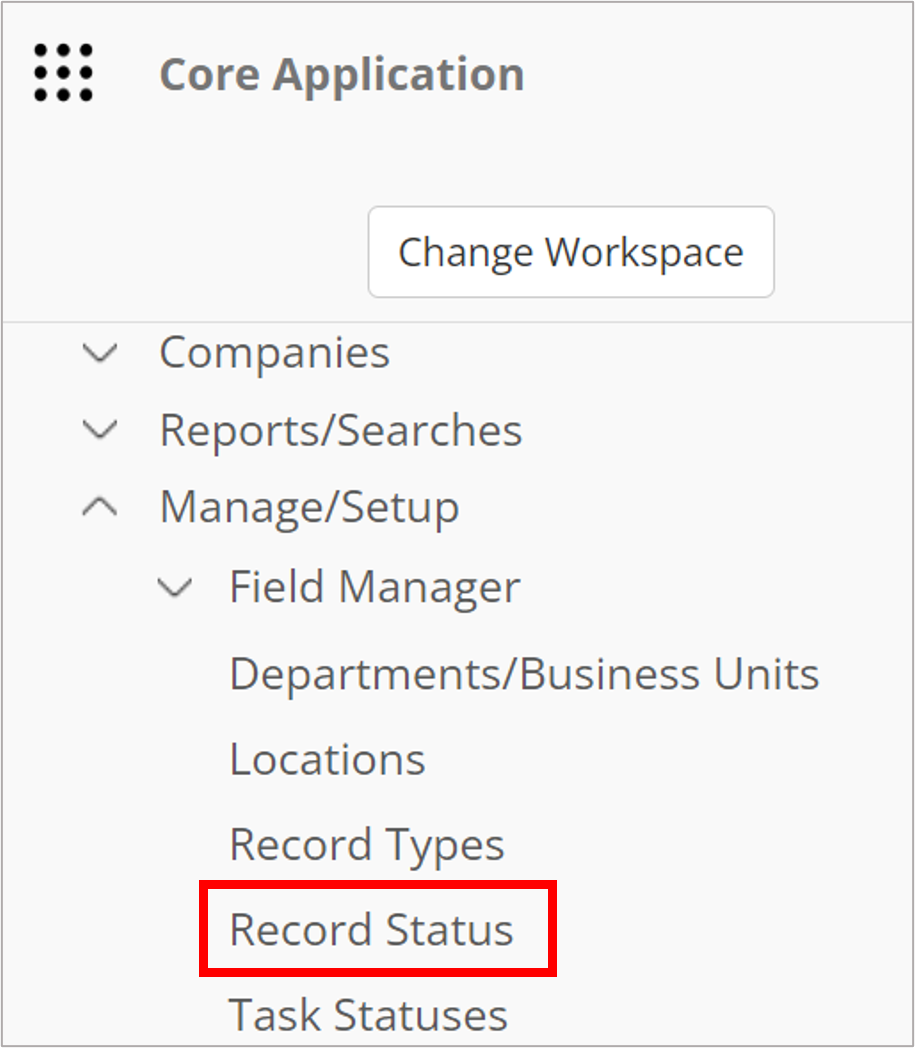
Record Status Management
Master Reference Data Management: Contract Status
Contract Insight supports the ability to track a contract's lifecycle by Contract Status. For example, a Contract Status may be Open, Closed, Canceled, Renewed, Pending, etc. The Contract Status list can be managed by the Application Administrator. The system may house as many or as few record statuses as desired.
To Add a Contract Status
1. Select Contract Status from the Manage/Setup top navigation menu item.
2. This will open the List Manager screen listing all of the contract statuses already in Contract Insight.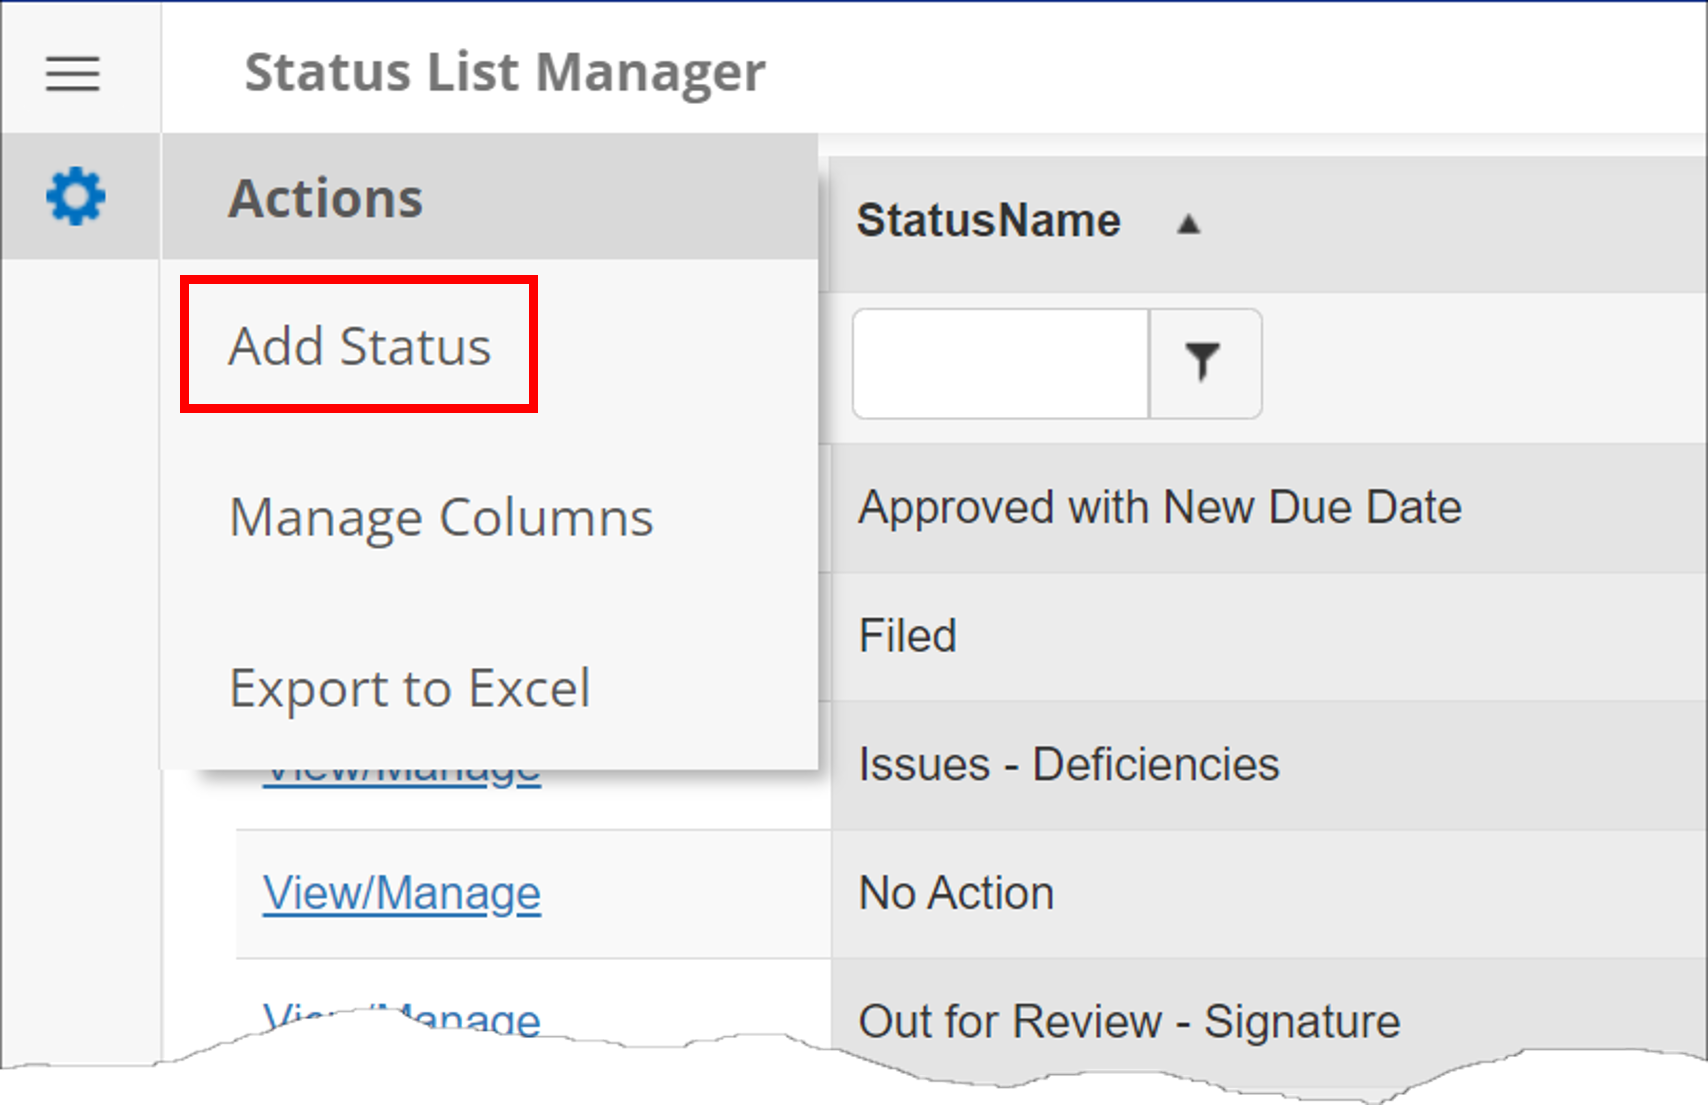
3. Click Add Record on the side menu.
4. Enter the name of the new contract status and click Save.
To View/Edit a Contract Status
1. Click View for the contract status line item to view/edit.
2. This will open the Status List Configuration screen.
3. To edit the name of the contract status, click the Pencil Icon for the Status Name line item.
4. Edit the text for the name of the status and click Save Changes.
To Delete a Contract Status:
Note: Prior to deleting a status, make sure it is not being used by any contract records.
1. Go to the Status List Configuration screen for the line item to delete.
2. Click Delete on the side menu.
3. Confirm the deletion.
To Set a Status to Not Allow Email
Users have the option to set a Contract Record to a Status that will not send out email alerts.
Note: this should only be used for contracts that alerts are not required (i.e. Expired, Terminated).
1. Go to the Status List Manager screen. If the Allow E-mail column is not visible, it can be added by using the Manage Columns link on the side menu.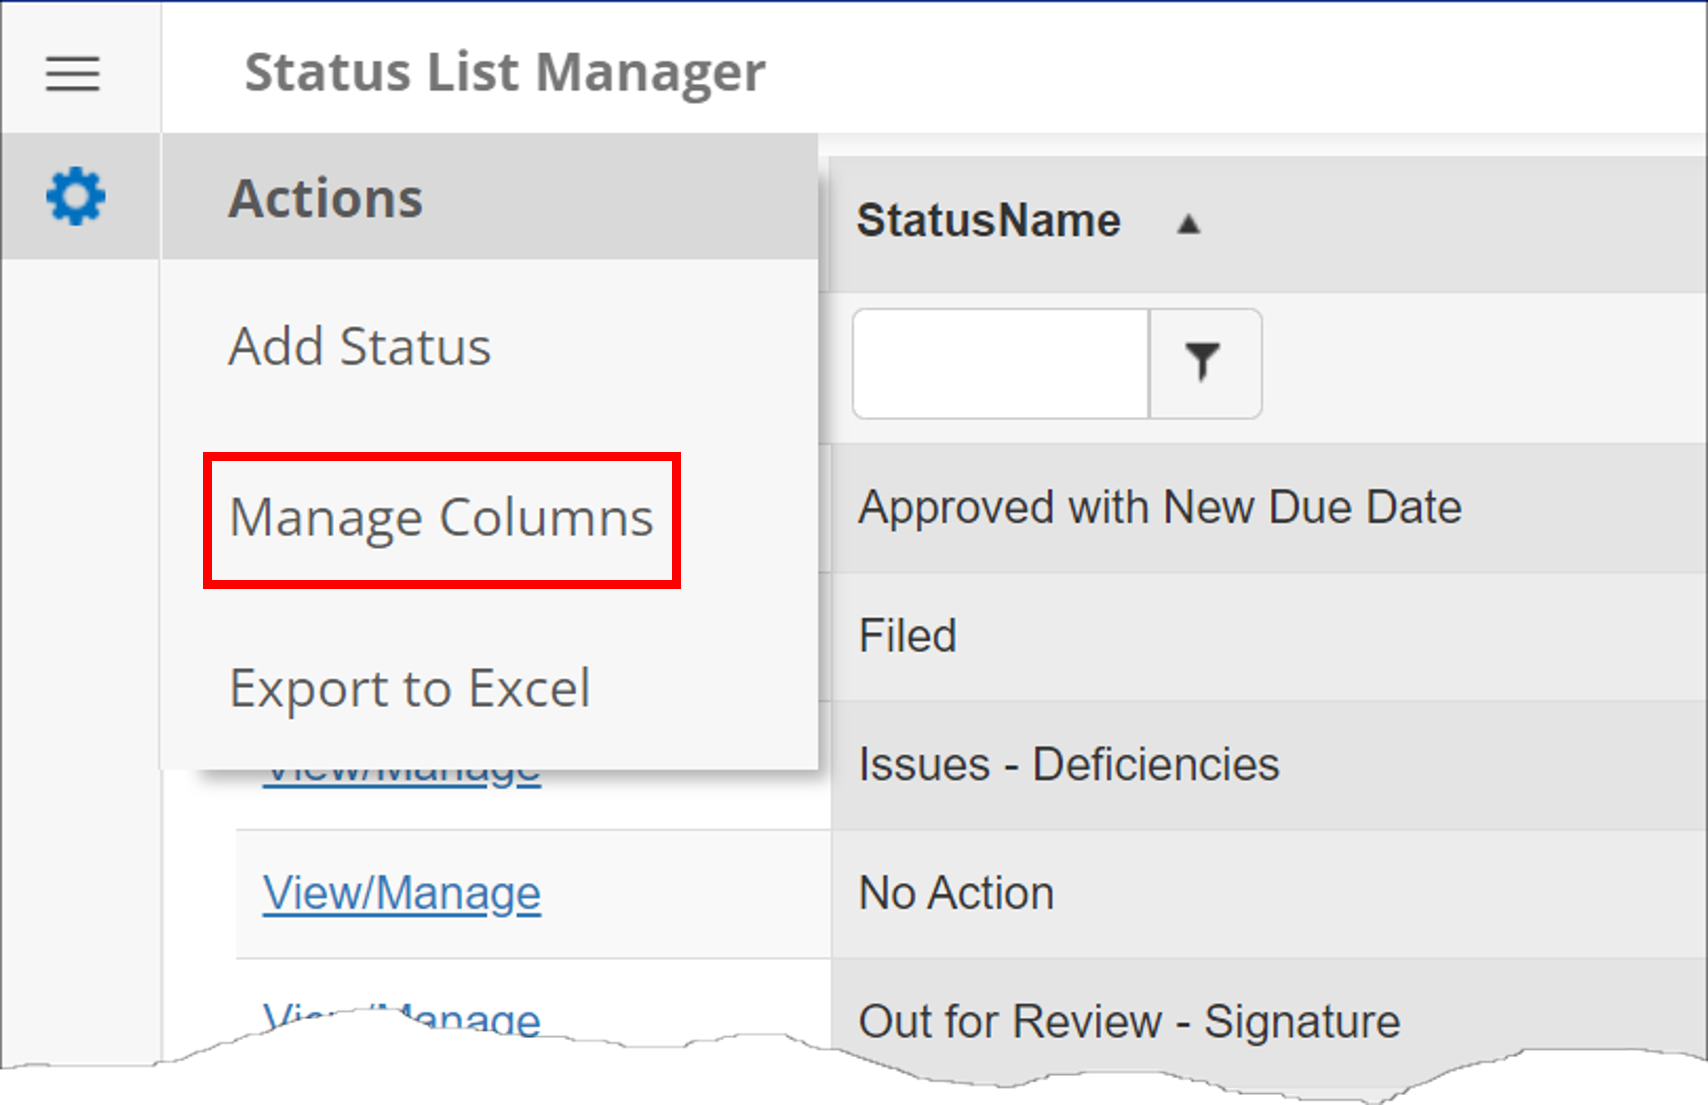
2. Click View for the Status for which to set the Allow-Email to False/No. Note that all Statuses, by default, are set to True/Yes.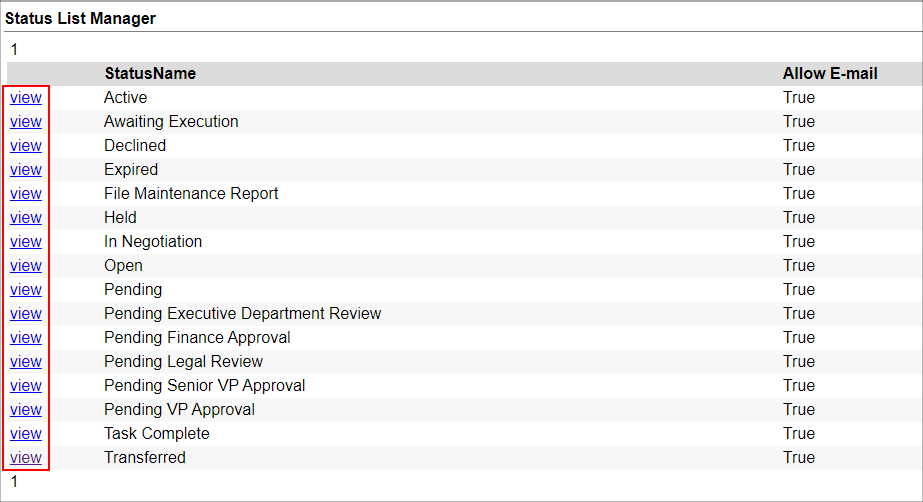
3. This will open the Status List Configuration screen. Click the Pencil Icon to edit the Allow Email item.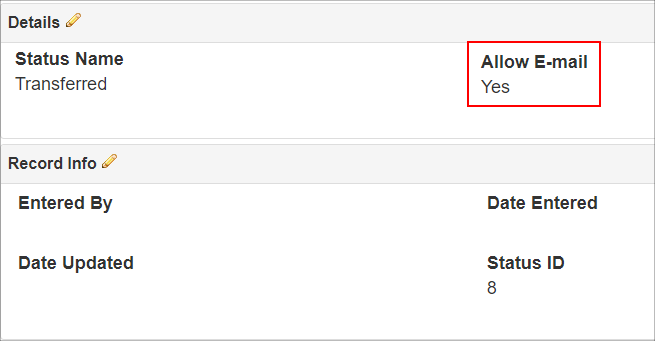
4. Set Allow Email to False/No to no longer have the regular system generated e-mail alerts sent out for the contract record when the Contract Record is set to this status.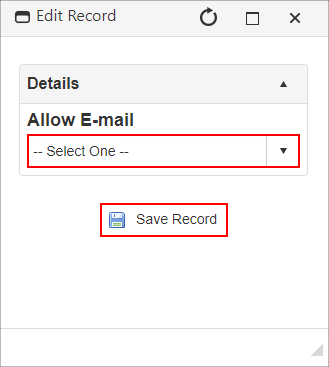
Manage Columns Button:
Note: The Manage Columns button will allow users to view additional columns of information available for the table selected.
1. Click Manage Columns on the side menu.
2. On the next screen select the field to view as a column. Click the Add button next to the desired field to move the item to the left-hand column.
3. Once added, click Back to List on the side menu. The column just added displays.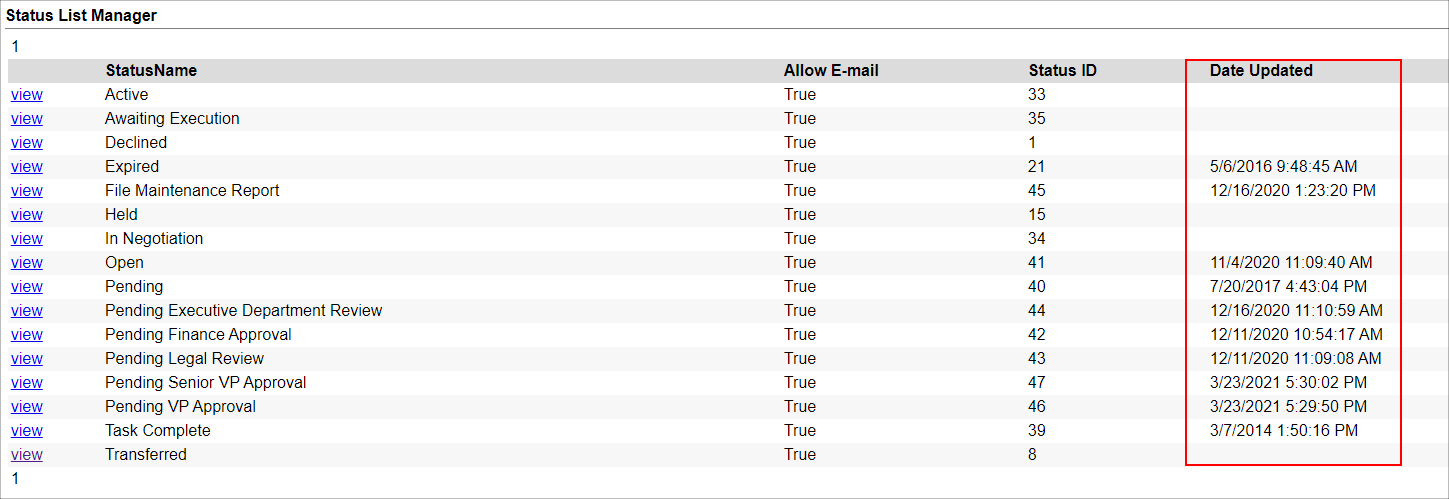
To learn more about Master Reference Data, please watch the following video.
Add a Contract Record
Add a Contract Record
Before adding a contract into the Contract Insight system for the first time, it is best to verify with the Application Administrator that all departments, vendors, employees, locations, contract types, and status values have been entered.
1. To add a contract into the system, go to the top navigation menu and click Contracts. From the Contracts menu, click Add Contract Record.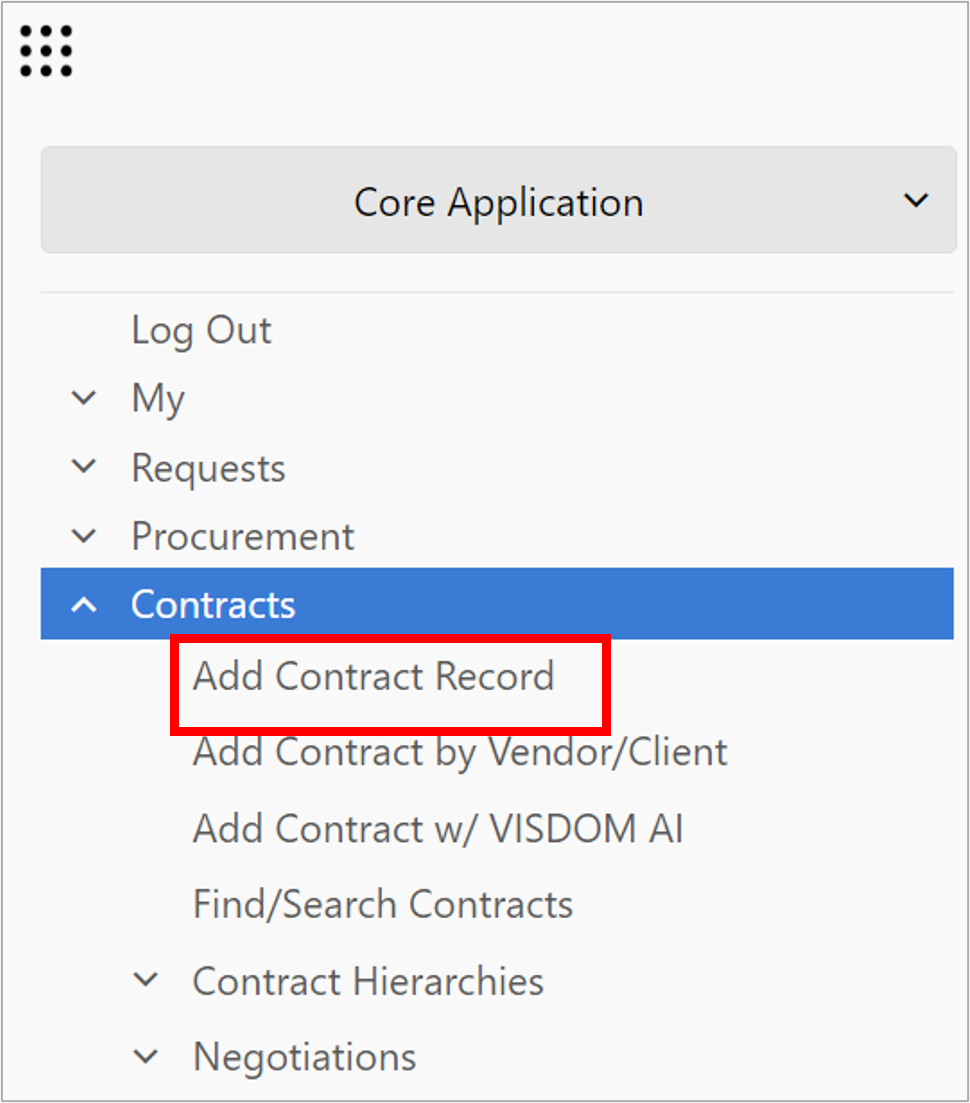
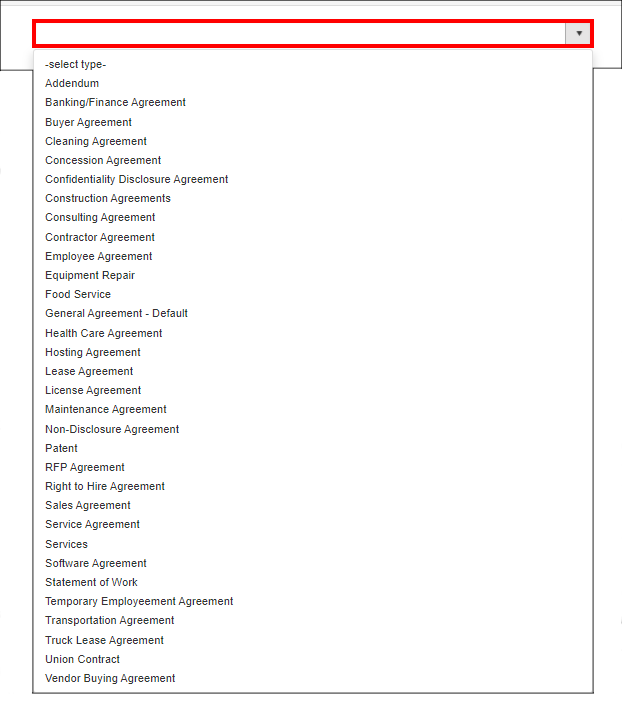
2. The Add New Contract Record screen displays. From this screen, you can choose from a drop down list what type of contract you would like to add. After selecting the type of contract to add, select Continue.
Note: Depending on the contract type you select to create, the Add Screens will look slightly different from one another. Your Application Administrator can alter the fields for each contract type in the Field Manager section of the Manage/Setup top menu selection. Please be sure to enter all required fields.
3. After entering all required fields (marked by a red asterisk *) on the Add New Contract screen, click Save & Continue to commit the record to the system.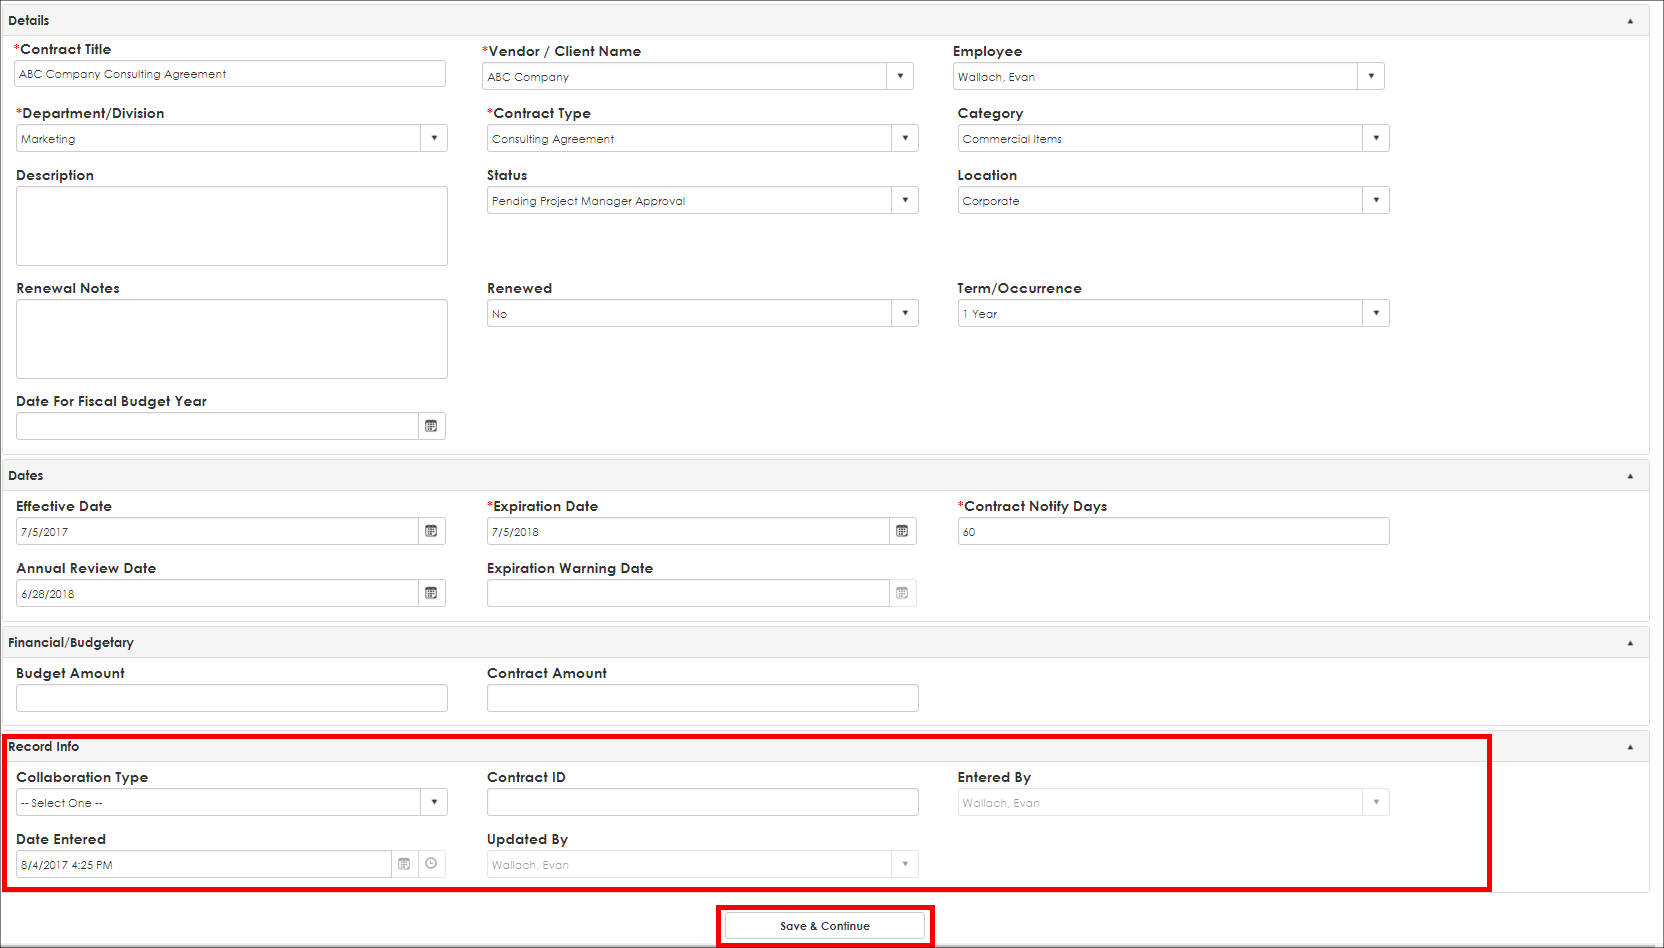
Note: For long drop down lists (for example, Vendor drop down), click the drop down arrow for the drop down list to appear, then begin typing the name of the value you would like to select. The system will automatically filter the selections based on your entered value.
Note: Grayed out fields, those that cannot be edited, may be different in each Contract Insight system. Contact your Application Administrator if you have any questions about areas that need to be altered/edited. Also, some fields may be auto-filled upon selecting Save & Continue.
You may also add a new company from the Add Contract screen once you select the type of contract you will be adding.
Select Add Company link on the side menu of the Add Contract screen. Follow the instructions for adding a company (see the Add a Company Wiki page).
Note: The employee assigned to the record, as well as any additionally assigned employees will receive the out-of-the-box key date alerts
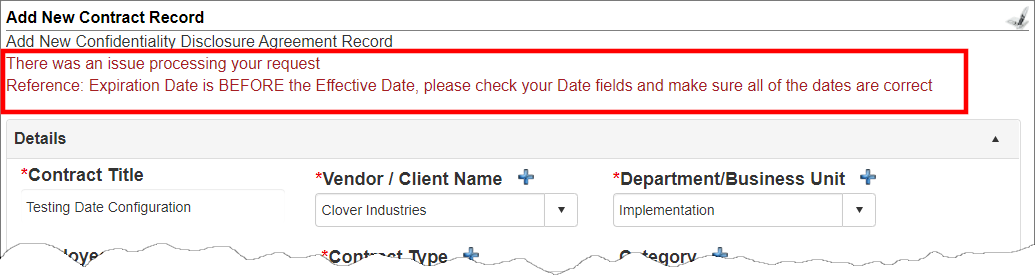
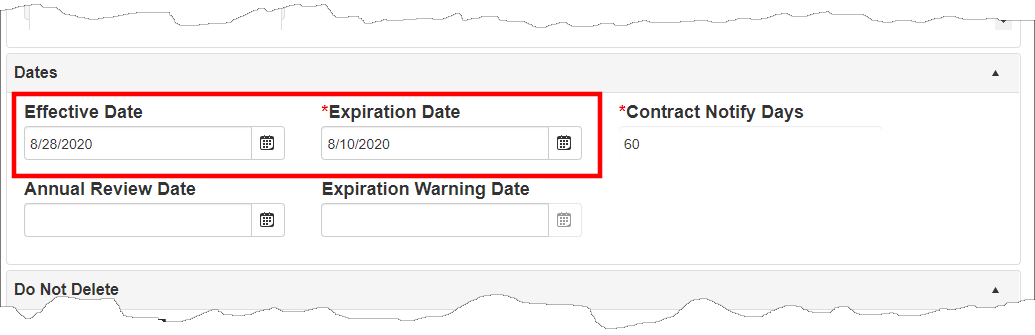
Note: If the expiration date entered is earlier than the expiration date, a warning displays : There was an issue processing your request. Reference: Expiration Date is BEFORE the Effective Date. Please check you Date fields and make sure all the dates are correct.
Out of the box date fields are Expiration Warning Date, Effective Date, and Expiration Date. As seen above, the Department field is required, just like on Employee records.
Wizard-Based Entry
Some add screens may be organized into a wizard. Click Next and Previous to navigate from section to section.
A progress bar displays toward the top of each group.
If a wizard page does not contain any fields for entry (usually due to rules dictating a field apply or not), a message letting the user know how to proceed displays.

Committing a Record
Once you click Save & Continue to create the new Contract Record, Contract Insight advances to the Contract Details screen for the new record.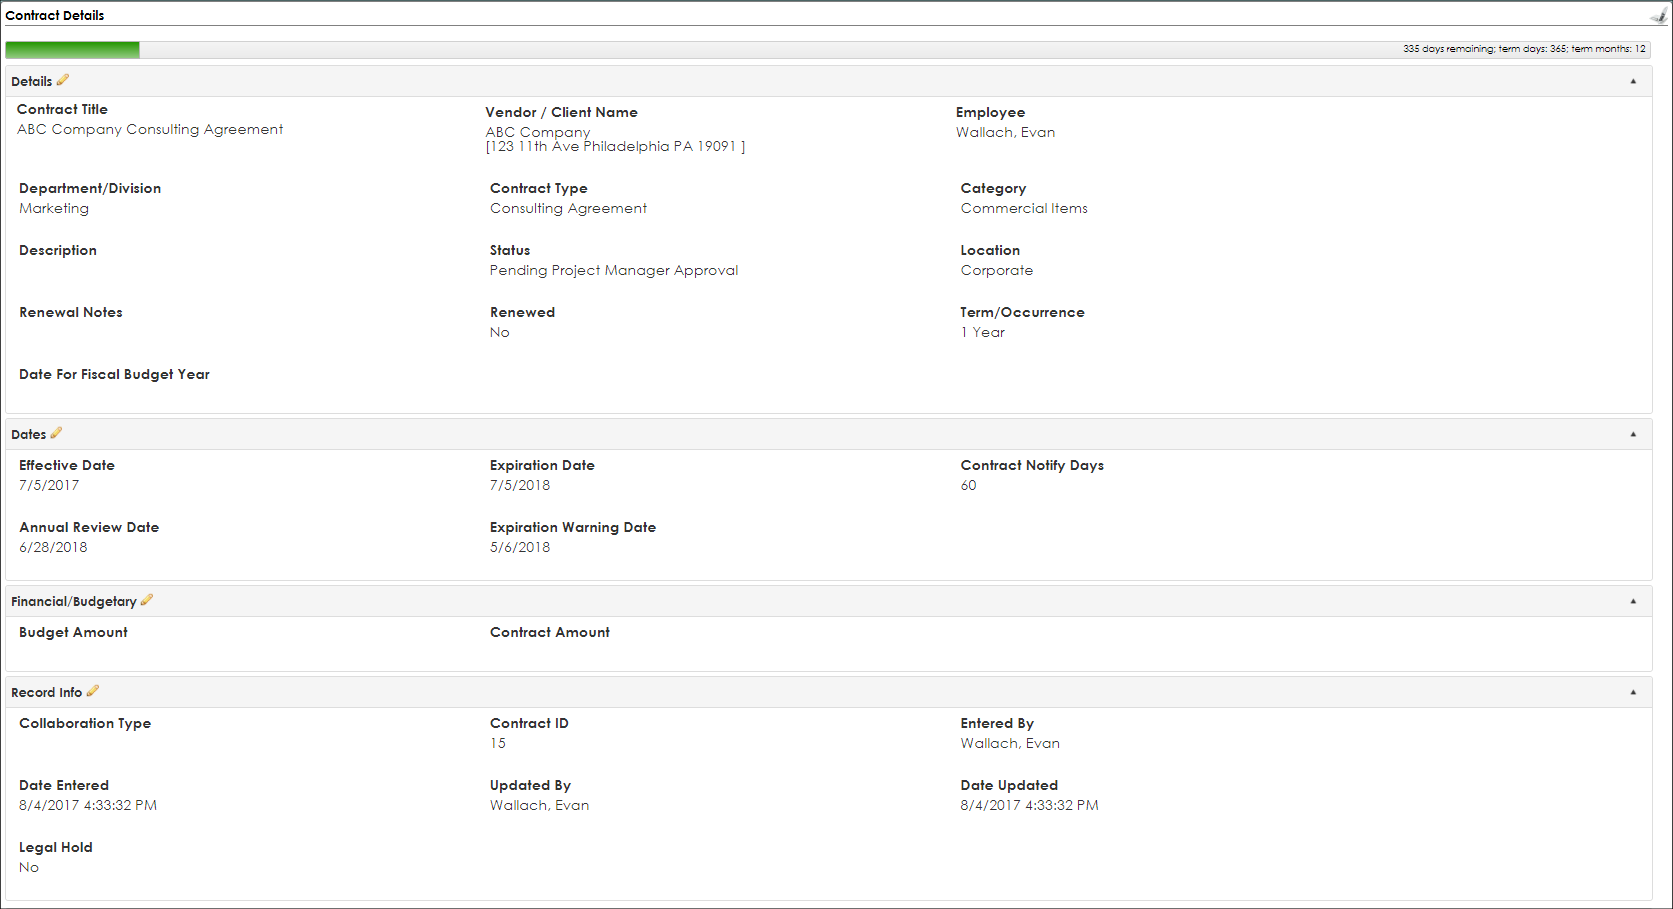
To watch more about Contract Records, watch the following video.
Field Level Searching/View All
Find/Search Contracts: Field Level Searching/View All
The Find/Search Contracts feature allows users to perform field-level searching and reporting for contracts. This search option is helpful when searching for something such as all of the contracts to which a particular employee is assigned.
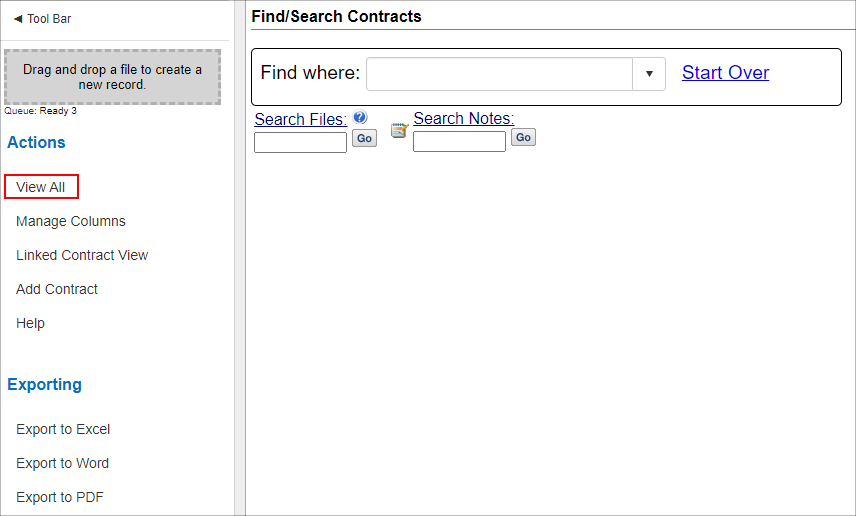
View All Contracts in your Contract Insight Application
Click View All under Actions on the side menu of the Find/Search Contracts screen.
Field-Level Searching
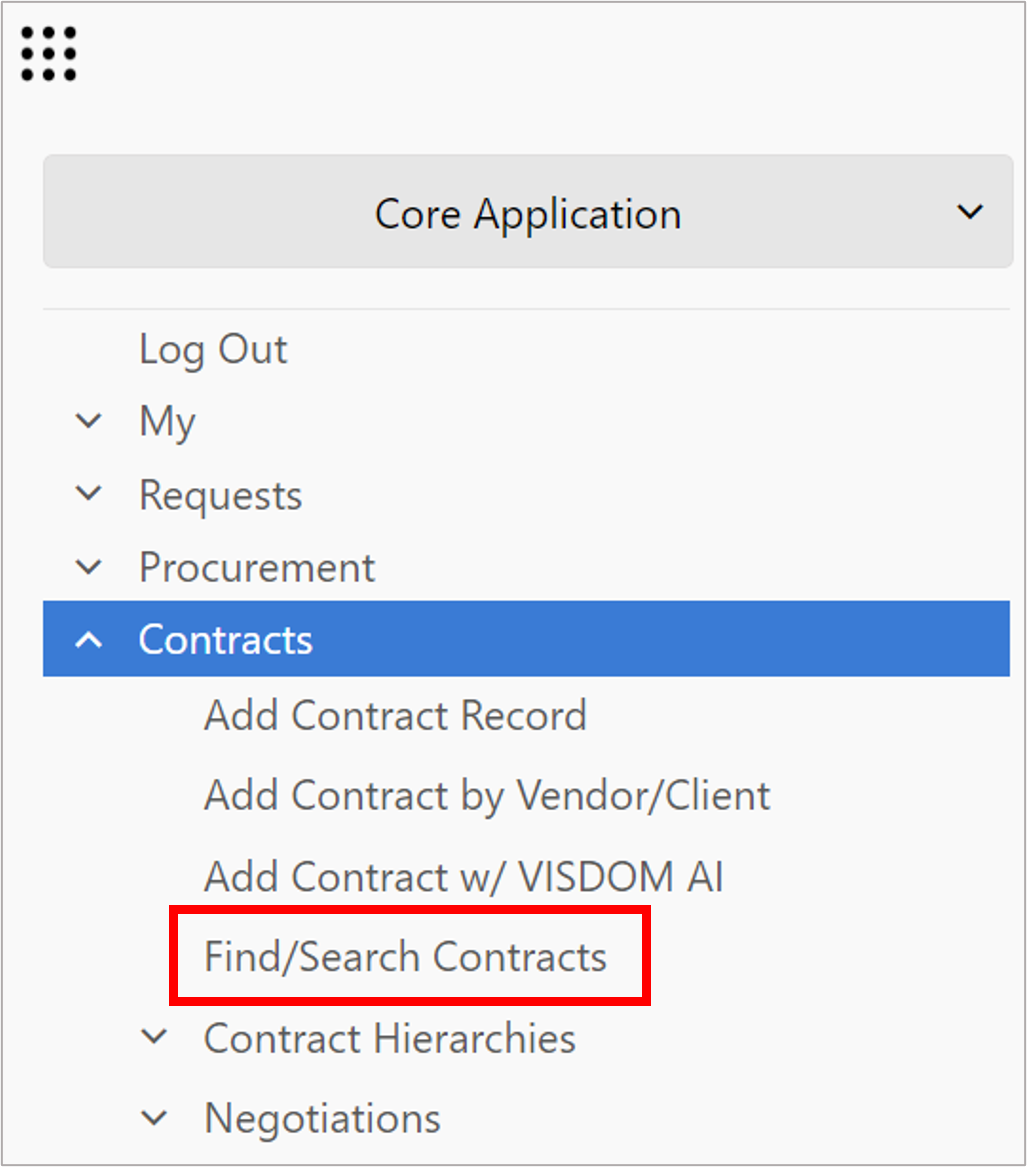
1. On the top navigation bar, navigate to Contracts > Find/Search Contracts.
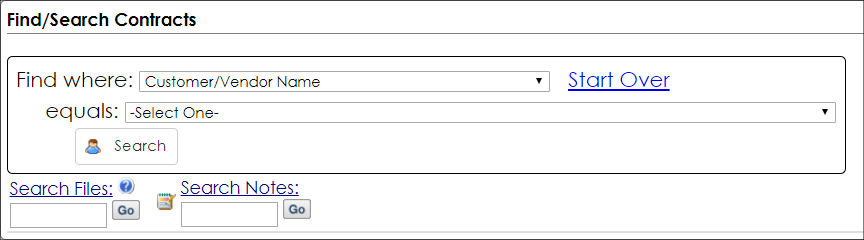
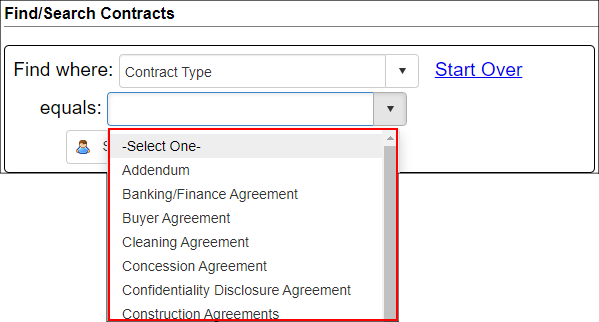
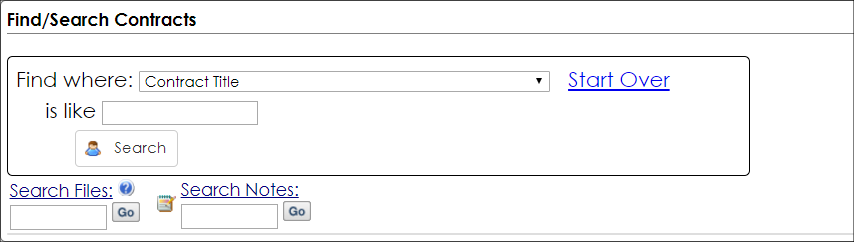
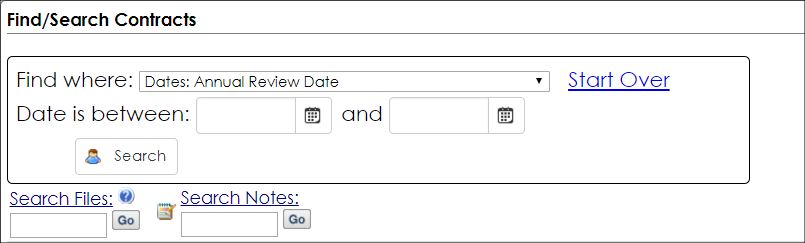
2. In the Find where drop down menu, select the area to be searched.
3. Depending on the selected field's field type, presented additional options display.
- For Drop Down Fields: a second drop down, one from which to select the value for which to search where the field Equals, displays. User-defined drop-down field values are also available.
- For Text Entered Fields (such as Text Box, Currency, Integer, Decimal Field Types): enter text into a text box where you can find where the selected field Is Like.
- For Date fields: enter/select (using the calendar icon) two dates between which to search the selected field where the Date is Between.
NOTE: If a Find Where field is selected, View All cannot be used. Click Start Over before clicking View All.
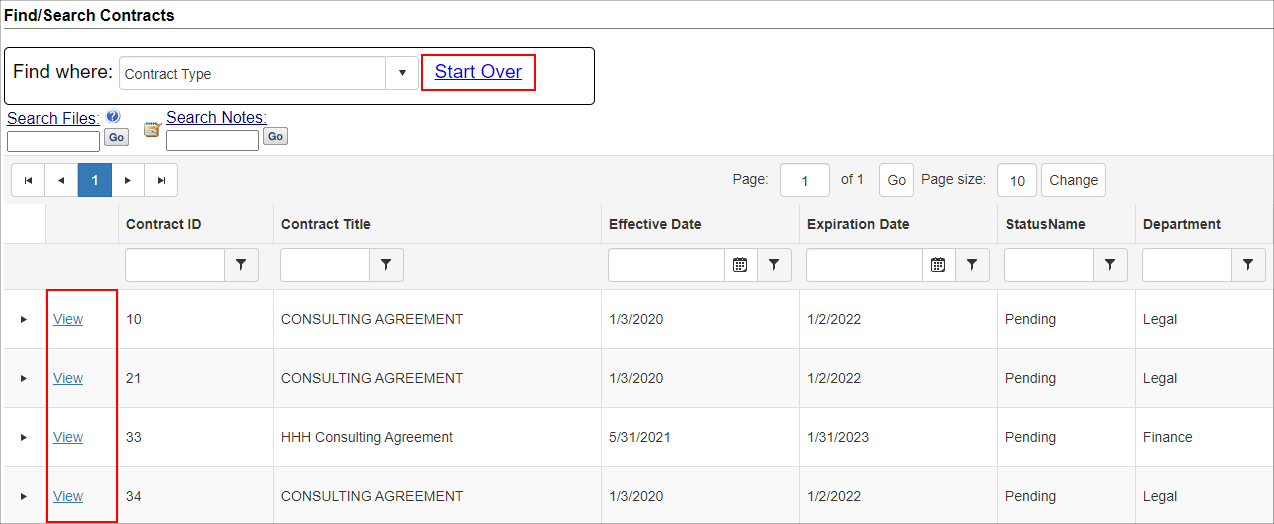
4. Click Search to display all Contract Records that match the search criteria entered.
5. To start a new search, click Start Over (to the right of the Find Where drop down menu).
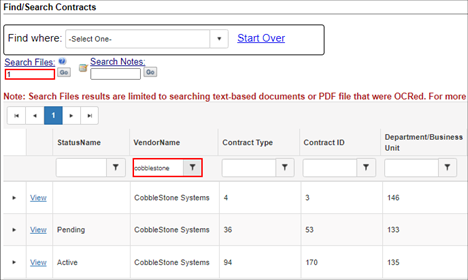
The system is also able to maintain filters and sorts on the Contract Find/Search screen. After filtering the grid on the Contract Find/Search screen, the system will retain results when performing a secondary Search Files or Search Notes on the Find/Search Screen.