CobbleStone® University Certification Program - Unit 1
Create User-Defined/Custom Fields
Field Manager: Overview
Contract Insight supports an unlimited number of easy-to-create, user-definable fields. Contract Insight includes standard fields and enables your organization to create unlimited user-definable fields and assign each field per each contract type. This offers the flexibility to gather and track all of the critical information that your organization requires, and track various fields per contract type. In addition, each field has a customizable field label and pop-up help description. Contract Insight’s Field Manager also offers the flexibility of various field types (text, date, currency, number, decimal, drop-down, multi select, etc.) with required and not-required settings.
Create a User-defined Field
1. Select Field Manager from the Manage/Setup menu option.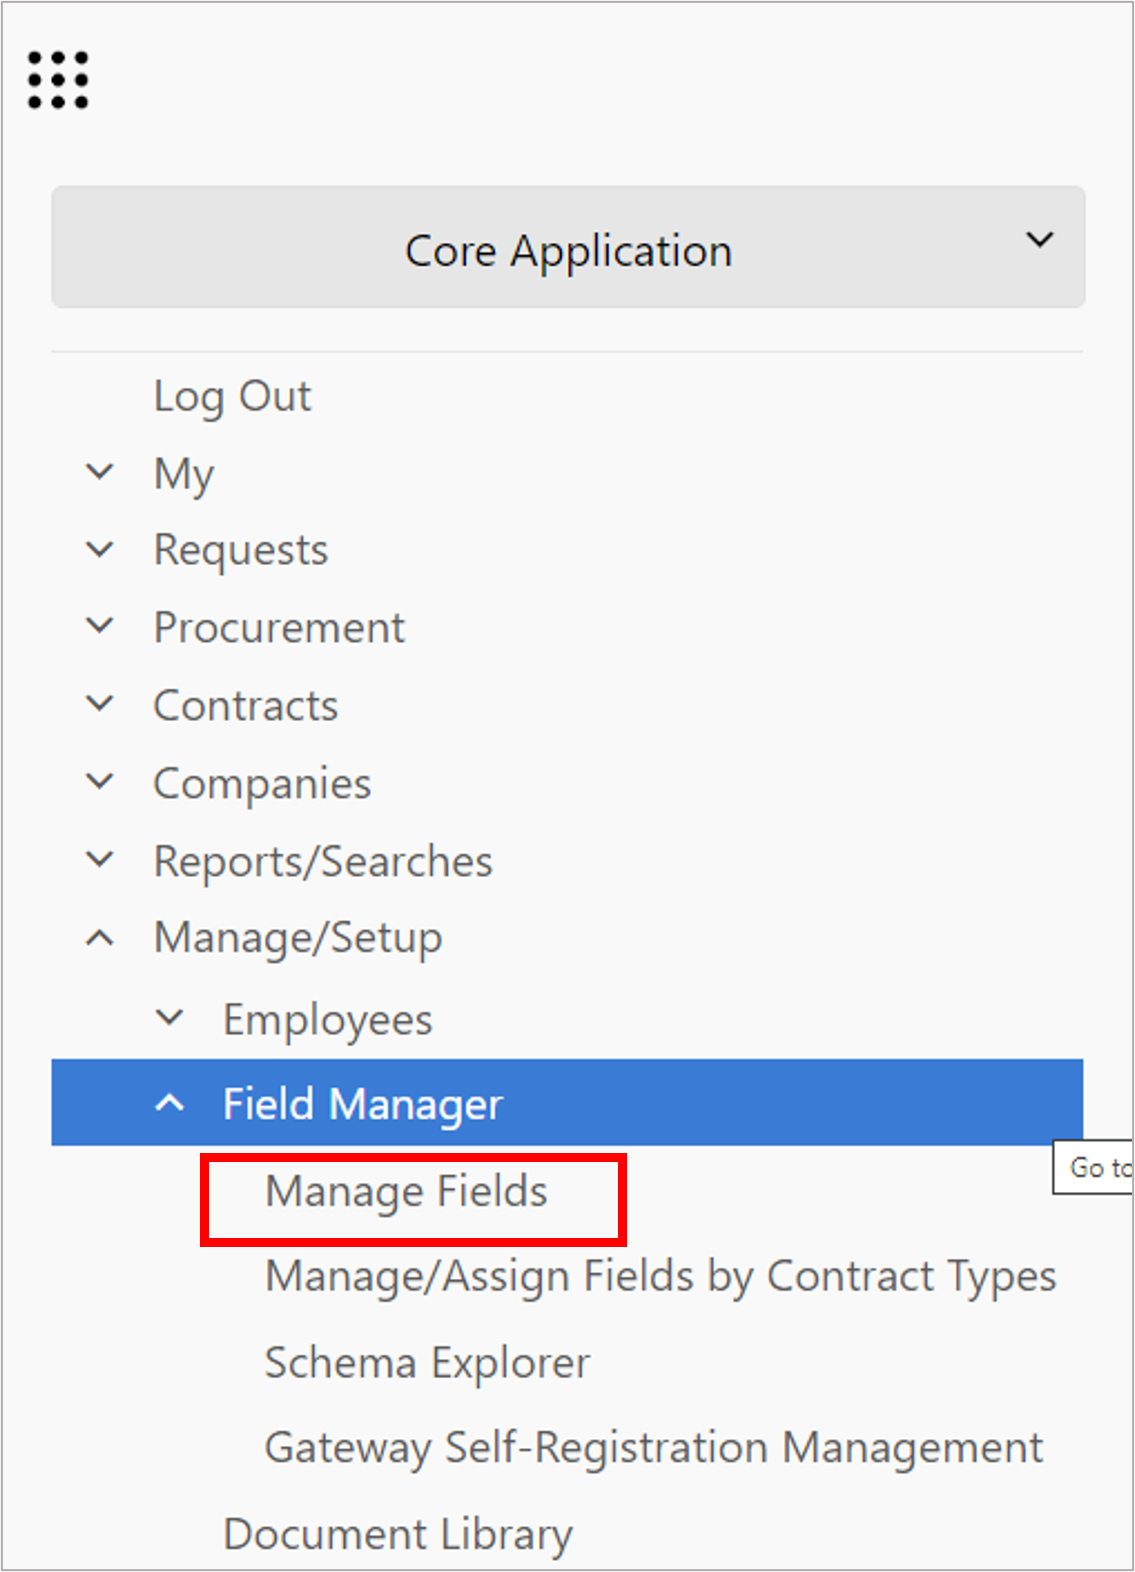
2. From the drop down menu, select the table for which the field is to be created. The field selector screen displays.
.png)
3. All existing field names display.
Note: This interface can be utilized to scroll through the records and make data changes (there is no undo option - all changes are final). If there are user-defined fields entered, you will be presented with the option to manage the field values and/or delete the custom field. All changes are final and cannot be undone. System fields cannot be deleted.
4. Click Add Field.
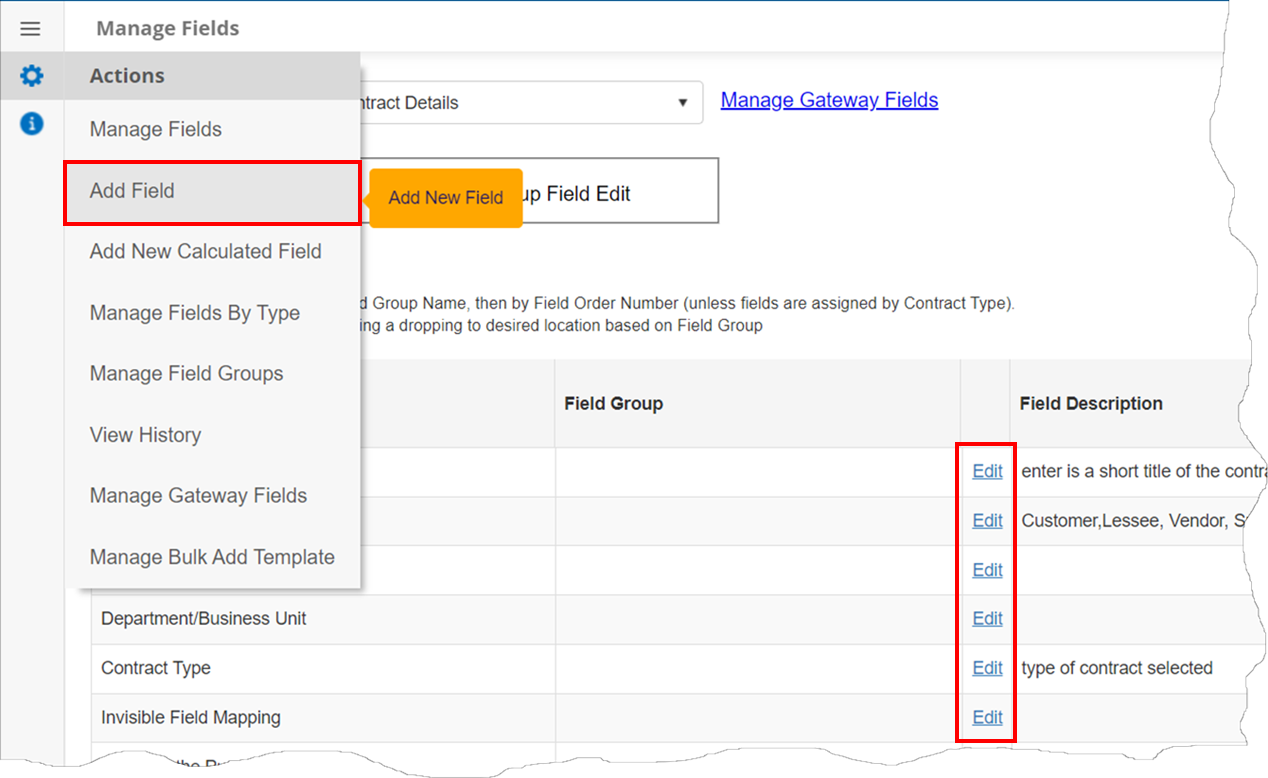
5. The field manager Add Field form displays.
.png)
1. Enter the Field Name (Required)
2. (Optional) Field Group
3. Field Type (select from list-see below for options available, Required)
4. (Dynamic) Field Length
5. (Optional) Default Value
6. Required Value (True or False) (Required)
7. (Optional) Help Description
Note: For field types of Drop Down Box, Slider or Multi-Select List Box, values entered into the Default Value box should be entered, separated by commas, with no spaces. (i.e. Yes,No,Maybe).
Field Types:
.png)
Text | The Text field type can be used to save characters or a mix of characters and numbers. The text field type will create a "varchar" data type in the underlying table. |
Integer | The Integer field type can be used to save integer numeric values. This can be used for whole numbers. |
Checkbox | The Checkbox field type can be used to create a field that can save a TRUE or FALSE value visually as a tick mark. |
Currency | The Currency field type can be used to create a field that can save currency data. |
Date | The Date field type can be used to create custom fields that can save dates. Dates should be formatted as 'mm/dd/yy' or 'mm/dd/yyyy'. |
Date Time | The Date Time field type can be used to create custom fields that can save dates and times. |
Drop Down | The Drop Down field type can be used to create a custom field that contains list items to pick from. Enter the list items (separated by commas using NO spaces after the comma) in the default value box. |
Multi Select Drop Down | The Multi-Select field type can be used to create a custom field that contains list items to pick from. This differs from a Drop Down in that the user can select multiple items from the list. Enter the list items (separated by commas using no spaces after the comma) in the default value box. |
Multi Line Text Box | The Multi-Line Text field type is similar to the Text field type in that it can be used to save characters or a mix of characters and numbers. This multi-line text box differs from a text box in that the user can enter multiple lines of text into multiple lines (the text box will not wrap into multiple lines as a multi-line text box will). |
Hyperlink | The Hyperlink field type is used to include a clickable link to a URL or email address. This field type has three options from which to select upon creation: Email Link, URL Link, and URL Link (open in a new window). Email allows an email address to be entered and, when clicked, launch the user's default mail manager with the address pre-populated in a new message. The two URL Link options are for web addresses and to open in the record's window or in a new window/tab. Friendly Text can be entered so users so not see the address but specified text instead. |
Password | The Passwords field type allows users to enter "password" values that hide the actual values with password-type characters. |
Rich Text Editor | The Rich Text Editor field type is similar to the Multi-Line Text field but allows formatting and additional options when adding/editing the field value. |
Slider | The Slider field type can be used to create a custom field that contains list items from which to pick. This differs from a Drop Down field in that all options are displayed and a sliding indicator is used to select an option. Enter the list items (separated by commas using no spaces after the comma) in the default value box. |
Decimal | The Decimal field type allows users to enter a decimal value with a two (2) digit number to the right of the decimal. |
Decimal 4 | The Decimal 4 field type allows users to enter a decimal value with a four (4) digit number to the right of the decimal. |
Note: The system does not permit duplicate custom field names.
Drop-Down Fields
Drop-Down fields offer an additional option, Auto Complete Box.
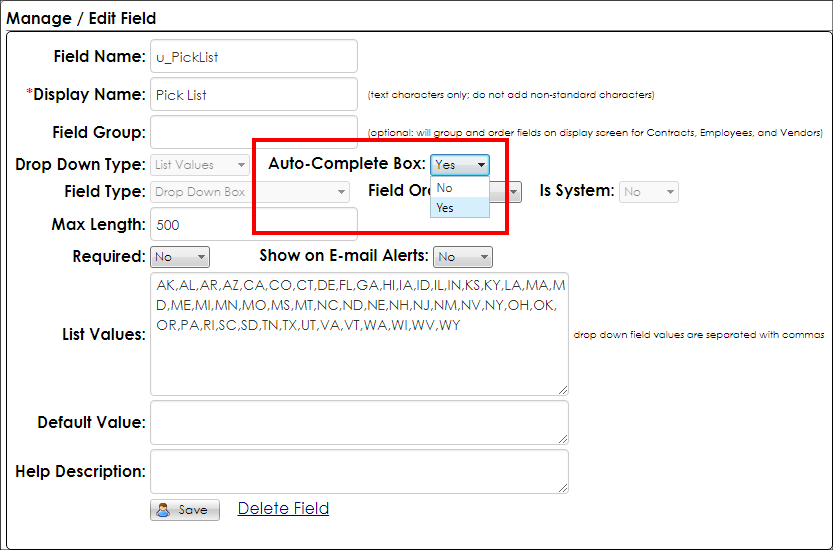
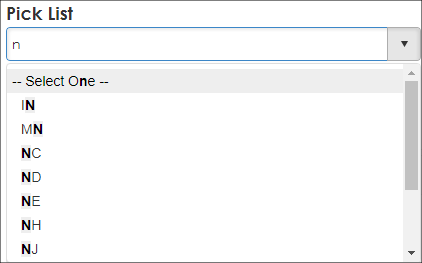
If set to Yes, the field allows users to type into the field to filter the results to those containing the string entered. Users can then select from the filtered options.
Notes:
While Auto Complete Box adds a nice aesthetic to drop-down fields, it also reduces the page's load time due to limiting the number of results that populate when the page is first loaded.
Additionally, Contract Insight has intelligence built in to monitor the number of entries for a drop-down field. If the number of entries exceeds the intelligence threshold, the drop-down field is automatically given the auto complete functionality.
Field Groups
Establishing field groups associates fields named within the group. For example, fields in the group Record Information will always be displayed together. The display sequence of fields and groups is dependent upon alphabetic sorting of the group name and then by order number: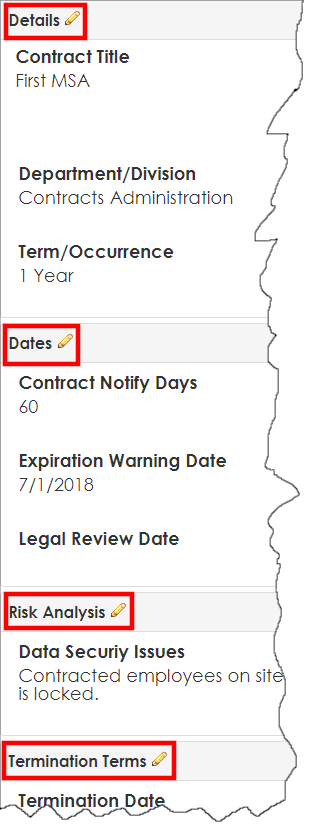
Add New Calculated Field
From the left side menu of the Manage Fields page, select Add New Calculated Field

From the drop down menu, select the table for which the field is to be created. The field selector screen displays.
.png)
The field manager Add New Calculated Field form displays.
1. Enter the Field Name
2. (Optional) Field Group
3. (Optional) Help Description
4. (Optional) Include On Task Email (defaults to No)
5. Field Type (select from list-see below for options available)
6. Value (Select the fields to calculate - Any standard arithmetic operation symbols (+, -, /, *) may be used when creating calculations)
.png)
Calculated Field Types
Date Calculation (Integer) | The difference in 2 specified dates may be calculated by selecting the type, Date Calculation (Integer). This will allow for users to pick a difference in month, days, or years between 2 dates. This will allow for comparisons between any dates within the same table, or comparisons between one date and the current date. |
Currency | Numeric calculation based on two applicable fields resulting in a value with 2 decimal places. |
Date | Date calculation Users may create calculated date and date time values from existing fields based on a specified interval. This interval may calculate a value based on the given field’s day, month, or year. |
DateTime | Users may create calculated date and date time values from existing fields based on a specified interval. This interval may calculate a value based on the given field’s day, month, or year. |
Decimal | Numeric calculation based on two applicable fields resulting in a value with 2 decimal places. |
Integer | Numeric calculation based on two applicable fields resulting in a value with 2 decimal places. |
Text Box | Custom text values may be created based on any available field to create a calculated text box value. This might be useful for concatenating several descriptor fields into one field for reporting purposes that would allow for it to be considered a single column, rather than individual columns. |
Note: A Calculated Field Type of Currency, Decimal, and Integer can include any field types that contains numeric-based values, however, the resulting calculated field will be converted to the specified type. For example, if Currency is the selected type, and it is pulling a calculation based on an integer value with no decimal places and another currency value with decimal places, it will convert the resulting calculation to a currency/decimal value with 2 decimal places.
Advanced Field Notes
• | All user defined custom fields are saved to the table source with the prefix of "u_" appended to the field name. The end user will not see the "u_" prefix. |
• | The Drop Down field types are saved to the table as a varchar(50) data type. |
• | User defined field names cannot be modified. |
• | User defined fields can be deleted, however, this action is permanent and all associated data saved in the user defined field is deleted. |
• | System defined fields cannot be deleted or modified without customization. |
• | Any field (standard or user-defined) may be included in email alerts. |
Managing and Editing Fields
Field Manager: Editing Fields
User-Defined and System fields can be edited, but only certain aspects of the field are able to be edited. To manage and edit fields, go to the Manage/Setup menu, select Field Manager, and then select Manage Fields.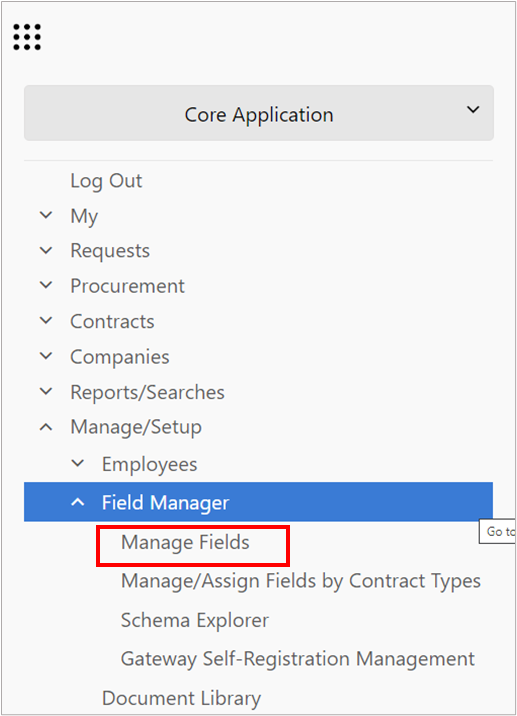
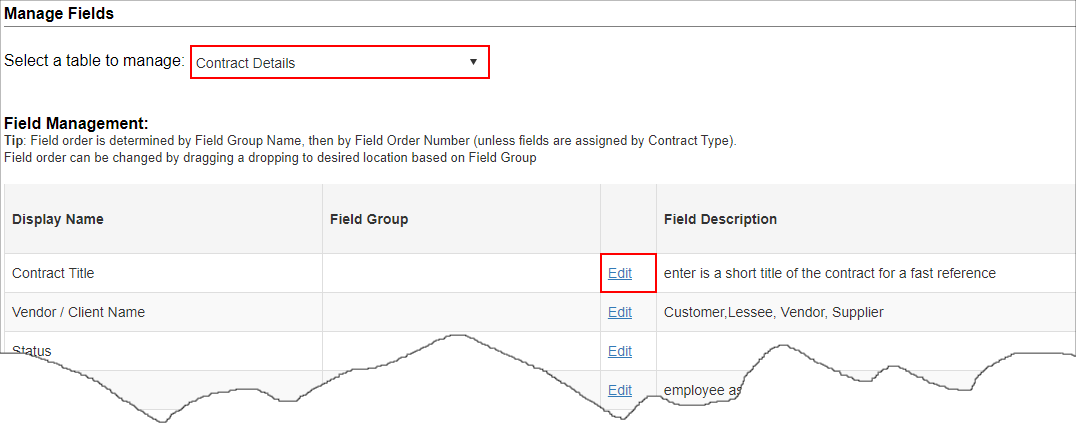
The Manage Fields screen displays. From the Select a table to manage drop down menu, select the table for which to manage the fields. Once the table is selected, a list of all fields for the selected table shows.
Editing Fields
To edit a field, click Edit for the line item to be altered.
The Edit Field screen for the selected field opens.
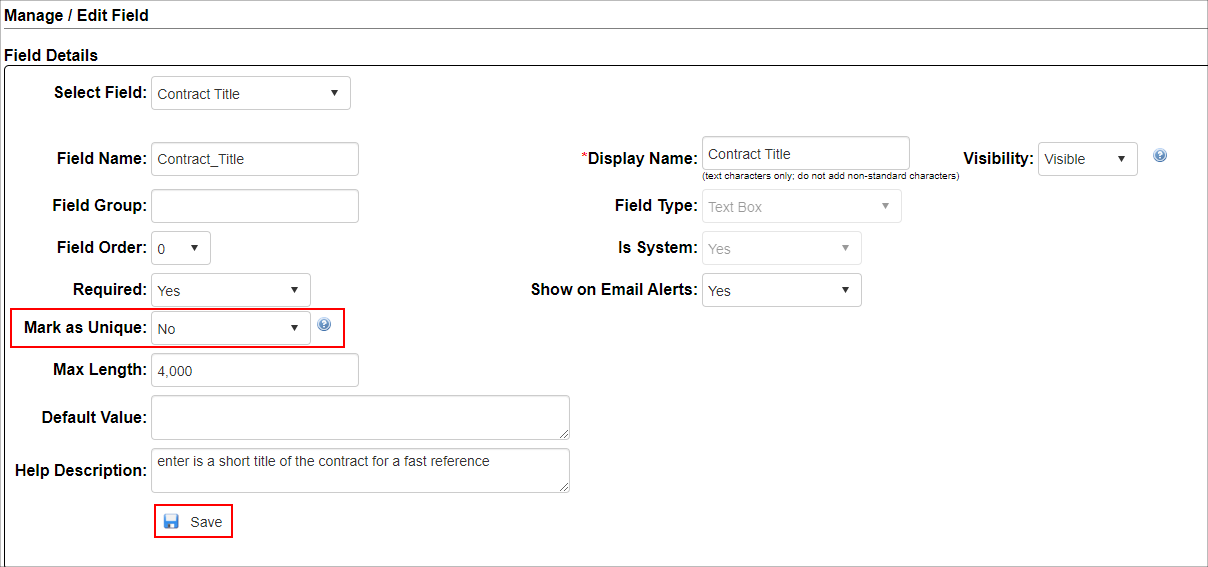
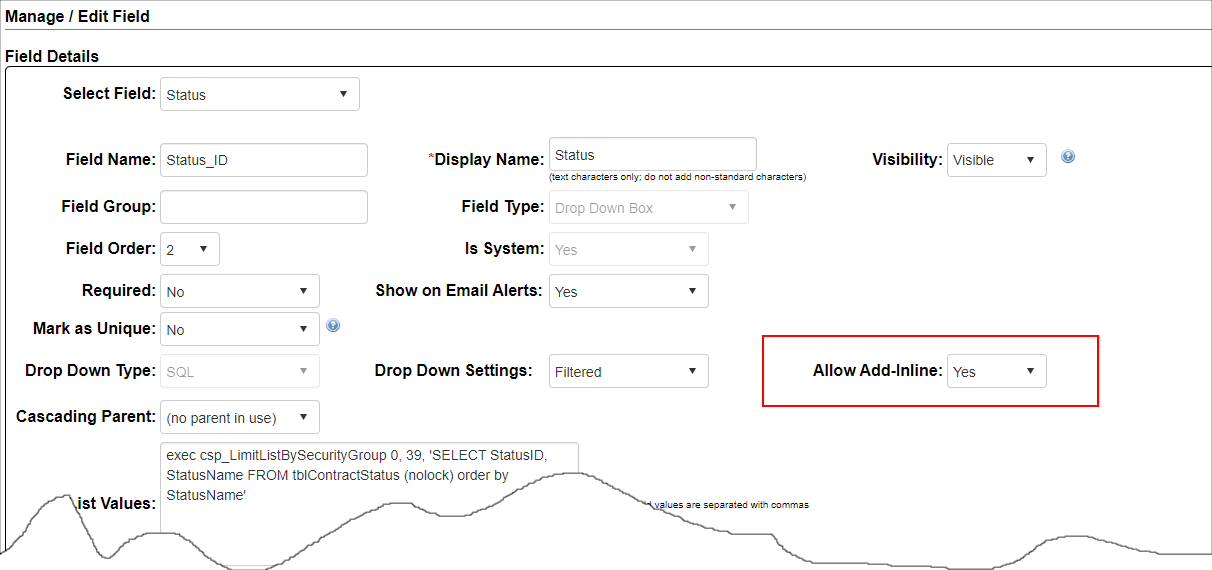
Fields that cannot be edited are highlighted in red below:
- Field Name
- Field Type
- Is System (can the field be deleted or not)
Note: Fields that have Is System set to Yes cannot be deleted.
Fields that can be edited are highlighted in green below:
- Display Name
- Field Group
- Field Order
- Required?
- Show on Email Alerts
- Help Description
Note: For Text Box, Drop Down, and Multi-Select List Box field types, the Default Values can be edited as well.
Once the Field has been edited, be sure to select the "Save" button to save any changes.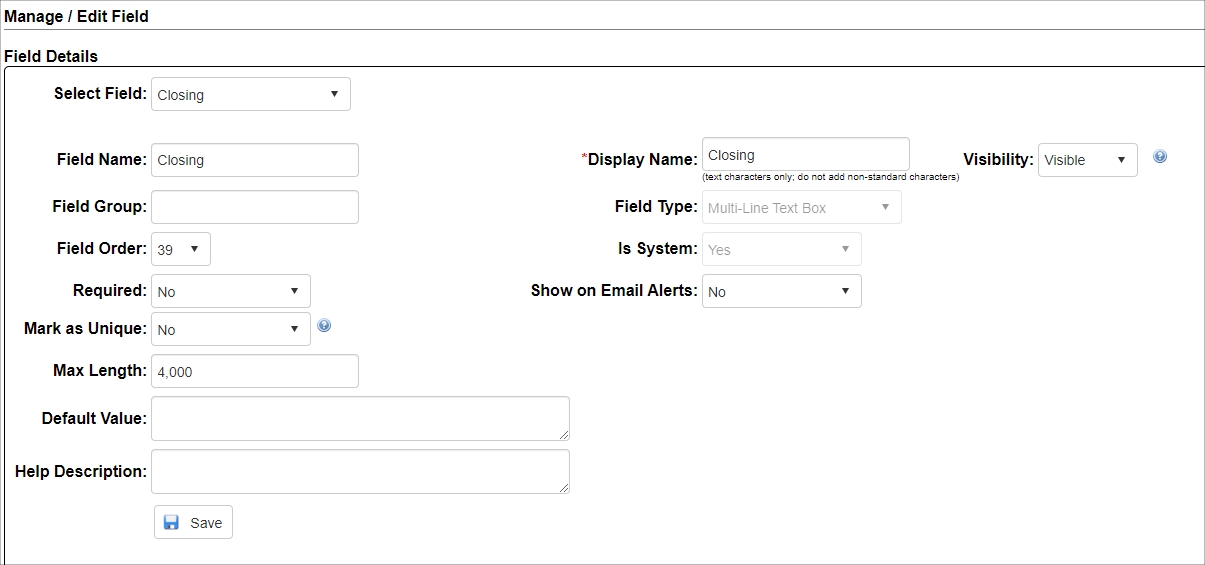
Reordering Fields
To move the order in which the fields are displayed, there are two options:
1. Drag and drop the field line item to move.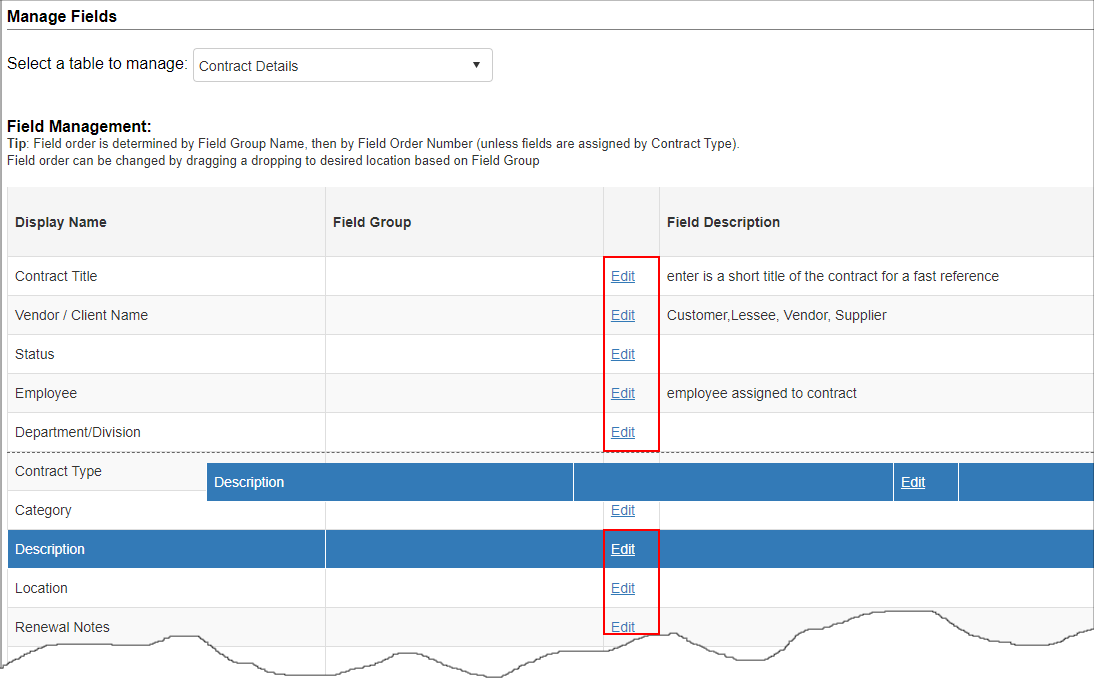
2. Click the Edit for the line item you would like to move and select the new position in Field Order.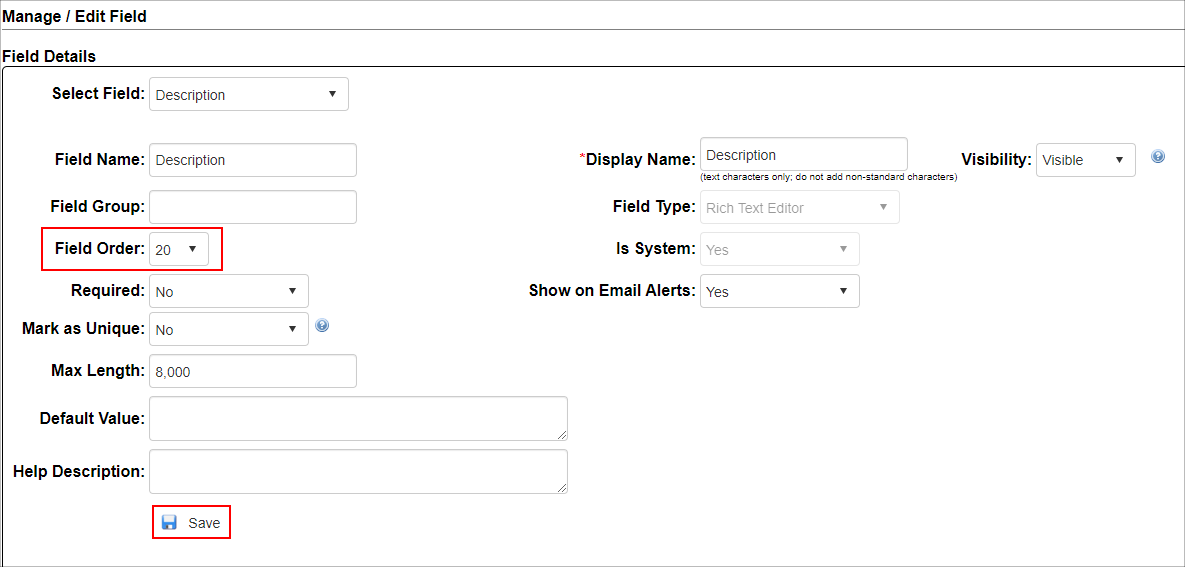
Specifying Which Fields will Show on Email Alerts
To specify which fields you would like displayed on e-mail alerts, go to the Manage/Setup menu, and navigate to Field Manager > Manage Fields. Select the table to manage from the drop down menu. The Show on Emails column displays for the field line items.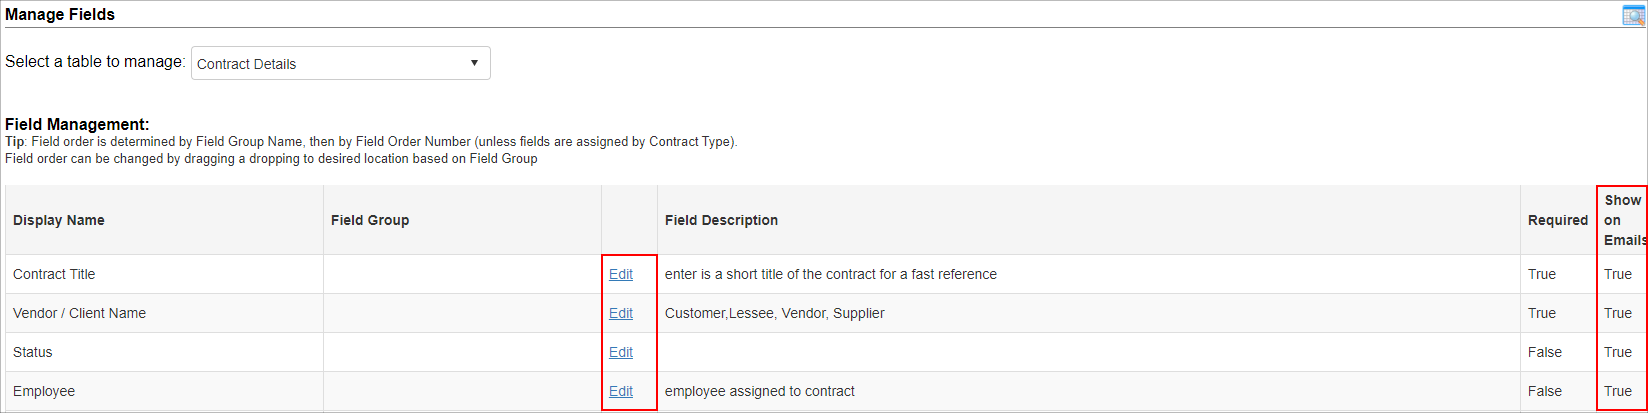
To change whether a field is displayed on e-mail alerts, click Edit for the field to alter the Show on E-mails.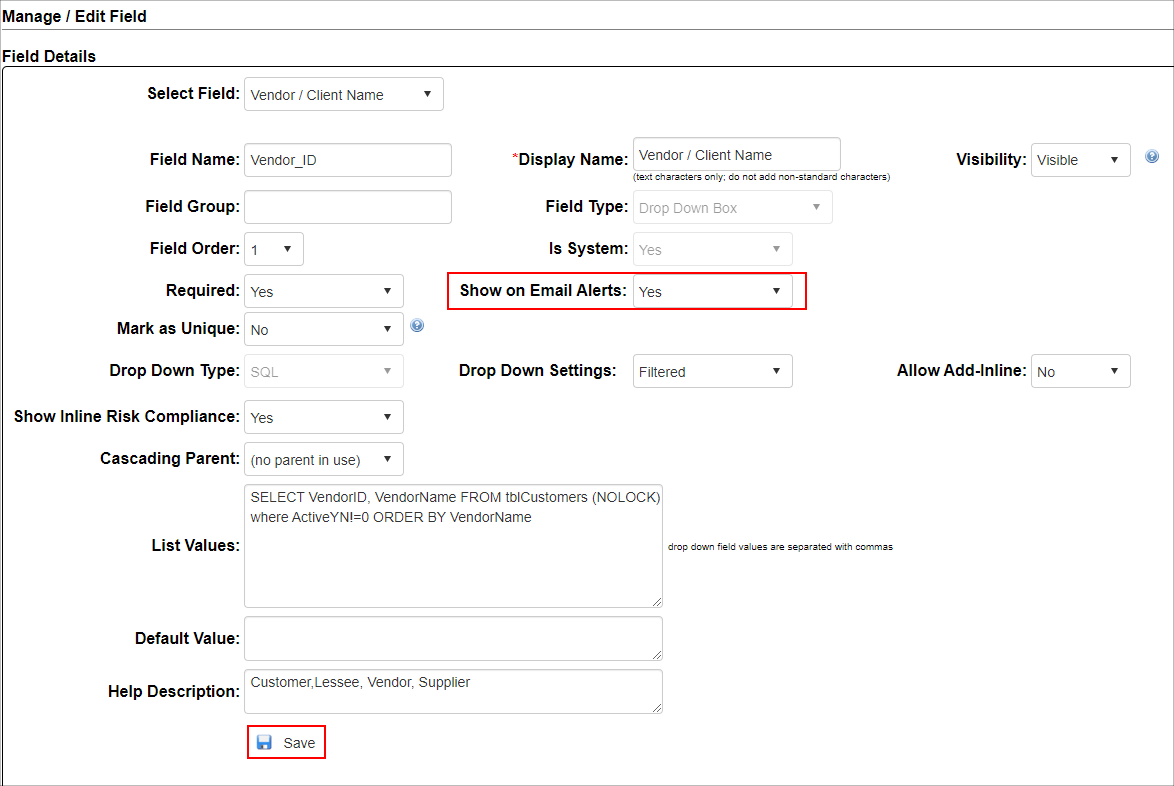
Additionally, a complete breakdown of where the field is utilized is shown below field details.
This information is important when it comes to deciding if a field should be deleted from the application or not. It is a standard best practice not to delete any field that is currently being used anywhere within Contract Insight. Doing so risks breaking other parts of the application.
Show/Hide Fields Based on Field Values
Additionally, You are able to control a fields visibility based on another field's value.
The Add Conditions to Show Field table allows the setting of rules for the field visibility based on another field's value.
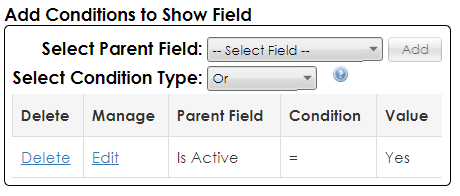
You select your Parent Field and click Add to bring you to another window for you to set your rules.
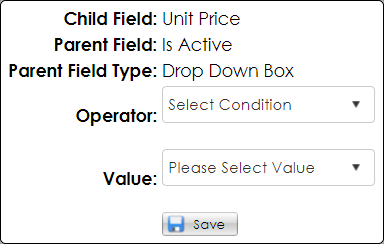
Operator has 2 options: = and != (Equal to and not equal to) and Value is a pick-list of values from the Parent Field you had selected earlier.
Note: Be sure all Fields Used On/ Assigned To is empty before deleting a field.
Field Types
Text | The Text field type can be used to save characters or a mix of characters and numbers. The text field type will create a "varchar" data type in the underlying table. |
Integer | The Integer field type can be used to save integer numeric values. This can be used for whole numbers. |
Checkbox | The Checkbox field type can be used to create a field that can save a TRUE or FALSE value visually as a tick mark. |
Currency | The Currency field type can be used to create a field that can save currency data. |
Date | The Date field type can be used to create custom fields that can save dates. Dates should be formatted as 'mm/dd/yy' or 'mm/dd/yyyy'. |
Date Time | The Date Time field type can be used to create custom fields that can save dates and times. |
Drop Down | The Drop Down field type can be used to create a custom field that contains list items to pick from. Enter the list items (separated by commas using NO spaces after the comma) in the default value box. |
Multi Select Drop Down | The Multi-Select field type can be used to create a custom field that contains list items to pick from. This differs from a Drop Down in that the user can select multiple items from the list. Enter the list items (separated by commas using no spaces after the comma) in the default value box. |
Multi Line Text Box | The Multi-Line Text field type is similar to the Text field type in that it can be used to save characters or a mix of characters and numbers. This multi-line text box differs from a text box in that the user can enter multiple lines of text into multiple lines (the text box will not wrap into multiple lines as a multi-line text box will). |
Hyperlink | The Hyperlink field type is used to include a clickable link to a URL or email address. This field type has three options from which to select upon creation: Email Link, URL Link, and URL Link (open in a new window). Email allows an email address to be entered and, when clicked, launch the user's default mail manager with the address pre-populated in a new message. The two URL Link options are for web addresses and to open in the record's window or in a new window/tab. Friendly Text can be entered so users so not see the address but specified text instead. |
Password | The Passwords field type allows users to enter "password" values that hide the actual values with password-type characters. |
Rich Text Editor | The Rich Text Editor field type is similar to the Multi-Line Text field but allows formatting and additional options when adding/editing the field value. |
Slider | The Slider field type can be used to create a custom field that contains list items from which to pick. This differs from a Drop Down field in that all options are displayed and a sliding indicator is used to select an option. Enter the list items (separated by commas using no spaces after the comma) in the default value box. |
Decimal | The Decimal field type allows users to enter a decimal value with a two (2) digit number to the right of the decimal. |
Decimal 4 | The Decimal 4 field type allows users to enter a decimal value with a four (4) digit number to the right of the decimal. |
Note: The system does not permit duplicate custom field names.
Unique Values
CobbleStone® provides a method of ensuring unique values are entered for a given field and that no two (or more) records share the same value.
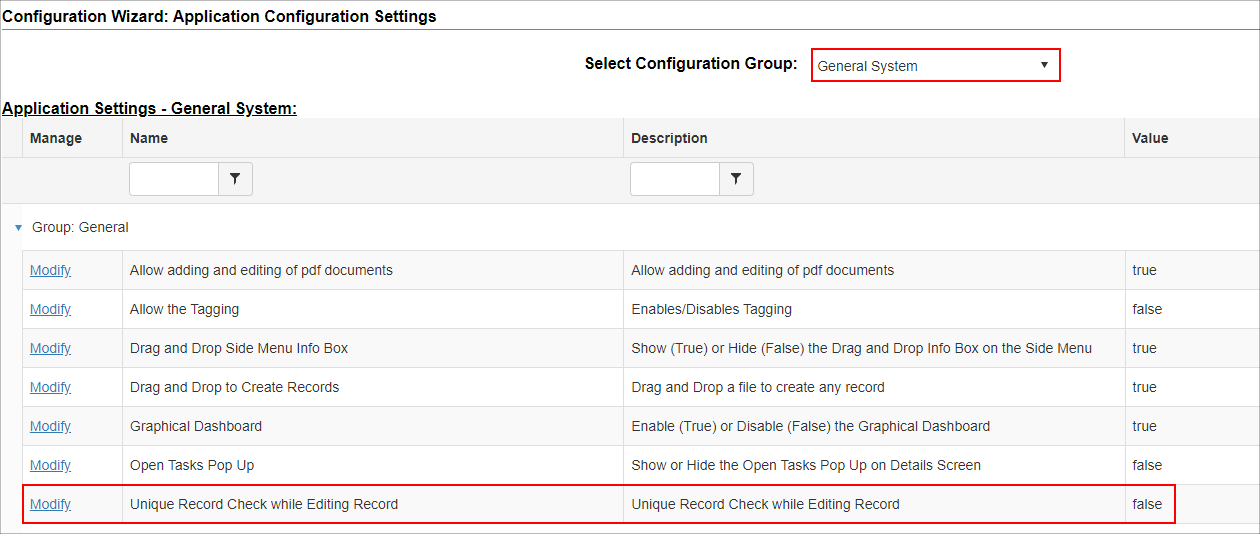
Note: To enable duplicate checking from the Edit/Details screens, navigate to Mangaae/Setup - Application Configuration, select the General System group, and set Unique Record Check while Editing Record to True. This setting impacts all fields with duplicate checking enabled.
In-Line Value Adding
Coupled with permissions is an option to add counterparty, MRD, and/or employee records in-line when adding a new record. To permit in-line adding for a field, from the Field Manager for that field, set Allow Add-Inline to Yes.
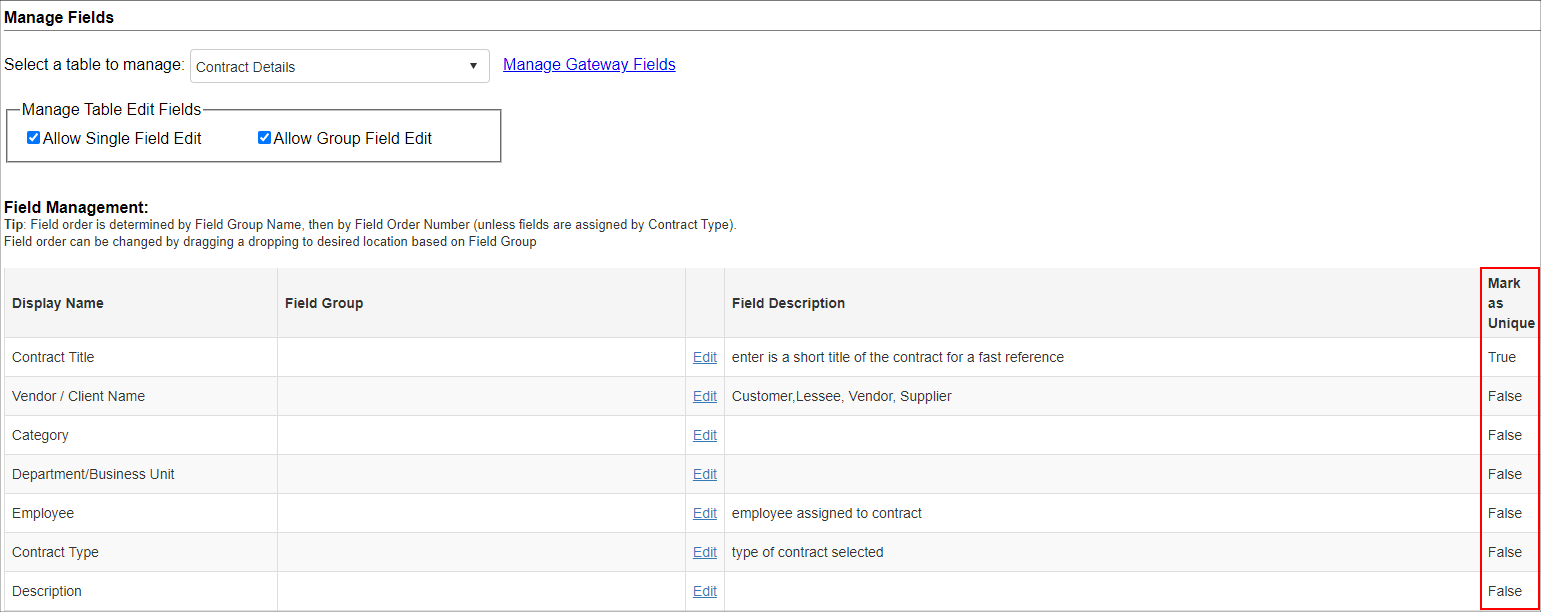
Show 'Mark as Unique' on Field Manager grid
Updated the Field Manager to show the ‘Mark as Unique’ column on the grid so users do not have to open the field to see which are set as unique.
Advanced Field Notes
• | All user defined custom fields are saved to the table source with the prefix of u_ appended to the field name. The end user will not see the u_ prefix. |
• | The Drop Down field types are saved to the table as a varchar data type. |
• | User defined field names cannot be modified. Their display names, however, can be. |
• | User defined fields can be deleted, however, this action is permanent and all associated data saved in the user defined field is deleted. |
• | System defined fields cannot be deleted or modified without customization from CobbleStone® Software. |
• | Any field (standard or user-defined) may be included in email alerts. |
Note: When editing a field, the Field Type is not able to be changed.
To learn more about Field Management, watch the following video.
Assign Fields by Contract Type
Field Manager: Assign Fields by Contract Type
Contract Insight allows Application Administrators to assign fields by contract type. This allows the system to assign and display fields for each record type: contract, request, and customer/vendor/counterparty. While this is optional, however, all fields from the details table that are set up in the field manager for the Contract Table/Screen will display for any contract type for which the fields are not specified (refer to the field manager section for more information).
Assign Fields by Contract Type
1. Log into the system as an Application Administrator.
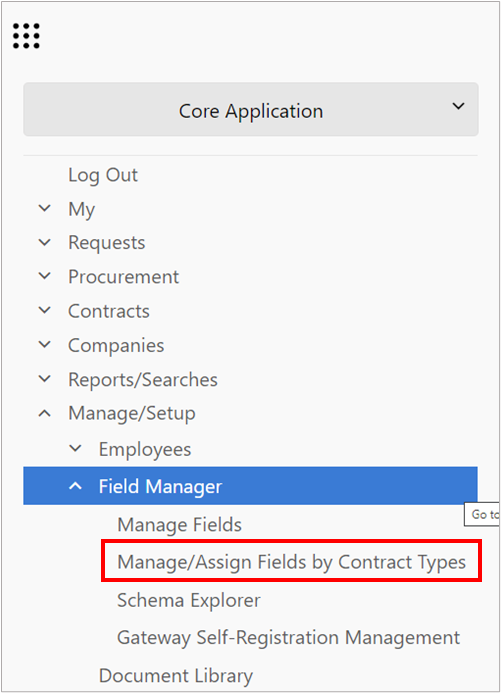
2. Select Manage/Assign Fields by Record Types from the Manage/Setup menu
3. The Manage Fields by Contract Types screen appears.
4. From the Manage Fields: Select a Type menu, select the table for which to edit a record type.
.png)
5. Then select the record type to which you would like to assign fields.
.png)
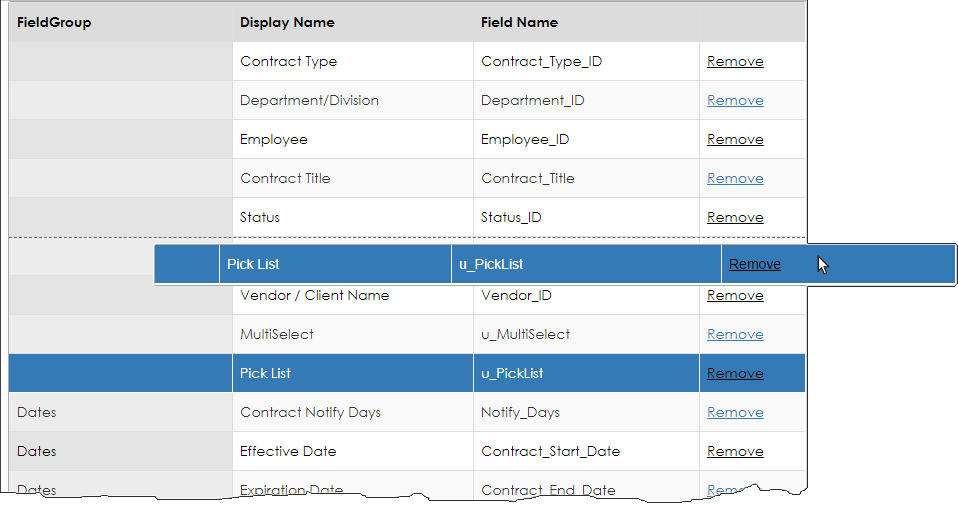
Admin users may add, and remove fields that are assigned to each contract type.
Admin users may remove all currently assigned fields from a type by clicking Remove All.
Admin users may add all fields to the selected type by clicking Add All.
Admin users may order the fields assigned to a type via drag and drop.
CobbleStone® Software recommends that some fields be placed on all contract types (with some exception). The suggested fields are listed on each type's Manage/Assign Fields by Type screen.

Note: New types are not populated with fields.
Required Fields by Type
Once you have selected a Table and type of record you see the field selection. In the field selection you can choose to make a field required or not and you can do this for each type of record.
.png)
Assign Field To All Types
Fields may be assigned to all types so users do not have to repeat the same process multiple times. To do this, navigate to the Field Manager and select the Table where the field resides. Click Edit next to the desired field which is to be applied to all contract types.

Then, click Assign To All Types.
.png)
To watch more on fields by type, watch the following video