COBBLESTONE SOFTWARE
Contract Insight — User Guide
Department/Division Management
Master Reference Data Management: Department/Division
Note: Each procedure in this guide begins at the Contract Insight homepage, so any section can be followed on its own. Custom fields and related tables are configurable, so the exact field and section list on a department record may vary between environments.
1. Overview
Contract Insight supports the ability to assign departments/divisions to your contracts and to your employees. Departments / Business Units are master reference data, maintained as a single shared list that contract and employee records draw on, so that every record is assigned consistently across the application.
Each department record carries a Department/Business Unit name, an optional Entity, and a system-assigned Department ID. Any custom fields configured for the environment also appear on the record. The system additionally maintains read-only Record Info values for each department: Entered By, Date Entered, Updated By, and Date Updated.
Only Application Administrators may manage departments, or other users specifically granted the appropriate permission. Standard users can typically select an existing department when completing a contract or employee record, but cannot manage the underlying list.
2. Accessing the Departments / Business Units List
The Departments / Business Units list is the central management screen for all department/division records. To open it:
From the Contract Insight homepage, click Administration at the bottom of the left navigation menu. On the Administration page, under Lookup Tables, select Master Reference Data, then click the Departments / Business Units tab.
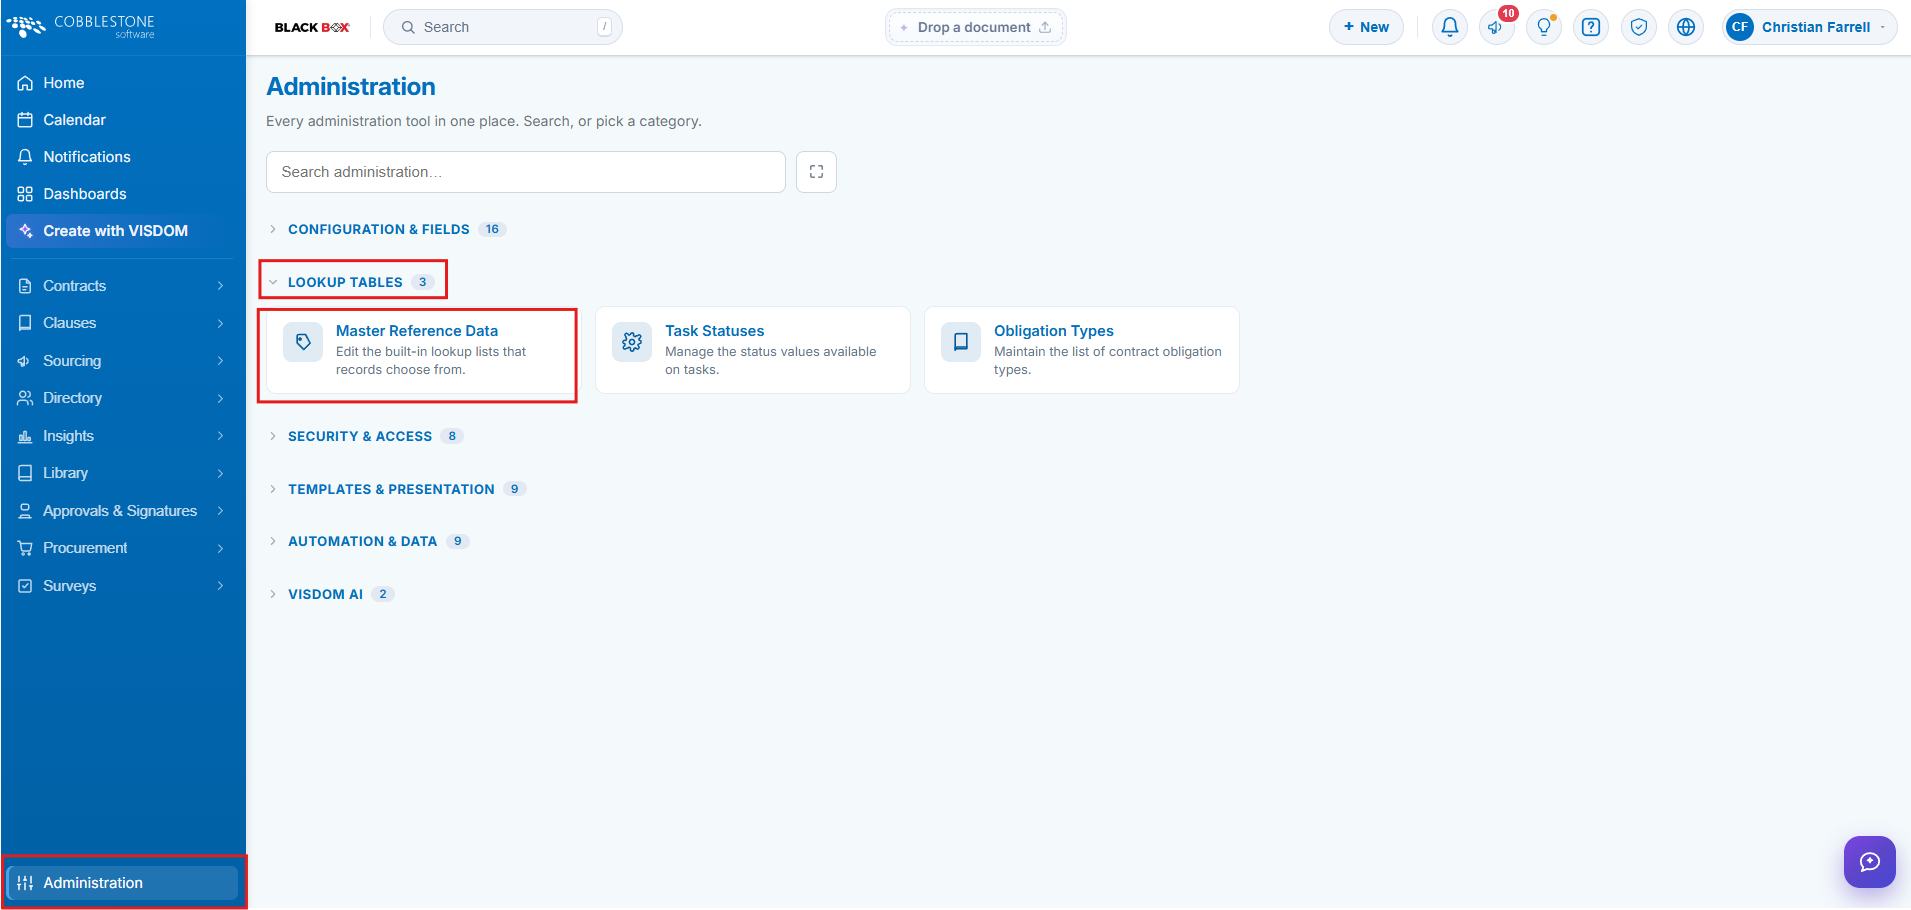 Image Caption
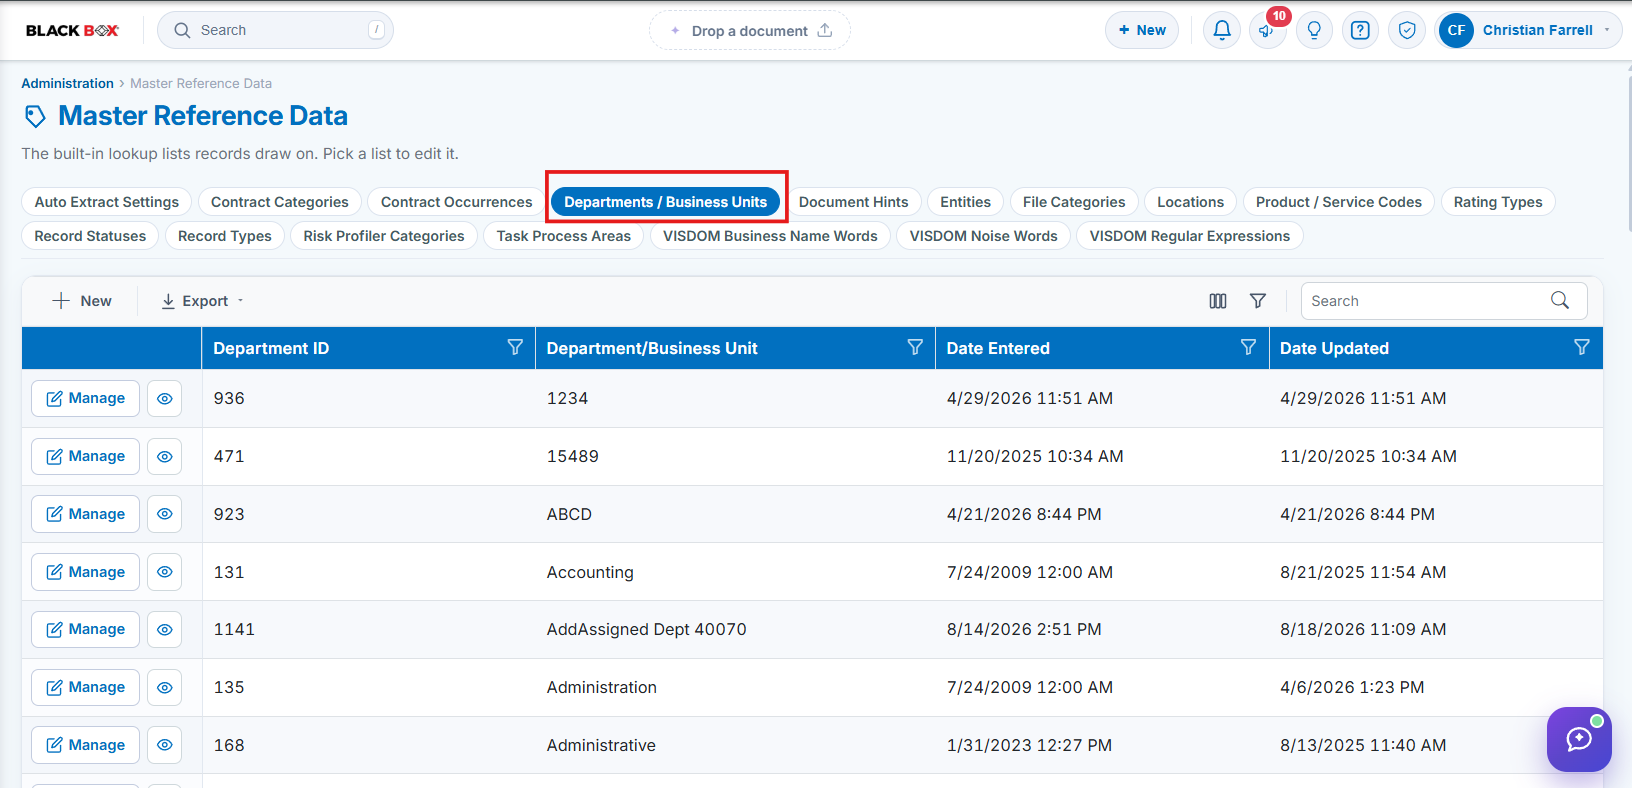
The Departments / Business Units list screen includes the following elements:
- A Master Reference Data heading with the subtitle “The built-in lookup lists records draw on. Pick a list to edit it.”
- A row of list selector tabs — Auto Extract Settings, Contract Categories, Contract Occurrences, Departments / Business Units, Document Hints, Entities, File Categories, Locations, Product / Service Codes, Rating Types, Record Statuses, Record Types, Risk Profiler Categories, Task Process Areas, and the VISDOM lists — with Departments / Business Units highlighted when selected
- A columns icon (grid icon, at the left of the list toolbar) that opens the Columns dialog
- A + New button to create a new department/business unit
- Export controls on the toolbar: Excel, PDF, and CSV
- A Search box at the right of the toolbar to filter the grid by keyword
- A sortable, filterable grid with Department ID, Department/Business Unit, Date Entered, and Date Updated columns, each with its own filter icon
- Per-row Manage (edit) and eye-shaped View action buttons
- Pagination controls at the bottom of the grid, with a live page and record count and an Items per page selector
3. Adding a Department / Business Unit
Steps:
- From the Contract Insight homepage, click Administration at the bottom of the left navigation menu. On the Administration page, under Lookup Tables, select Master Reference Data, then click the Departments / Business Units tab.
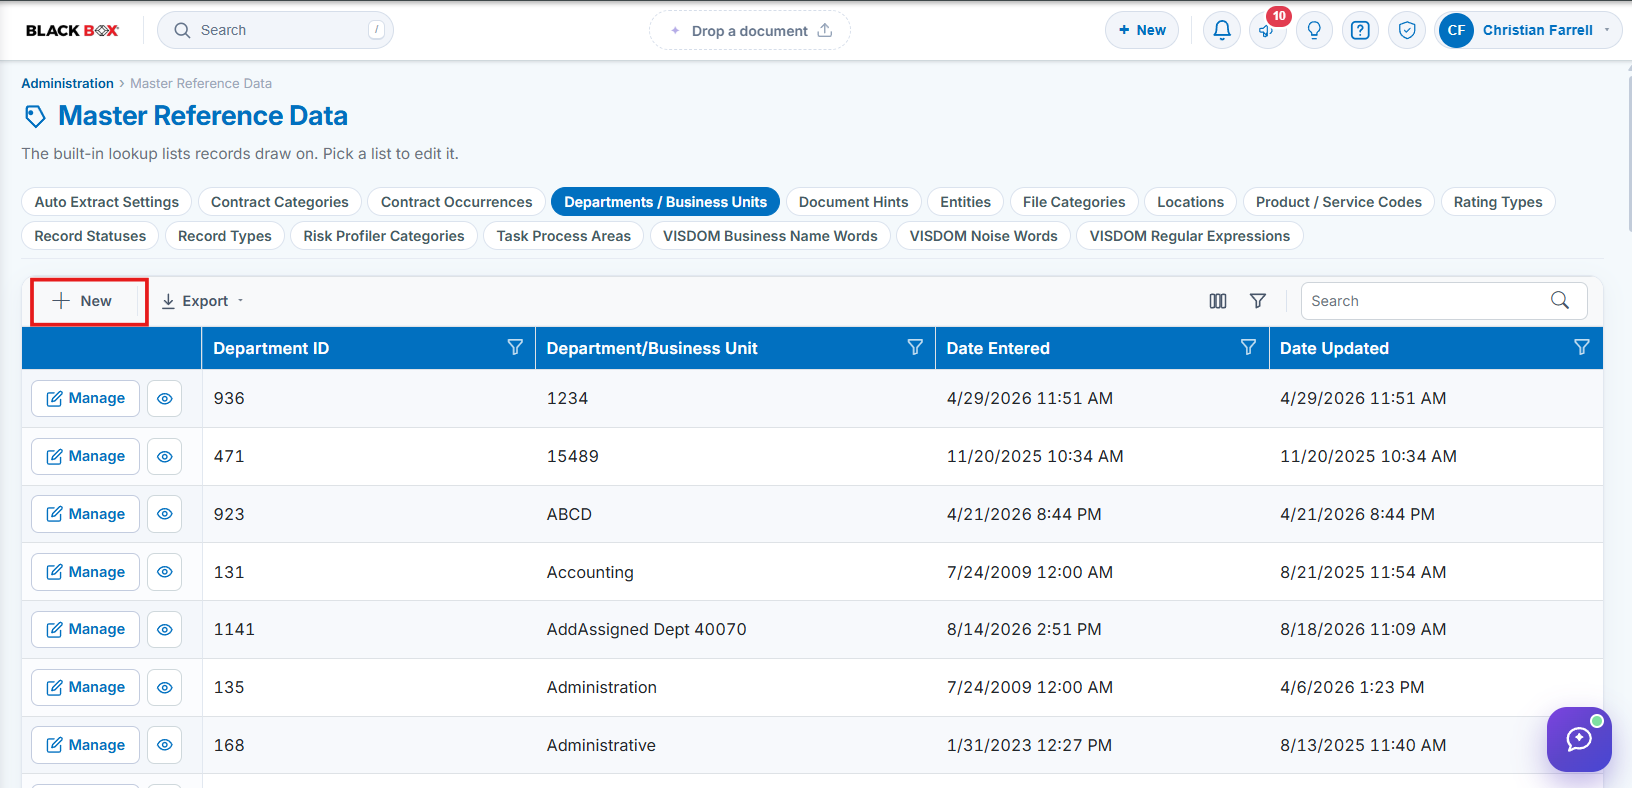
- Click + New on the list toolbar.
- The Add new Department panel slides out from the right, headed DEPARTMENTS / BUSINESS UNITS/ Add new Department, with a field-completion indicator in the Details header (for example, “0 / 5 filled — 1 required”).
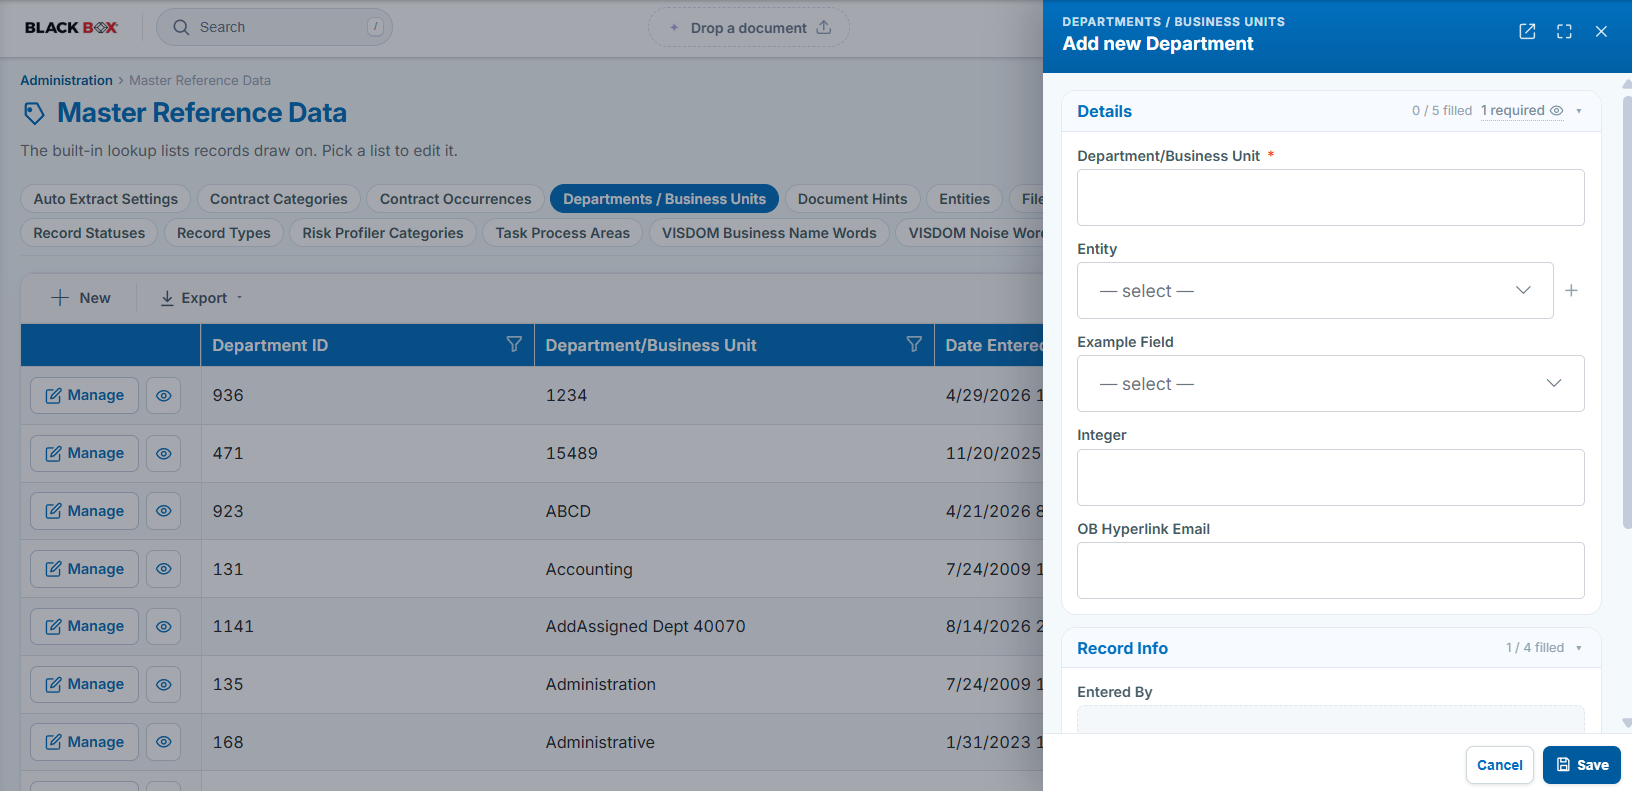
- In the Details section, enter the required Department/Business Unit name (marked with a red asterisk) — for example, Accounting, Administration, or Legal.
- Optionally select an Entity from the dropdown. The + button beside the dropdown allows a new entity to be added without leaving the panel.
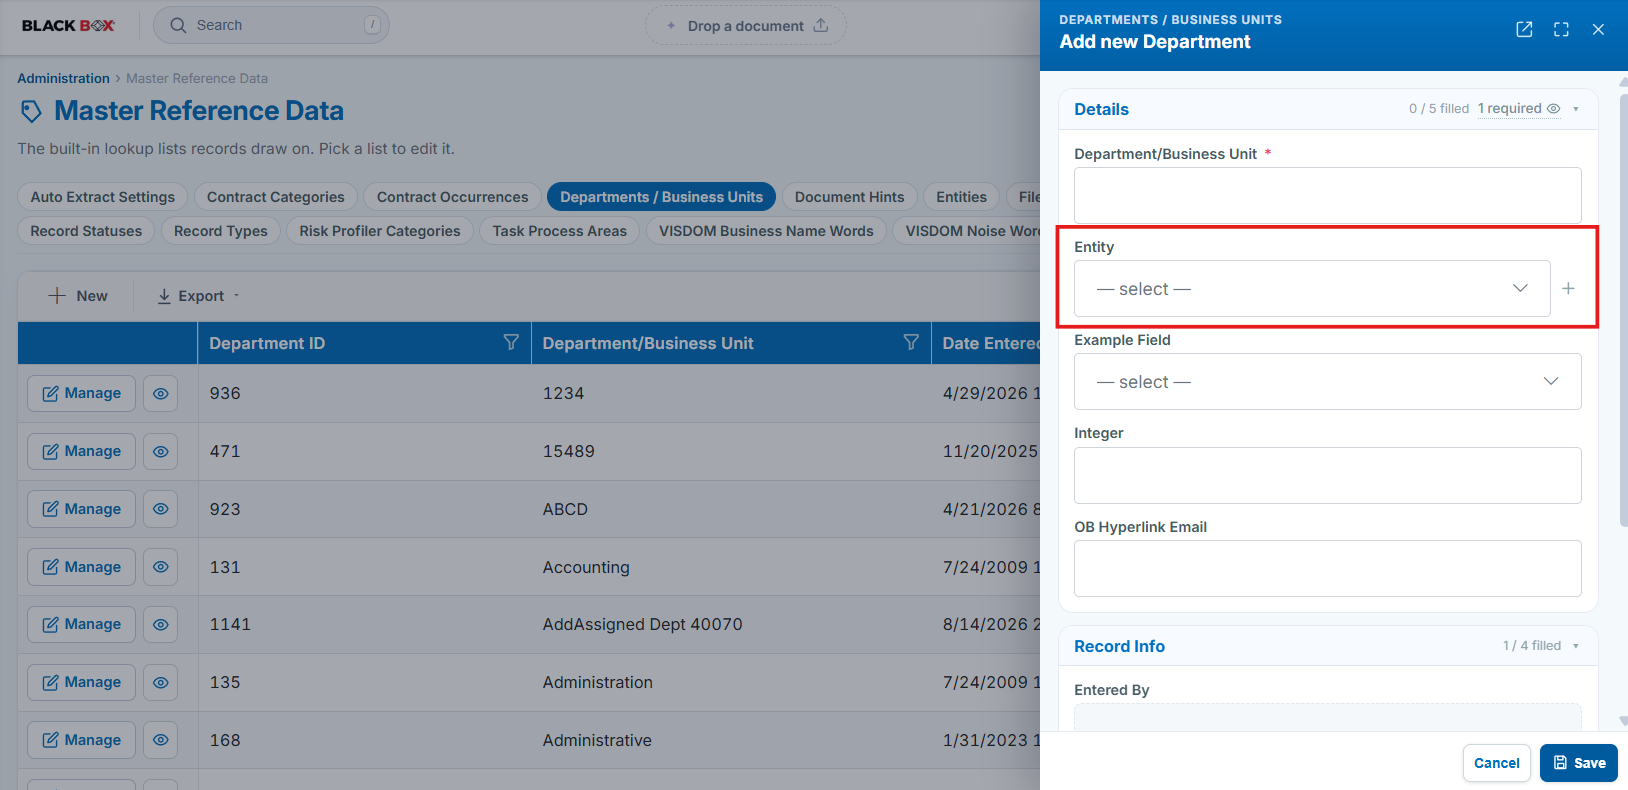
- Complete any other custom Details fields configured for the environment.
- The Record Info section (Entered By, Date Entered, Updated By, and Department ID) is read-only; these values are populated by the system when the record is saved.
- Click Save in the lower right of the panel to create the department, or Cancel to discard it without saving.
Note: Entering just the Department/Business Unit name and clicking Save satisfies the minimum requirement for a new record. Icons in the upper right of the panel allow it to be expanded to full width or opened as a full page.
4. Viewing a Department / Business Unit
Navigate to the Departments / Business Units list as described in Section 2. There are then two ways to review a department record: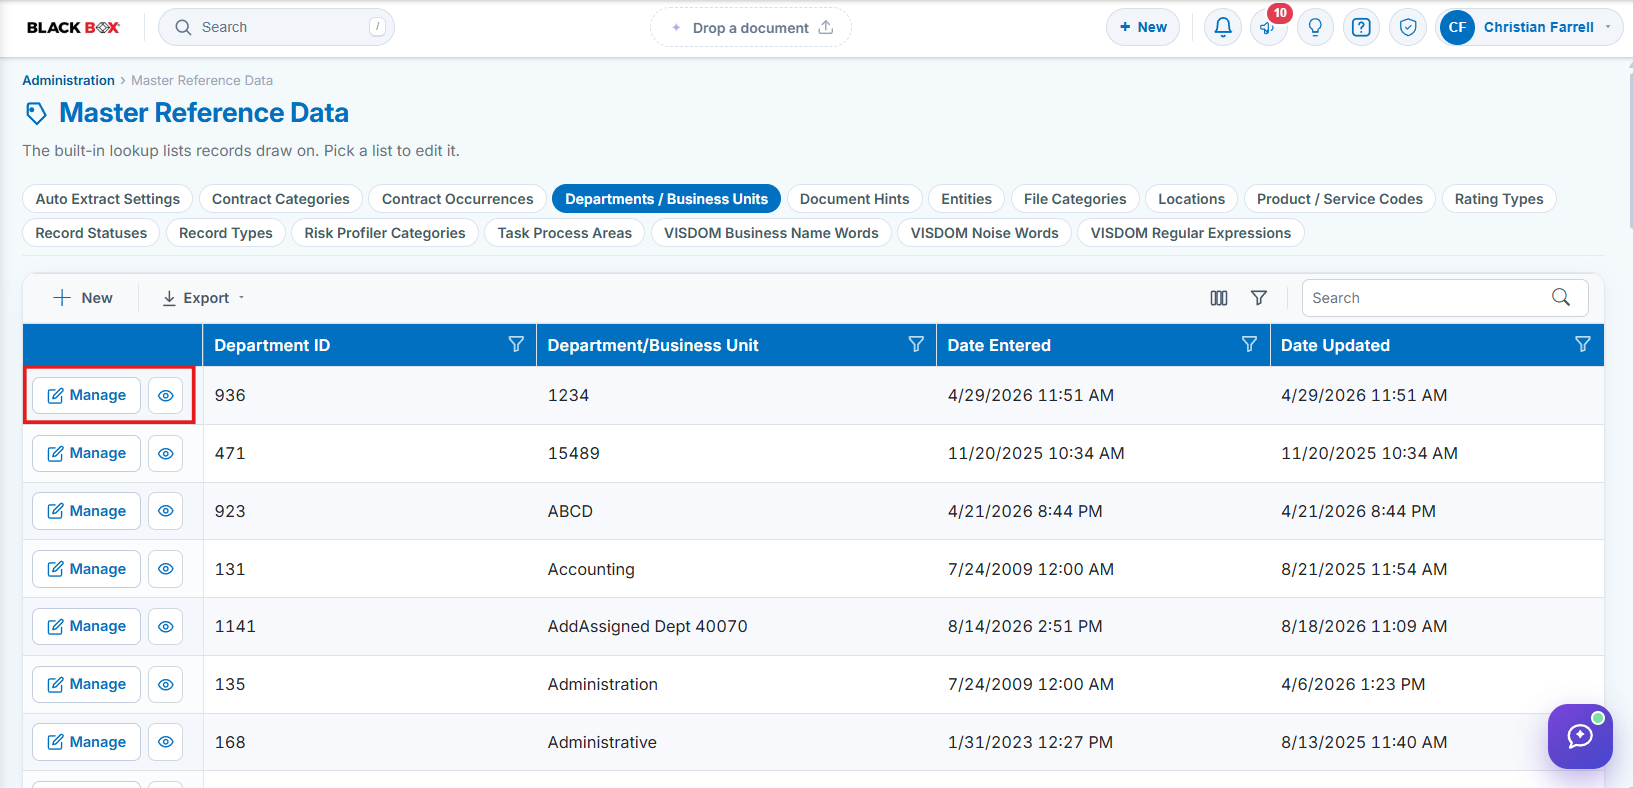
4.1 Quick View
Click the eye icon on a department’s row. A slide-out panel opens on the right showing the Details and Record Info tabs for that record, along with Done and Edit buttons.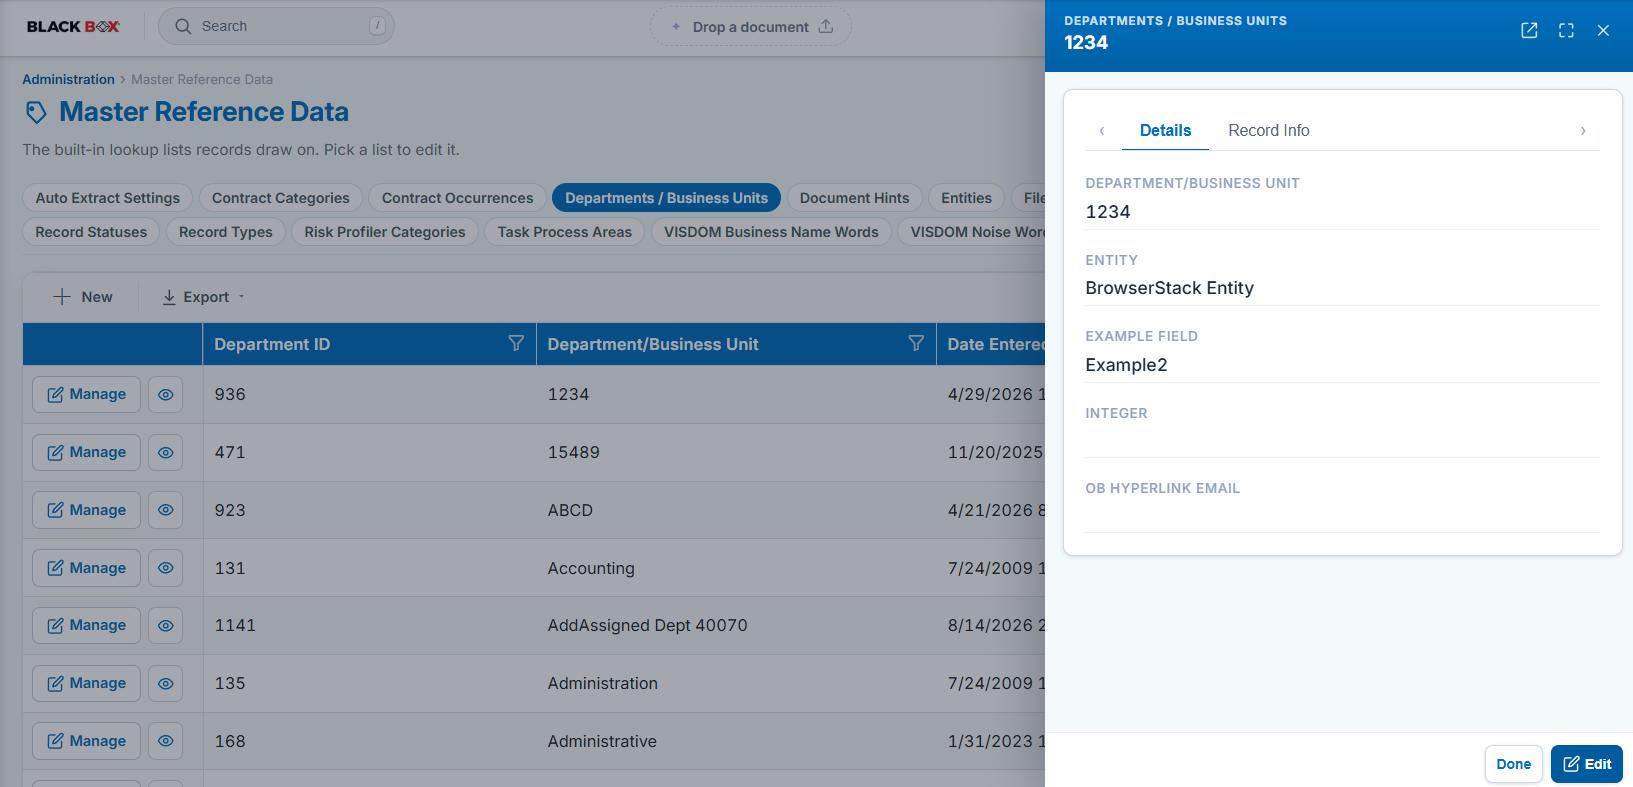
4.2 Full Record (Manage)
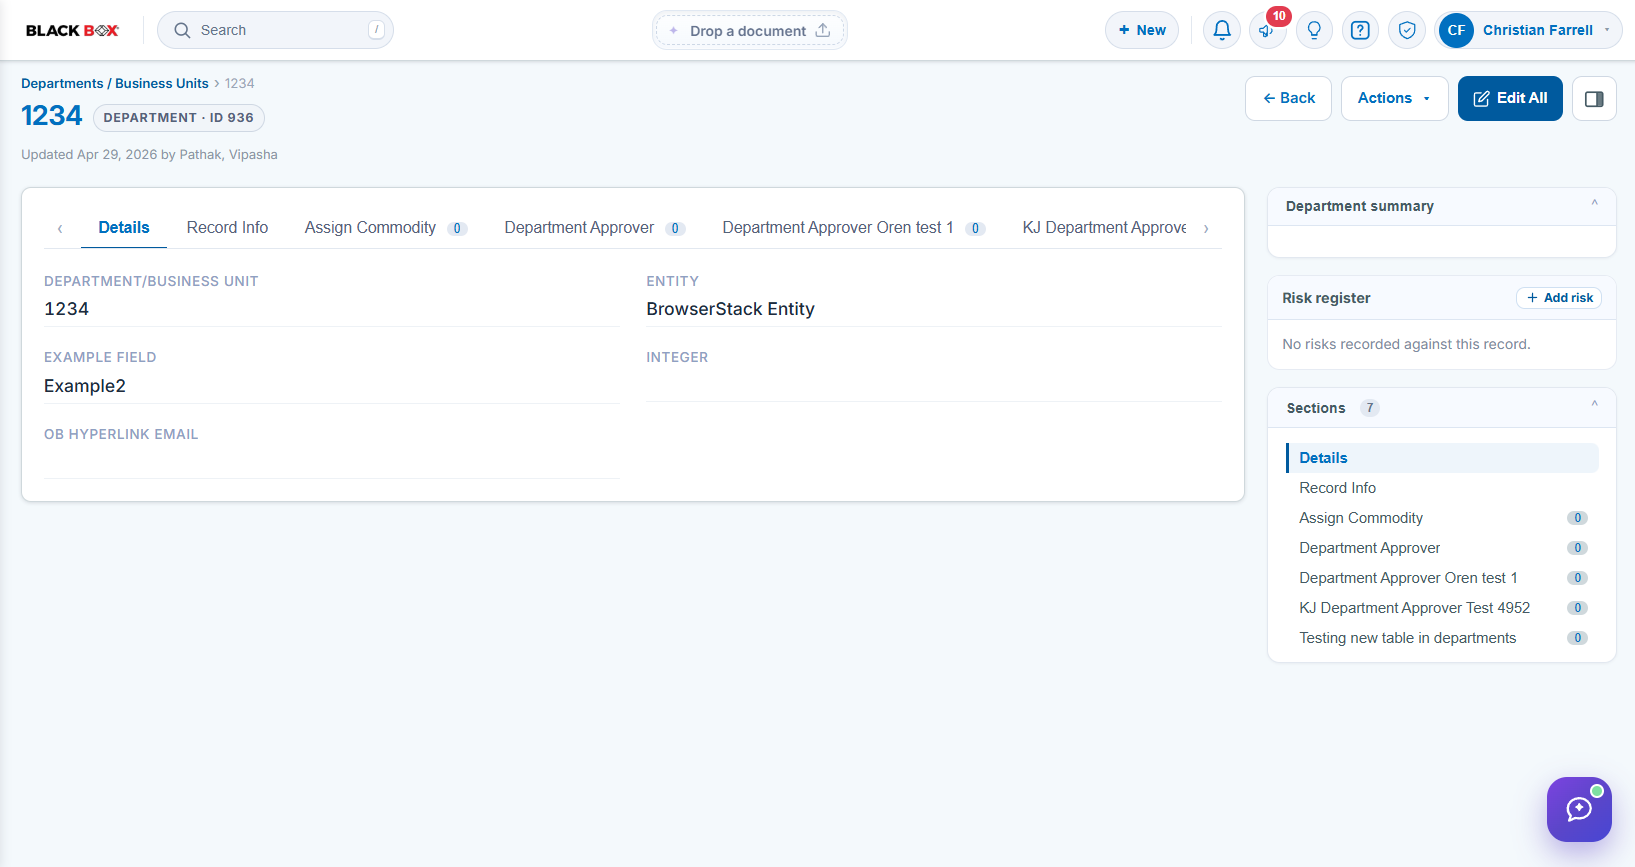
Click Manage on a department’s row to open the full department record page. This page displays:
- A breadcrumb trail of Departments / Business Units › the department name
- The department name as the page title, with a “DEPARTMENT · ID ##” badge and an “Updated <date> by <user>” byline
- Back, Actions, and Edit All buttons in the upper right, plus a toggle to hide or show the details panel
- A row of tabs for each section of the record, beginning with Details and Record Info and continuing with the related tables configured for departments, each showing its record count
- A right-hand rail with a Department summary panel, a Risk register panel (with a + Add risk button), and a Sections list showing the count of sections on the record
- An “Ask VISDOM about this department” button in the lower right of the page
5. Editing a Department / Business Unit
Steps:
- From the Contract Insight homepage, click Administration at the bottom of the left navigation menu. On the Administration page, under Lookup Tables, select Master Reference Data, then click the Departments / Business Units tab.
- Click Manage on the row for the department you want to edit to open its full record (or click the eye icon and then Edit from the Quick View panel).
- To change a single value, click the pencil icon beside that field label on the Details tab, edit the text, and save the change.
- To open every editable field at once, click Edit All in the upper right of the record page. The Details fields become editable inputs and a “1 required” indicator appears beside the tab row.
- Update the Department/Business Unit name, and adjust the Entity or any custom field values as needed.
- Click Save in the upper right to commit the change, or Cancel to leave the record unchanged.
Note: The Department ID and the Record Info values (Entered By, Date Entered, Updated By, and Date Updated) are maintained by the system and cannot be edited.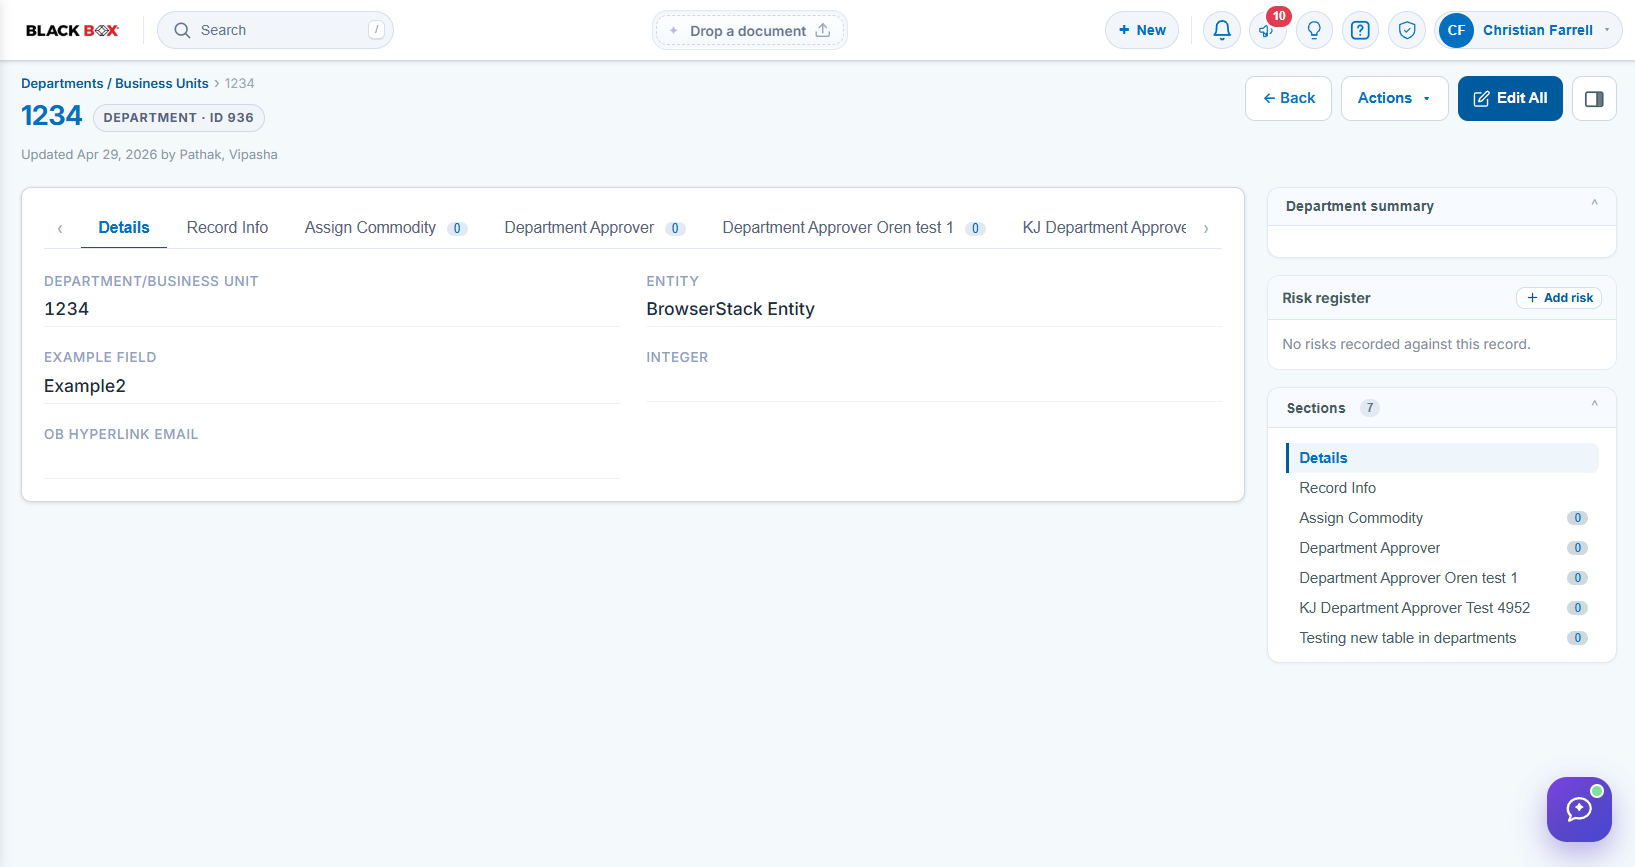
6. Deleting a Department / Business Unit
Note: Prior to deleting a department/division, make sure it is not being used by any contract records. Deleting a department that is still in use can affect reporting and existing record associations.
Steps:
- From the Contract Insight homepage, click Administration at the bottom of the left navigation menu. On the Administration page, under Lookup Tables, select Master Reference Data, then click the Departments / Business Units tab.
- Click Manage on the row for the department you want to remove to open its full record.
- Click Actions in the upper right of the record page.
- Under Record Actions, select Delete record (shown in red at the bottom of the menu).
- Confirm the deletion when prompted.
The Actions menu also provides Update with VISDOM, View History, Print, Record PDF, Create New Record, and Record Permissions, along with the Document Processing actions Approval Processes, Signature Processes, IntelliApprove, and IntelliSign.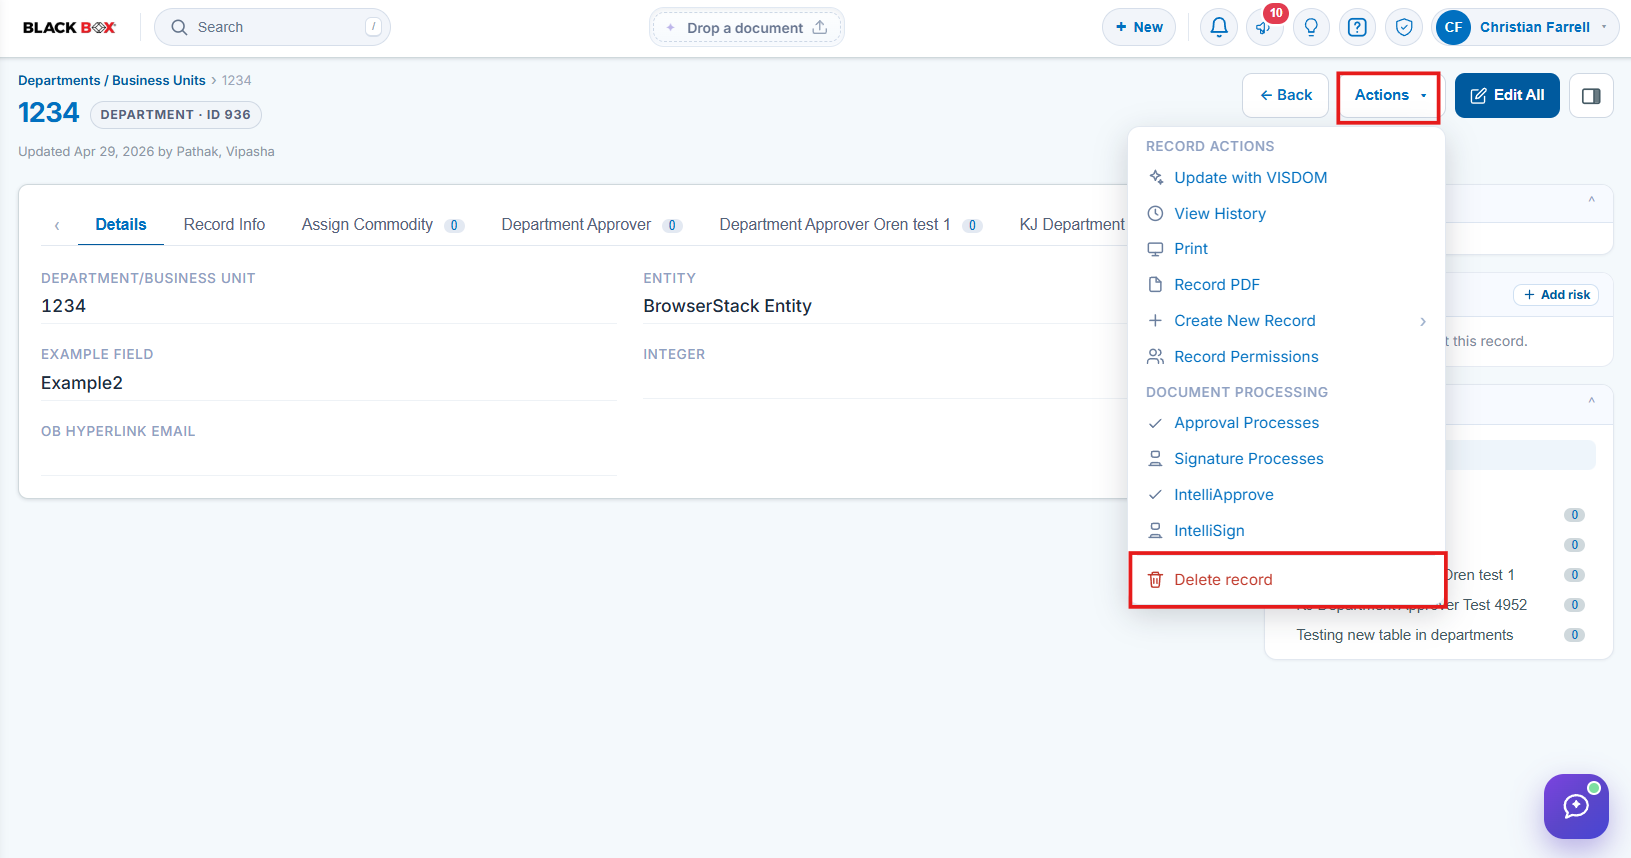
7. Managing List Columns
Function: Controls which columns are displayed on the Departments / Business Units grid.
Steps:
- From the Contract Insight homepage, click Administration at the bottom of the left navigation menu. On the Administration page, under Lookup Tables, select Master Reference Data, then click the Departments / Business Units tab.
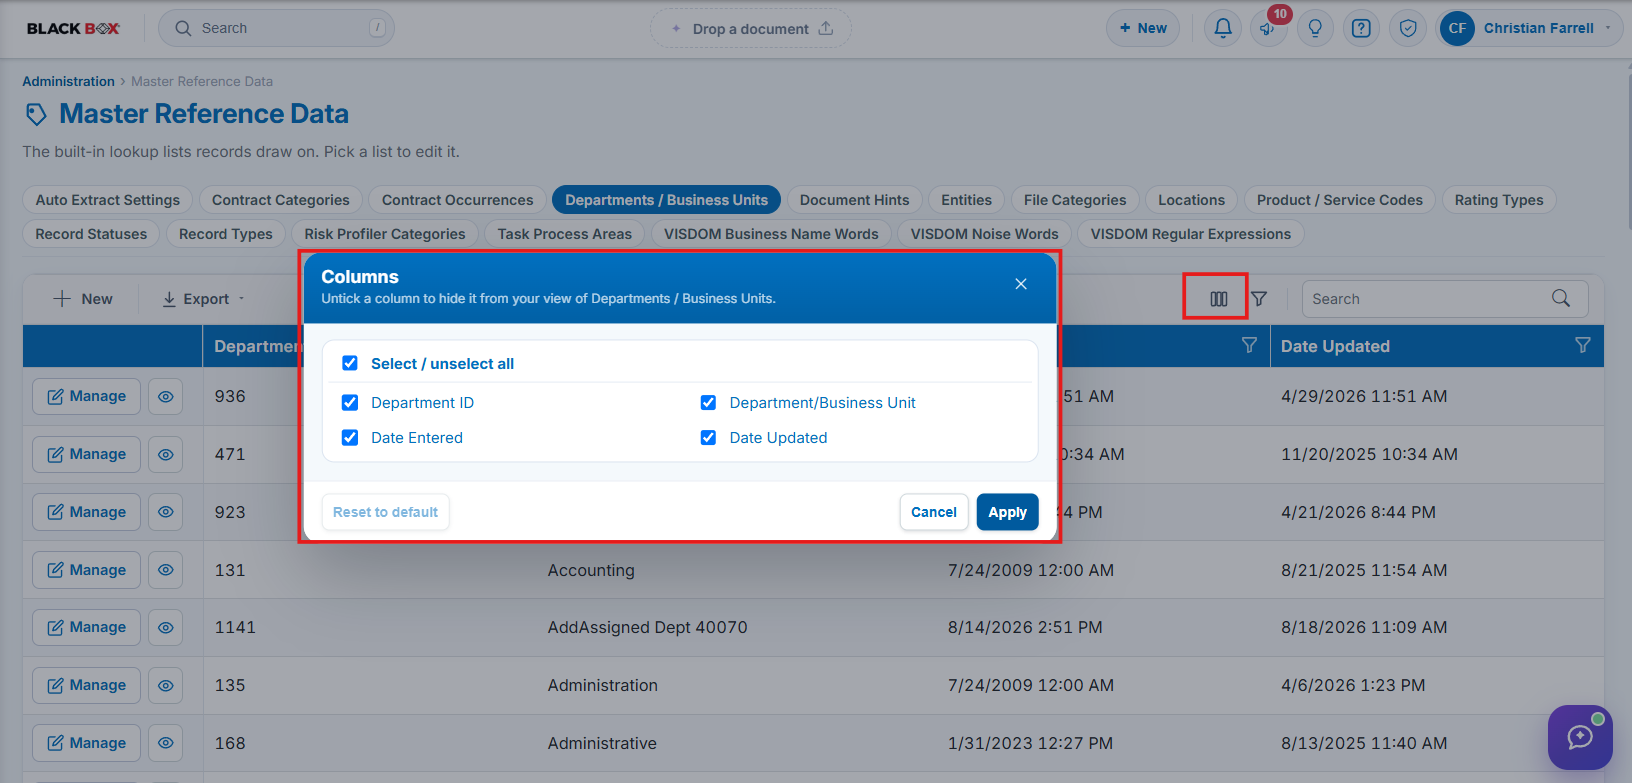
- Click the columns icon (small grid icon) at the right of the list toolbar.
- The Columns dialog opens, subtitled “Untick a column to hide it from your view of Departments / Business Units.” It lists every available column as a checkbox — Department ID, Department/Business Unit, Date Entered, and Date Updated — plus a Select / unselect all option.
- Untick any column to hide it from the grid, or tick it to show it again.
- Click Apply to update the list view immediately, or Reset to default to restore the original column layout. Click Cancel (or the × in the dialog header) to close the dialog without changing anything.
8. Exporting the Department / Business Unit List
Navigate to the Departments / Business Units list as described in Section 2. The full list — or a filtered view of it — can then be exported directly from the Export menu on the toolbar:
- Excel — exports the current grid to a spreadsheet (.xlsx)
- PDF — exports the current grid to a PDF document
- CSV — exports the current grid to a comma-separated values file
An individual department record can also be exported on its own using the Record PDF action in the Actions menu on the full record page. These exports are useful for sharing department data with stakeholders who do not have Contract Insight access, or for offline recordkeeping.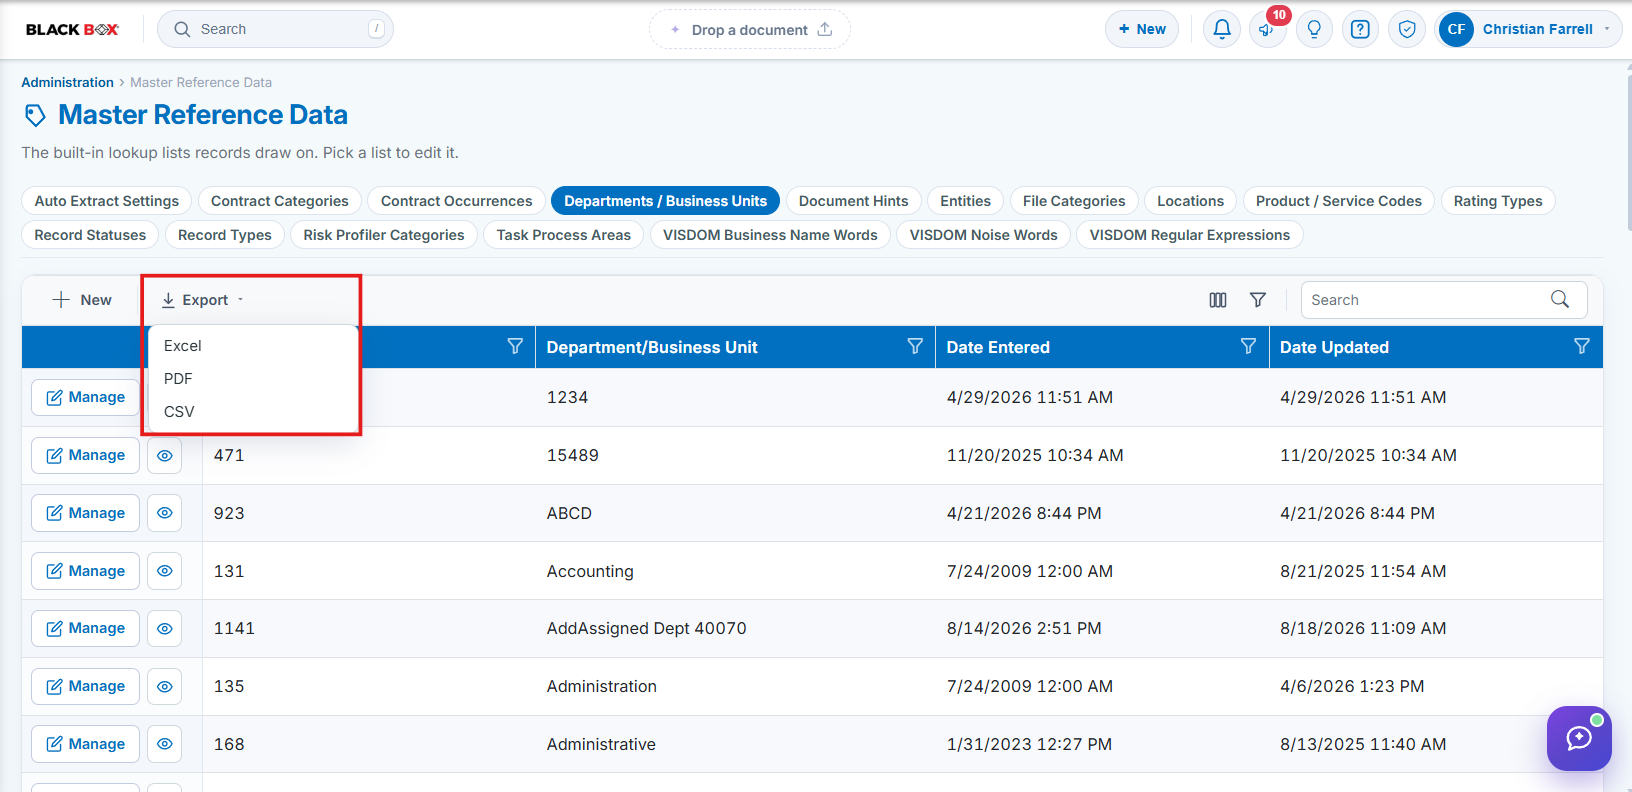
9. Related Sections on a Department Record
A department record organizes its information into tabbed sections, listed in the Sections panel on the right-hand rail with a count. Every department record includes:
- Details — the field values for the department: the Department/Business Unit name, the Entity, and any custom fields configured for the environment
- Record Info — system metadata for the record: Entered By, Date Entered, Updated By, Date Updated, and the system-assigned Department ID
The remaining sections are related tables configured for departments — for example Assign Commodity and Department Approver — and each displays the number of child records it holds. Opening one shows a grid of those records with its own + New, Excel, PDF, CSV, and Search controls, a Manage button per row, and its own pagination.
The right-hand rail also includes a Department summary panel and a Risk register panel, where risks can be recorded against the department record using + Add risk (the panel reads “No risks recorded against this record.” when empty).
Sections can be added to or removed from a department record’s layout through the Tab Details Setup administration tool, for administrators who need to adjust which related tables appear.
10. Quick Reference Summary
Task | How to Complete It |
Open the list | Homepage → Administration → Lookup Tables → Master Reference Data → Departments / Business Units tab. |
Add a department | + New on the list toolbar, enter the Department/Business Unit name in the Add new Department panel, then Save. |
View a department | Eye icon for a Quick View panel, or Manage for the full tabbed record page. |
Edit a department | Manage → pencil icon for a single field, or Edit All for every field, then Save. |
Delete a department | Manage → Actions → Delete record, then confirm. Check first that no contract records use the department. |
Change list columns | Columns icon on the list toolbar, tick or untick columns, then Apply. |
Export the list | Excel, PDF, or CSV on the list toolbar; Record PDF in Actions for a single record. |
Fields on a record | Department/Business Unit (required), Entity, and a system-assigned Department ID, plus any environment-specific custom fields. |