Configuration & Data Migration Scripts
Configuration & Data Migration Scripts
Configuration and Data Migration Scripts may be created through Contract Insight’s user interface to copy data from one Contract Insight system to another.
To configure this, System Admins should click Manage/Setup, then Account Maintenance.
.png)
Once brought to this screen, click Edit Migration Scripts under the Data Processing side menu.
.png)
Next, under the Actions side menu, click Create Script.
.png)
The System Admin will now be brought to an area in which they may create a name and description. Fill out these fields as desired and click Save upon completion.
.png)
Now, in that script, System Admins will be able to add tasks to the script, which begins the process of bringing over a dashboard, Ad-hoc report, etc. Under the Actions side menu, click Add Task.
.png)
Once here, fields must be filled out before continuing. Name the task, and then select its type, which is the area which will be brought over. The Admin may mark whether the task is Active. When everything is filled out, click Save.
.png)
Upon clicking save, the system will bring the Admin to the tasks screen, where all current tasks within that script will reside.
.png)
The next step will be creating an action. Specifically, this is when the System Administrator will say which report, workflow step, dashboard, etc. specifically they wanted migrated over. To do this, click the Tasks Icon ( ). Then, once in the Task Actions screen, click Add Action.
.png)
.png)
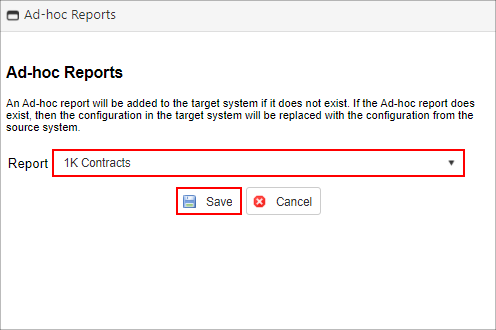
This is where the system is looking for a specific area to migrate. For Ad-hoc Reports, which specific Ad-hoc Report will be migrated? From the Report dropdown, select the desired report. Once complete, click Save. This step will be repeated for every action that must be migrated.
NOTE: More than one item can be migrated at once. This can be multiple Ad-hoc Reports, a combination of workflow steps, dashboards, etc.
When complete, the System Administrator may compile the script. Click the Compile Icon ( ).
).
.png)
The system will now begin processing the request and the Admin will receive the following message on their screen.
.png)
Scripts with much more information included within may take longer than others. Refresh the page accordingly until the download icon ( ) is un-greyed.
Once the script is ready to be downloaded, the status will change to “Compiled”. Once ready, click the Download Icon to download the script. The script will be downloaded as a .ZIP file.
.png)
Migrating the Script from Another System to the Desired System
Again, click Manage/Setup, then Account Maintenance. Under the Data Processing side menu, click Run Migration Scripts.
.png)
Once in this screen, click Upload Script. This is the area in which the newly compiled script from the previous system will be uploaded and reflected in the new system.
.png)
The system will then allow the Administrator to select the file they would like to upload. From here, click Select and find the link that was previously downloaded. The whole .ZIP file must be selected, not just any file housed within the .ZIP file.
.png)
Once the correct file has been selected, click Upload to commit the migration to the system. Please be sure to check if scripts have been migrated correctly. For example, if an Ad-Hoc report has been migrated, navigate to the Ad-Hoc report list screen to assure that the newly migrated report is present.
.png)