CobbleStone® University Certification Program - Unit 4
Application Configuration
These are various settings pages in CobbleStone® Contract Insight for Admins to manage the system.
They are nuanced but useful for a full holistic understanding of the solution.
Application Setup
AppConfig: Application Setup
Application Setup Settings
The primary/initial screen to manage the application configuration in through the Configuration Wizard: 1. Initial Application Setup screen. This screen provides a brief overview of the functionality contained within the AppConfig as well as the initial setup settings for Contract Insight.
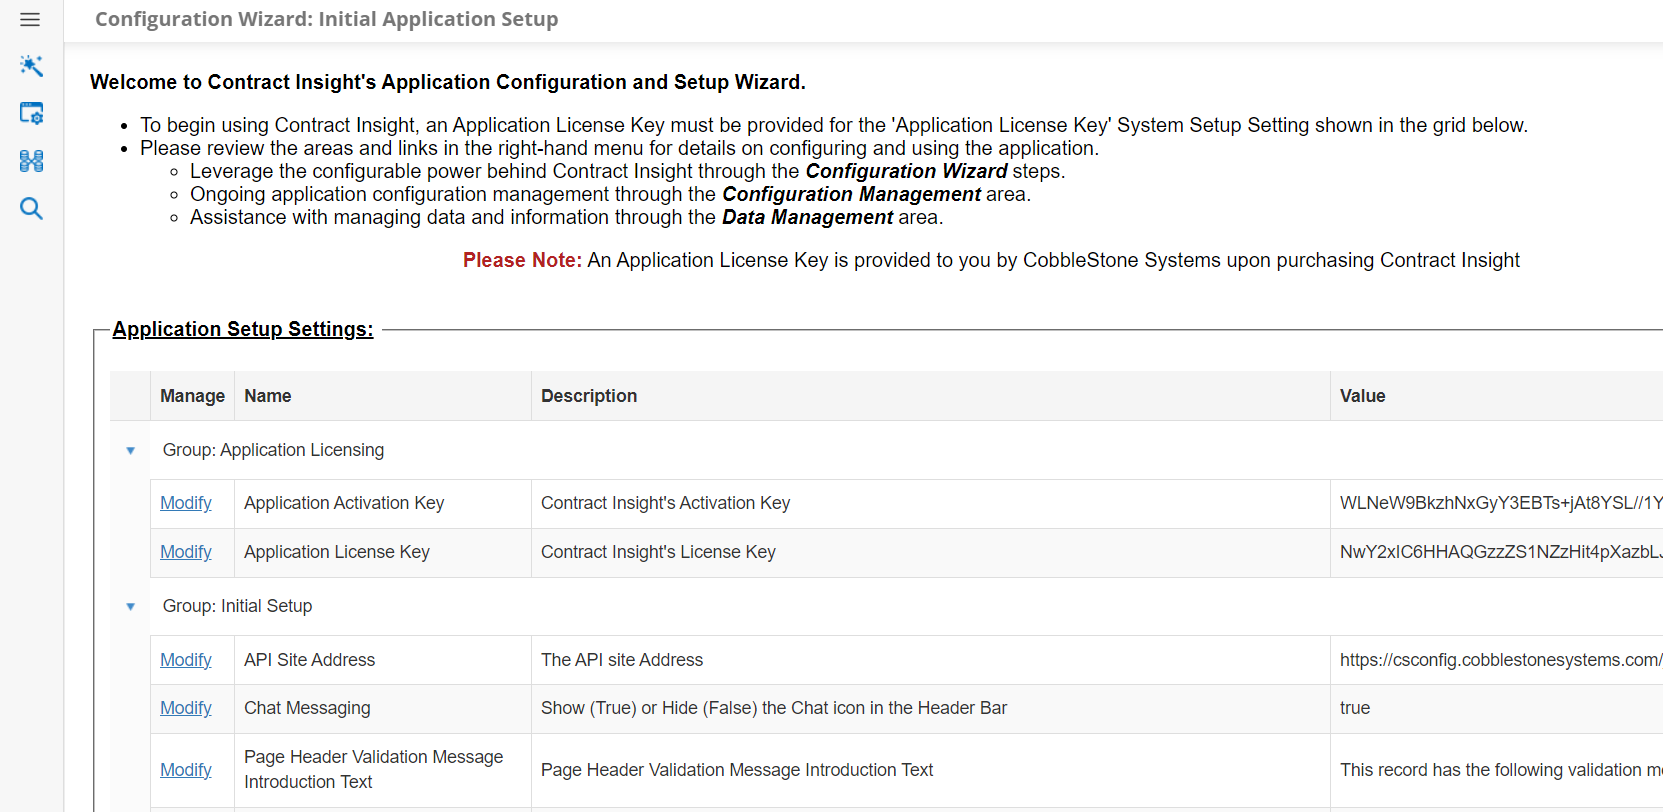
The name, description and value of each application configuration item associated with the selected configuration group will be displayed in the grid (as shown above).
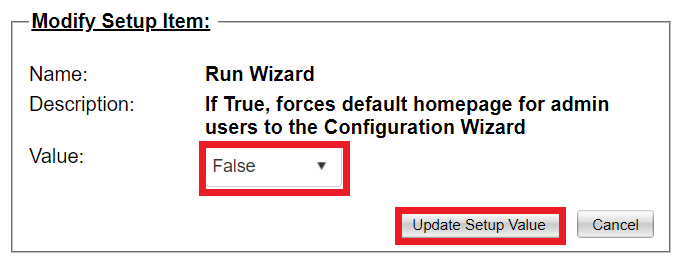
To modify any of the configuration items, click Modify for that item. A prompt will appear ensuring that modification of the selected configuration item was intended.
If OK is selected, the Modify Setup Item window will display. If Cancel is selected, the modification will be aborted.
Modify Setup Item is where the value of the setup item can be changed. The name and description of the setup item will be shown, along with its current value. Modify the value as needed. Click Update Setup Value to finalize the modification. Click Cancel to abort the modification.
Application Setup Settings
Group: Application Licensing
Application Activation Key: Contract Insight's Activation Key - provided by CobbleStone® Software upon purchasing Contract Insight.
Application License Key: Contract Insight's License Key - provided by CobbleStone® Software upon purchasing Contract Insight.
NOTE: System Admins will see an Expired License Warning when the Application License Key is set to expire within 30 days.
Group: Initial Setup
Chat Messaging: Show or Hide the Chat Icon in the Menu Bar.
Page Header Validation Message Intro Text: Set the page header validation message introduction text.
Run Wizard: If set to True, the default homepage for Admin users is the Configuration Wizard.
Session Timeout in Minutes: Employee session timeout length (in minutes). The default is 60 minutes. One minute before the expiration, a timer displays on screen allowing the session to continue or, if nothing is clicked, expire.
Show CobbleStone® New Alerts: Set the URL to CobbleStone® News to show CobbleStone® News and Updates. Set it to blank to disable it. Set it to a 'dummy' URL to use only your organization's newsletters. If disabling the functionality, refresh your web browser and the top menu icon will be gone.
Show Work Spaces: Show or Hide the Work Space Menu in the Menu Bar. Only hide it if not using additional Work Spaces.
Site Address Monitoring: Enable or disable the site address to be monitored and updated based upon the URL used to access the site.
Website Address: Store's the application's website address. This is set during the initial startup of the application.
Group: Task Management
Allow Continuous Escalations (Escalations on Escalated Tasks): Enable or disable additional escalations for already escalated tasks.
Allow for File Links in Task Email Alerts: Enable or disable links to files from showing on task email alerts.
Continuous Escalations - Escalate after days: Specify the number of days after the end date of escalated tasks to escalate again.
Single Threaded Hierarchical Workflows: Set Workflow Manager to handle workflow tasks in a single threaded hierarchical structure.
License Overview
In addition to the initial setup settings, this page provides a detailed breakdown of the Licensing Information for Contract Insight.
.png)
License Key:
Displays the Status of the License Key (Validated or Invalid) as well as the type of system license (Concurrent or Named users).
User Licenses:
Displays the number of active users as well as the max number of users licensed for Contract Insight.
Note: For Legacy/Traditional Licenses, this section will only show total users due to there being no user levels.
Additional Options:
Displays any/all additionally licensed options for Contract Insight such as Gateways & Portals, Modules, Add-On Components, or Connector Licenses.
To watch more on these configuration areas, watch the video below.
Manage Main Menu: Work Spaces
Manage Main Menu: Work Spaces
System Admins can customize main menu views and assign them to groups of users via Work Spaces. Work Spaces allow System Admins to show and hide specific menu items from specific users to allow greater security and ease of use for users. Admins can create new dropdown lists, edit folder and link names, and create new internal/external links. User permissions still impact menu items; if a menu item is assigned, the permissions applied can impact use/availability. All users have access to the Core Application Work Space unless unassigned by a System Admin.
Accessing Work Space Configuration
1.To access and configure Work Spaces, log in as a System Admin.
2.Navigate to Manage/Setup - Application Configuration - Manage Main Menu. 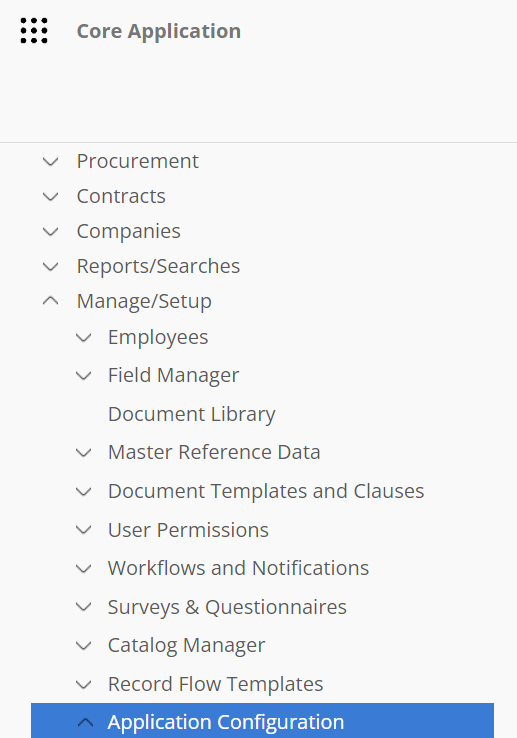
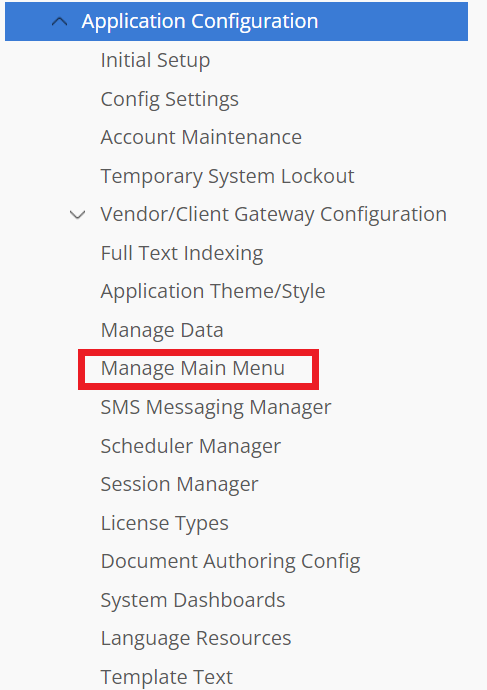
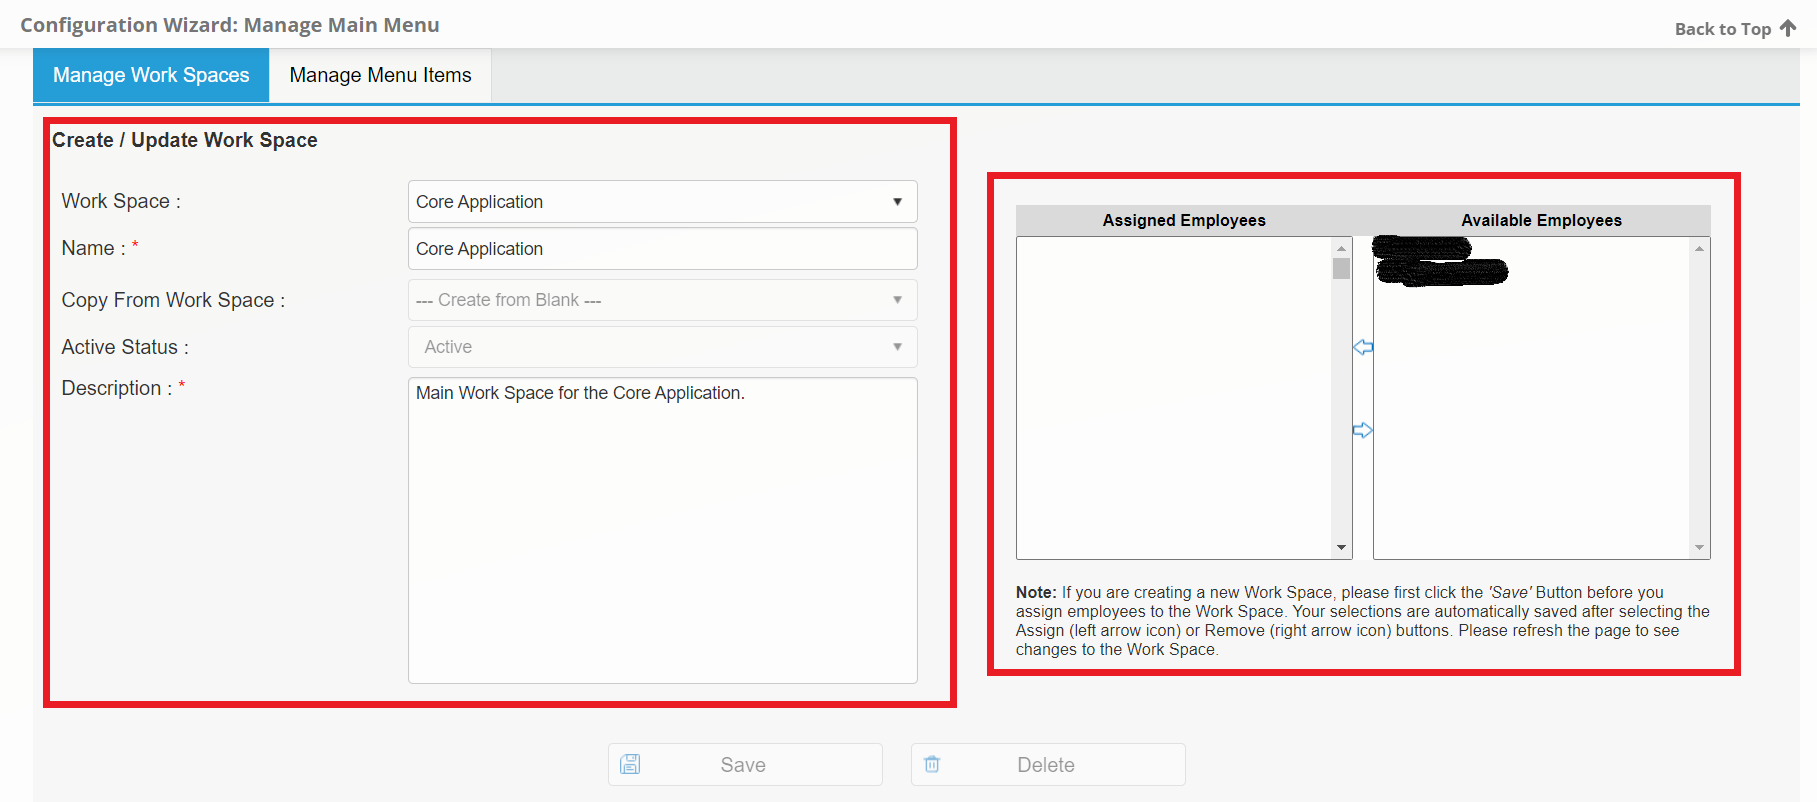
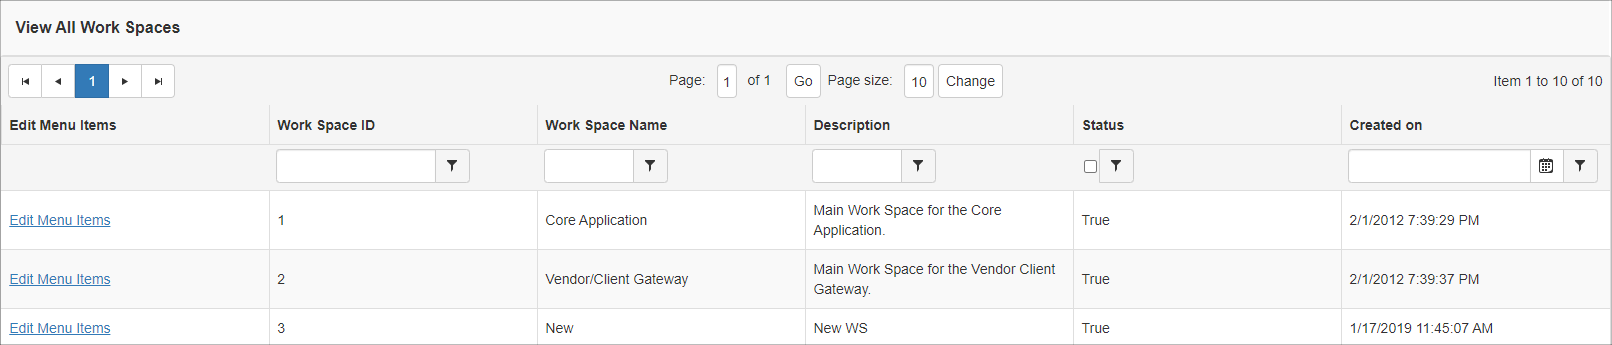
The Configuration Manager: Manage Main Menu screen displays. On this screen, an admin user can Modify the Core Application (Default) work space, modify any work spaces already created, assign users to existing work spaces, and create new work spaces.
Creating and Editing Work Spaces
1.Click Create New Work Space from the Work Space pick-list.
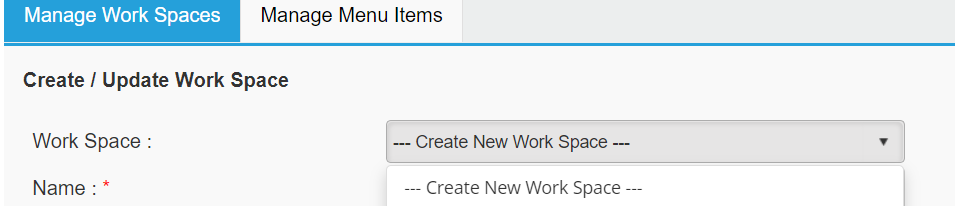
2.Enter a short, descriptive title into the Name field.

3.Creating a new Work Space gives you the option to Create from Blank or Copy From Work Space already created.
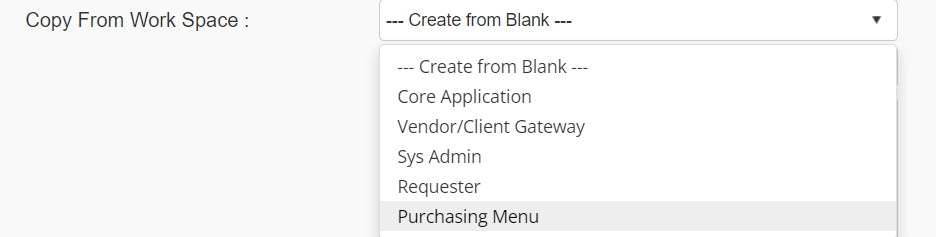
Note: If creating from a blank work space, no menu items populate. Best practice is to copy from an existing work space and then hide whichever menu items you desire.
4. Enable the work space by setting the Active Status to Active.

5. When done making changes, click Save at the bottom of the area.

Note: The core application work space cannot be deleted, select the work space from the drop down and hit the delete button.
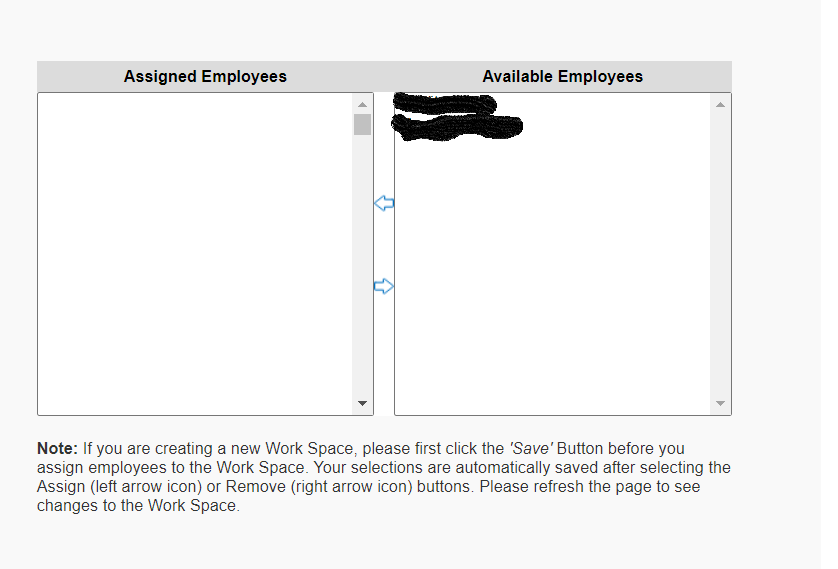
6. Once saved, assign the desired employee(s) to the work space. Select the Employee Name(s) from the list of Available Employees and click the left-facing green arrow to assign the employee. To remove an assigned employee, select the Employee Name(s) from the list of Assigned Employees and click the right-facing arrow.
7. To Edit the menu items for the work space created, click Edit Menu Items for the appropriate line item at the bottom of the screen.
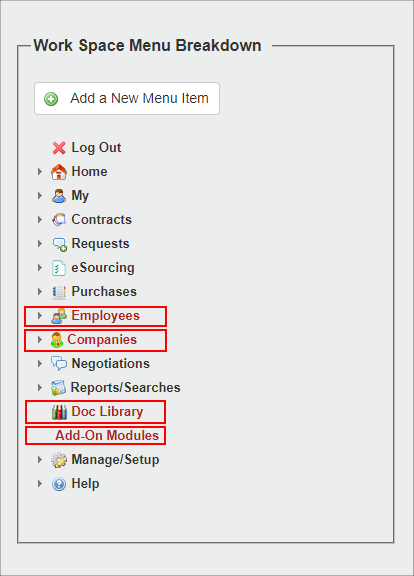
8. The Manage Menu Items tab displays. The Work Space Menu Breakdown shows the main menu items.
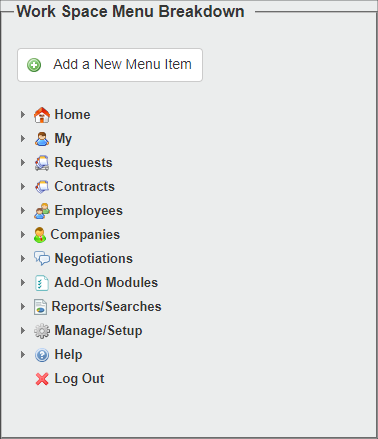
9. Edit the main menu item text, hide or add additional main menu items. Any items that are colored RED are hidden. By default, all items will show thus, none will be marked Red.
10. To Hide/display an item or make edits to the item text, select the item from the main menu breakdown. Expand the menu item to include sub-menu items by clicking the carat next to the Menu Item Name to modify its sub-menu items.
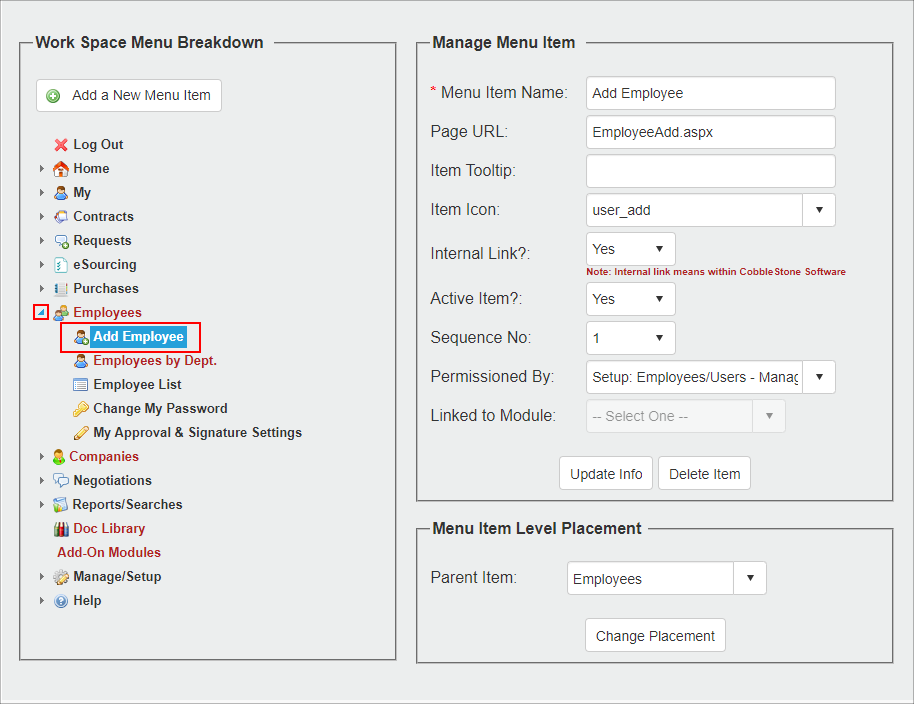
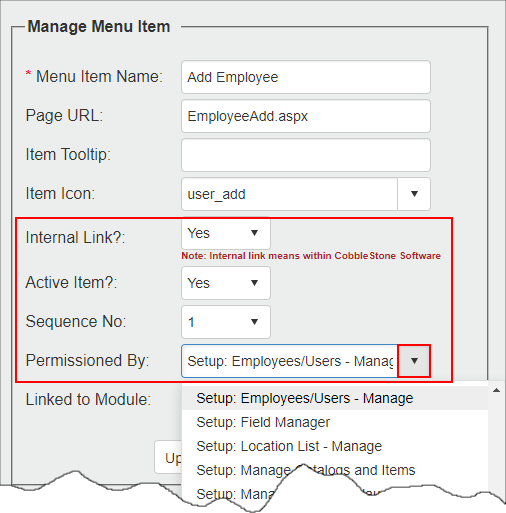
11. On this page an admin user can alter the Menu Item Name, establish a mouse-over tool-tip, choose an Item Icon (or no icon), Make the item Active (or not), modify the Sequence Number (where it displays on the top menu), and set the menu item to be Permissioned By a specific system, custom permission, or no permission. The menu item can be moved to a completely different menu header, Parent Item, if needed.
12. If Managing a Menu Item, be sure to click Update Info. If altering the Parent Item, be sure to click Change Placement.
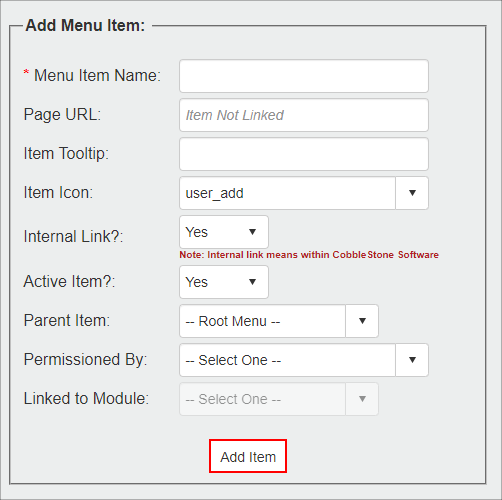
13. If creating a new menu item, specify if the URL is an internal link, (In case you want to pin a report on the menu or another Contract Insight link, or if it is an external link (If you wanted to pin a link to an external web site). Then provide the Page URL as necessary. Provide no URL if creating a folder for menu items. Be sure to click Add Item for when done configuring the new menu item.
14. When done making menu changes, click Refresh Menu.

Through this area, the top menu may be changed by creating folders (dropdowns), editing names, as well as creating internal/external links.
Manage Main Menu: Core Application Menu(s)
App Config: Manage Main Menu
Contract Insight allows authorized and licensed users with Administrative permissions to customize the top navigation menu to display icons as well as alter the menu names, accessibility, and location of the menus.
Accessing the Menus
1. To customize the items of the top navigation menu, go to Manage/Setup > Application Configuration> Manage Main Menu.
.png)
.png)
2. The Configuration Wizard: Manage Main Menu screen displays. Click Manage Menu Items.
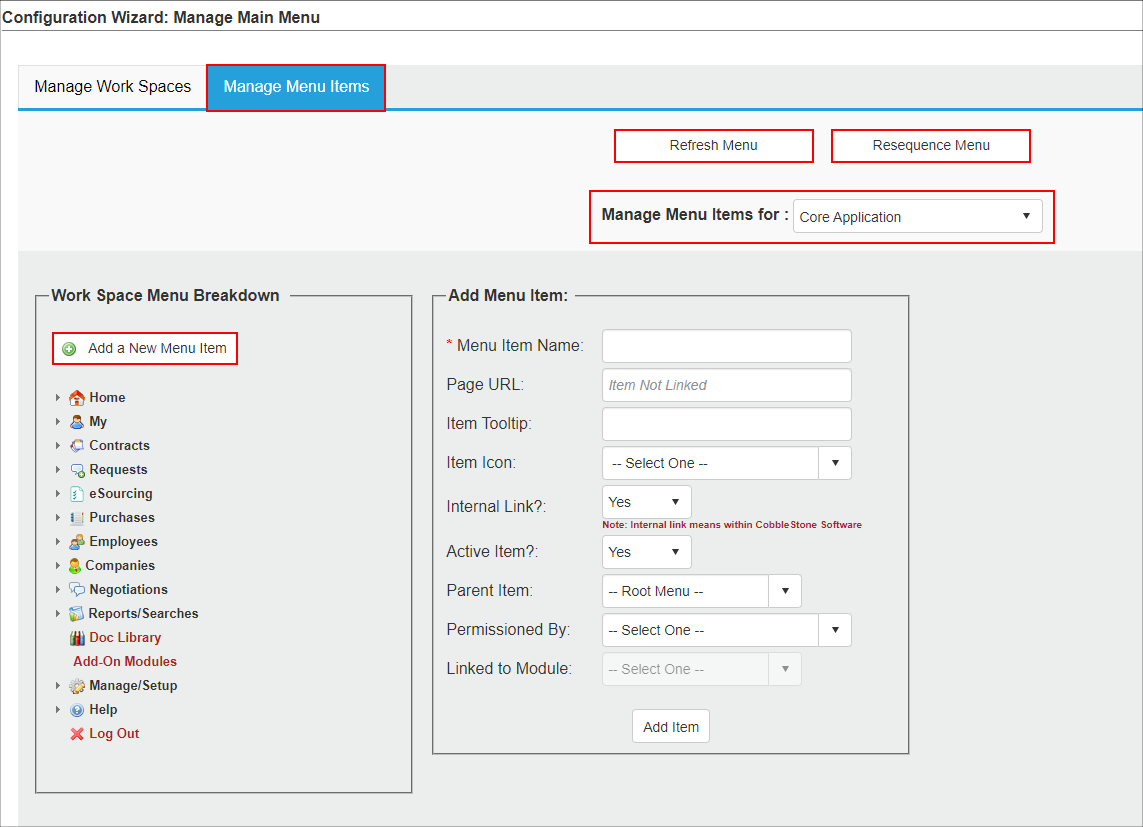
3. Select the desired work space menu via the Manage Menu Items for pick-list.
The Menu Editor
There are four main sections of the screen:
1. Main Menu Breakdown
- Click the carat to the left of the menu title to display a list of sub-menus that are contained within.
- Select the menu or sub-menu name to show the menu item’s details in the Manage Menu Item Info section of the screen.
- Click Add Menu Item to add a new menu item.
2. Manage Menu Item Info
- Item Text: The menu’s name as it will appear in the navigation menu.
- Page URL: Where the page is located (if this is a system page, the ‘Page URL’ is not customization).
- Item Icon: Select an icon to be displayed to the left of the menu name in the navigation menu (optional).
- Active Item?: Determines whether the menu item will appear in the menu.
- Sequence No.: The order in which the menus will appear in each grouping.
- Permissioned By: For system-managed items only.
- Linked to Module: For system-managed items only.
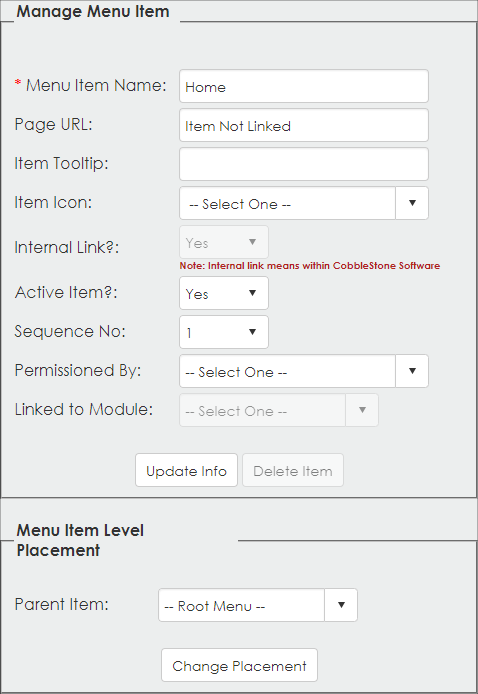
Click Update Info to save the changes you have made.
3. Manage Menu Item Placement
Parent Item: Shows the menu item directly above the selected item in the main menu hierarchy (i.e. My Dashboards is contained in the Home main menu item).
- All menu items can have their parent item customized/changed to any other menu item in the main menu hierarchy by selecting the name in the drop down box and clicking Change Placement.
- When a menu item has it's parent item modified, its sequence number will automatically be updated to the last number in the sequence list for the new parent item.
Upload a New Icon
Allows users to upload personalized icons to be selected in the Item Icon drop down in the Manage Menu Item Info section of the page. (see the Image Library Wiki page for more information)
Note: Uploaded icons should be 16 pixels x 16 pixels (the default size of icons).
Refresh Menu/Resequence the Menu
- Once any changes have been made to the menu, be sure to click Refresh Menu at the top of the Manage Main Menu screen.
- To re-sequence the order in which the menus display, click Resequence Menu at the top of the Manage Main Menu screen.
To watch more on Main Menu/Workspace configuration, please watch the following video(s).
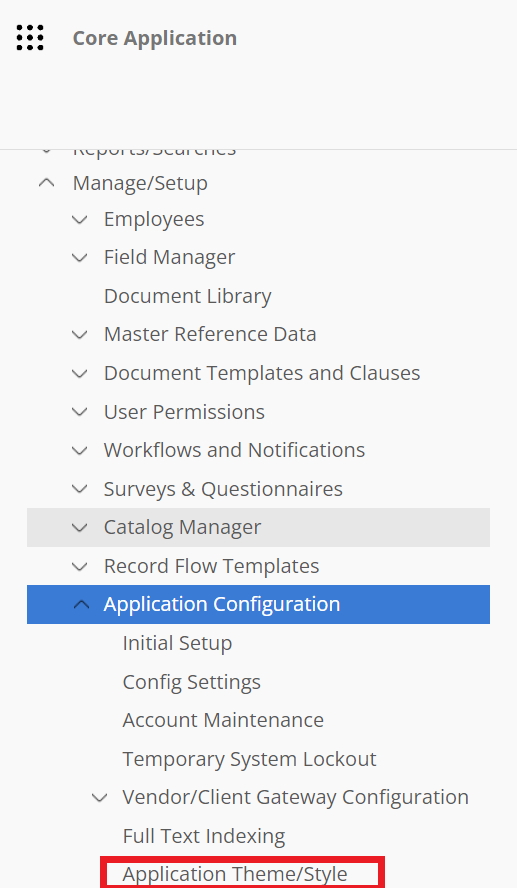
Application Theme and Style
Application Theme and Style
To adjust the Theme/Style of your Contract Insight system, navigate to:
Manage/Setup > Application Configuration > Application Theme/Style
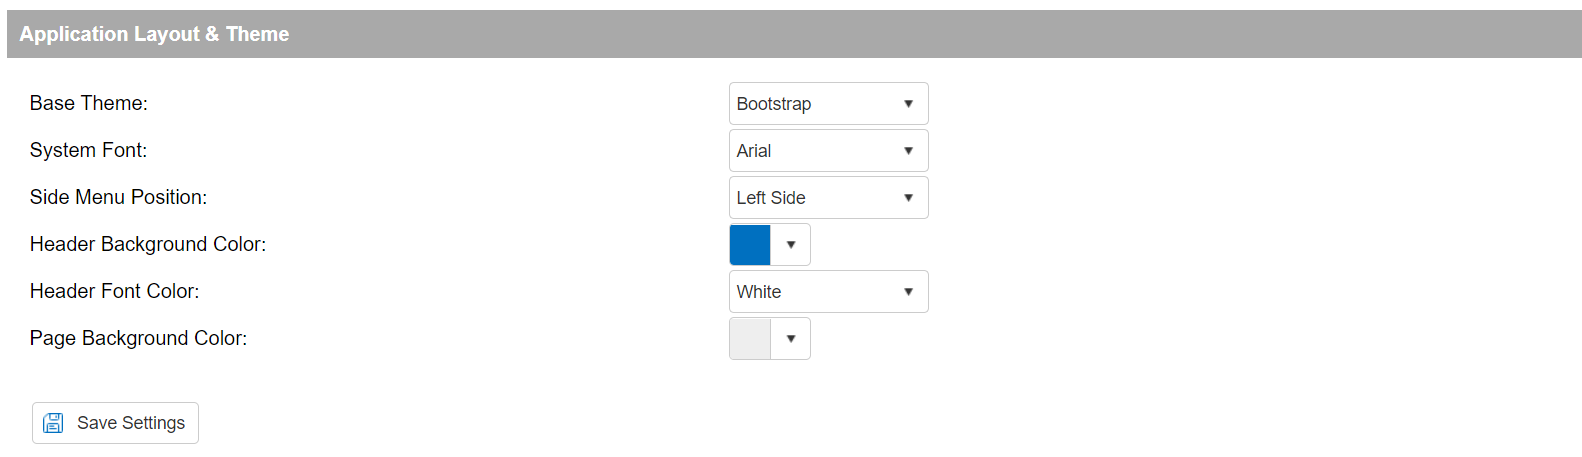
The below screenshots detail the available Theme/Style settings, and please note that these are the default settings. Any adjustments to the Theme/Style settings are global, and will affect all Users of your system.
Note: Changes will also be reflected in the Document Collaboration & E-Signature (optional add-on module) and the Vendor/Client Collaboration Gateway (optional add-on module) to ensure a unified look between the core application and these modules.
Application Layout & Theme
Base Theme: This setting adjusts the overall theme of your Contract Insight system. Adjusting this setting will provide the greatest overall change.
Base Font: This changes the font used throughout the system.
Side Menu Position: This changes whether the Side Menu appears on the left or right side throughout the system.
Header Font Color: This setting changes the background color used throughout Contract Insight
Page Background Color: This changes the Background Color used throughout the system.
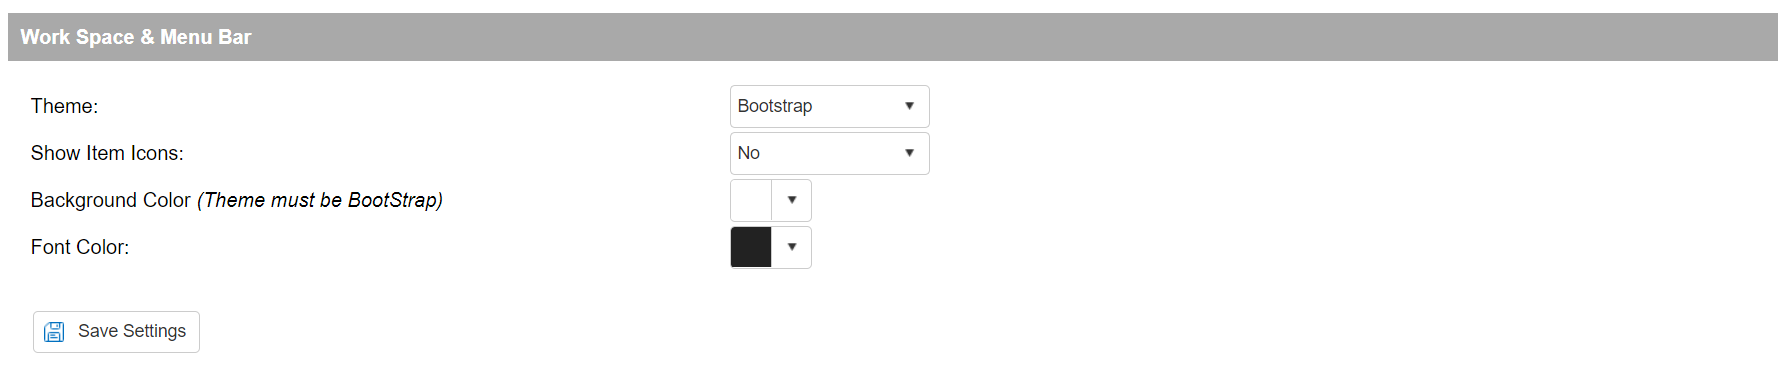
Work Space and Menu Bar
Theme: This will adjust the Theme used for the Top Menu and can be set to be different from your Base Theme setting.
Show Item Icons: This setting determines whether or not Item Icons are shown.
Background Color: This setting establishes the Menu Bar's background color. This works only if using the Bootstrap theme.
Font Color: This setting determines the Font Color used in the Top Menu.
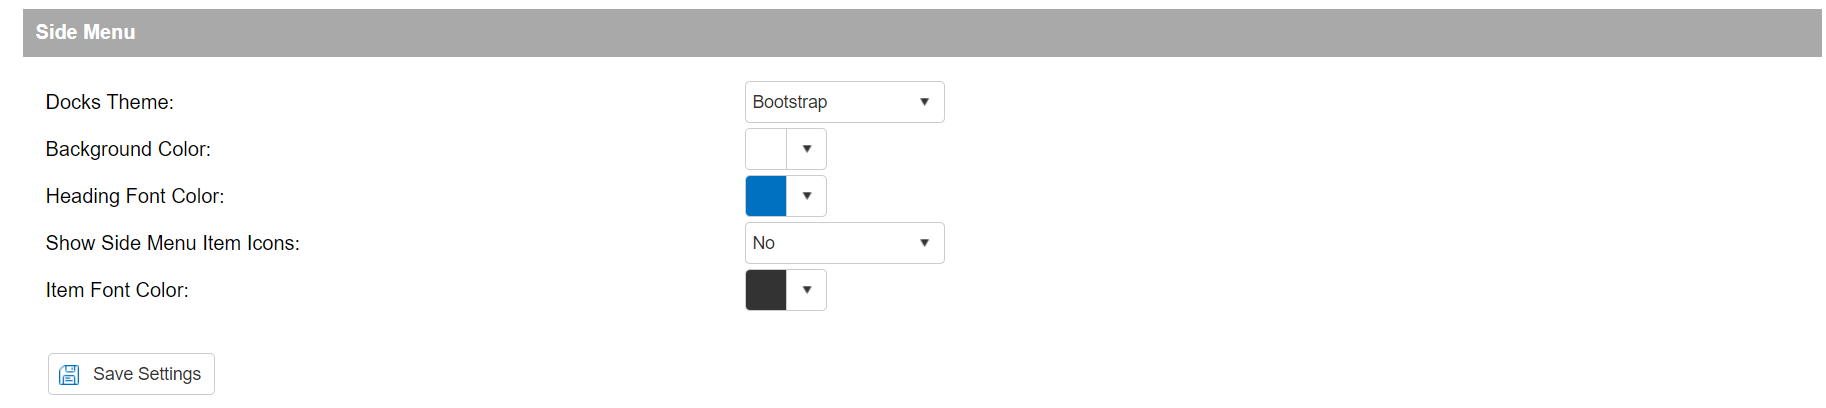
Side Menu
Docks Theme: This will adjust the Theme used for the Side Menu and can be set to be different from your Base Theme setting.
Background Color: This setting establishes the Side Menu's background color.
Heading Font Size: This setting determines the Font Size used for Side Menu Headers/Categories.
Show Menu Item Icons: This setting determines whether or not Icons are shown for the Side Menu Items.
Item Font Color: This setting determines the Font Color used for Side Menu Items.
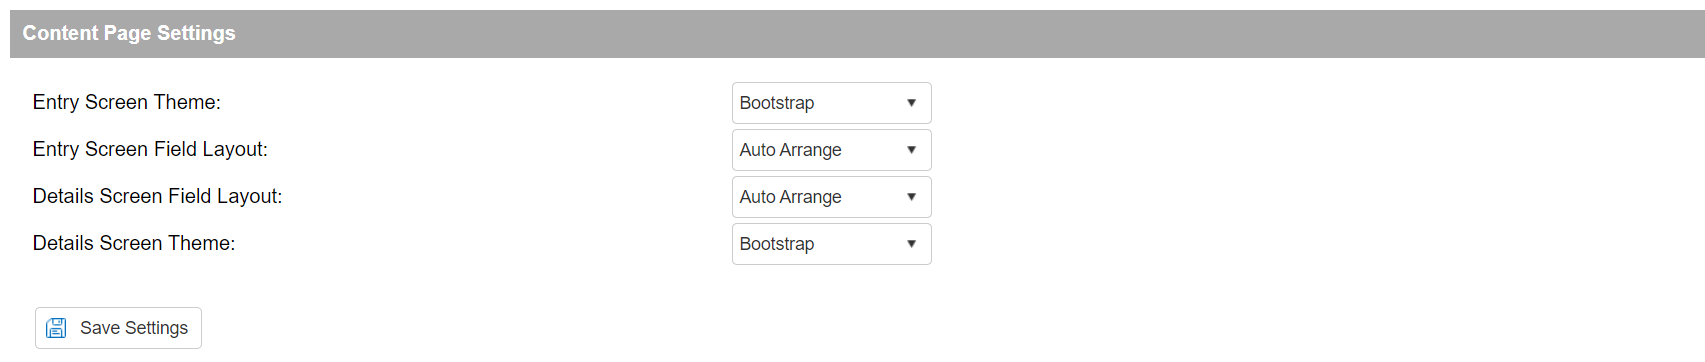
Content Page Settings
Entry Screen Theme: This adjusts the Theme used only on Entry Screens throughout your system, and can be set to be different from your Base Theme setting.
Entry Screen Field Layout: This adjusts how Fields are organized on your Entry Screens.
Details Screen Field Layout: This adjusts how Fields are organized on your Details Screens.
Details Screen Theme: This adjusts the Theme used only on Details Screens throughout your system, and can be set to be different from your Base Theme setting and from your Entry Screen Theme setting.
Footer
Font Color: This setting determines the Font Color used for the footer.

Reset to CobbleStone® Default Theme
Reset to CobbleStone® Default Theme: Clicking the Reset to CobbleStone® Default Theme button removes all configured settings from the system and restores them to the CobbleStone® default.

To watch more on Application Theme/Style, please watch the following video.