COBBLESTONE SOFTWARE
Contract Insight — User Guide
04. Employee List
03. Admin User Manual › Employee/User Management › 04. Employee List
Note: Each procedure in this guide begins at the Contract Insight homepage, so any section can be followed on its own. Custom fields are configurable, so the exact field list on a contract category record may vary between environments.
1. Overview
Directory > Employees is the full list of employee/user accounts — 68 records in this QA environment, shown 50 per page by default across 2 pages. Each row offers Manage, Preview, Attachments, and Add to your favorites actions, and every column (Last Name, First Name, Email Address, Department Name, License Level, Active User, Username, Sys Admin, Employee ID, Date Entered) can be filtered from the funnel icon in its header. Above the grid are a saved-view selector ("All Employees" by default), a Fields chooser for visible columns, an Advanced filter, and a Search box, along with Print, Export, and + Add buttons in the page header.
2. Key Elements
- Directory > Employees lists every employee/user account with row-level actions: Manage (open the record to edit it), Preview (eye icon — a read-only side panel), Attachments (paperclip icon), and Add to your favorites (star icon).
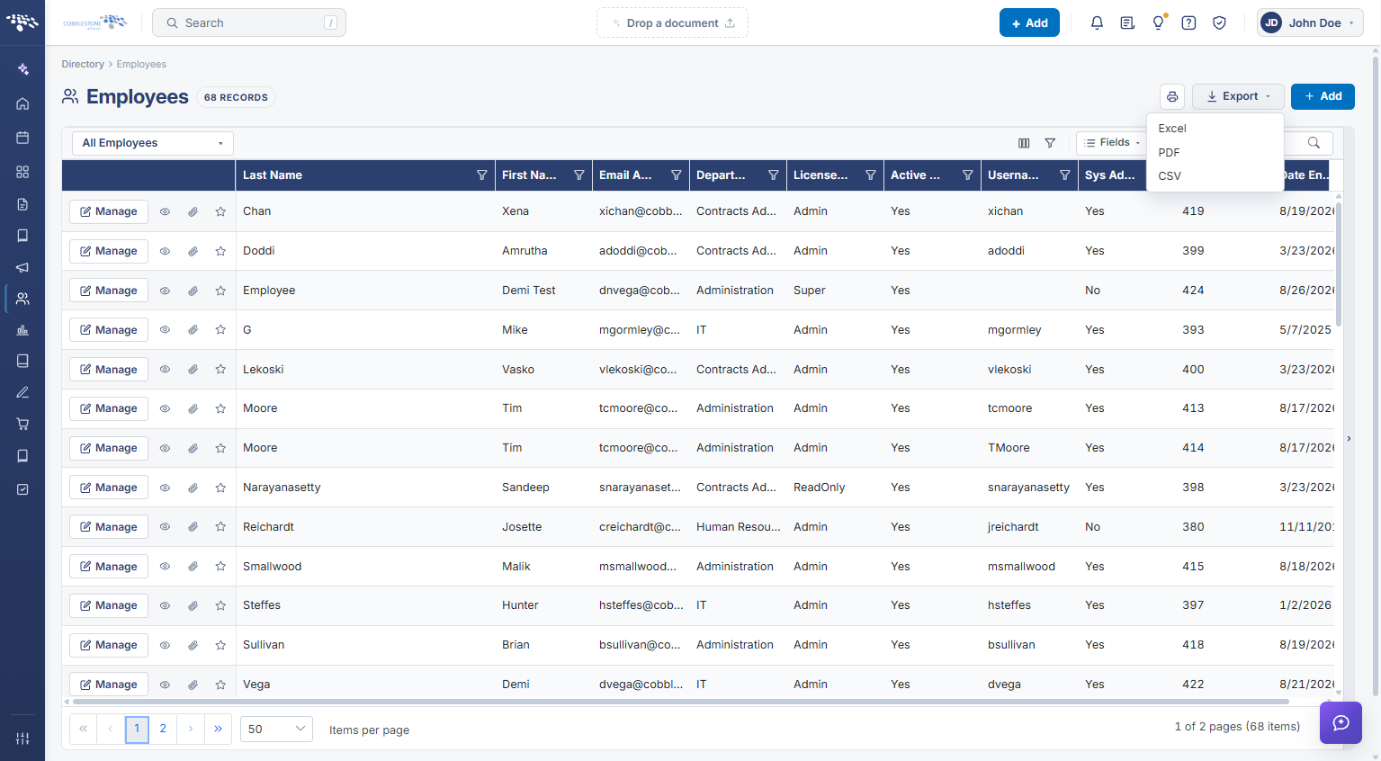
- The page header shows a live record count (for example, "68 RECORDS") next to the Print, Export (Excel, PDF, CSV), and + Add buttons.
- The grid toolbar holds the view selector ("All Employees" by default), the Fields chooser (columns icon), the Advanced filter (funnel icon), and the Search box. The Fields ▾ toggle inside the Search box switches between Search fields and Search attachments.
- Every column header has its own funnel icon for a quick single-column filter. A Clear link appears in the toolbar whenever a search, filter, or sort is active.
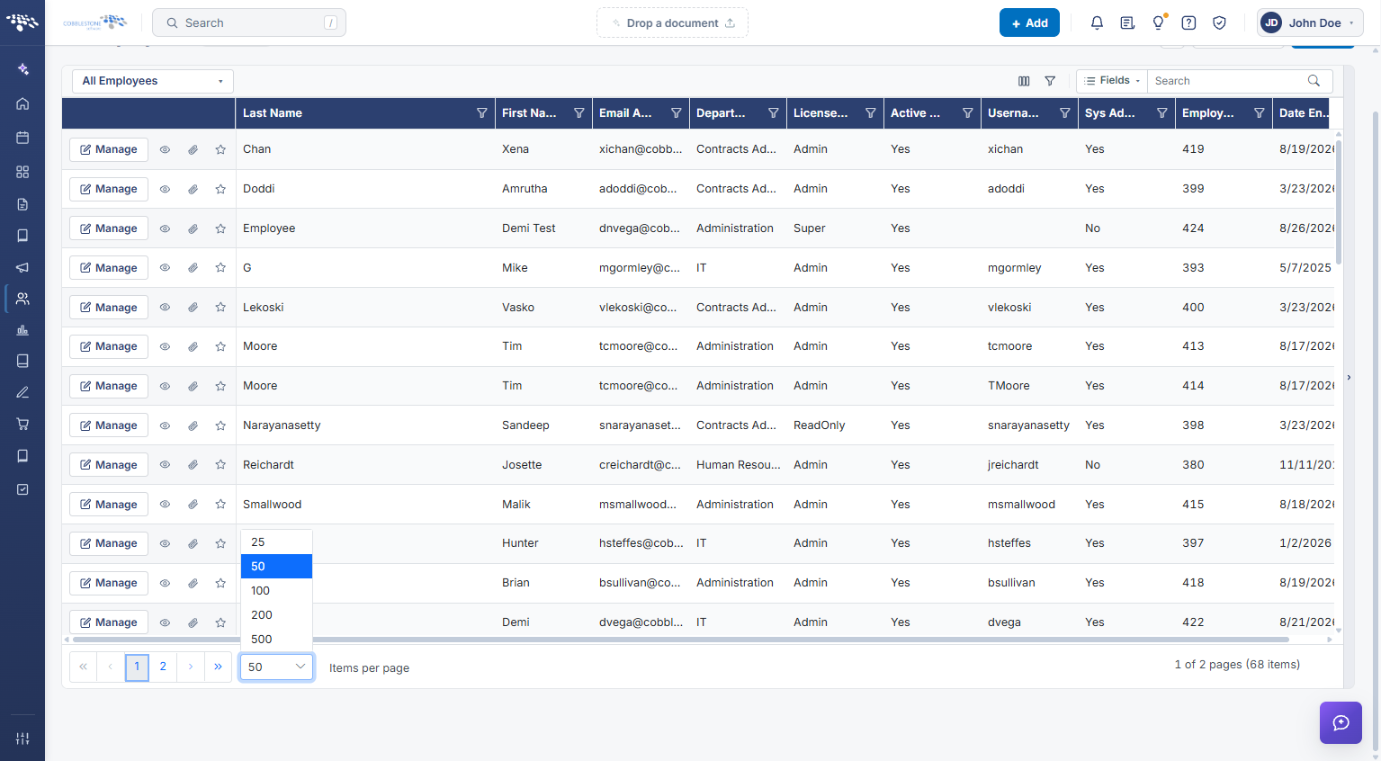
- Pagination controls at the bottom show the total pages and item count, let you move between pages, and set Items per page (25, 50, 100, 200, or 500).
- The + Add button is the starting point for the Add Employee flow described in "02. Adding an Employee/User."
3. Opening the Employee List
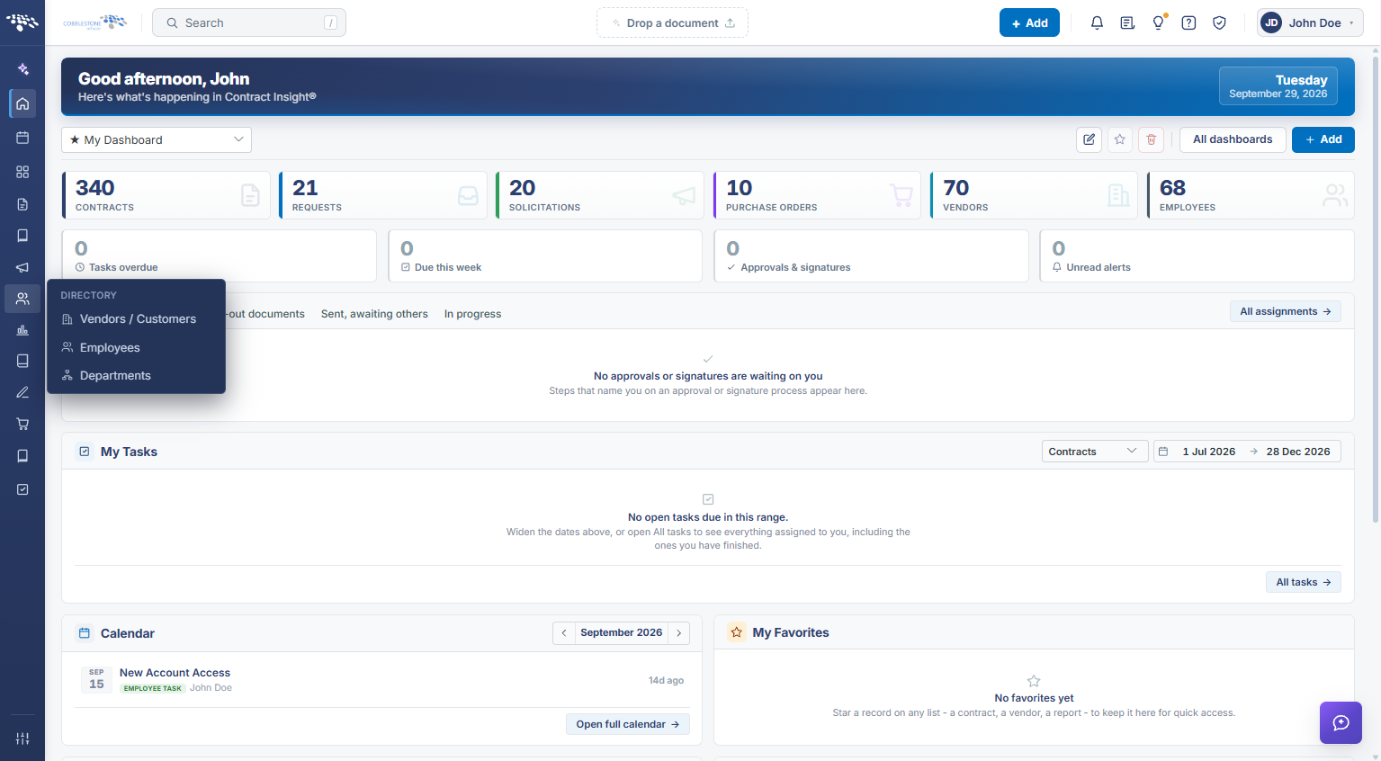
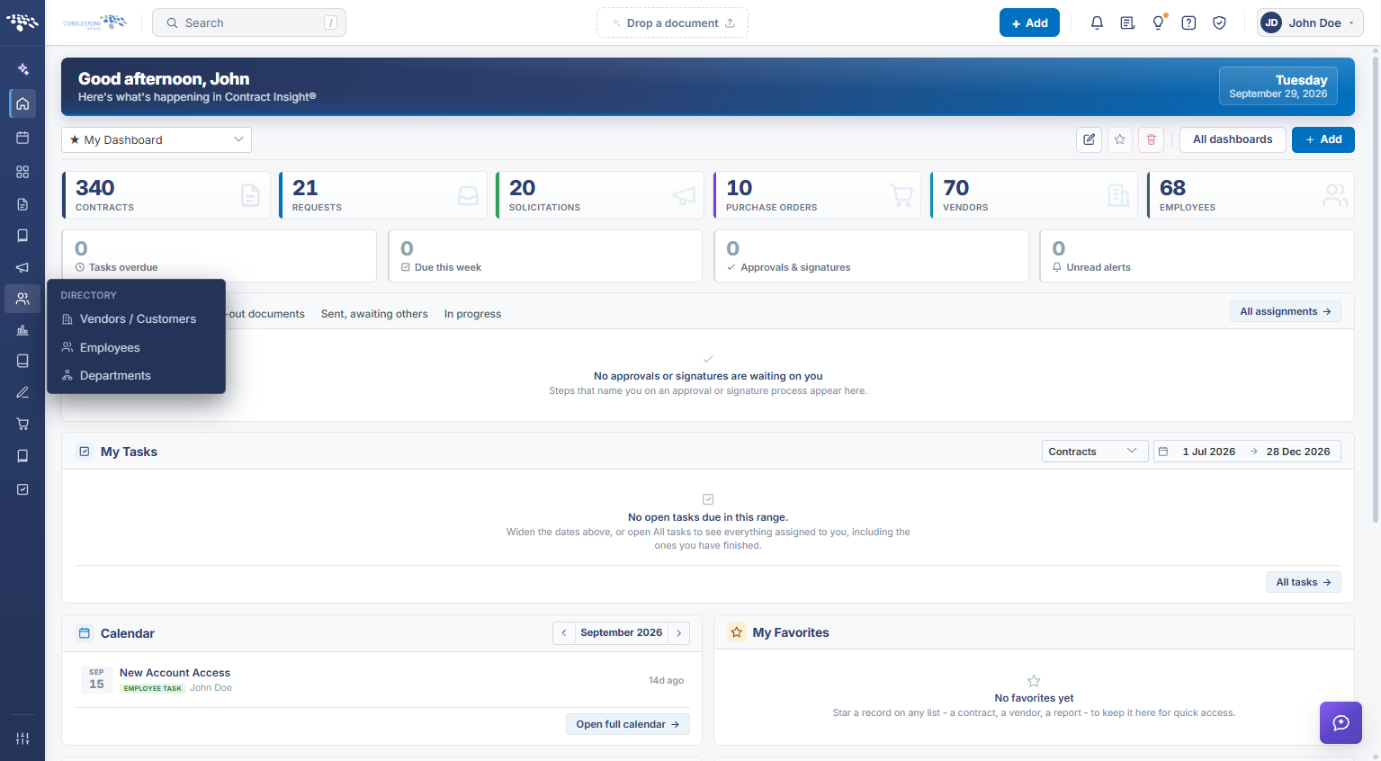
The Employee List is reached from the Directory icon in the left navigation bar, which also holds Vendors / Customers and Departments.
- From the Contract Insight homepage, click the Directory icon (people icon) in the left navigation bar.
- In the Directory flyout, click Employees.
- The Employees list opens in the All Employees view.
4. Searching the List
The Search box at the top right of the grid runs a free-text search against the current view. The record count in the page header and the pager update to reflect only the matching records.
- Click in the Search box above the grid.
- (Optional) Click Fields ▾ and choose Search fields (the default) to search record data, or Search attachments to search files attached to employee records.
- Type a search term — for example, a last name — and press Enter.
- To return to the full list, click Clear in the toolbar or the X in the Search box.
5. Filtering by a Single Column
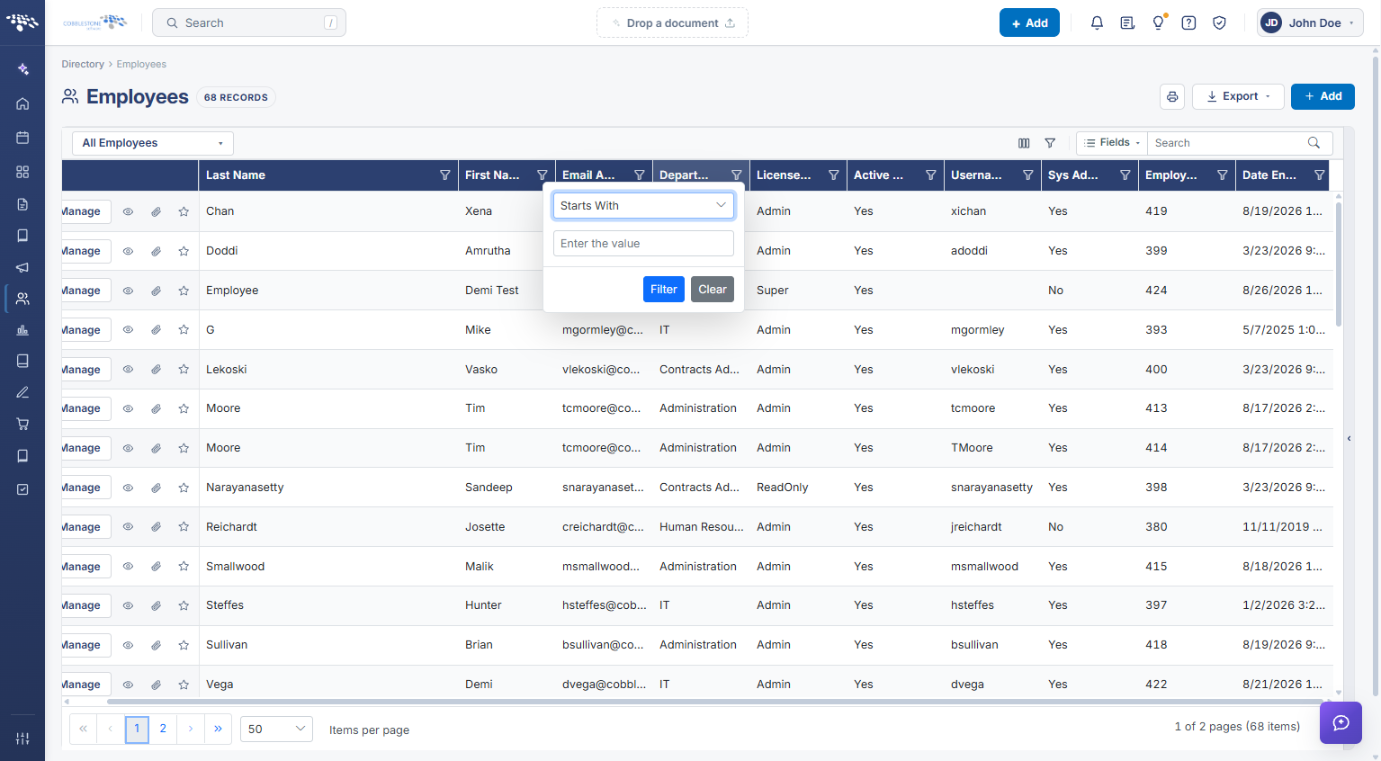
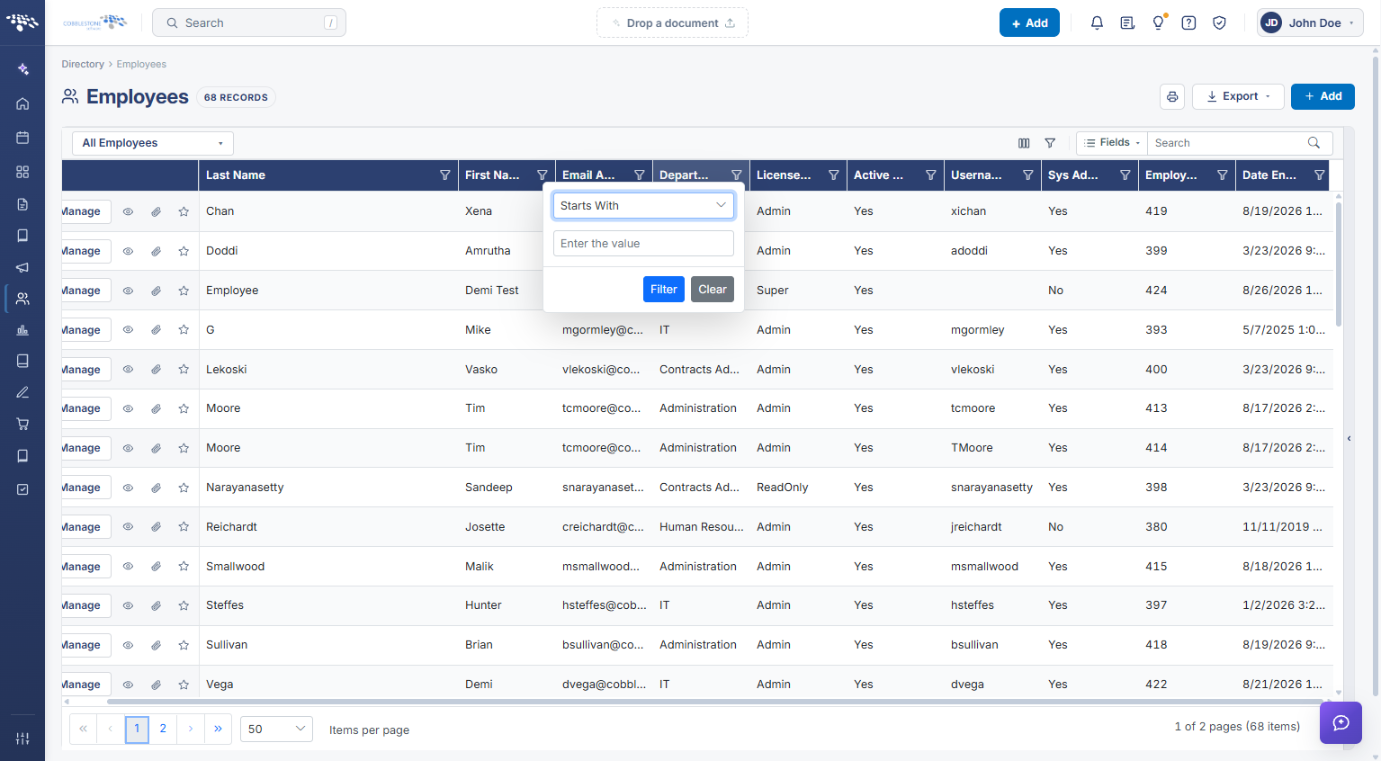
Each column header has a funnel icon that opens a quick filter for just that column. Column filters can be combined with each other and with a search.
- Click the funnel icon in the header of the column you want to filter (for example, Department Name).
- Choose an operator from the first drop-down (Starts With is the default).
- Type a value in Enter the value, or pick one of the suggested matches.
- Click Filter. To remove the filter, reopen the funnel and click Clear, or click Clear in the grid toolbar.
6. Building an Advanced Filter
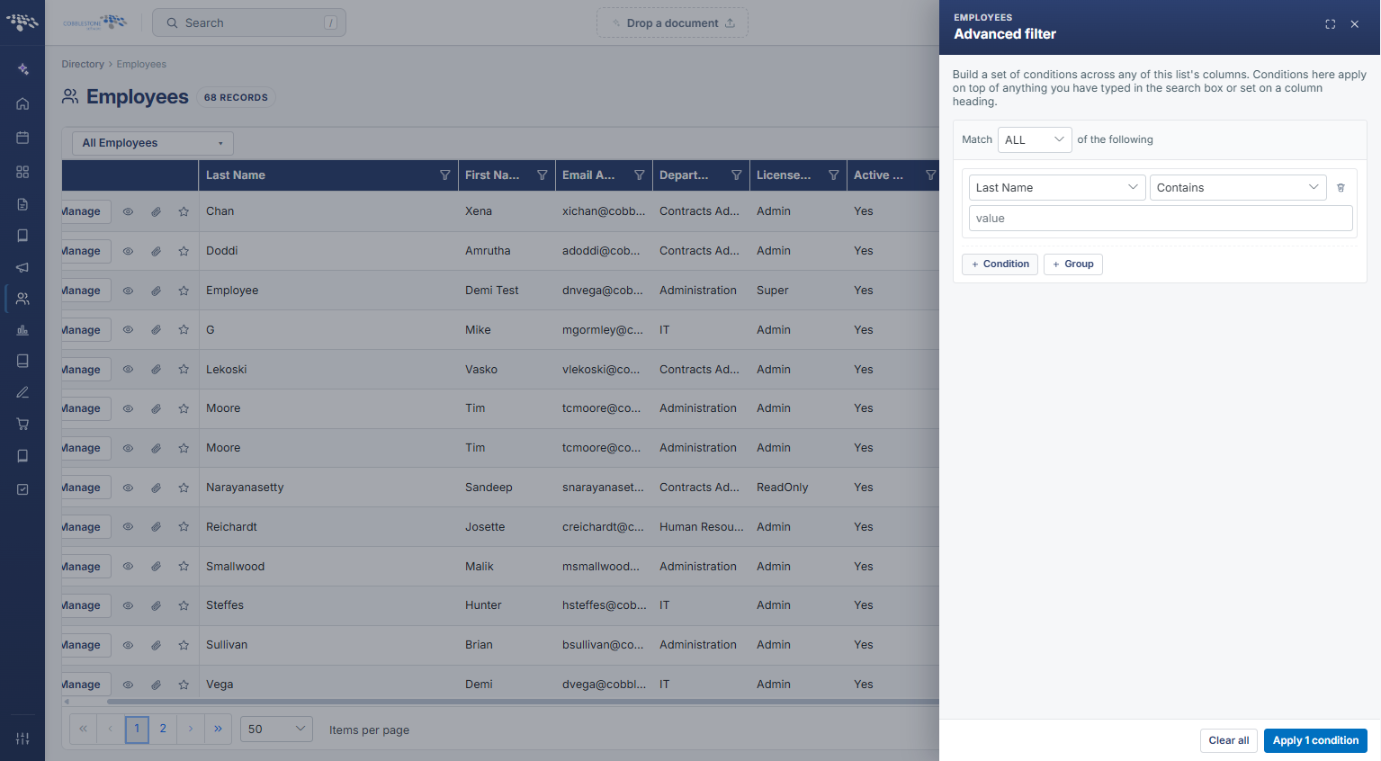
The funnel icon to the left of Fields in the toolbar opens the Advanced filter panel, which builds a set of conditions across any of the list's columns. These conditions apply on top of anything typed in the Search box or set on a column heading.
- Click the Filter on several fields at once (funnel) icon in the grid toolbar.
- Use Match (ALL by default) to set how the conditions combine.
- Click + Condition, then choose a field (for example, Last Name), an operator (for example, Contains), and enter a value. Repeat for each condition, or click + Group to nest a group of conditions.
- Click Apply (the button shows the number of conditions). Click Clear all to remove every condition.
7. Switching Views
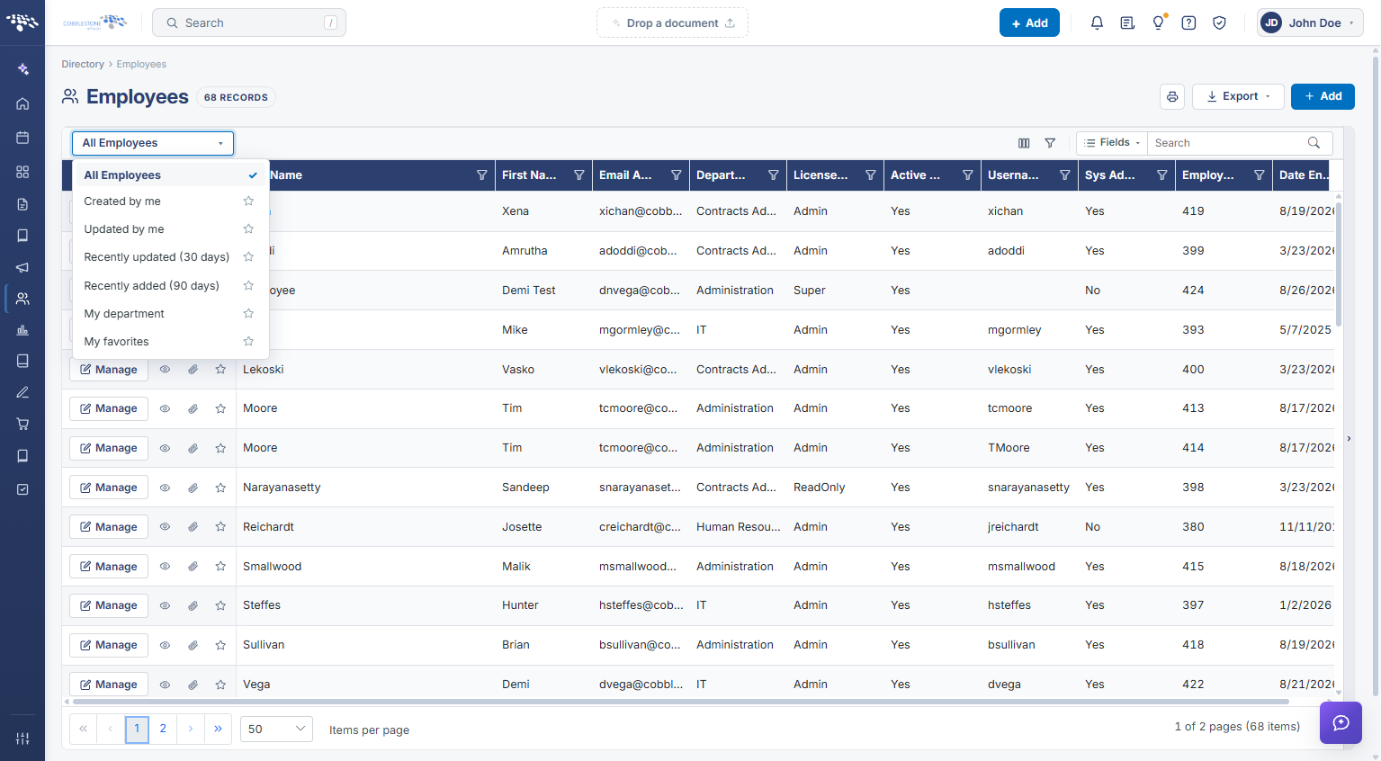
The view selector at the top left of the grid switches between saved views of the employee list. The available views are All Employees, Created by me, Updated by me, Recently updated (30 days), Recently added (90 days), My department, and My favorites.
- Click the view selector (shows All Employees by default).
- Select a view to load it. A check mark shows the current view.
- (Optional) Click the star next to a view to open this view by default each time you visit the list.
8. Choosing Which Columns Display
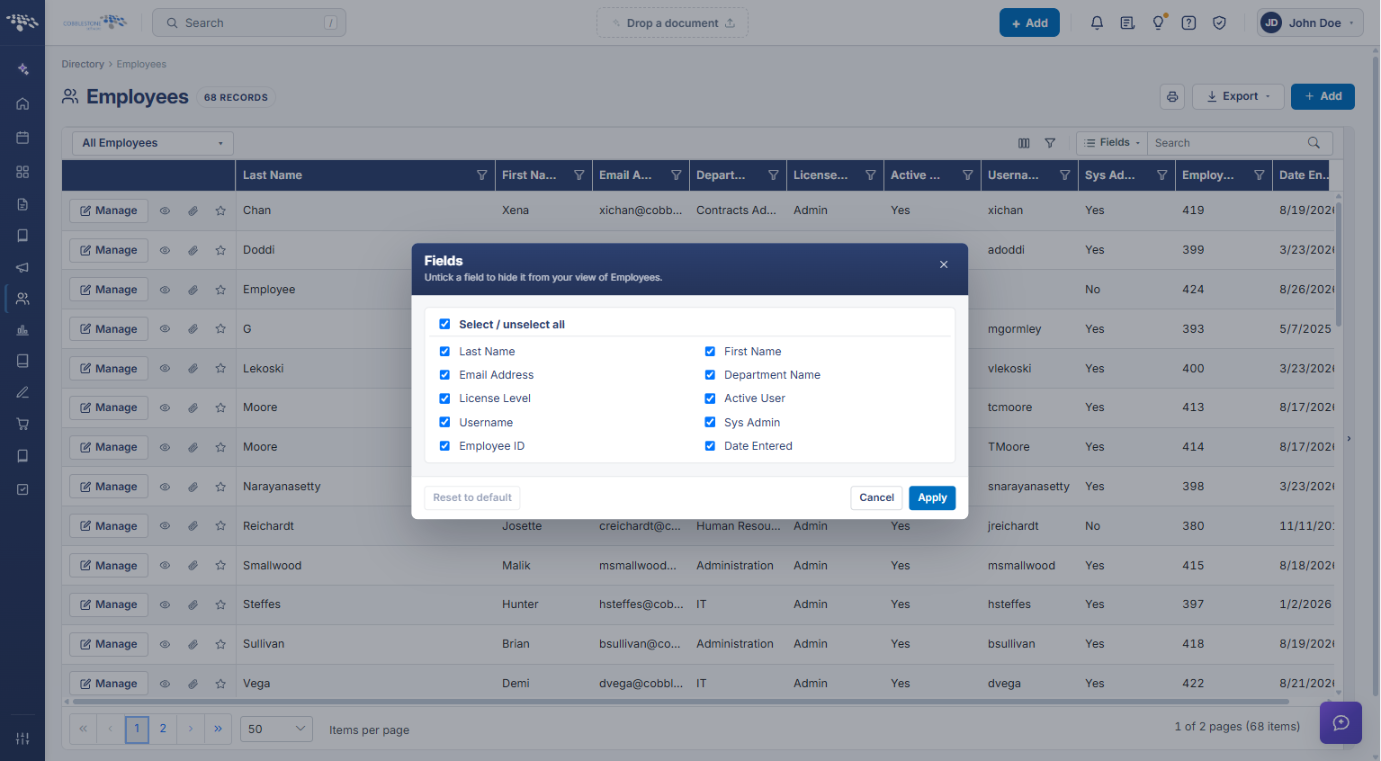
The Fields dialog (columns icon in the grid toolbar) controls which columns appear in your view of the list.
- Click the Choose which fields this list shows (columns) icon in the grid toolbar.
- Untick any field to hide it, or tick it to show it. Use Select / unselect all to toggle every field at once.
- Click Apply to save your changes, Cancel to discard them, or Reset to default to restore the standard columns.
9. Previewing an Employee Record
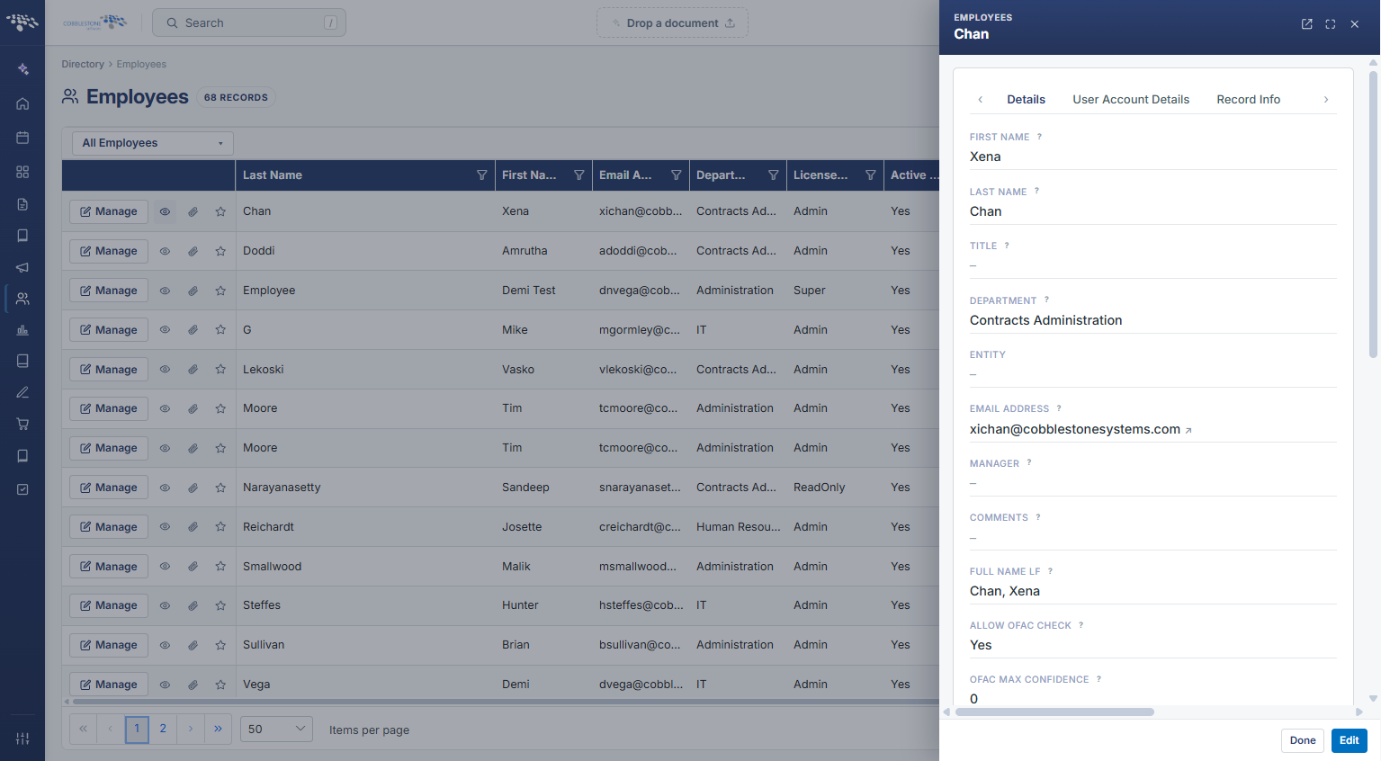
The eye icon on any row opens a read-only Preview panel on the right side of the screen so you can check an employee's details without leaving the list. The panel is organized into tabs — Details, User Account Details, Record Info, and more (use the arrows to scroll through the tabs).
- Click the Preview (eye) icon on the employee's row.
- Review the record's fields, switching tabs as needed.
- Click Edit to edit the record (see "03. Editing Employees/Users"), or Done to close the panel. The icons in the panel's header open the record in a new tab or expand the panel.
10. Paging Through the List
The pager at the bottom of the grid shows the current page, the total number of pages, and the total item count (for example, "1 of 2 pages (68 items)").
- Use the page numbers or the arrow buttons to move to the first, previous, next, or last page.
- To change how many rows display, open the Items per page drop-down and choose 25, 50, 100, 200, or 500.
11. Printing and Exporting the List
The Print and Export buttons in the page header output what the list is currently showing, so apply any search, filters, view, or column choices first.
- Click the Print this list (printer) icon to print the current list.
- Or click Export and choose Excel, PDF, or CSV to download the list in that format.
12. Quick Reference Summary
| Task | How to Complete It |
|---|---|
| Open the Employee List | Directory icon → Employees. |
| Search for an employee | Type in the grid Search box → Enter (use Fields ▾ to search attachments instead). |
| Filter a single column | Column header funnel icon → operator + value → Filter. |
| Filter on several fields at once | Toolbar funnel icon → + Condition → Apply. |
| Switch views | View selector (All Employees) → choose a view; star to open it by default. |
| Show or hide columns | Columns icon → tick/untick fields → Apply. |
| Preview an employee | Row eye icon → Done or Edit. |
| Edit an employee | Row Manage button (see "03. Editing Employees/Users"). |
| Change rows per page | Pager → Items per page → 25 / 50 / 100 / 200 / 500. |
| Print or export the list | Printer icon, or Export → Excel / PDF / CSV. |
| Clear all searches and filters | Clear in the grid toolbar. |
| Add a new employee | + Add (see "02. Adding an Employee/User"). |